Samsung PS50C530C1W Скачать руководство пользователя страница 24

24

English

Advanced Features

Media Play

MEDIA.P

Enjoy photos, music and/or movie fi les saved on 
a USB Mass Storage Class (MSC) device 


¦

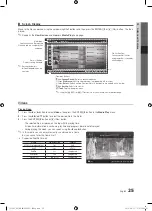
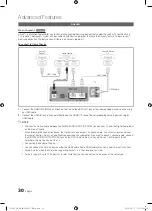
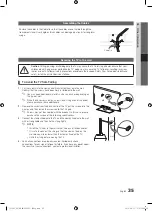
Connecting a USB Device

1. 

Turn on your TV.

2. 

Connect a USB device containing photo, music and/or movie fi les to the

USB (HDD)

 port on the back or side panel of the TV.

3. 

When USB is connected to the TV, popup window appears. Then you can select 

Media Play

.


It might not work properly with unlicenced multimedia files.


Need-to-Know List before using 

Media Play (USB)


x

MTP (Media Transfer Protocol) is not supported.


x

The file system supports FAT16, FAT32 and NTFS.


x

Certain types of USB Digital camera and audio devices may not be compatible with this TV.


x

Media Play only supports USB Mass Storage Class (MSC) devices. MSC is a Mass Storage Class Bulk-Only 
Transport device. Examples of MSC are Thumb drives, Flash Card Readers and USB HDD (USB HUB are not 
supported). Devices should be connected directly to the TV’s USB port. 


x

Before connecting your device to the TV, please back up your files to prevent them from damage or loss of data. 
SAMSUNG is not responsible for any data file damage or data loss.


x

Connect a USB HDD to the dedicated port, 

USB (HDD)

 port.


x

Do not disconnect the USB device while it is loading.


x

The higher the resolution of the image, the longer it takes to display on the screen.


x

The maximum supported JPEG resolution is 15360X8640 pixels.


x

For unsupported or corrupted files, the “Not Supported File Format” message is displayed.


x

If the files are sorted by Basic View, up to 1000 files can be displayed in each folder.


x

MP3 files with DRM that have been downloaded from a non-free site cannot be played. Digital Rights Management 
(DRM) is a technology that supports the creation of content, the distribution and management of the content in an 
integrated and comprehensive way, including the protection of the rights and interests of the content providers, the 
prevention of the illegal copying of contents, as well as managing billings and settlements.


x

If more than 2 PTP devices are connected, you can only use one at a time.


x

If more than two MSC devices are connected, some of them may not be recognized. A USB device that requires high 
power (more than 500mA or 5V) may not be supported.


x

If an over-power warning message is displayed while you are connecting or using a USB device, the device may not 
be recognized or may malfunction.


x

If the TV has been no input during time set in 

Auto Protection Time

, the Screensaver will run.


x

The power-saving mode of some external hard disk drives may be released automatically when connected to the TV.


x

If a USB extension cable is used, the USB device may not be recognized or the files on the device may not be read.


x

If a USB device connected to the TV is not recognized, the list of files on the device is corrupted or a file in the list is 
not played, connect the USB device to the PC, format the device and check the connection.


x

If a file deleted from the PC is still found when Media Play is run, use the “Empty the Recycle Bin” function on the PC 
to permanently delete the file.
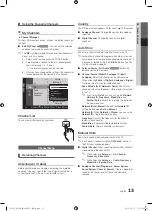
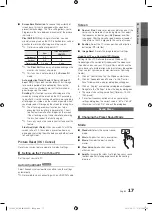
TV Side Panel

USB Drive

USB 

SUM

 Change Device

 View Devices   

 E 

Enter   

 R 

Return

MediaPlay

Videos

[PC530_XU]BN68-02693C-02Eng.indb   24

2010-09-17   오후 12:56:49

Содержание PS50C530C1W

Страница 1: ...msung com ie U K 0845 SAMSUNG 7267864 www samsung com uk 2010 Samsung Electronics Co Ltd All rights reserved BN68 02693C 02 Plasma TV user manual imagine the possibilities Thank you for purchasing thi...

Страница 2: ...ndeavour to avoid black borders top or bottom by using the zoom function This will help eliminate the black borders and fit the picture to the entire area of the screen Using a video game console may...

Страница 3: ...7 Sound Menu 19 Setup Menu 22 Support Menu Advanced Features 23 23 Connecting to a PC 24 Media Play 30 Anynet Other Information 33 33 Analogue Channel Teletext Feature 34 Installing the Wall Mount 35...

Страница 4: ...ower Cord y y Quick Setup Guide y y Blanking Bracket y y Cable Tie y y Ferrite Core for Power Cord 1EA See separate guide for installing the stand M4 X L12 y y Stand 1EA y y Guide Stand 1EA y y Screws...

Страница 5: ...ol z Changes the channels In the OSD use the z buttons as you would use the and buttons on the remote control Power Indicator Blinks and turns off when the power is on and lights up in standby mode P...

Страница 6: ...annels Displays channel lists on the screen p 13 Displays the EPG Electronic Programme Guide p 11 Displays information on the TV screen Exits the menu Have direct access to channels Adjusts the volume...

Страница 7: ...ate country If the desired country does not exist on the menu select Others 4 Selecting an antenna Press the or button then press the ENTERE button Select Air or Cable 5 Selecting a channel Press the...

Страница 8: ...k the HDMI version of the external device If you suspect the version is older than 1 3 contact the provider of the device to confirm the HDMI version and request an upgrade x x It is recommended you p...

Страница 9: ...the amplifier or DVD home theatre When the source is a digital component such as a DVD Blu ray player cable box STB Set Top Box satellite receiver and is connected to the TV via HDMI only 2 CH audio w...

Страница 10: ...ring information containing a telephone number the CI or CI CARD ID the Host ID and other information will be displayed in about 2 3 minutes If an error message is displayed please contact your servic...

Страница 11: ...Now Next guide shows daily TV programme information for each channel according to the broadcasting time y y Scroll to view information for a desired programme while watching the current channel y y S...

Страница 12: ...he Channel Manager x x Red Antenna Toggle among Air or Cable x x B Green Zoom Enlarges or shrinks a channel number x x Yellow Select Select desired channels and press the Yellow button to set all the...

Страница 13: ...ital Analogue Select the channel source to memorise When selecting Cable Digital Analogue or Digital Provide a value to scan for cable channels Search Mode Full Network Quick Scans for all channels wi...

Страница 14: ...d viewed NOTE x x This function is available only when the Child Lock is set to On x x The PIN input screen appears Enter your 4 digit PIN the default of which is 0 0 0 0 Change the PIN using the Chan...

Страница 15: ...f Eco Sensor is On the display brightness may change become slightly darker or brighter depending on the surrounding light intensity No Signal Power Off Off 15 min 30 min 60 min To avoid unnecessary e...

Страница 16: ...and 4 3 modes can be adjusted x x Settings can be adjusted and stored for each external device connected to an input of the TV x x After selecting Screen Fit in HDMI 1080i 1080p or Component 1080i 108...

Страница 17: ...l Resets your current picture mode to its default settings Setting up the TV with Your PC Set the input source to PC Auto Adjustment t Adjust frequency values positions and fine tune the settings auto...

Страница 18: ...ion not available in all locations digital channels only This function handles the Audio Stream for the AD Audio Description which is sent along with the Main audio from the broadcaster Audio Descript...

Страница 19: ...nge Stereo Mono Stereo Dual Mono Dual f Dual g Dual f If the stereo signal is weak and an automatic switching occurs then switch to the mono Only activated in stereo sound signal Only available when t...

Страница 20: ...authorized users such as children from watching unsuitable programme Available only when the Input source is set to TV Parental Lock depending on the country Prevent unauthorized users such as childre...

Страница 21: ...the CAM inserted into the CI slot and on the CI or CI CARD which is inserted into the CAM You can install the CAM anytime whether the TV is on or off 1 Purchase a CI CAM module at your nearest dealer...

Страница 22: ...TV will be turned off and on automatically after completing the firmware upgrade When software is upgraded video and audio settings you have made will return to their default settings We advise you t...

Страница 23: ...1280 x 720 1280 x 800 1280 x 800 1280 x 960 1360 x 768 1440 x 900 1440 x 900 1680 x 1050 31 469 37 861 37 500 37 879 48 077 46 875 48 363 56 476 60 023 67 500 63 981 79 976 45 000 49 702 62 795 60 00...

Страница 24: ...ew up to 1000 files can be displayed in each folder x MP3 files with DRM that have been downloaded from a non free site cannot be played Digital Rights Management DRM is a technology that supports the...

Страница 25: ...VD sub or txt string based Information You can ascertain the selected file name and the number of files and page Sort List Section Displays sorting standard Sorting standard is different depending on...

Страница 26: ...x1080 24 25 30 30 AC3 MPEG LPCM AAC MPEG2 1920x1080 24 25 30 30 H 264 1920x1080 6 30 25 ts tp trp TS MPEG2 1920x1080 24 25 30 30 AC3 AAC MP3 DD HE AAC H 264 1920x1080 6 30 25 VC1 1920x1080 6 30 25 Oth...

Страница 27: ...the sound is strange when playing MP3 files adjust the Equalizer in the Sound menu An over modulated MP3 file may cause a sound problem Photos Viewing a Photo or Slide Show 1 Press the or button to s...

Страница 28: ...er Title It sorts and displays the file title in Symbol Number Alphabet Special order Preference It sorts and displays the file by preference You can change the file preference in the file list sectio...

Страница 29: ...w Zoom You can zoom into images in full screen mode Rotate You can rotate images in full screen mode Information You can see detailed information about the played file Settings Using the Setup Menu Co...

Страница 30: ...d the Digital Audio Input on the Home Theatre x x When following the connection above the Optical jack only outputs 2 channel audio You will only hear sound from the Home Theatre s Front Left and Righ...

Страница 31: ...in progress May not be enabled depending on the device Switching between Anynet Devices 1 Anynet devices connected to the TV are listed If you cannot find a device you want press the Red button to re...

Страница 32: ...Initial setup etc When connecting or removing the HDMI cable please make sure to search devices again or turn your TV off and on again Check if the Anynet Function of Anynet device is set on I want t...

Страница 33: ...pics on a Teletext page are colour coded and can be selected by pressing the coloured buttons Press the colour corresponding to the topic of your choice A new colour coded page is displayed Items can...

Страница 34: ...sary for assembly are provided x x Do not use screws that do not comply with the VESA standard screw specifications x x Do not use screws that are longer than the standard dimension or do not comply w...

Страница 35: ...an anchor depending on the type of wall Since the necessary clamps screws and string are not supplied please purchase these additionally 2 Remove the scres from the back centre of the TV put the screw...

Страница 36: ...o to Picture mode Colour Brightness Sharpness p 15 Adjust Energy Saving option in the TV menu go to MENU Picture Eco Solution Energy Saving p 15 Try resetting the picture to view the default picture s...

Страница 37: ...icture is distorted macroblock error small block dots pixelization Compression of video contents may cause picture distortion especially with fast moving pictures such as sports and action movies A lo...

Страница 38: ...etup Plug Play Initial setup ENTERE p 7 You have intermittent loss of audio or video Check the cable connections and reconnect them Loss of audio or video can be caused by using overly rigid or thick...

Страница 39: ...g charger headset USB cable should not be disposed of with other household waste at the end of their working life To prevent possible harm to the environment or human health from uncontrolled waste d...

Страница 40: ...the registration code locate the DivX VOD section in the device setup menu Go to vod divx com with this code to complete the registration process and learn more about DivX VOD Pat 7 295 673 7 460 688...

Страница 41: ...I Installation Space 40 L Language 20 Licence 40 Lock 14 M Media Play 24 Melody 21 Menu Transparency 21 Music 27 My Channels 13 N Navigate 11 Now Next guide 11 O Optimal resolution 23 P Photos 27 Pic...

Страница 42: ...d adaptors and the point where they exit from the appliance y y To protect this apparatus from a lightning storm or when it is left unattended and unused for long periods of time unplug it from the wa...

Страница 43: ...Kingdom This Samsung product is warranted for a period of twelve 12 months from the original date of purchase against defective materials and workmanship In the event that warranty service is require...

Страница 44: ...This page is intentionally left blank PC530_XU BN68 02693C 02Eng indb 44 2010 09 17 12 57 03...

Отзывы: