background image

47

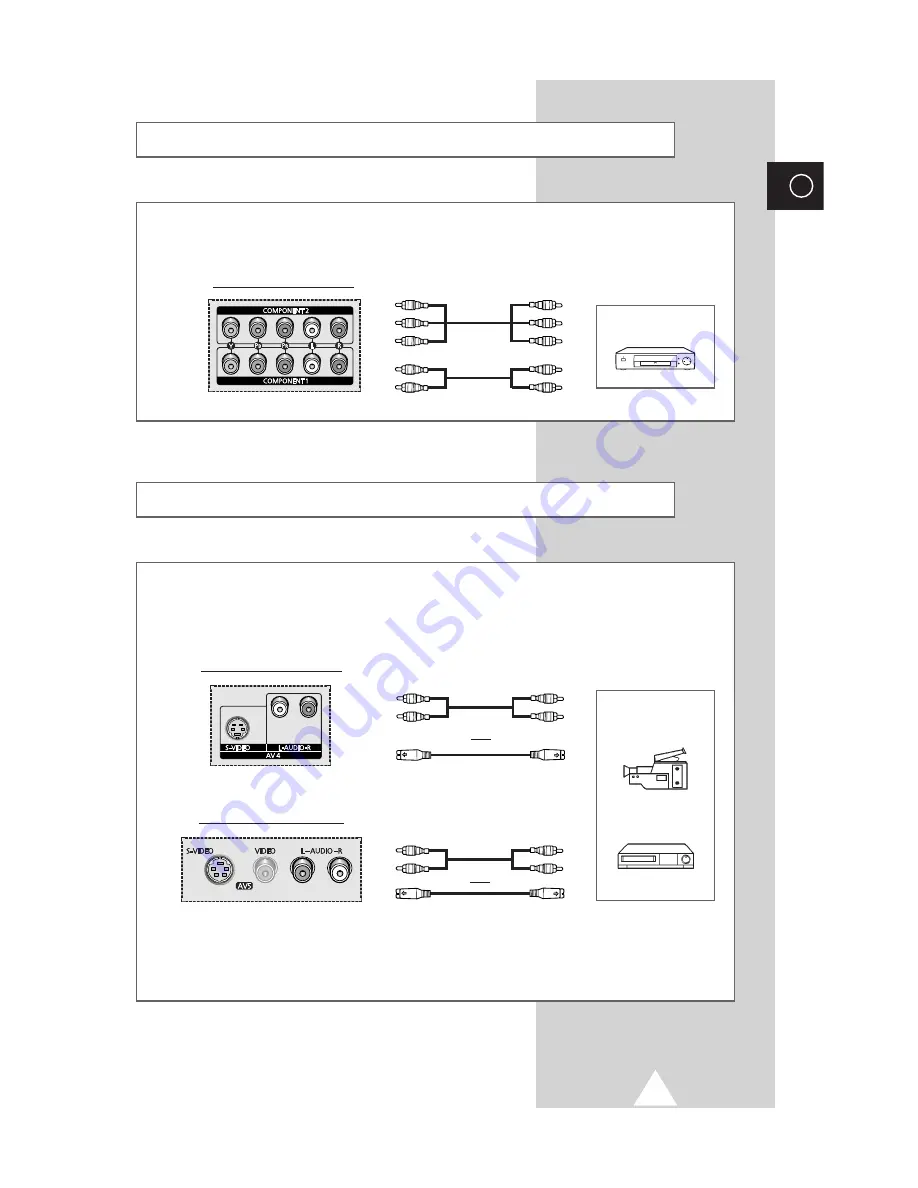
Connecting to the DVD Input

ENG

The RCA connectors are used for equipment with a DVD output. (480i/480p/576i/576p)

DVD

Rear of the Media Station

Connecting to the S-Video Input

The S-VIDEO and RCA (AUDIO-L/R) connectors are used for equipment with an S-Video output,
such as a camcorder or VCR.

Front of the Media Station

Camcorder

VCR

and

Rear of the Media Station

and

To play pictures and sound, both the S-VIDEO and RCA connectors must be used.

Содержание PS42PNSB

Страница 1: ...splay withMediaStation Owner s Instructions Before operating the unit please read this manual thoroughly and retain it for future reference ENG REMOTE CONTROL ON SCREEN MENUS PICTURE IN PICTURE TELETE...

Страница 2: ...ote control is not used for a long period of time remove the batteries and store it in a cool dry place Do not drop the remote control User Instructions Screen Image retention Do not display a still i...

Страница 3: ...dangerous voltage inside the product The exclamation point within the triangle is a warning sign alerting you of important instructions accompanying the product The main voltage is indicated on the re...

Страница 4: ...r with the Remote Control 14 Setting up your Remote Control 15 Plug and Play 16 Choosing Your Language 17 USING YOUR DISPLAY continued Storing Channels Automatically 18 Sorting the Stored Channels 19...

Страница 5: ...RE Teletext Feature 42 Displaying the Teletext Information 43 Selecting Display Options 44 Selecting a Teletext Page 45 CONNECTIONS AND RECOMMENDATIONS FOR USE Connecting to the External Devices 46 Co...

Страница 6: ...d This stand turns left right up to 25 degrees respectively so that you can adjust the angle while viewing Drawer When installing a VCR cable receiver DVD player or DTV receiver in the drawer and conn...

Страница 7: ...7 Viewing the Plasma Display ENG Rear Panel Connect the video cable between the PDP and Media Station Plug the mains lead into an appropriate socket...

Страница 8: ...rnal devices with an S Video output such as a camcorder or VCR d COMPONENT 1 COMPONENT 2 Video Y PB PR and audio L R inputs for Component 480i 480p 576i 576p 720p 1080i For further details refer to Pr...

Страница 9: ...PLAYER EXTERNAL INPUT SELECTION TELETEXT HOLD It is possible that the work of the transmitter is dull or not operated normally if the light of the Bulb is on around the PDP PIP FUNCTIONS PIP ACTIVATI...

Страница 10: ...l downwards and then pulling firmly to remove it 2 Insert two R03 UM4 AAA 1 5V or equivalent batteries taking care to respect the polarities on the battery against on the remote control on the battery...

Страница 11: ...of where the TV is located such as the thickness of the carpet 2 Install the rack on the swivel stand using screws Insert the glass fixtures into the rack and fasten it using screws 3 Insert the glass...

Страница 12: ...hat is both sharp and clear For further details refer to Storing Channels Automatically on page 18 Storing Channels Manually on page 20 Rear of the Media Station Cable Television Network or Connecting...

Страница 13: ...nt panel of the Media Station or remote control to switch the display on If you have purchased this PDP in the United Kingdom refer to page 55 for further instructions on plug wiring Do not connect th...

Страница 14: ...ll result in a single digit channel being displayed Used to select a channel numbered ten or over Press this button and enter the two or three digit channel number Used to increase the volume Used to...

Страница 15: ...ower button on the remote control The component you select should turn on If it turns on your remote control is now set correctly 4 Once your remote control is set up press the Select button any time...

Страница 16: ...ayed Make sure that the antenna is connected to the Media Station 3 Select your area by moving the joystick left or right Result The following areas are available ASIA W EUROPE CIS E EUROPE CHINA HONG...

Страница 17: ...u is displayed 2 Move the joystick up or down until the Function is selected Result The options available in the Function group are displayed 3 Press the joystick button Result The Language is selecte...

Страница 18: ...E EUROPE CHINA HONGKONG UK AUSTRALIA SOUTH AFRICA AMERICA 5 Move the joystick up or down until the Auto Store is selected Press the joystick button to start the search Result The search will end autom...

Страница 19: ...are displayed with the From is selected 5 Select the channel number that you wish to change by moving the joystick left or right 6 Move the joystick up or down until the To is selected Select the new...

Страница 20: ...correct number by moving the joystick left or right 6 Move the joystick up or down until the Colour System is selected Select the broadcasting system required by moving the joystick left or right Resu...

Страница 21: ...down Set to OK by moving the joystick left or right 12 Repeat Steps 9 to 11 for each channel to be stored Channel mode P Programme mode When completing tuning the broadcasting stations in your area h...

Страница 22: ...an prevent unauthorised users such as children from watching unsuitable programme Select the Child Lock by moving the joystick left or right If necessary select the On to lock the channel required by...

Страница 23: ...he Fine Tune group are displayed with the Fine Tune is selected 5 To obtain a sharp and clear picture and good sound quality move the joystick left or right until you reach the setting 6 To memorise a...

Страница 24: ...lect Menu PC Mode Your PDP has several settings which allow you to control picture quality 1 Press the MENU button Result The Picture menu is displayed 2 Press the joystick button to enter the picture...

Страница 25: ...able depending on the input source Wide Panorama Zoom1 Zoom2 Stretch 14 9 Normal Standard Full Normal PC or DVI Mode You can select these options by simply pressing the P Size Picture Size button on t...

Страница 26: ...available in the Colour Tone group are displayed with the Mode is selected 5 Select the required mode by moving the joystick left or right Result The following modes are available Custom Colour l Colo...

Страница 27: ...mage Lock is selected Press the joystick button Result The options available in the Image Lock group are displayed 5 Select the required option Frequency or Phase to be adjusted by moving the joystick...

Страница 28: ...e adjusted to suit your personal preferences 1 Press the MENU button Result The main menu is displayed 2 Move the joystick up or down until the Sound is selected Result The options available in the So...

Страница 29: ...output when the modulation signal is low 1 Press the MENU button Result The main menu is displayed 2 Move the joystick up or down until the Sound is selected Result The options available in the Sound...

Страница 30: ...of broadcast On screen indication FM Mono Mono FM Stereo Stereo Mono FM Dual Dual I Dual II NICAM Mono NICAM Mono Mono NICAM Stereo NICAM Stereo Mono NICAM Dual NICAM Dual I NICAM Dual II Mono You can...

Страница 31: ...following modes are available Off Virtual Pro Logic When you select the Pro Logic the following settings can be adjusted For further details of sound output depending on the each options refer to page...

Страница 32: ...Surround Surround Sub Left Right Right Left Woofer Off Stereo Mono Virtual Stereo Mono Pro Logic Normal Stereo Mono Phantom Stereo Mono Wide Stereo Mono Sound If the center speaker is not connected n...

Страница 33: ...the Sound group are displayed 3 Press the joystick button 4 Move the joystick up or down until the Dolby Surround is selected Press the joystick button Result The options available in the Dolby Surrou...

Страница 34: ...s the MENU button Result The main menu is displayed 2 Move the joystick up or down until the Sound is selected Result The options available in the Sound group are displayed 3 Press the joystick button...

Страница 35: ...the clock again 1 Press the MENU button Result The main menu is displayed 2 Move the joystick up or down until the Function is selected Result The options available in the Function group are displayed...

Страница 36: ...own until the Off Time is selected Set the time which you wish to be switched off 7 Move the joystick up or down until the On Time Program is selected Select the channel when it will be switched on by...

Страница 37: ...leep Timer is selected Select the preset time interval 15 30 45 60 90 120 150 180 210 240 270 300 330 360 for staying on by moving the joystick left or right You can set the sleep timer by simply pres...

Страница 38: ...the joystick up or down Move the joystick left or right Result The followings are available depending on the input source TV AV 1 AV 2 AV 3 AV 4 AV 5 You can also select these options simply by pressi...

Страница 39: ...also do simply by pressing the Locate button 9 In the PC mode select the Locate and press the joystick button Result The PIP Panning is displayed You can move the sub picture to your required locatio...

Страница 40: ...in the Sound group are displayed 3 Press the joystick button 4 Move the joystick up or down until the Source is selected Set to Sub by moving the joystick left or right Result You can listen to the s...

Страница 41: ...isplayed 3 Move the joystick up or down until the required input source is selected and press the joystick button If you change the external source while viewing pictures might take a short period of...

Страница 42: ...Selected page number B Broadcasting channel identity C Current page number or search indications D Date and time E Text F Status information FASTEXT information Teletext information is often divided...

Страница 43: ...the teletext mode Result The contents page is displayed It can be redisplayed at any time by pressing the index button 3 Press the Text Off button again Result The screen will be split into two This...

Страница 44: ...quiz games for example The normal screen reveal again A secondary page by entering its number Time Subcode The broadcast when searching for a page cancel The next page page up The previous page page...

Страница 45: ...a Teletext page are color coded and can be selected by pressing the coloured buttons on the remote control Press the coloured button corresponding to the topic that you wish to select the available t...

Страница 46: ...O AUDIO L and R If you have a second VCR and wish to copy cassettes tape connect the source VCR to AV 1 and the target VCR to MONITOR OUT so that you can redirect the signal from source VCR to target...

Страница 47: ...ar of the Media Station Connecting to the S Video Input The S VIDEO and RCA AUDIO L R connectors are used for equipment with an S Video output such as a camcorder or VCR Front of the Media Station Cam...

Страница 48: ...as an audio system or external amplifier to take full advantage of the Surround sound effect Rear of the Media Station Audio System External Amplifier Connecting to the DVI Input The DVI IN and RCA AU...

Страница 49: ...ded Display Identification Data EDID using Display Data Channel DDC protocols Preset Signals Connecting to the PC Input The PC IN and RCA AUDIO L R connectors are used for interfacing with your PC Per...

Страница 50: ...appears click on Display and a display dialog box will appear Select the Settings tab in the display dialog box The two key variables that apply the Media Station PC interface are Resolution and Color...

Страница 51: ...our PC to a PDP If a vertical and horizontal frequency select mode exists select 60Hz vertical and 31 5kHz horizontal In some cases abnormal signals such as stripes might appear on the screen when the...

Страница 52: ...ignal 1 T M D S Data2 2 T M D S Data2 3 T M D S Data2 4 Shield 4 T M D S Data4 5 T M D S Data4 6 Clock DDC 7 Data DDC 8 Not Connected 9 T M D S Data1 10 T M D S Data1 11 T M D S Data1 3 Shield 12 T M...

Страница 53: ...ntilation openings clear Do not place the PDP on a rough and slanted surface such as cloth or paper Liquids Do not handle liquids near or on the PDP Cabinet Never open the cabinet or touch the parts i...

Страница 54: ...sed the Power button Check the picture contrast and brightness settings Check the volume Check the volume Check whether the MUTE button has been pressed Adjust the colour settings Check that the broad...

Страница 55: ...ety approved extension lead or consult your dealer for assistance However if there is no alternative to cutting off the plug remove the fuse and then safely dispose of the plug Do NOT connect the plug...

Страница 56: ...TER SALES SERVICE Do not hesitate to contact your retailer or service agent if a change in the performance of your product indicates that a faulty condition may be present BN68 00397A 00 ENG ELECTRONI...

Отзывы: