background image

10

ENG

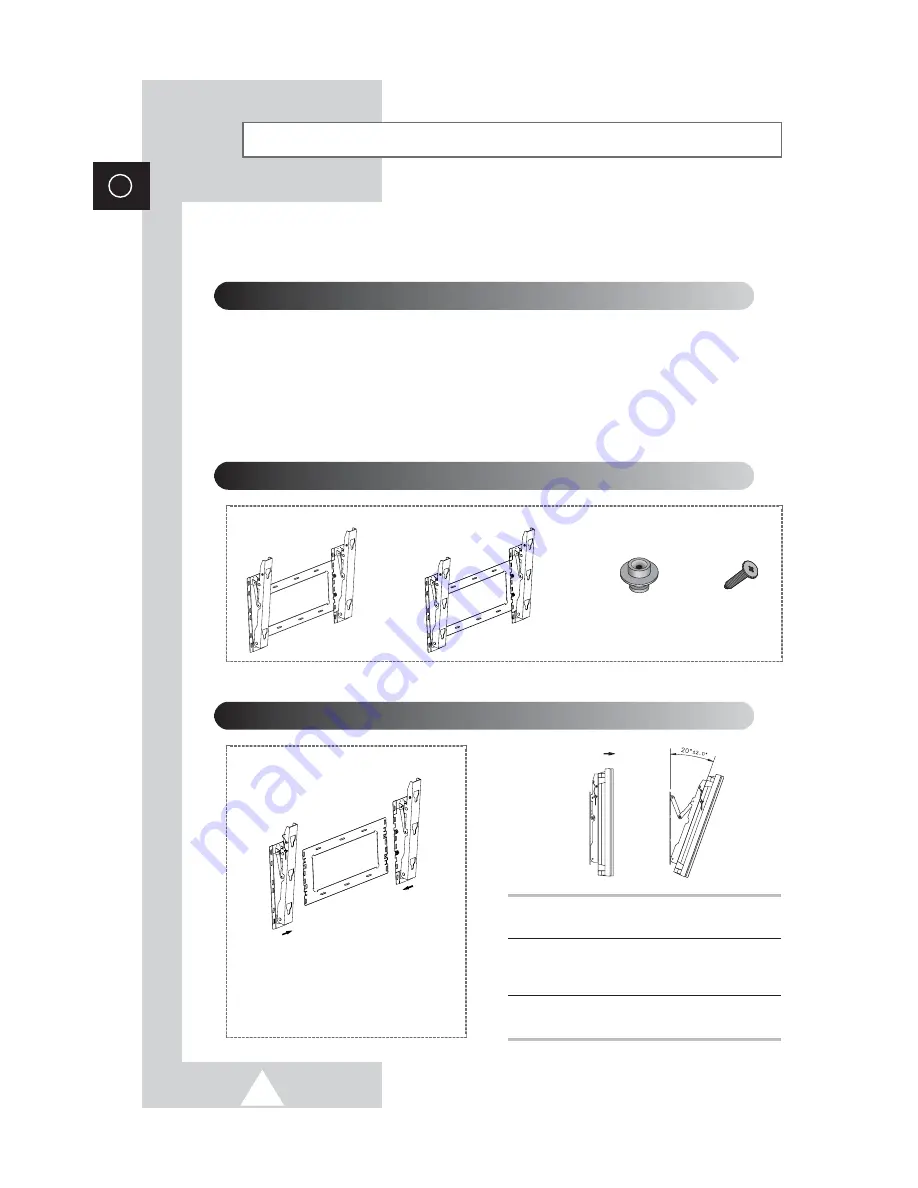
Installing the Display on the Wall Attachment Panel

Wall Mount Bracket

Mounting Kits

PS42P3S/50P3H: 4

PS63P3H: 6

Plastic Hanger

Screws

How to Adjust Mounting Angle

1

Secure the PDP to the wall mount bracket.
(Please refer to the following instructions.)

2

Set the angle by pulling the upper end of the
PDP attached to bracket in the direction of the
arrow.

3

The angle can be adjusted from 0° to 20° by
±2°.

The wall mount bracket is delivered
separately. Please tighten the captive
screw in the direction of the arrow after
assembling the bracket.

This wall mount bracket installation guide is for the following models: WMN4230/WMN5030/WMN6330.
This installation guide may be different from the PDP User’s manual. Please refer to the proper
installation guide for your product.

Installation Notes

Do not install the PDP on any place other than vertical walls.

To protect the performance of the PDP and prevent troubles, avoid the followings:
- Do not install next to smoke and fire detectors.
- Do not install in an area subjected to vibration or high voltage.
- Do not install near or around any heating apparatus.

Use only recommended parts and components.

PS42P3S/50P3H

PS63P3H

(depending on your model)

Содержание PS-63P3H

Страница 1: ...AYPANEL PS42P3S PS50P3H PS63P3H PS50P3H PS63P3H Owner s Instructions Before operating the unit please read this manual thoroughly and retain it for future reference ON SCREEN MENUS PICTURE IN PICTURE PIP TELETEXT TELEWEB OPTION ...

Страница 2: ...ng a PDP such as for an exhibition etc there is risk of overheating the unit if placed directly on a floor or carpet Be sure to use a proper stand wall mount ceiling mount or Lift Stand offered by Samsung Do not use and exhibit by laying down or sitting the unit directly on the floor User Instructions Screen Image retention Do not display a still image such as on a video game or when hooking up a ...

Страница 3: ...e enhancement New image compensation Algorithm gives brighter clearer much detailed image to you DNIeTM technology will fit every signals into your eyes The lightning flash and arrow head within the triangle is a warning sign alerting you of dangerous voltage inside the product The exclamation point within the triangle is a warning sign alerting you of important instructions accompanying the produ...

Страница 4: ...rol 17 Plug Play Feature 18 Choosing Your Language 19 SETTING THE CHANNELS Storing Channels Automatically 20 Sorting the Stored Channels 21 Storing Channels Manually 22 Assigning Names to Channels 24 Activating the Child Lock and Skipping Unwanted Channels 25 Selecting a Channel by Information 26 USING YOUR DISPLAY continued Changing the Picture Standard 26 Adjusting the Picture Settings 27 Adjust...

Страница 5: ...Selecting Display Options 43 Selecting the Teletext Source Option 44 Selecting a Teletext Page 45 USING THE TELEWEB FEATURE TeleWeb Feature Option 46 Using the TeleWeb Menu after Displaying the TeleWeb 47 Easy Accessing the TeleWeb Service via the Remote Control 48 ADDITIONAL INFORMATION AND CONNECTIONS Viewing Pictures From External Sources 48 Connecting to the External Devices 49 Connecting to t...

Страница 6: ... SOURCE External input selection MENU Menu display VOL Volume adjustment CH Channel selection I Press to turn the PDP on and off Speaker Speaker a b c PS42P3S PS50P3H PS63P3H a b c a Power Indicator Power Off Red Power On Off Timer On Green b Remote Control Signal Receiver Aim the remote control towards this spot on the PDP c ...

Страница 7: ...t to the video output jack on your PC e MONITOR OUT VIDEO L AUDIO R Outputs for external devices f S VIDEO IN L AUDIO R VIDEO IN Video and audio inputs for external devices with an S Video output such as a camcorder or VCR g COMPONENT IN Inputs for external devices such as DVD video game device or video disc players h EXT SPEAKER 8Ω Connect external speakers i ANT IN VHF UHF 75Ω Coaxial connector ...

Страница 8: ... TRY USING THE REMOTE CONTROL AGAIN PREVIOUS CHANNEL TELETEXT PREVIOUS PAGE TELEWEB BACKWARD TELEWEB DISPLAY OPTION PIP FUNCTIONS PIP ACTIVATING OR DEACTIVATING PIP ON USED TO MOVE THE SUB PICTURE COUNTERCLOCKWISE LOCATE USED TO ASSIGN A SOURCE OF SUB PICTURE SOURCE SELECTING THE CHANNEL OF SUB PICTURE P MAKE THE REMOTE CONTROL WORKS FOR TV VCR CATV DVD PLAYER STB VCR DVD FUNCTIONS REWIND REW STOP...

Страница 9: ... Remove the cover on the rear of the remote control by pressing the symbol downwards and then pulling firmly to remove it 2 Insert two R03 UM4 AAA 1 5V or equivalent batteries taking care to respect the polarities on the battery against on the remote control on the battery against on the remote control 3 Replace the cover by aligning it with the base of the remote control and pressing it back into...

Страница 10: ...direction of the arrow after assembling the bracket This wall mount bracket installation guide is for the following models WMN4230 WMN5030 WMN6330 This installation guide may be different from the PDP User s manual Please refer to the proper installation guide for your product Installation Notes Do not install the PDP on any place other than vertical walls To protect the performance of the PDP and...

Страница 11: ...cket Please avoid catching your fingers while installing and adjusting the angle Please tightly secure the wall mount bracket to the wall to avoid injury from a falling PDP 3 Tighten the screws of the plastic hanger to the back side of the PDP 4 Put the 4 pegs on the PDP in the grooves of the wall mount bracket and pull down on the PDP to secure it to the wall mount bracket Tighten the screws as s...

Страница 12: ...en the PDP and the speaker bracket using the screws removed from the PDP When moving your PDP do NOT hold the speaker connected to your PDP It may damage the bracket clamping the speaker and your PDP together and result in a drop of your PDP and a risk of personal damage and injury PS42P3S PS50P3H PS63P3H PS42P3S PS50P3H PS63P3H PS42P3S PS50P3H PS63P3H ...

Страница 13: ... PS50P3H Sub woofer speaker PS63P3H The speakers MUST have to a power handling capability of 10 watts minimum impedance 8Ω When you connect the speaker wire to the external speaker out connector first bind the speaker wire round the ferrite core to secure it Ferrite Cores The ferrite cores are used to attenuate undesired signals When connecting cables attach one of these ferrite cores to the cable...

Страница 14: ...ctly a signal must be received by the set from one of the following sources An outdoor aerial A cable television network A satellite network 1 In the first three cases connect the aerial or network input cable to the 75Ω coaxial socket on the rear of the PDP 2 If you are using an indoor aerial you may need to turn it when tuning your PDP until you obtain a picture that is both sharp and clear For ...

Страница 15: ...picture appears Refer to Storing Channels Automatically on page 20 or Storing Channels Manually on page 22 3 To switch your PDP off press the I button again Your PDP can be placed in Standby mode in order to reduce the Power consumption The Standby mode can be useful when you wish to interrupt viewing temporarily during a meal for example 1 Press the POWER button on the remote control Result The s...

Страница 16: ...ed PRE CH Press the PRE CH button The TV will switch to the last channel viewed To quickly switch between two channels that are far apart tune to one channel then use the number button to select second channel Then use the PRE CH button to quickly alternate between them Used to increase the volume Used to decrease the volume MUTE Used to switch the sound off temporarily To turn the sound back on p...

Страница 17: ...Mode is changed whenever SELECT button is pressed new mode is displayed on LED screen 3 Press the POWER button on the remote control The component you select should turn on If it turns on your remote control is now set correctly 4 Once your remote control is set up press the SELECT button any time you want to use the remote control to operate your VCR Cable box DVD or STB When your remote control ...

Страница 18: ... Select your country by pressing the or button 6 Press the button to confirm your choice Result The Auto Store menu is displayed 7 To start the search press the button Result The search will end automatically Channels are sorted and stored in an order which reflects their position in the frequency range with lowest first and highest last The programme originally selected is then displayed To stop ...

Страница 19: ... MENU button Result The main menu is displayed 2 Press the or button to select Function Result The options available in the Function group are displayed 3 Press the button Result The Language option is selected 4 Press the button again Result The languages available are listed 5 Select the appropriate language by pressing the or button 6 Press the button to confirm your choice 7 When you are satis...

Страница 20: ...Store menu is displayed 9 Press the button to start the search Result The search will end automatically Channels are sorted and stored in an order which reflects their position in the frequency range with lowest first and highest last The programme originally selected is then displayed To stop the search before it has finished press the MENU button 10 When the channels have been stored you can Sor...

Страница 21: ...The Sort menu is displayed 5 Select the channel that you wish to move by pressing the or button Press the button 6 Select the number of the programme to which the channel is to be moved by pressing the or button Press the button Result The channel is moved to its new position and all other channels are shifted accordingly 7 Repeat Steps 5 to 6 until you have moved all the channels to the required ...

Страница 22: ...required Press the or button to select Colour System and press the œ or button The colour standards are displayed in the following order depending on the model AUTO PAL SECAM AUTO NTSC3 58 NTSC4 43 6 Press the or button to select Sound System and press the œ or button The sound standards are displayed in the following order BG DK I M Storing Channels Manually Manual Store Prog No P 1 Colour System...

Страница 23: ...ber to a channel select the Prog No by pressing the or button Press the œ or button until you find the correct number 11 To store the channel and associated programme number press the button 12 Repeat Steps 7 to 11 for each channel to be stored Channel mode P Programme mode When completing tuning the broadcasting stations in your area have been assigned to position numbers from P00 to max P99 You ...

Страница 24: ... channel automatically is selected Arrow indications are displayed around the name box 5 If necessary select the channel to be assigned a new name by pressing the or button Press the button 6 Press the or button to select a letter A Z a number 0 9 or a symbol space Move on the previous or next letter by pressing the œ or button 7 When you have finished entering the name press the button to confirm...

Страница 25: ...ayed 3 Press the button 4 Press the or button to select Edit Press the button Result The Edit menu is displayed with the current channel automatically is selected 5 Press the or button to select the channel to be locked 6 Press the œ or button to select Child Lock To lock the channel select On by pressing the or button to unlock the channel select Off Press the button to confirm 7 Press the or but...

Страница 26: ...andard Mode œ œ Dynamic Adjust Colour Tone œ œ Normal Digital NR Off Size Wide LNA Off Picture Move œ œ Sel Return Selecting a Channel by Information Information 96 97 98 99 0 1 2 3 4 5 6 7 8 Move Exit Mono You can display the list of stored channels 1 Press the CH INFO button Result A list is displayed with the first 13 channels Two text boxes to the right of the list indicate Whether the Teletex...

Страница 27: ...e satisfied with the settings press the button to store them 6 Press the MENU button Result The options available in the Picture group are displayed again 7 Press the or button to select Colour Tone 8 Select the option by pressing the œ or button The colour tones are displayed in the following order Normal Warm1 Warm2 Cool2 Cool1 If you make any changes to these settings the picture standard is au...

Страница 28: ...s the button Result The Colour Adjust menu is displayed When select the Colour Tone to Custom the Colour Adjust menu is displayed The Colour Adjust menu can not be selected in DVI mode 9 Press the or button to select the option Red Green Blue to be adjusted Press the œ or button Result The horizontal bar is displayed Move the horizontal bar s cursor left or right by pressing the œ or button 10 Whe...

Страница 29: ... select the picture format which best corresponds to your viewing requirement select the Size by pressing the or button Press the button 9 Select the option by pressing the œ or button The picture formats are displayed Wide Normal 10 When you are satisfied with the settings press the button to store them 11 If you get the PC information select the Information by pressing the or button Press the bu...

Страница 30: ...ursor left or right by pressing the œ or button 7 Press the MENU button Result The options available in the Function group are displayed again 8 Press the or button to select Recall Press the button Result The screen quality and position are automatically reset 9 When you are satisfied with the settings press the MENU button repeatedly to return to the normal viewing Setting the Picture Component ...

Страница 31: ...est corresponds to your viewing requirements LNA Low Noise Amplifier This feature is very useful in the situation that the TV is used in a weak signal and amplifies the TV signal in the weak signal area but not noise This feature is working only in a weak signal condition and that is memorized on current channel additional Available in TV mode 1 Press the MENU button Result The options available i...

Страница 32: ...ress the button 5 Press the œ or button to change the setting On or Off Mode œ œ Standard Adjust Colour Tone œ œ Normal Digital NR On Size Auto Wide Film Mode Off Picture Move œ œ Sel Return Selecting the Film Mode Video or S Video Mode only You can automatically sense and process film signals from all sources and adjust the picture for optimum quality 1 Press the MENU button Result The options av...

Страница 33: ...tedly to select the following options On Switches on the DNIe mode Off Switches off the DNIe mode Demo Option The screen before applying DNIe appears on the right and the screen after applying DNIe appears on the left DNIeTM Digital Natural Image engine You can freeze the picture when watching a television programme simply by pressing the STILL button To return to normal viewing press it again In ...

Страница 34: ...nd standard is automatically switched to the Custom Adjusting the Sound Settings Equalizer Standard You can select the type of special sound effect to be used when watching a given broadcast 1 Press the MENU button Result The main menu is displayed 2 Press the or button to select Sound Result The options available in the Sound group are displayed 3 Press the button Result The Mode is selected 4 Se...

Страница 35: ...settings apply to the sound effects such as Standard Music Movie and Speech 1 Press the MENU button Result The main menu is displayed 2 Press the or button to select Sound Result The options available in the Sound group are displayed 3 Select the required option by pressing the or button 4 Press the œ or button to change the setting Off or On Extra Sound Settings Mode œ œ Standard Equalizer Auto V...

Страница 36: ...nd an automatic switching occurs then switch to the Mono When receiving a mono sound in the AV mode connect to the AUDIO L input connector on the side of the television If the mono sound comes out only from left speaker press the DUAL I II button Type of broadcast Regular broadcast Standard audio Regular NICAM Mono NICAM Stereo NICAM Dual I II Regular broadcast Standard audio Bilingual or Dual I I...

Страница 37: ...ton Result The main menu is displayed 2 Press the or button to select Function Result The options available in the Function group are displayed 3 Press the button 4 Press the or button to select Time Press the button Result The Time menu is displayed with the Clock option selected 5 Set the clock by pressing the numeric buttons 6 Press the or button to select Timer Set to On by pressing the œ or b...

Страница 38: ...s displayed If the sleep timer is not yet set Off is displayed If the sleep timer is already set the remaining time before which the television switches to Standby mode is displayed 2 Select the preset time intervals 15 30 45 60 75 90 105 120 135 150 165 180 by pressing the œ or button 3 Press the button to confirm your selection Setting the Sleep Timer Sleep timer œ œ Sel Store Off TV ...

Страница 39: ...e selected in Component1 mode The PC DVI Component1 can not be selected in Component2 mode 6 Press the or button to select Swap Press the œ or button Result The main picture and sub picture are interchanged 7 Press the or button to select Size Select a size of the sub picture by pressing the œ or button Result The sizes are displayed in the following order Large Small Double1 Double2 12PIP 12PIP U...

Страница 40: ...ly LOCATE Used to move the sub picture counterclockwise P Used to select the channel of sub picture SCAN Used to scan every memorized channel in order To stop scanning press it again SOURCE Used to assign a source of sub picture TV Video S Video Component1 Component2 PC DVI Viewing the Picture In Picture PIP continued ...

Страница 41: ...the PIP group are displayed 3 Press the button 4 Press the or button to select Sound Sel Set to Sub by pressing the œ or button Result You can listen to the sound of the sub picture To listen the sound of current main picture set to Main Listening to the Sound of the Sub Picture PC or DVI Mode PIP On Sel TV Swap Size Large Sound Sel Sub PIP Move œ œ Sel Return Preset to the PC or DVI mode by using...

Страница 42: ...ided into numbered pages see diagram Part Contents A Selected page number B Broadcasting channel identity C Current page number or search indications D Date and time E Text F Status information FASTEXT information Teletext information is often divided between several pages displayed in sequence which can be accessed by Entering the page number Selecting a title in a list Selecting a coloured headi...

Страница 43: ...e actual broadcast and teletext information separately on the screen 4 If you wish to display the current input source and teletext page on a single screen press the TTX MIX button again 5 To exit from the teletext display press the TTX MIX button again Displaying the Teletext Information When you have displayed a Teletext page you can select various options to suit your requirements To display Pr...

Страница 44: ... of current channel If you set to Sub you can display the teletext information of other channel If the PIP feature is activating you can display the teletext information of sub channel If change the channel of sub picture you can display the teletext information of the changed sub channel If the Double Teletext feature is activating you can display the teletext information of other channel at the ...

Страница 45: ...are colour coded and can be selected by pressing the coloured buttons on the remote control Press the coloured button corresponding to the topic that you wish to select the available topics are given on the status line Result The page is displayed with other coloured information that can be selected in the same way 3 To display the previous or next page press the corresponding coloured button 4 To...

Страница 46: ...n the teleweb downloading will start 8 Press the TeleWeb button to enter the teleweb mode 9 If you want to download the Teleweb information before switch the television off select the Download by pressing the or button Press the or button to set to On Result Even though you turn off the TV on the channel no provider is selected the channel will be automatically switched to the selected channel and...

Страница 47: ... URL is erased and the listed URLs moves up one by one 4 Select the URL you wish to enter by pressing the or button and press the button Result The current page moves to the selected URL and the menu is disappeared Opening the Home Page 1 Press the MENU button Result The TeleWeb menu is displayed 2 Press the or button to select Home Page Press the button Result It moves to a home page Using the Te...

Страница 48: ... If you change the external source while viewing pictures might take a short period of time to be switched Viewing Pictures From External Sources AV Input TV Video Not Connected S Video Not Connected Component1 Not Connected Component2 Not Connected PC Connected DVI Not Connected Sel Store Easy Accessing the TeleWeb Service via the Remote Control Button Function TeleWeb Activate or deactivate the ...

Страница 49: ...ignal from source VCR to target VCR If you have a decoder connect the decoder to the VCR and the VCR to the TV MONITOR OUT is used for displaying the current picture to an external device When you wish to record the current picture connect the VCR to MONITOR OUT VCR Decoder Video game device Video disc player Satellite receiver DVD Whenever you connect an audio or video system to your television e...

Страница 50: ...ith an S Video output such as a camcorder or VCR Rear of the TV Camcorder VCR To play picture and sound both the S VIDEO and RCA connectors must be used and Connecting to the DVD Input The RCA connectors are used for equipment with a DVD output 480i 480p 576i 576p 720p 1080i DVD Rear of the TV Y Pb Pr L R ...

Страница 51: ... IN video and AUDIO connectors are used for interfacing with your PC Personal Computer and Rear of the TV Connecting to the DVI Input The DVI IN video and AUDIO connectors are used for equipment with a DVI output Personal Computer Rear of the TV and ...

Страница 52: ...quence Start Settings Control Panel When the control panel screen appears click on Display and a display dialog box will appear Select the Settings tab in the display dialog box The two key variables that apply the television PC interface are Resolution and Colours The correct settings for these two variables are Size sometimes called Resolution 640 x 480 pixels PS42P3S 1024 x 768 pixels PS50P3H P...

Страница 53: ...television If a vertical and horizontal frequency select mode exists select 60Hz vertical and 31 5kHz horizontal In some cases abnormal signals such as stripes might appear on the screen when the PC power is turned off or if the PC is disconnected If so press the Source button to enter the Video mode Also make sure that the PC is connected When connecting a notebook PC to the television make sure ...

Страница 54: ...ctor 15Pin Pin Signal 1 T M D S Data2 2 T M D S Data2 3 T M D S Data2 4 Shield 4 T M D S Data4 5 T M D S Data4 6 Clock DDC 7 Data DDC 8 Not Connected 9 T M D S Data1 10 T M D S Data1 11 T M D S Data1 3 Shield 12 T M D S Data3 13 T M D S Data3 14 5V Power 15 5V Grounding 16 Hot Plug Detect 17 T M D S Data0 18 T M D S Data0 19 T M D S Data0 5 Shield 20 T M D S Data5 21 T M D S Data5 22 T M D S Clock...

Страница 55: ...ll socket Check that you have pressed the I button On Off and the POWER button Check the picture contrast and brightness settings Check the volume Check the volume Check whether the volume MUTE button on the remote control has been pressed Adjust the colour settings Check that the broadcast system selected is correct Try to identify the electrical appliance that is affecting the television then mo...

Страница 56: ...ELECTRONICS BN68 00481A 00 AFTER SALES SERVICE Do not hesitate to contact your retailer or service agent if a change in the performance of your product indicates that a faulty condition may be present ...

Отзывы: