

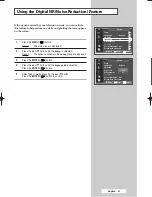


Displaying the Teletext Information
You can display Teletext information at any time on your television
☛
For Teletext information to be displayed correctly,
channel reception must be stable; otherwise:
◆
Information may be missing
◆
Some pages may not be displayed
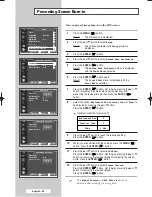
1
Select the channel providing the Teletext service by pressing the
P
or button.
2
Press the
TTX/MIX
(
) button to activate the teletext mode.
Result:
The contents page is displayed. It can be redisplayed
at any time by pressing the
(index) button.
3
Press the
TTX/MIX
(
) button again.
Result:
The screen will be split into two. This Double Teletext
feature lets you view the actual broadcast and teletext
information separately on the screen.
4
If you wish to display the actual broadcast and teletext information
on a single screen, press the
TTX/MIX
(
) button again.
5
To exit from the teletext display, press the
EXIT/TV
(
) button.
English - 53
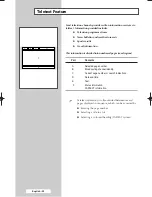
Selecting Display Options
TV
When you have displayed a Teletext page, you can select various
options to suit your requirements.
To display...
Press the...
◆
Hidden text
(reveal)
(answers to quiz games, for example)
◆
The normal screen
(reveal) again
◆
A secondary page by entering its number
(sub-page)
◆
The broadcast when searching for a page
(cancel)
◆
The next page
(page up)
◆
The previous page
(page down)
◆
Double-size letters in the:
(size)
• Upper half of the screen
• Once
• Lower half of the screen
• Twice
◆
The normal screen
• Three times
BN68-00700B-00Eng_1012 10/12/04 2:31 PM Page 53
Содержание PS-37S4A
Страница 66: ...Memo English 66 ...
Страница 67: ...Memo English 67 ...