background image

English - 11

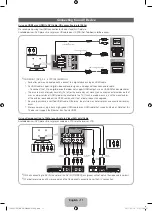
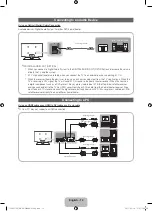
Connecting to an AV Device

Using an HDMI or an HDMI to DVI Cable: HD connection (up to 1080p)

We recommend using the HDMI connection for the best quality HD picture.
Available devices: DVD player, Blu-ray player, HD cable box, HD STB (Set-Top-Box) satellite receiver


HDMI IN 1 (DVI), 2, 3, 4 / PC/DVI AUDIO IN


x

For better picture and audio quality, connect to a digital device using an HDMI cable.


x

An HDMI cable supports digital video and audio signals, and does not require an audio cable.


– To connect the TV to a digital device that does not support HDMI output, use an HDMI/DVI and audio cables.


x

The picture may not display normally (if at all) or the audio may not work if you connect an external device that 
uses an older version of HDMI mode is connected to the TV. If such a problem occurs, ask the manufacturer 
of the external device about the HDMI version and, if out of date, request an upgrade.


x

Be sure to purchase a certified HDMI cable. Otherwise, the picture may not display or a connection error may 
occur.


x

We recommend using a basic high-speed HDMI cable or an HDMI cable that supports Ethernet. Note that this 
TV does not support the Ethernet function via HDMI.

Using a Component (up to 1080p) or an Audio to Video (480i only) Cable 

Available devices: DVD player, Blu-ray player, cable box, STB satellite receiver, VCR


When connecting to 

AV IN

, the color of the 

AV IN [Y/VIDEO]

 jack (green) will not match the video cable (yellow).


For better picture quality, we recommend the Component connection over the A/V connection.

W

R

DVI OUT

HDMI OUT

Device

Device

White

Red

HDMI to DVI Cable (Not Supplied)

HDMI Cable (Not Supplied)

Audio Cable (Not Supplied)

1

2

Device

Device

Red

Red

White

White

Yellow

Red

Blue

Green

Audio Cable  

(Not Supplied)

Audio Cable  

(Not Supplied)

Video Cable  

(Not Supplied)

Component Adapter 

(Not Supplied)

[PD550-ZA]BN68-03448A-01Eng.indb   11

2011-02-14   오전 11:38:37

Содержание PN51D550C1F

Страница 1: ...ct SAMSUNG WORLDWIDE If you have any questions or comments relating to Samsung products please contact the SAMSUNG customer care center Country Customer Care Center Web Site Address CANADA 1 800 SAMSUNG 726 7864 www samsung com Samsung Electronics Canada Inc Customer Service 55 Standish Court Mississauga Ontario L5R 4B2 Canada U S A 1 800 SAMSUNG 726 7864 www samsung com Samsung Electronics Americ...

Страница 2: ...mited Warranty Statement and a dated Bill of Sale as Proof of Purchase must be presented to the Service Center Transportation to and from the Service Center is the responsibility of the purchaser Conditions covered are limited only to manufacturing defects in material or workmanship and only those encountered in normal use of the product Excluded but not limited to are any originally specified pro...

Страница 3: ... cable open the ferrite core and clip it around the cable near the plug as shown in the figure x x A One ferrite core should be no more than 2 inches from the end of the cord that is inserted into the TV x x A One ferrite core should be no more than 8 inches from the end of the cord that is inserted into the TV 51 inches model only A Power Cord Ferrite Core The ferrite cores are used to shield the...

Страница 4: ... small amount of electric power To be safe and to decrease power consumption do not leave your TV in standby mode for long periods of time when you are away on vacation for example It is best to unplug the power cord Securing the Installation Space Keep the required distances between the TV the wall and other objects to ensure proper ventilation Failing to do so may result in a fire or a problem w...

Страница 5: ...1 EA A 1 EA Side View 4 5 D M4 X L8 x4 Correct assembly B A Rear Front C M4 X L12 x4 Top View DO NOT USE CHEMICALS DO NOT USE GREASE DO NOT USE OIL ATTENTION 1 3 2 Place a soft cloth over the table to protect the TV and then place the TV on the cloth screen side down Insert the Stand Guide into the slot of TV bottom side Incorrect assembly PD550 ZA BN68 03448A 01Eng indb 5 2011 02 14 오전 11 38 29 ...

Страница 6: ...the screws with the TV lying down it may lean to one side when you stand it up Do not insert your fingers into the stand base slot of the TV when installing the stand base 5 Incorret assembly Correct assembly Side View 4 B A Rear Front C M4 X L12 x4 Top View DO NOT USE CHEMICALS DO NOT USE GREASE DO NOT USE OIL ATTENTION 1 3 2 Place a soft cloth over the table to protect the TV and then place the ...

Страница 7: ...crews that are longer than the standard length or do not comply with the VESA standard screw specifications Screws that are too long may cause damage to the inside of the TV set x x For wall mounts that do not comply with the VESA standard screw specifications the length of the screws may differ depending on the wall mount specifications x x Do not fasten the screws too firmly This may damage the ...

Страница 8: ...lays information on the TV screen Exits the menu Gives direct access to channels Adjusts the volume Press to select additional digital channels being broadcast by the same station For example to select channel 54 3 press 54 then press and 3 Opens the OSD Displays My Contents Watch TV and Source Quickly select frequently used functions Returns to the previous menu Selects the on screen menu items a...

Страница 9: ...e or button 5 Adjust the value of an item with the or button The adjustment in the OSD may differ depending on the selected menu 6 ENTERE Press ENTERE to confirm the selection 7 EXITe Press EXIT For the best cable connections to this product be sure to use cables no thicker than 0 55 inches 14mm y y Maximum thickness 0 55 inches 14mm Using an EX Link Cable Connection Available Devices External dev...

Страница 10: ...te and Time select Next and then press ENTERE 4 Selecting search options for auto tuning Press the or button to select Air or Cable and then press ENTERE A check appears on your selection Select Next and then press the ENTERE button You can check both if you have both connected If you selected Cable you ll go to the Cable System screen Use the or button to select Digital or Analog and then press E...

Страница 11: ...vice about the HDMI version and if out of date request an upgrade x x Be sure to purchase a certified HDMI cable Otherwise the picture may not display or a connection error may occur x x We recommend using a basic high speed HDMI cable or an HDMI cable that supports Ethernet Note that this TV does not support the Ethernet function via HDMI Using a Component up to 1080p or an Audio to Video 480i on...

Страница 12: ...hen the source is a digital component such as a DVD player Blu ray player cable box STB Set Top Box satellite receiver and you connected it to the TV via HDMI you will only hear 2 CH audio from the home theater receiver If you want to hear 5 1 CH audio connect the digital audio out jack from your DVD Blu ray player cable box STB satellite receiver directly to an amplifier or home theater Connectin...

Страница 13: ...x The set may operate abnormally if you select a non standard video format x x Separate and Composite modes are supported SOG Sync On Green is not supported Changing the Input Source Source Use to select TV or an external input source such as a DVD player Blu ray player cable box STB satellite receiver TV PC AV Component1 Component2 HDMI1 DVI HDMI2 HDMI3 HDMI4 USB AllShare 1 Press the SOURCE butto...

Страница 14: ...ost Configuration Protocol DHCP to configure network connections automatically If your have a Static IP network see your user s manual for configuration instructions To configure your network connection for a network that uses DHCP follow these steps 1 Connect your TV to your network as shown in the illustrations above 2 Turn on your TV press the MENU button on your remote and the select Network N...

Страница 15: ... then press ENTERE again 4 The Network Connection screen appears and verifies the network connection When the connection has been verified the Internet connection successful message appears Network set up is completed If your TV cannot acquire network the connection values automatically or if you want to set the connection manually select IP Settings on the network test screen Set Internet Protoco...

Страница 16: ...E If you want to return to the e Manual press the E MANUAL button on your remote You can not use Try Now function if the menu is not activated TV Screen Displays the program movie video etc you are currently watching The category list Press l or r button to select the category you want Displays the sub menu list Use the arrow buttons on your remote to move the cursor Press the ENTERE button to sel...

Страница 17: ... topic To return to the e Manual screen press the E MANUAL button b Green Home Moves to the e Manual home screen Yellow Zoom Magnifies a screen Blue Index Displays the Index screen L Page Moves to previous or next page e Exit Exit the e Manual U Move R Return Changing the Preset Picture Mode O O MENUm Picture Picture Mode ENTERE Picture Mode Picture modes apply preset adjustments to the picture Se...

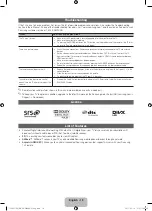
Страница 18: ... the connected device by unplugging and then reconnecting the device s power cable The remote control does not work Replace the remote control batteries Make sure the batteries are installed with their poles in the correct direction Clean the sensor s transmission window on the remote Try pointing the remote directly at the TV from 5 6 feet away The cable set top box remote control doesn t turn th...

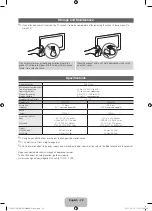
Страница 19: ...the appropriate supplied screw If you use a different screw you can damage your TV 2 Firmly fasten the screw you provided size M4xL20 or similar to the wall or cabinet where the TV is to be installed If you fasten the screw to the wall we recommend you drive the screw into a stud If that is not possible use a molly to anchor the screw 3 Tie the TV Holder cord to the screw fastened on the wall or c...

Страница 20: ...Size Diagonal 51 Class 50 7 measured diagonally 59 Class 59 0 measured diagonally Sound Output 10 W X 2 15W x 2 Dimensions WxDxH Body With stand 47 1 X 2 2 X 28 2 inches 1196 8 X 57 0 X 715 6 mm 47 1 X 12 0 X 31 0 inches 1196 8 X 305 0 X 787 4 mm 54 3 x 2 2 x 32 5 inches 1379 4 X 57 0 X 824 4 mm 54 3 x 13 2 x 35 4 inches 1379 4 x 335 0 x 899 0 mm Weight Without Stand With Stand 48 1 Ibs 21 8 kg 57...

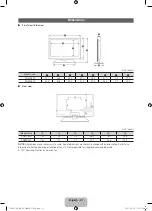
Страница 21: ... PN51D550 15 7 4 2 4 9 36 4 15 7 18 9 PN59D550 15 7 7 0 7 7 40 7 23 6 20 3 NOTE All drawings are not necessarily to scale Some dimensions are subject to change without prior notice Refer to the dimensions prior to performing installation of your TV Not responsible for typographical or printed errors 2011 Samsung Electronics America Inc 1 2 3 4 5 6 1 2 3 4 5 6 7 8 PD550 ZA BN68 03448A 01Eng indb 21...

Страница 22: ...This page is intentionally left blank PD550 ZA BN68 03448A 01Eng indb 22 2011 02 14 오전 11 38 51 ...

Отзывы: