Samsung PN51D495 Скачать руководство пользователя страница 10

English - 10

Plug & Play (Initial Setup)

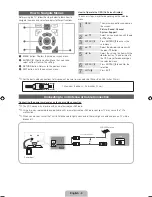
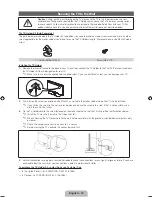
When you turn the TV on for the first time, a sequence of on-screen prompts will assist in configuring basic settings. To turn on 
the TV, press the 

POWER

P

 button.


Plug & Play

 is available only when the 

Source

 is set to TV.


To return to the  previous step in the 

Plug & Play

 sequence, press the red button, and then press 

ENTER

E

.


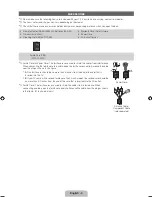
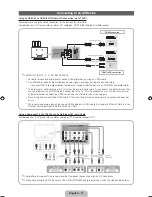
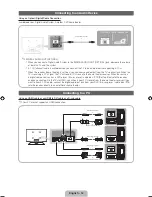
Before turning on the TV, make sure you have connected the TV to an antenna or cable connection (p. 8).

1

Selecting the OSD 
Language

Press the 

 or 

 button to select a language. Press 

ENTER

E

 twice 

when done.

2

Selecting the usage 
mode

Press the 

 or 

 button to select 

Home Use

, and then press the 

ENTER

E

 button twice.

Select 

Home Use

 mode. 

Store Demo

 mode is for retail environments.

3

Setting the 

Clock 

Mode

Press the 

 or 

 button to select 

Auto

 or 

Manual

, and then press 

ENTER

E

 twice.


If you selected 

Auto

, you’ll go to the 

Time Zone

 and 

DST

 screen. Select 

Time Zone


or 

DST

, and then press 

ENTER

E

. On the 

Time Zone

 screen, use the 

 or 


button to select your zone, and then press 

ENTER

E

. On the 

DST

 screen, press, 

ENTER

E

, then select whether to turn 

DST

 (Daylight Savings Time) on or off. When 

done, press 

ENTER

E

.


If you selected 

Manual

, you’ll go to the 

Date

 and 

Time

 screen. Select 

Date

 or 

Time

and then press 

ENTER

E

. Then, use the number buttons or the 

 or 

 button to 

set the date or time. Use the 

 or 

 button to move between entry fields. When 

done setting the 

Date

 and 

Time

, select 

Next

, and then press 

ENTER

E

.

4

Selecting search 
options for auto tuning

Press the 

 or 

 button to select 

Air

 or 

Cable

, and then press 

ENTER

E

. A check 

appears on your selection. Select 

Next

, and then press the 

ENTER

E

 button. You can 

check both if you have both connected.


If you selected

 Cable

, you’ll go to the Cable System screen. Use the 

 or 

 button 

to select 

Digital

 or 

Analog

, and then press. 

ENTER

E

. Use the 

 or 

 button 

to select the correct cable signal format - 

STD

HRC

, or 

IRC

 - and then press 

ENTER

E

. Most cable systems use 

STD

. Select the correct cable signal format for 

both the Digital and Analog systems.

When done, select 

Next

, and the press 

ENTER

E

.

5

Selecting and 
memorizing channels

The channel search will start automatically. This can take up to 30 minutes.
For more information, refer to 

Channel


Auto Program

 in the e-Manual.


Press the 

ENTER

E

 button at any time to interrupt the memorization process.

6

Enjoy your TV

.

Press the 

ENTER

E

 button.

If You Want to Rerun Plug & Play...


O

MENU


System


Plug & Play


ENTER

E


NOTE


y

To change the TV’s setting from 

Store Demo

 to 

Home Use

 when not in Plug & Play, press the volume button on the TV. 

When you see the volume bar on the screen, press and hold the 

MENU

 button on the TV for 5 sec.
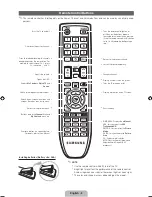
P

POWER

INFO

GUIDE

[PD495-ZA]BN68-03496F-00Eng.indb   10

2011-07-01   오전 10:04:15

Содержание PN51D495

Страница 1: ...tions or comments relating to Samsung products please contact the SAMSUNG customer care center Country Customer Care Center Web Site Address CANADA 1 800 SAMSUNG 726 7864 www samsung com Samsung Electronics Canada Inc Customer Service 55 Standish Court Mississauga Ontario L5R 4B2 Canada U S A 1 800 SAMSUNG 726 7864 www samsung com Samsung Electronics America Inc 85 Challenger Road Ridgefield Park ...

Страница 2: ...o are any originally specified provisions for in home or on site services minimum or maximum repair times exchanges or replacements accessories options upgrades or consumables For the location of a SAMSUNG Authorized Service Center please call toll free In the United States 1 800 SAMSUNG 1 800 726 7864 In Canada 1 800 SAMSUNG Important User Information Screen Image retention Do not display a still...

Страница 3: ...es are used to shield the cables from interference When connecting the ferrite core to a cable open the ferrite core and clip it around the cable near the plug as shown in the figure x x A One ferrite core should be no more than 8 inches from the end of the cord that is inserted into the TV x x B If your TV came with a second ferrite core the 43 inch model the second core should be no more than 3 ...

Страница 4: ... the RS232 cable contact www SamsungParts com RS232 AA39 00311A HDMI HDMI DVI Audio Component Composite AV Coaxial RF VGA Check the cable before plug in Cable Ports HDMI USB Optical Warning Do not plug cable upside down Be sure to check before plug in ...

Страница 5: ...f and continues to consume a small amount of electric power To be safe and to decrease power consumption do not leave your TV in standby mode for long periods of time when you are away on a vacation for example It is best to unplug the power cord Securing the Installation Space Keep the required distances between the TV the wall and other objects to ensure proper ventilation Failing to do so may r...

Страница 6: ...he Stand 3 Fasten four screws M4 X L8 at position NOTE x x Make sure to distinguish between the front and back of the Stand and Guide Stand when assembling them x x Make sure that at least two people lift and move the PDP TV Do not insert your fingers into the stand base slot of the TV when installing the stand base x4 M4 X L12 x4 M4 X L8 Rear Front M4 X L12 x4 Top View DO NOT USE CHEMICALS DO NOT...

Страница 7: ...mbly are provided x x Do not use screws that do not comply with the VESA standard screw specifications x x Do not use screws that are longer than the standard length or do not comply with the VESA standard screw specifications Screws that are too long may cause damage to the inside of the TV set x x For wall mounts that do not comply with the VESA standard screw specifications the length of the sc...

Страница 8: ...ily Displays channel lists on the screen Turns the 3D image on or off Displays information on the TV screen Exits the menu Gives direct access to channels Press to select additional digital channels being broadcast by the same station For example to select channel 54 3 press 54 then press and 3 Displays My Contents Watch TV and Source Quickly select frequently used functions Returns to the previou...

Страница 9: ...t the desired submenu with the or button 5 Adjust the value of an item with the or button The adjustment in the OSD may differ depending on the selected menu 6 ENTERE Press ENTERE to confirm the selection 7 EXITe Press EXIT For the best cable connections to this product be sure to use cables no thicker than 0 55 inches 14mm x x Maximum thickness 0 55 inches 14mm Connecting to an Antenna or Cable C...

Страница 10: ...r Time and then press ENTERE Then use the number buttons or the or button to set the date or time Use the or button to move between entry fields When done setting the Date and Time select Next and then press ENTERE 4 Selecting search options for auto tuning Press the or button to select Air or Cable and then press ENTERE A check appears on your selection Select Next and then press the ENTERE butto...

Страница 11: ...ernal device about the HDMI version and if out of date request an upgrade x x Be sure to purchase a certified HDMI cable Otherwise the picture may not display or a connection error may occur x x We recommend using a basic high speed HDMI cable or an HDMI cable that supports Ethernet Note that this TV does not support the Ethernet function via HDMI Using a Component up to 1080i or an Audio Video 48...

Страница 12: ...he home theater receiver When the source is a digital component such as a DVD player Blu ray player cable box STB Set Top Box satellite receiver and you connected it to the TV via HDMI you will only hear 2 CH audio from the home theater receiver If you want to hear 5 1 CH audio connect the digital audio out jack from your DVD Blu ray player cable box STB satellite receiver directly to an amplifier...

Страница 13: ...ay player cable box STB satellite receiver 1 Press the SOURCE button on your remote 2 Select a desired external input source You can change the view mode between the All and Connected by pressing the l or r button TV PC AV Component1 Component2 HDMI1 DVI HDMI2 HDMI3 USB You can only choose external devices that are connected to the TV In Source connected inputs will be highlighted In Source PC alw...

Страница 14: ...en Displays the program movie video etc you are currently watching The category list Press l or r button to select the category you want Displays the sub menu list Use the arrow buttons on your remote to move the cursor Press the ENTERE button to select the sub menu you want Operation Buttons Blue Index Displays the Index screen E Enter Select a category or sub menu e Exit Exit the e Manual Basic ...

Страница 15: ... the e Manual screen press the E MANUAL button b Green Home Moves to the e Manual home screen Yellow Zoom Magnifies a screen Blue Index Displays the Index screen L Page Moves to previous or next page e Exit Exit the e Manual U Move R Return Changing the Preset Picture Mode O O MENUm Picture Picture Mode ENTERE Picture Mode Picture modes apply preset adjustments to the picture Select a mode using t...

Страница 16: ... it by taking advantage of Auto Motion Plus y y Auto Motion Plus User Menu Picture Picture Options Auto Motion Plus Unwanted Powering off If your Samsung TV appears to turn off by itself there may be an issue with either your Timer settings or your Eco friendly No Signal Power Off feature First make sure you Sleep Timer is not accidentally set The sleep timer allows you the comfort of falling asle...

Страница 17: ...ce s power cable The remote control does not work Replace the remote control batteries Make sure the batteries are installed with their poles in the correct direction Clean the sensor s transmission window on the remote Try pointing the remote directly at the TV from 5 6 feet away The cable set top box remote control doesn t turn the TV on or off or adjust the volume Program the Cable Set remote c...

Страница 18: ...r your TV Make sure to use only the appropriate supplied screw If you use a different screw you can damage your TV 2 Firmly fasten the screw you provided size M4xL20 or similar to the wall or cabinet where the TV is to be installed If you fasten the screw to the wall we recommend you drive the screw into a stud If that is not possible use a molly to anchor the screw 3 Tie the TV Holder cord to the...

Страница 19: ...ure Storage Humidity 50 F to 104 F 10 C to 40 C 10 to 80 non condensing 4 F to 113 F 20 C to 45 C 5 to 95 non condensing Stand Swivel Left Right 0 Model Name PN51D495 Screen Size Diagonal 51 Class 50 7 measured diagonally Sound Output 10 W X 2 Dimensions WxDxH Body With stand 46 8 x 2 2 x 27 8 inches 1187 8 x 56 0 x 706 6 mm 46 8 x 9 9 x 30 8 inches 1187 8 x 251 8 x 781 9 mm Weight Without Stand W...

Страница 20: ...s Model name 1 2 3 4 5 6 PN51D495 15 7 3 9 4 7 36 2 15 7 18 6 NOTE All drawings are not necessarily to scale Some dimensions are subject to change without prior notice Refer to the dimensions prior to performing installation of your TV Not responsible for typographical or printed errors 2011 Samsung Electronics America Inc 1 2 3 4 5 6 1 2 3 4 5 6 7 8 ...

Страница 21: ...This page is intentionally left blank ...

Отзывы: