background image

English - 10

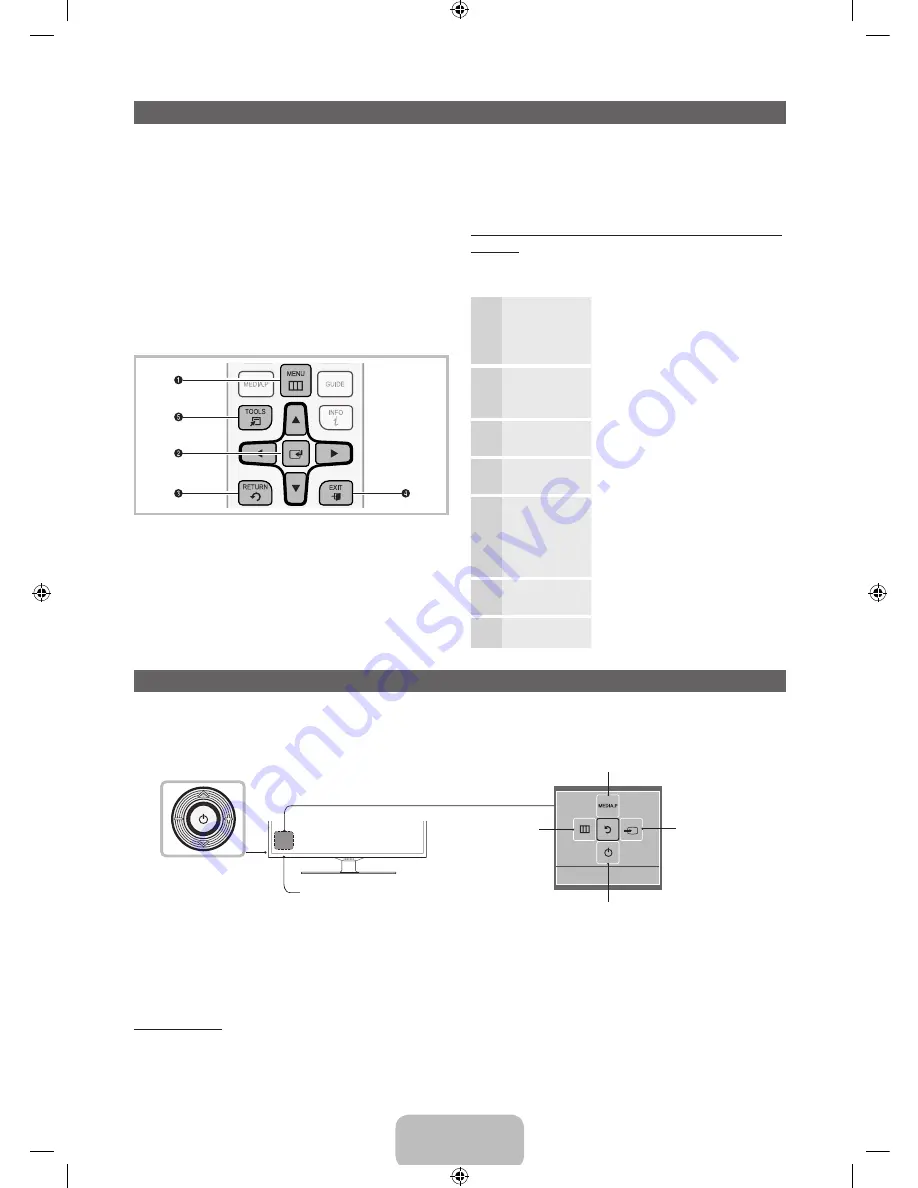
Using the TV’s Controller (Panel Key)

The TV’s Controller, a small joy stick like button on the rear left side of the TV, lets you control the TV without the remote 
control. To open a function and view it on the screen or select a setting displayed on the screen, push the controller 
backwards, forwards, left, or right. To confirm a setting after you have selected it, press up on the Controller.

TV Controller

The image is drawn as if 
you are facing the front 
side of the TV.

Remote control sensor

Function menu

Return

Select 

Media Play 

Select a 

Source

Power Off

Select the 

Menu


To close the 

Menu

Media Play

, or 

Source

 screens, press the Controller for more than 1 second. 


When selecting a function by moving the controller backwards, forwards, left, or right, be sure not to press the 
controller. If you press it first, it will not operate properly when you move it.


The product color and shape may vary depending on the model. 

Standby mode

Your TV enters Standby mode when you turn it off and continues to consume a small amount of electric power. To be 
safe and to decrease power consumption, do not leave your TV in standby mode for long periods of time (when you are 
away on vacation, for example). It is best to unplug the power cord.

Your TV’s Main and Tools menus contains functions that 
let you control the TV’s features. For example, in the Main 
menu you can change the size and configuration of the 
picture, its brightness, its contrast and so on. There are 
also functions that let you control the TV’s sound, channel 
configuration, energy use, and a host of other features. 
To access the main, on-screen menu, press the 

MENU


(

m

) button on your remote. To access Tools menus, press 

the 

TOOLS

 button. Tools menus are available when the 

TOOLS

 menu Icon is displayed on the bottom right of the 

screen.
The illustration below displays the buttons on the remote 
you use to navigate the menus and select and adjust 
different functions.

B

C

D

1


MENU

 button: Displays the main on-screen menu.

2


ENTER

E

 and Direction buttons: Use the Direction 

buttons to move the cursor and highlight an item. 
Use the Enter button to select an item or confirm the 
setting.

3


RETURN

 button: Returns to the previous menu.

4


EXIT

 button: Exits the on-screen menu.

TOOLS

 button: Displays the Tools menus when 

available.

How to Operate the Main Menu (OSD - On Screen 
Display)

The access steps may differ depending on the menu 
option you select.

1

MENU

The main menu options appear 
on the screen:

Picture, Sound, Broadcasting, 
Applications, System, Support

.

2

▲ / ▼

Select a main menu option on 
the left side of the screen with 
the 

 or 

 button.

3

ENTER

E

Press 

ENTER

to access the 

sub-menus.

4

▲ / ▼

Select the desired submenu with 
the 

 or 

 button.

5

◄ / ►

Adjust the value of an item 
with the 

 or 

 button. The 

adjustment in the OSD may 
differ depending on the selected 
menu.

6

ENTER

E

Press 

ENTER

E

 to confirm the 

selection.

7

EXIT

e

Press 

EXIT

.

How to Navigate Menus

[PH4500-5000-ZA]BN68-05661A-00ENG.indb   10

2014-01-03     10:30:45

Содержание PN43F4500

Страница 1: ...c Customer Service 55 Standish Court Mississauga Ontario L5R 4B2 Canada U S A 1 800 SAMSUNG 726 7864 www samsung com us Samsung Electronics America Inc 85 Challenger Road Ridgefield Park NJ 07660 Than...

Страница 2: ...e not likely to be walked on or pinched by items placed on or against them Pay particular attention to cords at the plug end where connected to adaptors and at the point where they exit from the appar...

Страница 3: ...ration Do not drop or strike the product If the product is damaged disconnect the power cord and contact a service center To clean the product unplug the power cord from the power outlet and wipe the...

Страница 4: ...reen These pixels will have no impact on the performance of the product Avoid operating the TV at temperatures below 41 F 5 C A still image displayed too long may cause permanent damage to the PDP Pan...

Страница 5: ...emote Control BN59 01177A Batteries AAA x 2 Owner s Instructions Power Cord Regulatory Guide Stand Wire Holder BN61 08370A Assembling the Stand Wire Holder Input Cables Sold Separately To purchase an...

Страница 6: ...VI jack If you connect a device to the HDMI IN 2 DVI port using an HDMI to DVI cable the audio will not work DVI does not transmit audio You must add a separate audio connection For PCs with DVI video...

Страница 7: ...2 100 000 c VESA DMT 640 x 480 31 469 59 940 25 175 c c 640 x 480 37 861 72 809 31 500 c c 640 x 480 37 500 75 000 31 500 c c 800 x 600 37 879 60 317 40 000 c c 800 x 600 48 077 72 188 50 000 c c 800...

Страница 8: ...C Controls the caption decoder Cut off the sound temporarily Displays the EPG Electronic Program Guide Displays the channel list on the screen Displays information on the TV screen Quickly select freq...

Страница 9: ...y HD DVD DMA Select the name of the device connected to each input jack to make your input source selection easier When you view the Source list the device name and the input jack will be displayed to...

Страница 10: ...size and configuration of the picture its brightness its contrast and so on There are also functions that let you control the TV s sound channel configuration energy use and a host of other features...

Страница 11: ...category or sub menu e Exit Exit the e Manual How to toggle between an e Manual topic and the corresponding OSD menu s E MANUAL Try Now a Try Now b Home Zoom Index L Page e Exit Basic Features Changi...

Страница 12: ...you are viewing an e Manual instruction page press the Yellow Zoom to magnify the screen You can scroll through the magnified screen by using the u or d buttons To return the screen to normal size pre...

Страница 13: ...Tint G R and so on Unwanted Powering Off If your Samsung TV appears to turn off by itself there may be an issue with either your Timer settings or your Eco friendly No Signal Power Off feature First...

Страница 14: ...o to MENU System Eco Solution Energy Saving Try resetting the picture to the default picture settings go to MENU Picture Reset Picture There is a dotted line on the edge of the screen If the picture s...

Страница 15: ...Make sure the coaxial cable is connected securely Run Auto Program to add available channels to the channel list There are 3 options STD HRC and IRC Most cable systems use STD Verify the antenna is p...

Страница 16: ...smell is normal and will dissipate over time TV Signal Information is unavailable in the Self Diagnosis Test menu This function is only available for digital channels the TV receives from an Antenna R...

Страница 17: ...hown in the table below Samsung wall mount kits contain a detailed installation manual and all parts necessary for assembly are provided Do not use screws that do not comply with the VESA standard scr...

Страница 18: ...he appropriate supplied screw If you use a different screw you can damage your TV 2 Firmly fasten the screw you provided size M4 x L20 or similar to the wall or cabinet where the TV is to be installed...

Страница 19: ...nd the double D symbol are trademarks of Dolby Laboratories Manufactured under a license from U S Patent No s 5 956 674 5 974 380 5 978 762 6 487 535 6 226 616 7 212 872 7 003 467 7 272 567 7 668 723...

Страница 20: ...ass 50 7 measured diagonally 60 Class 59 9 measured diagonally 64 Class 64 0 measured diagonally Sound Output 10W x 2 Dimensions W x H x D Body With stand 46 6 x 27 6 x 2 1 inches 1185 2 x 702 1 x 55...

Страница 21: ...Audio Codec avi mkv asf wmv mp4 3gp vro mpg mpeg ts tp trp mov flv vob svi divx AVI MKV ASF MP4 3GP MOV FLV VRO VOB PS TS DivX 3 11 4 5 6 1920 x 1080 6 30 30 AC3 LPCM ADPCM IMA MS AAC HE AAC WMA DD MP...

Страница 22: ...ass Powerdivx psb Internal Name Container Format Xsub AVI Picture Format SubStation Alpha MKV Text Format Advanced SubStation Alpha MKV Text Format SubRip MKV Text Format MPEG 4 Timed text MP4 Text Fo...

Страница 23: ...ts and the requirements conditions exclusions and limitations contained herein SAMSUNG will additionally provide Warranty Repair Service in the United States on SAMSUNG products purchased in Canada an...

Страница 24: ...blems incorrect electrical line voltage fluctuations and surges customer adjustments and failure to follow operating instructions cleaning maintenance and environmental instructions that are covered a...

Отзывы: