background image

C

HAPTER

T

WO

: I

NSTALLATION

2

.7

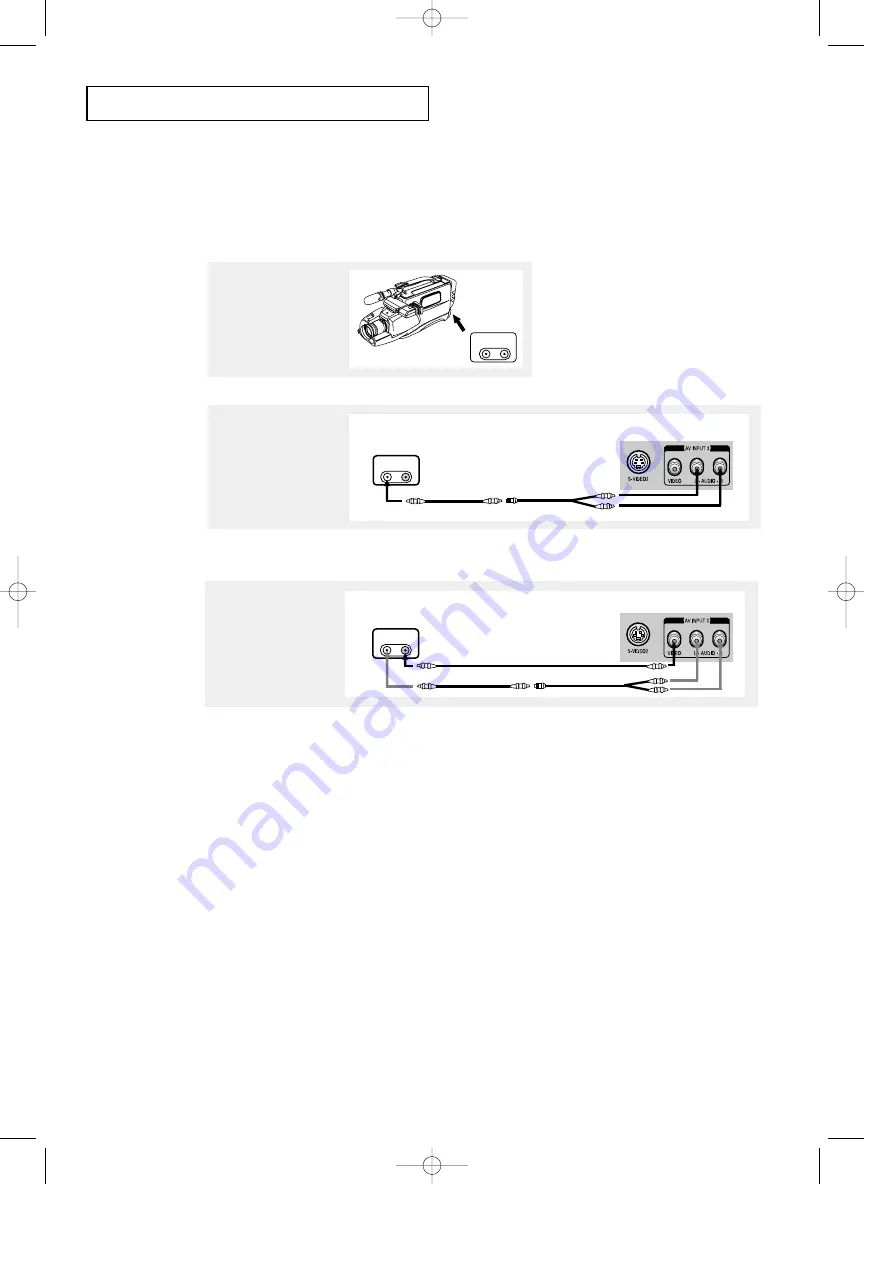
Camcorder

Output Jacks

TV Front Panel

Input Jacks

VIDEO

AUDIO

OUTPUT

Audio Cable

Y-Connector

2

Connect an audio cable
between the AUDIO
OUTPUT jack on the
camcorder and the
AUDIO terminals on the
front of the TV.

3

Connect a video cable
between the VIDEO
OUTPUT jack on the
camcorder and the
VIDEO terminal on the
front of the TV.

I

N S TA L L AT I O N

Camcorder

Output Jacks

VIDEO

AUDIO

OUTPUT

1

Locate the A/V output
jacks on the camcorder.
They are usually found
on the side or back of
the camcorder.

Connecting a Camcorder

The front panel jacks on your TV make it easy to connect a camcorder to your TV. They
allow you to view the camcorder tapes without using a VCR. (Also see “Viewing a VCR or
Camcorder Tape” on page 3.14)

The audio-video cables shown here are usually included with a Camcorder. (If not, check
your local electronics store.) If your camcorder is stereo, you need to connect a set of two
cables.

This figure shows the Standard Connector-jack panel. The actual configuration on your

TV may be different, depending on the model.

Camcorder

Output Jacks

VIDEO

AUDIO

OUTPUT

Video Cable

TV Front Panel

Input Jacks

00578C(E)-CHAPTER 2  7/3/00  4:39 PM  Page 7

Содержание PCJ533R

Страница 1: ...Owner s Instructions COLOR TELEVISION AA68 00578C ENG PCJ533R HCJ552W HCJ652W 00578C E FRONT COVER 7 3 00 4 36 PM Page 1 ...

Страница 2: ...rounding system of the building as close to the point of cable entry as practical Caution FCC CSA regulations state that any unauthorized changes or modifica tions to this equipment may void the user s authority to operate it Caution To prevent electric shock match the wide blade of plug to the wide slot and fully insert the plug Attention pour eviter les chocs electriques introduire la lame le pl...

Страница 3: ...e where it can fall A falling TV can cause serious injury to a child or adult and serious damage to the appliance Use only with a cart stand tripod bracket or table recommended by the manu facturer or sold with the TV Follow the manufacturer s instruc tions when mounting the unit and use a mounting accessory rec ommended by the manufacturer Move the TV and cart with care Quick stops excessive forc...

Страница 4: ...t to service the TV yourself Refer all servicing to qualified service personnel Unplug the unit from the wall outlet and refer servicing to qualified service personnel under the following conditions when the power supply cord or plug is damaged if liquid has been spilled on the unit or if objects have fallen into the unit if the TV has been exposed to rain or water if the TV does not operate norma...

Страница 5: ... This device complies with Part 15 of the FCC Rules Operation is subject to the following two conditions 1 this device may not cause harmful interference and 2 this device must accept any interference received including interference that may cause undesired opera tion The party responsible for product compliance SAMSUNG ELECTRONICS CO LTD America QA Lab of Samsung 85 West Tasman Drive San Jose CA ...

Страница 6: ...hapter 3 Operation 3 1 Turning the TV On and Off 3 1 Adjusting basic convergence 3 1 Adjust Red Convergence 3 2 Adjust Blue Convergence 3 2 Viewing the Menus and On Screen Displays 3 3 Viewing the Menus 3 3 Viewing the Display 3 3 Selecting a Menu Language 3 4 Memorizing the Channels 3 5 Selecting the Video Signal source 3 5 Storing Channels in Memory Automatic Method 3 6 Adding and Erasing Channe...

Страница 7: ...g the Available Channels 4 15 Using the V Chip 4 16 Setting Up Your Personal ID Number PIN 4 16 How to Enable Disable the V Chip 4 17 How to Set up Restrictions Using the TV guidelines 4 17 How to Set up Restrictions using the MPAA Ratings G PG PG 13 R NC 17 X 4 19 How to Reset the TV after the V Chip Blocks a Channel Emergency Escape 4 20 Chapter 5 PC Display 5 1 Using Your TV as a Computer PC Di...

Страница 8: ... that can be stored in the TV s memory Automatic channel tuning for up to 181 channels A special filter to reduce or eliminate reception problems Fine tuning control for the sharpest picture possible A built in multi channel sound decoder for stereo and bilingual listening Built in dual channel speakers 15 watts per channel A special sleep timer Picture in Picture Headphone jack for private listen...

Страница 9: ...ned off this indicator stays lit Clock must be set before using this function ˇ Remote Control Sensor For model PCJ533R Aim the remote control towards this spot on the TV VOLUME Press to increase or decrease the volume Also used to select items on the on screen menu CH and CH Press to change channels Also press to highlight various items on the on screen menu ˆ MENU Press to see an on screen menu ...

Страница 10: ...er or a video game ˇ AUDIO IN jacks Used to connect the audio signals from a camcorder or video game Front Panel Jacks You can use the front panel jacks to connect an A V component that is used only occasionally such as a camcorder or video game For information on connecting equipment see pages 2 1 2 7 For models HCJ552W HCJ652W For model PCJ533R 00578C E CHAPTER 1 7 3 00 4 38 PM Page 3 ...

Страница 11: ... These audio video signals are identical to A V signals being displayed on the big screen Typically used as the input signals for a recording VCR Note The monitor out does not operate in DVD or DTV mode DVD INPUT Connect video from a DVD player DVD DTV AUDIO INPUT Connect to the audio output jacks of a DVD player SET TOP BOX DTV INPUT For models HCJ552W HCJ652W Connects video from a SET TOP BOX SU...

Страница 12: ...one of the preset factory settings or select your personal customized sound settings MUTE Press to temporarily cut off the sound CH and CH Channel Up Down Press CH or CH to change channels Also used to highlight selections on the on screen menus Ô MODE Selects a target device to be con trolled by the Samsung remote control i e TV PC Cable box or VCR DVD 3D PHONIC Selects one of the 3D Phonic modes...

Страница 13: ...P window to any of the four corners of the TV screen P SIZE Press to make the PIP window larger or smaller SWAP Exchanges the video signal that is currently displayed on the main screen with the signal in the PIP window PIP CH Displays the available channels in sequence These buttons change channels in the PIP window only STILL Press to stop the action during a particular scene Press again to resu...

Страница 14: ...ing a sep arate remote control that is sup plied with the set top box When pressing the DTV button the DTV mode is selected after approximately 5 seconds Select either 1080i or 480p format for the set top box output signal Otherwise the picture may flicker ADD ERASE Press to add or erase channels in the TV s memory For model HCJ552W HCJ652W 00578C E CHAPTER 1 7 3 00 4 38 PM Page 7 ...

Страница 15: ...eparate VHF and UHF Antennas on page 2 2 Chapter Two INSTALLATION Antennas with 300 ohm Flat Twin Leads If you are using an off air antenna such as a roof antenna or rabbit ears that has 300 ohm twin flat leads follow the directions below 1 Place the wires from the twin leads under the screws on the 300 75 ohm adaptor not sup plied Use a screwdriv er to tighten the screws 2 Plug the adaptor into t...

Страница 16: ...the VHF UHF terminal on the bottom of the rear panel INSTALLATION Antennas with 75 ohm Round Leads 1 Plug the antenna lead into the VHF UHF terminal on the bottom of the back panel Separate VHF and UHF Antennas If you have two separate antennas for your TV one VHF and one UHF you must combine the two antenna signals before connecting the antennas to the TV This procedure requires a an optional com...

Страница 17: ...f your cable box descrambles only some channels such as premium channels follow the instructions below You will need a two way splitter an RF A B switch and four lengths of coaxial cable These items are available at most electronics stores 1 Find and disconnect the cable that is connected to the ANTENNA IN terminal on your cable box This terminal might be labeled ANT IN VHF IN or simply IN 2 Conne...

Страница 18: ...TION Connecting a VCR These instructions assume that you have already connected your TV to an antenna or a cable TV system according to the instructions on pages 2 1 2 3 Skip step 1 if you have not yet connected to an antenna or a cable system After you ve made this connection set the A B switch to the A position for normal viewing Set the A B switch to the B position to view scrambled channels Wh...

Страница 19: ...uded with a VCR If not check your local electronics store If you have a mono non stereo VCR use the Y connector supplied to hook up to the left and right audio input jacks of the TV If your VCR is stereo you must connect two cables Coaxial Cable VCR Rear Panel TV Rear Panel IN OUT ANTENNA VIDEO OUT AUDIO OUT L R 1 To begin follow steps 1 3 in the previous section to connect the antenna or cable to...

Страница 20: ...deo Cable 2 Connect a video cable between the VIDEO OUT jack on the TV and the VIDEO IN jack on the VCR Refer to your VCR s instructions for more information about how to record using this kind of connection The VCR input jacks might be either on the front or on back of the VCR Connecting a Digital TV Set Top Box For models HCJ552W HCJ652W Connect the Y Pb and Pr video outputs of the set top box t...

Страница 21: ... the side or back of the camcorder Connecting a Camcorder The front panel jacks on your TV make it easy to connect a camcorder to your TV They allow you to view the camcorder tapes without using a VCR Also see Viewing a VCR or Camcorder Tape on page 3 14 The audio video cables shown here are usually included with a Camcorder If not check your local electronics store If your camcorder is stereo you...

Страница 22: ...time The remote control can be used up to about 23 feet from the TV Assuming typical TV usage the Batteries last for about one year 2 Install two AAA size batteries Make sure to match the and ends of the batteries with the diagram inside the compartment Installing Batteries in the Remote Control 1 Slide the cover out com pletely 00578C E CHAPTER 2 7 3 00 4 39 PM Page 8 ...

Страница 23: ...tion V chip ANT English 1 Press MENU Press CH twice to highlight the Setup icon starts blinking Move Ent Menu SET UP Channel set up ANT CATV Time Convergence Language Caption V chip ANT English 2 Press VOL Press CH three times to highlight Convergence the letters change to blue color Turning the TV On and Off Press POWER You can also use the POWER button on the front panel CHAPTER THREE OPERATION ...

Страница 24: ...r line i e make a single vertical line that is as white as possible Adjust Red Convergence 7 If the left adjustments need press the number 4 button on the remote control to move the vertical red line to the left Use the VOL to buttons to move the line to the right or left If the right adjustments need press the number 6 button on the remote control to move the vertical red line to the right Use th...

Страница 25: ...TS Mono Signal Mono Viewing the Menus and On Screen Displays Viewing the Menus 1 With the power on press MENU The main menu appears on the screen Its left side has five icons Video Audio Setup Dolby and PIP The on screen menus disappear from the screen after about thirty seconds Move Ent Exit VIDEO Settings Contrast Brightness Sharpness Color Tint Custom 2 Use the CH and CH buttons to highlight on...

Страница 26: ... French 4 Press MENU twice to exit 2 Press VOL to display the SET UP menu Press CH four times to highlight Language Move Sel Menu SET UP Channel set up ANT CATV Time Convergence Language Caption V chip ANT English 1 Press MENU to display the menu Press CH two times to select SET UP Move Exit Ent SET UP Channel set up ANT CATV Time Convergence Language Caption V chip ANT English 00578C E CHAPTER 3 ...

Страница 27: ... antenna or a cable system 1 Press MENU to display the menu 2 Press CH two times to highlight SET UP Move Exit Ent SET UP Channel set up ANT CATV Time Convergence Language Caption V chip ANT English 3 Press VOL The setup sub menu will appear Press CH to highlight ANT CATV Move Sel Menu SET UP Channel set up ANT CATV Time Convergence Language Caption V chip ANT English 4 Repeatedly press VOL to cyc...

Страница 28: ...ocess and return to the Setup menu 2 Press VOL while Channel set up is high lighted A new sub menu will appear and Auto program will be highlighted Move Ent Menu SET UP Auto program Fine tune LNA 00 Off 1 First select the correct signal source ANT STD HRC IRC See steps 1 4 on previous page Press MENU then press CH twice to highlight SET UP Press VOL to access the SETUP sub menu Channel set up will...

Страница 29: ... TV will change channels when you press the second number When you use the number buttons you can directly select channels that were either erased or not memorized To select a channel over 100 press the 100 button For channel 122 press 100 then 2 then 2 To change to single digit channels 0 9 faster press 0 before the single digit For channel 4 press 0 then 4 2 Press ADD ERASE Repeatedly pressing t...

Страница 30: ...glish 3 Press CH twice to highlight Time menu Press VOL The Time menu will appear on the screen and Clock will be highlighted blue color SET UP Move Adj Menu Time Clock On time Off time Sleep Off On time volume AM AM Off AM Off 10 4 Press VOL again the hours digits will start blinking Press CH repeatedly until the correct hour appears After the hour is entered press VOL at this point the minutes d...

Страница 31: ...olume 1 Press MUTE and the sound cuts off The word Mute will appear in the lower left corner of the screen 2 To turn mute off press MUTE again or simply press either the VOL or VOL button Using Mute At any time you can temporarily cut off the sound using the Mute button 00578C E CHAPTER 3 7 3 00 4 40 PM Page 9 ...

Страница 32: ... the word Custom is highlighted When Custom is high lighted the words Contrast Brightness Sharpness Color and Tint will appear on the screen Move Sel Menu VIDEO Settings Contrast Brightness Sharpness Color Tint Custom 4 Press VOL or VOL to increase or decrease the value of a particular item For example if you select Brightness pressing VOL increas es it Press MENU twice to exit After adjusting an ...

Страница 33: ...ing video games Choose Custom if you want to adjust the settings accordings to personal preference see Customizing the Picture page 3 10 1 Press MENU to display the menu Video icon will be highlighted blinking Press VOL to display the VIDEO menu Move Sel Menu VIDEO Settings Contrast Brightness Sharpness Color Tint Custom 2 Press VOL or VOL to select the Standard Mild or Custom picture setting Stan...

Страница 34: ... Press CH to high light the AUDIO icon starts blinking Move Ent Exit AUDIO Settings Treble Bass Balance MTS Headphone Custom Mono Main Customizing the Sound You can use the on screen menus to adjust the bass treble and balance according to individual preference Alternatively you can use one of the automatic settings See next page 4 Press VOL or VOL to increase or decrease the value of a particular...

Страница 35: ...eos or concerts Choose Speech when watching a show that is mostly dialogue i e news Choose Movies when watching movies Choose Custom to recall your personalized settings 2 Press VOL or VOL repeatedly to select the Standard Music Speech Movie or Custom audio settings Move Sel Menu AUDIO Settings MTS Headphone Music Mono Main 1 Press MENU to display the menu Press CH once to highlight the AUDIO menu...

Страница 36: ...ay identifies all the active video sources and their corresponding input jacks ANT 4 ANT CATV Video 1 Connected Video 2 Connected Video 3 Connected S Video 1 Not connected S Video 2 Not connected DVD Not connected PC Not connected Move Ent TV Video Exit 3 Use the CH or CH button to highlight a particular signal source and then press VOL to activate it Press TV VIDEO to exit Select Video 1 Video 2 ...

Страница 37: ...has four modes TV PC CABLE and VCR DVD Press the MODE button to switch the remote control to the VCR DVD mode continued 4 Enter 3 digits of the VCR or DVD code listed on the next page for your brand of VCR or DVD Make sure you enter 3 digits of the code even if the first digit is a 0 If more than one code listed try the first one 5 Press POWER on the remote control Your VCR or DVD should turn on I...

Страница 38: ...0 007 009 013 045 046 052 008 053 007 009 013 045 046 052 014 007 012 000 007 008 014 015 046 053 064 067 013 045 076 014 016 000 015 027 008 009 010 013 015 020 023 027 034 041 042 047 049 057 062 065 067 068 070 002 012 018 019 043 048 058 015 000 007 008 032 053 007 014 005 015 035 036 008 002 005 007 008 014 016 030 035 051 053 008 002 014 016 030 046 002 014 088 089 002 014 016 030 046 073 00...

Страница 39: ...control press SET 2 Press the MODE button and make sure that the CABLE LED is illuminated Cable Box Codes Anvision Cablestar Eagle Eastern Int General Instrument GI Hamlin Hitachi Jerroid Macom Magnavox NSC Oak Osk Sigma Panasonic Philips Pioneer Randtek RCA Regal Regency SA Samsung Signature Sprucer Starcom Stargate 2000 Sylvania Texscan Tocom Unika Universal Viewster Warner Amex Zenith 007 008 0...

Страница 40: ...TV Time Convergence Language Caption V chip ANT English 3 Press CH to select On time Press VOL to highlight the On time hours The hours digits will start blinking Press CH or CH repeatedly to select the appropriate hours i e the hour when the TV will turn on SET UP Adj Move Menu Time Clock On time Off time Sleep Off On time volume 6 30 AM 5 00 AM Off AM Off 10 When you set the hours make sure the ...

Страница 41: ...Off time press CH to highlight Off time Press VOL and set the hours and minutes Follow the same proce dure as in steps 1 6 above SET UP Move Adj Menu Time Clock On time Off time Sleep Off On time volume 6 30 AM 5 15 AM On AM Off 10 1 Press the SLEEP button on the remote control 2 Press SLEEP repeatedly until the appropriate time interval appears any of the preset values from Off to 360 After about...

Страница 42: ...home recorded video tapes also provide closed captions Most pre recorded commercial video tapes provide closed captions as well Check for the closed caption symbol in your television schedule and on the tape s packaging Note The Caption feature does not work with DVD DTV or PC signals The DTV mode is not available on model PCJ533R 1 Press MENU to display the menu Press CH two times to select the S...

Страница 43: ... resume normal viewing SPECIAL FEATURES Fine Tuning Channels Use fine tuning to manually adjust a particular channel for optimal reception 1 Select the appropriate channel 2 Press MENU Press CH two times to highlight SET UP Move Exit Ent SET UP Channel set up ANT CATV Time Convergence Language Caption V chip ANT English 3 Press VOL to select Setup menu Channel set up will be highlighted Press VOL ...

Страница 44: ...u SET UP Auto program Fine tune LNA 01 Off 3 Press VOL or VOL to select LNA on Press MENU three times to exit Move Sel Menu SET UP Auto program Fine tune LNA 01 On Move Exit Ent SET UP Channel set up ANT CATV Time Convergence Language Caption V chip ANT English 1 Press MENU to display the menu Press CH two times to highlight the SET UP menu Press VOL to select the Set up menu Channel set up will b...

Страница 45: ...ll directions Select the mode Press the CH button to highlight Mode Next press VOL repeatedly until the appropriate mode appears Wide Phantom or Normal Some recommended settings Phantom Selected when the center speaker is either not present or not used In Phantom Mode the center sound is output through both left and right speakers Normal Selected when the center speaker is smaller than the main TV...

Страница 46: ...aboratories Licensing Corporation DOLBY the double D symbol and PRO LOGIC are trademarks of Dolby Laboratories Licensing Corporation Notes In order to enjoy the Dolby sound in the Dolby ProLogic Mode connect the TV to the external center and surround speakers The center speaker is built in to models HCJ552W HCJ652W The external speakers are not provided They must be pur chased separately The Dolby...

Страница 47: ... The text at the bottom of the menu tells you if the incoming audio is stereo SAP or mono 1 Press MENU to display the menu Press CH once to highlight the AUDIO menu Move Ent Exit AUDIO Settings Treble Bass Balance MTS Headphone Custom Mono Main Choose Stereo for channels that are broadcasting in stereo Choose Mono for channels that are broadcasting in mono or if you are having difficulty receiving...

Страница 48: ...rn the transmitter and Wireless Headphones on VO L 3 Adjust the volume of the Wireless Headphones 2 Press VOL to alternate between Main and Sub the sound associ ated with program in PIP window If PIP is not active then the Sub option is not available Press MENU twice to exit Move Sel Menu AUDIO Settings Treble Bass Balance MTS Headphone Custom Mono Sub Notes If there is an obstacle between the tra...

Страница 49: ...enu Press CH four times to highlight the PIP menu Press VOL to select the PIP menu PIP PIP Off Sel Menu 2 Press VOL to select PIP On If you turn TV off while watching and turn it on again the PIP window will disappear 3 Press MENU twice to exit Note Picture in Picture does not function when the V chip is active PIP PIP TV Video Swap PIP size ANT CATV Channel On TV Small ANT ANT 4 Move Sel Menu Qui...

Страница 50: ...s is dis played STD HRC or IRC PIP PIP TV Video Swap PIP size ANT CATV Channel On TV Small STD STD 4 Move Sel Menu Press TV VIDEO repeatedly to cycle through all of the available signal sources TV Video 1 Video 2 Video 3 S Video 1 and S Video 2 For more information about external A V components and sig nals see Viewing a VCR or Camcorder Tape on page 3 14 If you select TV the PIP image is the same...

Страница 51: ...r scene Press STILL again to resume normal video Freezing the PIP Image Press P SIZE to alternate between a smaller and larger PIP window Changing the Size of the PIP Window This procedure scans all of the available channels and then stores them in memory Press CH SCAN and the memorized channels will appear in sequence for 2 to 3 seconds per channel Press CH SCAN again to stop the scanning process...

Страница 52: ...es and high light Change pin Note When a particular field is highlighted its color turns BLUE SET UP V chip mode V chip lock TV guidelines MPAA rating Change pin No 4 While the Change pin field is selected press VOL The Change pin screen will appear Choose any 4 digits for your PIN and enter them SET UP Confirm new pin Confirm new pin SET UP Change pin Enter new pin Note If you forget the PIN pres...

Страница 53: ...CH six times to highlight the V chip menu Press VOL The Enter pin screen will appear Enter your 4 digit PIN number Menu SET UP V chip Enter pin 3 The V Chip mode screen will appear and V Chip lock will be highlighted turns blue color To enable the V Chip feature press VOL so that the V Chip lock field is YES Pressing VOL will alternate between YES and NO SET UP V chip mode V chip lock TV guideline...

Страница 54: ...CH button to block or unblock the category Press MENU once to save the TV guidelines A TV Rating will be highlighted BLUE and no letters will blink To exit this screen press MENU again To select a different TV Rating press CH or CH and then repeat the process Note 1 The TV Y7 TV PG TV 14 and TV MA have additional options See the next step to change any of the following sub ratings FV Fantasy viole...

Страница 55: ...ss CH or CH to change the sub rating Press MENU once to save the TV guidelines A TV Rating will be highlighted BLUE and no letters will blink To exit this screen press MENU again To select a different TV Rating press CH or CH and then repeat the process Note The V chip will automatically block certain categories that are More restrictive For example if you block L sub rating in TV PG then the L su...

Страница 56: ...U Move Ent Menu B Blocked U Unblocked G General audience no restrictions PG Parental guidance suggested PG 13 PG 13 Parents strongly cautioned R R Restricted Children under 17 should be accompanied by an adult NC 17 No children under age 17 X X Adults only NR Not rated 3 The V chip mode screen will appear Press the CH button twice and highlight MPAA rating SET UP V chip mode V chip lock TV guideli...

Страница 57: ...VE PC DISPLAY 5 1 TV Rear Panel PC Rear PC Audio inputs Connect these to the audio output jacks on your PC PC Audio outputs Connect these to the audio jacks of some other computer device such as a multi media PC monitor PC Video output Connect to the video input terminals of some other computer device such as a multi media PC monitor PC Video input Connect to the video output port on your PC 00578...

Страница 58: ... Settings is highlighted move the cursor so that control panel is highlighted When the control panel screen appears click on Display and a dis play dialog box will appear Navigate to the settings tab on the display dialog box The two key variables that apply the TV PC interface are resolution and col ors The correct settings for these two variables are Size sometimes called resolution 640 x 480 pi...

Страница 59: ...the PC is disconnected If so press the TV VIDEO button to enter the TV mode Also make sure that the PC is connect ed Connect only a PC monitor to the monitor output port while viewing the PC screen Otherwise random signals might appear Notes Both screen position and size will vary depending on the type of PC monitor and its resolution The table below shows all of the display modes that are support...

Страница 60: ...s Note The PC mode buttons on the remote control green color are active only when the remote control is set to the PC mode 3 Press the POSITION SIZE button Note Repeatedly pressing the POSITION SIZE button alternates between posi tion control and size control 4 UP DOWN Press CH CH to move the image up down 5 LEFT RIGHT Press VOL and VOL to move the image left right Changing the Position of the Ima...

Страница 61: ...ignal source 2 Press MODE to select PC mode The PC mode LED illuminates Note The PC mode buttons on the remote control green color are active only when the remote control is set to the PC mode 3 Press the POSITION SIZE button Note Repeatedly pressing the POSITION SIZE button alternates between posi tion control and size control Changing the Size of the Image 5 Adjusting Vertical Size Press CH CH t...

Страница 62: ...l be enlarged To restore the screen to normal size press S ENLARGE Repeatedly pressing S ENLARGE will toggle between the enlarged area and the normal sized screen 3 Enlarge a portion of the screen by pressing the number keys on the remote control For example pressing 1 enlarges the upper left area 4 To shift the position of the enlarged screen Press either CH CH for horizontal or press VOL VOL for...

Страница 63: ...screen image probably has lots of text and numbers How to Stop the Action While Viewing a Digital Video File MPEG AVI ETC 2 Press STILL and the display will alternate between a paused scene and ordi nary playback of the video file 1 Make sure the remote is set to PC mode and the signal source is PC See pages 5 3 5 4 1 Make sure the remote is set to PC mode and the signal source is PC See pages 5 3...

Страница 64: ...ck all wire connections Poor sound quality Try another channel Adjust the antenna No picture or sound Try another channel Press the TV VIDEO button Make sure the TV is plugged in Check the antenna connections No color wrong colors or tints Make sure the program is broadcast in color Adjust the picture settings Picture rolls vertically Adjust the antenna Check all wire connections The TV operates e...

Страница 65: ...n top of the cabinet Temperature If your TV is suddenly moved from a cold to a warm place unplug the power cord and allow at least two hours for moisture that may have formed inside the unit to dry completely Using Your TV in Another Country If you plan to take your TV with you to a foreign country please be aware of the different television systems that are in use around the world A TV designed f...

Страница 66: ...Owner s Instructions COLOR TELEVISION AA68 00578C ENG PCJ533R HCJ552W HCJ652W 00578C E FRONT COVER 7 3 00 4 36 PM Page 1 ...

Отзывы: