background image

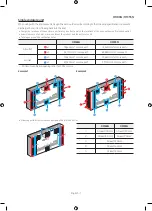
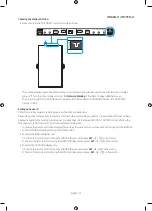
Checking the display direction


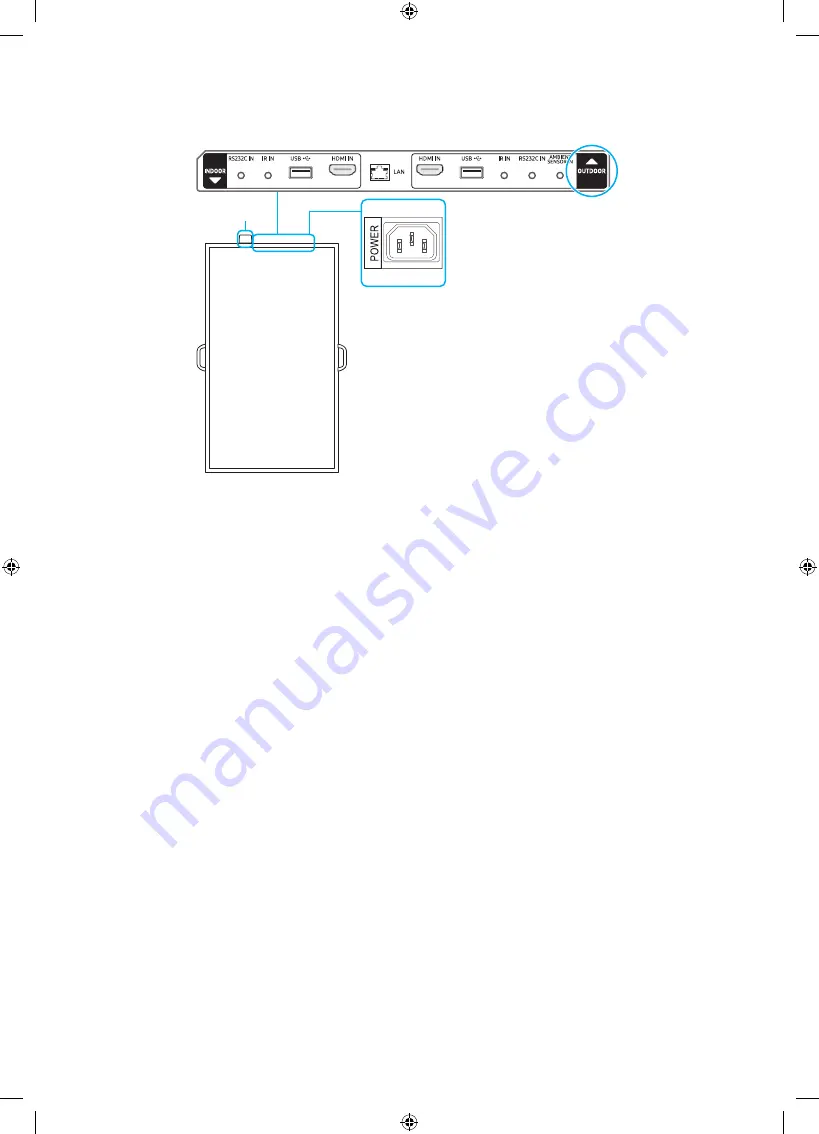
Make sure that the “OUTDOOR” mark is facing the window.


A


The outdoor display may not be able to connect to your wired network when used alone with the indoor display 

turned off. Turn the indoor display on or set the 

Network Standby

 of the indoor display to 

On

 before use.


The protruded part of the Wifi-Module (

A

) indicates the display direction. (INDOOR direction: left, OUTDOOR 

direction: right)

Setting up Device ID

OMN-D model has separate remote sensors on the front and back sides.
Depending on the distance from the remote control or other surrounding conditions, it is possible both front and back 
displays respond to the remote control signal. You can assign IDs to displays (INDOOR: 1, OUTDOOR: 2) and follow the 
steps below to restrict remote control to one selected display only.


To reverse the remote controlled display after setting otherwise, first cancel the existing ID settings for the INDOOR 

and OUTDOOR displays by pressing the UNSET button.


To select the INDOOR display only
1) Position the remote control facing the INDOOR IR sensor and press 

SET

 → 

1

 → 

E

 on the control.

2) Position the remote control facing the OUTDOOR IR sensor and press 

SET

 → 

1

 → 

E

 on the control.


To select the OUTDOOR display only
1) Position the remote control facing the INDOOR IR sensor and press 

SET

 → 

2

 → 

E

 on the control.

2) Position the remote control facing the OUTDOOR IR sensor and press 

SET

 → 

2

 → 

E

 on the control.

English - 12

OM46N-D / OM55N-D

Содержание OM46N

Страница 1: ... Samsung will not provide warranty coverage for problems that may arise as a result of failure to follow the guide The color and shape of the product may vary In addition instructions in the installation guide may change without prior notice when necessary to improve the product Semi Outdoor Installation Guide ...

Страница 2: ...tlet types 5 Vent opening design guide 6 Partition design guide 6 OM46N D OM55N D 01 PriortoInstallation Precautions for installation 9 Rotation and tilt angle 9 Clearance for installation 10 Air flow direction 10 02 Brackettypesandinstallationguide Before installing brackets 11 Bracket types 13 Bracket installation 17 03 Enclosureunitdesignguide Inlet and outlet types 18 Vent opening design guide...

Страница 3: ... malfunctioning when used in an outdoor environment which will not be covered by the warranty Do not install this product near machinery that works with oil Oil mist may cause fans to malfunction Rotationandtiltangle Contact Samsung CustomerService Centre forfurtherdetails 15 The product can be used in landscape or portrait orientations at tilting angles up to 15 from a wall surface English 3 OM46...

Страница 4: ...insufficient gap this maycause a malfunction whichwill not be covered bythewarranty The product mayoverheatwhen usedwith an enclosure unit Make sure to contact Samsung forguidance in using enclosure units A C B Air conditioner Clearanceforwallmounting Contact Samsung CustomerService Centre forfurtherdetails Installationrequirementsforwallmounting A at least 60 mm B ambient temperature measuring po...

Страница 5: ...n installing a semi outdoorunit remove anyobstacles nearthe airinlet and outlet that mayaffect airflow Back Sideview Airinlet Airoutlet 02 Enclosureunitdesignguide Inletandoutlettypes Airinlet and outlet should be grid ormesh types Do not use the louvertype as it has a limited intake size Grid type Mesh type Louvertype English 5 OM46N OM55N ...

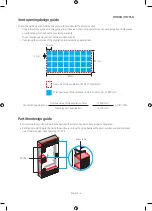
Страница 6: ...atio Total area of theventilation 181 x 89 16 109 mm Total open area of theventilation holes 20 x 20 x 32 12 800 mm 181 mm 3 mm 20 mm 89 mm Ventilation opening ratio Total open area of theventilation holes 12 800 mm x100 79 Total area of theventilation 16 109 mm Partitiondesignguide Forsemi outdoorunits add partitions between the inlet and outlet to keep airpaths separated Partitions should fit pe...

Страница 7: ... product and the enclosure unit Total open area of the ventilation holes OM46N OM55N Airoutlet x1 14 560 mm ormore each 14 560 mm ormore each x 2 32 172 mm ormore each 42 840 mm ormore each Airinlet x 3 13 650 mm ormore each 13 650 mm ormore each x 2 40 180 mm ormore each 57 120 mm ormore each Minimumventilation opening ratio 50 ormore Example1 Example2 Allow suggested clearance when designing the...

Страница 8: ...ducts to keep the airpaths separated Referto the Vent opening design guide Page 6 Make sure there is no gap between the partitions and the enclosure unit Contact Samsung and guidewhen designing an N x M one side enclosure unit Product1 Product 2 Product 3 Partition At least 50 mm English 8 OM46N OM55N ...

Страница 9: ... product from overheating and malfunctioning when used in an outdoor environment which will not be covered by the warranty Do not install this product near machinery that works with oil Oil mist may cause fans to malfunction Rotationandtiltangle Contact Samsung CustomerService Centre forfurtherdetails This model does not support landscape orientation English 9 OM46N D OM55N D ...

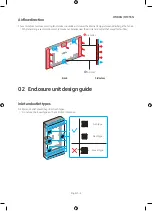
Страница 10: ...t is subjected to excess heat due to an insufficient gap this maycause a malfunction whichwill not be covered bythewarranty The product mayoverheatwhen usedwith an enclosure unit Make sure to contact Samsung forguidance in using enclosure units A C B Air conditioner Airflowdirection The semi outdoorunit uses cooling fans to take in outside airto lowerthe internal temperature and discharge the hot ...

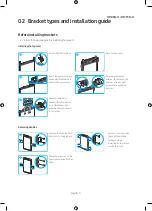
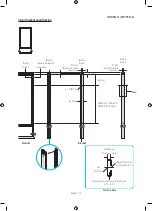
Страница 11: ... Securely position the external IR cable and the external ambient light sensor at the specified location 3 Connect cables e g external IR cable power cord HDMI cable and organize them as shown in the image Removinghandles 1 Remove the handles from both sides of the product Remove the screw caps found at the marked locations before installing on the ceiling orwith the stand 2 Place the screws back ...

Страница 12: ...ck displays respond to the remote control signal You can assign IDs to displays INDOOR 1 OUTDOOR 2 and followthe steps belowto restrict remote control to one selected displayonly To reverse the remote controlled displayaftersetting otherwise first cancel the existing ID settings forthe INDOOR and OUTDOOR displays bypressing the UNSETbutton To select the INDOOR displayonly 1 Position the remote con...

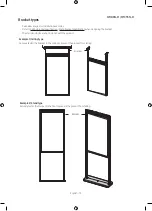
Страница 13: ...ionwhen designing the bracket The stand and bolts are not includedwith the product Example1 Ceilingtype Securelyfasten the bracket to the ceiling to prevent the product from falling Bracket Example2 Standtype Securelyfasten the bracket to the floorto prevent the product from falling Bracket English 13 OM46N D OM55N D ...

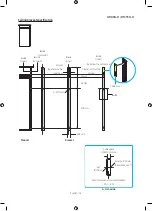
Страница 14: ...m Space forcable insertion 200 mm 58 mm 69 5 mm A A Cable cover 55 mm A side inner A side inner Including the cable cover A side inner B side outward A A oneside Recommended structure thickness 3 0 t 4 0 t Set Φ10 mm External Φ 20 mm Screwhead size Cable space 10 mm ormore English 14 OM46N D OM55N D ...

Страница 15: ...nsertion OM46N D 548 5 mm OM55N D 740 mm 50 mm 55 mm 58 mm A A Product Bracket B side outward A side inner A side inner A side inner B side outward A A oneside Recommended structure thickness 3 0 t 4 0 t Set Φ10 mm External Φ 20 mm Screwhead size Cable space 10 mm ormore English 15 OM46N D OM55N D ...

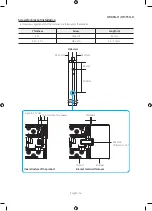
Страница 16: ...ket Thickness Screw Length A 2 0 t M8 x L18 5 9 mm 2 5 t 4 0 t M8 x L20 5 5 7 0 mm Bracketmaterialthickness Innerstructureoftheproduct Thickness M8 x L18 Thickness1 6t 2 0t 10 5 mm Cut thru space 34 75 mm 34 75 mm 58 mm 200 mm Length A 7 0 mm Sideview Product Bracket English 16 OM46N D OM55N D ...

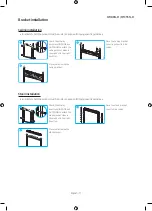
Страница 17: ...ction 3 Close the ceiling bracket cover in yellow to hide cables 2 Place cables inside the ceiling bracket Standinstallation Brackets to hold the product must be custom designed following specific guidelines 1 Check the display directions INDOOR and OUTDOOR to attach the stand bracket sides to the product in the right direction 3 Close the stand bracket cover to hide cables 2 Place cables inside t...

Страница 18: ...are not observed the cooling system maynotwork properlyand maycause a malfunction whichwill not be covered bywarranty Theventilation opening ratio should be minimum 50 Calculating the total area of theventilation andventilation opening ratio Total area of theventilation 181 x 89 16 109 mm Total open area of theventilation holes 20 x 20 x 32 12 800 mm 181 mm 3 mm 20 mm 89 mm Ventilation opening rat...

Страница 19: ...ing ratio 50 ormore Airoutlet Total open area of theventilation holes 67 000 mm ormore Minimumventilation opening ratio 50 ormore Design the locations of the enclosure unit inlet and outlet to match the locations of the semi outdoorunit inlet and outlet The front and back sides of the enclosure unit must be openwithout glass Keep cleararound the product and the openings on the top and bottom to en...

Отзывы: