Samsung Odyssey S49CG954SU Скачать руководство пользователя страница 10

- 10 -

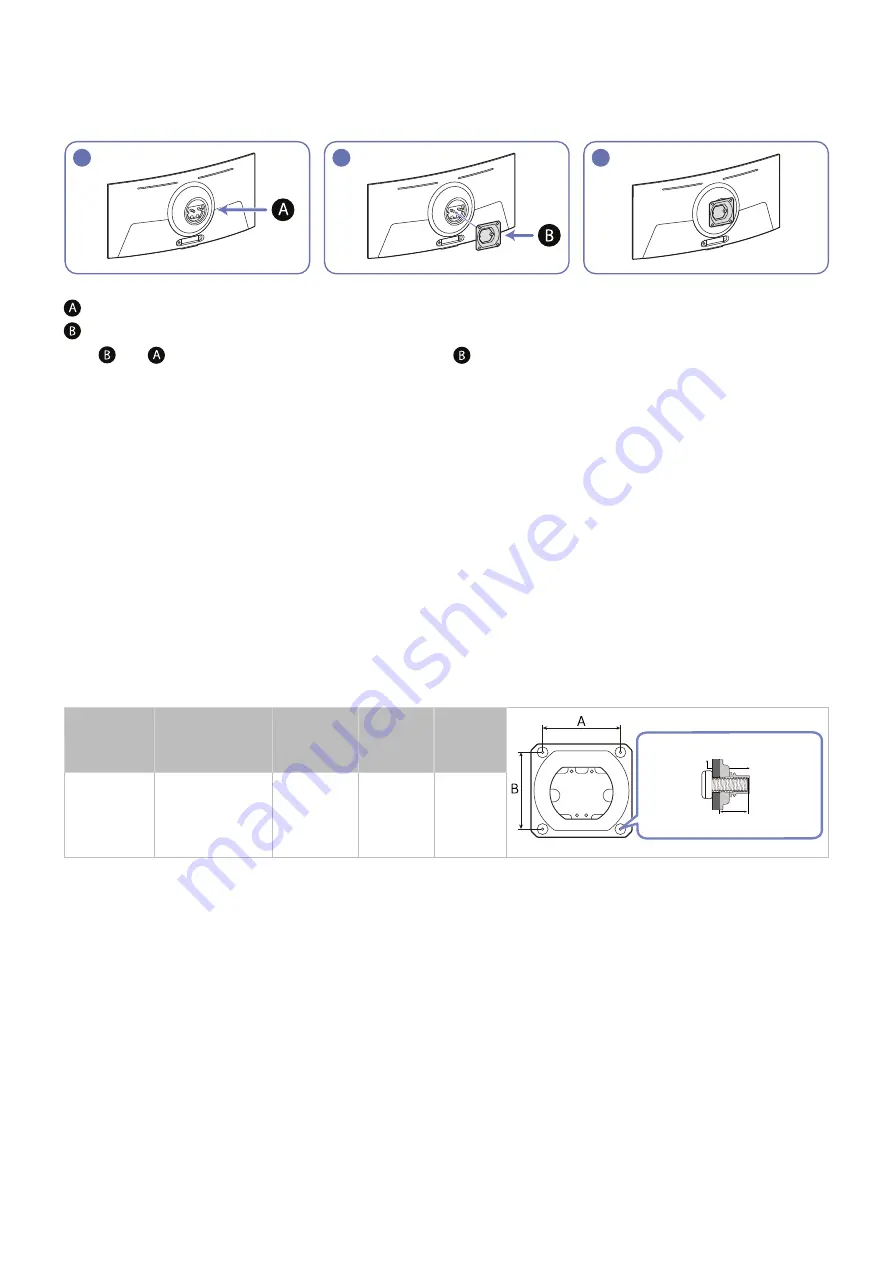
Attaching the BRACKET WALL


"

The bracket may not be supplied, depending on the country and region.


"

Power the product off and remove the power cord from the power socket.

1

2

3

 Attach the BRACKET WALL here
 BRACKET WALL

Align   with   on the monitor, and tightly fasten the screws on  .

Notes


Using a screw longer than the standard length can damage the internal components of the product.


The length of screws required for a wall mount that does not comply with the VESA standards may vary depending on the 
specifications.


Do not use screws that do not comply with the VESA standards. Do not attach the wall-mount kit or desktop stand using 
excessive force. The product may get damaged or fall and cause personal injury. Samsung shall not be held liable for any 
damage or injury caused by using improper screws or attaching the wall-mount kit or desktop stand using excessive force.


Samsung shall not be held liable for any product damage or personal injury caused by using a wall-mount kit other than 
the one specified or from an attempt to install the wall-mount kit on your own.


To mount the product on a wall, ensure you purchase a wall-mount kit that can be installed 10 cm or farther away from the 
wall.


Be sure to use a wall-mount kit that complies with the standards.


To install the monitor using a wall mount, disconnect the stand base from the monitor.

Model 

name

VESA screw hole 

specs (A * B) in 

millimeters

C

Standard 

Screw

Quantity

C

Product

Wall mount bracket

S49CG95*

100.0 x 100.0

3.5 ~ 5.5 

mm

M4

4 EA


"

The bracket may not be supplied, depending on the country and region.


"

Do not install your Wall Mount Kit while your product is turned on. It may result in personal injury due to electric shock.


"

Do not mount the product at more than a 15 degree tilt.

Содержание Odyssey S49CG954SU

Страница 1: ...read b You bring the unit to a repair centre but it is found that the product has no defect i e where the user manual has not been read You will be informed of the administration fee amount before a t...

Страница 2: ...4 Operation Cleaning Correct posture to use the product Preparations Installation 7 Attaching the Stand 8 Precautions for moving the product 9 Checking the space around the product 9 Adjusting the Pro...

Страница 3: ...ST have a reliable connection to protective earth ground Caution Consult instructions for use This symbol instructs the user to consult the user manual for further safety related information Electrici...

Страница 4: ...binets or shelves of the right size Set down the product gently Product failure or personal injury may result Installing the product in an unusual place a place exposed to a lot of fine dust chemical...

Страница 5: ...r foreign substances have entered the product Then contact Samsung Customer Service Centre Caution Leaving the screen fixed on a stationary image for an extended period of time may cause afterimage bu...

Страница 6: ...e the cloth to wipe the exterior of the product clean Do not apply a cleaning agent that contains alcohol solvent or surfactant to the product Do not spray water or detergent directly on the product 4...

Страница 7: ...embly 1 2 Put the stand base onto the stand neck as the direction shown in the figure Check that the stand neck is firmly connected Tightly fasten the connecting screw at the bottom of the stand base...

Страница 8: ...s or edges of the product when moving it Do not directly apply pressure on the screen Do not hold the screen when moving the product Do not hold the product upside down only by the stand Do not press...

Страница 9: ...ng the Product Tilt and Height The colour and shape of parts may differ from what is shown Specifications are subject to change without notice to improve quality 2 0 2 0 15 0 2 0 120 0 mm 5 0 mm The p...

Страница 10: ...ed by using improper screws or attaching the wall mount kit or desktop stand using excessive force Samsung shall not be held liable for any product damage or personal injury caused by using a wall mou...

Страница 11: ...microphone is turned off All voice and sound features using microphone are not available The position and shape of the microphone switch may differ depending on the model During analysis using data fr...

Страница 12: ...page Connects to a USB device such as a keyboard or mouse Used to update the software Connects to a source device using an HDMI cable or HDMI DVI cable Connects to a PC using a DP cable Connects to a...

Страница 13: ...d by OS drive programmes or software please contact relevant suppliers With the launch of various USB devices on the market we cannot guarantee that our products are matched with all USB devices For a...

Страница 14: ...Up the Connected Cables 1 1 1 1 2 Pass cables through the hole on the stand Connect the cables to the corresponding ports 1 3 Organise cables by passing them through the hole on the stand as shown in...

Страница 15: ...he current source The applied Picture Size will remain in effect wheneveryou select that source unless you change them Input signal Picture size HDMI 3840 x 1080 120 Hz 32 9 16 9 HDMI 5120 x 1440 240...

Страница 16: ...on is set to an unsupported one the Mode Not Supported message may appear or noise may occur on the screen Make sure to set the resolution to a supported one VESA DMT Resolution Dots x lines Display f...

Страница 17: ...splay format Horizontal frequency KHz Vertical frequency Hz Clock frequency MHz Polarity horizontal vertical Port HDMI DP 2560 x 1440RB 240 Hz 355 919 240 000 1010 810 O 2560 x 1440RB 240 Hz 359 722 2...

Страница 18: ...0 60 Hz 67 500 60 000 148 500 O O 1920 x 1080 120 Hz 135 000 120 003 297 000 O O 3840 x 2160 30 Hz 67 500 30 000 297 000 O O 3840 x 2160 50 Hz 112 500 50 000 594 000 O O 3840 x 2160 60 Hz 135 000 60 0...

Страница 19: ...1080 120 Hz Game Mode off HDMI 5120 x 1440 120 Hz Game Mode off DP 5120 x 1440 120 Hz Game Mode on HDMI DP Maximum Resolution 5120 x 1440 240 Hz Power Supply AC100 240V 50 60Hz Based on the AC voltag...

Страница 20: ...nce The specifications are subject to change without notice to improve quality For detailed device specifications visit the Samsung website Europe only To access energy labelling information about thi...

Страница 21: ...e If customer requests software installation and setup for the product If a service technician removes cleans dusts or foreign materials inside of the product If customer requests an installation addi...

Страница 22: ...the Input Signal Plus to Off the FreeSync Premium pro function is disabled If you use the FreeSync Premium pro function while playing a game the following symptoms may occur The screen may flicker dep...

Страница 23: ...nc Premium pro feature visit the official AMD website When applying the FreeSync Premium pro function via the HDMI cable it may fail to work due to the bandwidth limitation of certain AMD graphics car...

Страница 24: ...0 240 Hz 291 600 240 000 1201 390 progressive 5120 x 1440 60 Hz 88 859 60 000 479 840 progressive 5120 x 1440 120 Hz 182 880 120 000 987 550 progressive 5120 x 1440 240 Hz 356 879 240 000 1941 420 pro...

Отзывы: