


49
4. Troubleshooting
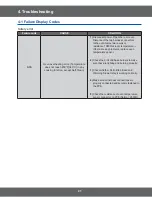
SYMPTOM
DIAGNOSIS
REMEDY
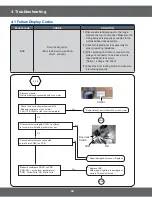
Oven lamp is not
working.
*
Make sure the door lock feature is
not turned on.
*
Unlock the controls by pressing and
holding the lock key for 3 or more
seconds.
*
Check for a burned out bulb.
*
Replace with a 40 watt appliance bulb.
*
Check the harness connections, the
oven lamp relay (RY06), and the
source control relay (RY01).
*
Repair or replace loose or disconnected
harness.
*
Replace any malfunctioning relays.
*
Measure the resistance across
the light ballast/socket terminals.
1RUPDO
*
Replace the light ballast/socket.
*
Replace the PCB.
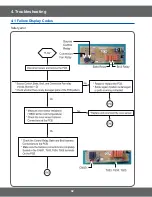
Convection fan is
not rotated.
*
Check the harness and harness
connector (CN02) on the PCB and
at the terminals at each convection
motor).
*
Reconnect a loose or disconnected harness
or replace a damaged harness.
*
Check the membrane control
harness and connectors (CN08) on
the PCB and touch control panel.
*
Reconnect securely or replace a damaged
membrane control harness.
*
Check the convection fan relay
(RY05) and the connector (CN02)
on the PCB.
*
Replace the malfunctioning relay.
*
Replace the PCB.
*
Measure the resistance across the
fan motor terminals.
*
Replace the burned out fan motor.
The oven smells
and/or smokes
when it is initially
started.
*
This is normal.
*
The insulation around the oven will give off
a slight odor until the adhesive has cured.
7KLVVKRXOGJRDZD\DIWHUWKH¿UVWFRXSOHRI
oven uses.
*
The oven is designed to burn off dirt and/or
foreign substances.
*
If the oven is dirty, run a self-cleaning cycle.
(See page 53 in the “User Manual”.) A
ventilation system should be used while the
oven is self cleaning.
The LED display
is dim or not
visible.
*
Check the membrane control harness
and connectors (CN08) on the PCB
and membrane control panel.
*
LED display is inferior.
*
Reconnect securely or replace a damaged
membrane control harness.
*
Replace the PCB assembly. (PCB and
membrane control glass panel.)
The buzzer does
not beep when
a keypad is
touched.
*
Check to see if the sabbath function
has been turned on.
*
The buzzer does not work on the
PCB.
*
Press and hold the Sabbath pad for at least
3 seconds. The display will show the time of
day when the function is turned off.
*
Replace the PCB.
Содержание NX58H5650WS
Страница 3: ...3 RQWHQWV 6 Wiring Diagram 70 6 1 Wiring Diagram 70...
Страница 44: ...42 4 Troubleshooting 4 1 Failure Display Codes Safety error...
Страница 61: ...59 4 Troubleshooting 4 3 Oven Malfunction Convection fan not working Electrical...
Страница 66: ...64 4 Troubleshooting 4 3 Oven Malfunction Oven lamp not working Electrical door lock Start Set...