background image

important safety instructions _

11

impor

tAN

SA
fet

y i

NS
truc

tio
NS

WARNING

 ELECTRICAL WARNINGS

Comply with the following electrical instructions and requirements to avoid 

death, personal injury from electric shock, and/or property damage from fire:

1. 

Plug into a grounded 3-prong outlet.

2. 

DO NOT remove the ground prong.

3. 

DO NOT use an adapter.

4. 

NEVER use an extension cord.

Use a dedicated 120-volt, 60-Hz, 20-amp, AC, fused electrical circuit for this 

appliance. A time-delay fuse or circuit breaker is recommended. DO NOT plug 

more than one appliance into this circuit.

The range is supplied with a 3-pronged grounded plug. This cord MUST be 

plugged into a mating, grounded 3-prong outlet that meets all local codes and 

ordinances. If you are unsure your electrical outlet is properly grounded, have it 

checked by a licensed electrician.

If codes permit the use of a separate ground wire, we recommend that a 

qualified electrician determine the proper path for this ground wire.

Electrical service to the range must conform to local codes. Barring local 

codes, it should meet the latest ANSI/NFPA No. 70 – Latest Revision (for the 

U.S.) or the Canadian Electrical Code CSA C22.1 – Latest Revisions.

It is the personal responsibility of the appliance owner to provide the correct 

electrical service for this appliance.
NEVER connect the ground wire to plastic plumbing lines, gas lines, or hot 

water pipes.

DO NOT modify the plug provided with the appliance. 

DO NOT put a fuse in a neutral or ground circuit.

User manual NX58H5 Series_DG68-00CFR.indb   11

08/02/2014   12:02:04

Содержание NX58H5650WS

Страница 1: ...ng this Samsung product To receive more complete service please register your product at www samsung com register 1 800 SAMSUNG 726 7864 NX58H5650WS NX58H5600SS This manual is made with 100 recycled p...

Страница 2: ...many other leading brands in the United States and Canadian markets This means greater convenience for you when cooking for the holidays or when entertaining A cooktop with 5 burners Power burners sim...

Страница 3: ...l risk for personal injury or property damage CAUTION To reduce the risk of fire explosion electric shock or personal injury when using your gas range follow these basic safety precautions Do NOT atte...

Страница 4: ...hbor s phone Follow the gas supplier s instructions If you cannot reach your gas supplier call the fire department Installation and service must be performed by a qualified installer service agency or...

Страница 5: ...lation is strongly recommended Due to the size and weight of the range it is highly recommended that two or more people move or install this appliance All ranges can tip over and cause severe injuries...

Страница 6: ...play with the controls or any part of the range We recommend you utilize the control door lockout feature to reduce the risk of mis use by children Before disposing of the range cut off the power cor...

Страница 7: ...surface units unattended at high heat settings Boilovers cause smoke and greasy spillovers could ignite Do not use a flame to check for gas leaks Instead use a brush to spread a soapy water mixture a...

Страница 8: ...oiling To prevent delayed eruptive boiling ALWAYS allow heated beverages to stand at least 20 seconds after you have turned the burner off so that the temperature in the liquid can stabilize In the ev...

Страница 9: ...ust conform with the current Natural Gas Installation Code CAN CGA B149 1 or the current Propane Installation Code CAN CGA B149 2 and with local codes where applicable This range has been design certi...

Страница 10: ...limited to benzene carbon monoxide formaldehyde and soot substances resulting from the incomplete combustion of natural gas or LP fuels IN THE COMMONWEALTH OF MASSACHUSETTS This product must be insta...

Страница 11: ...et that meets all local codes and ordinances If you are unsure your electrical outlet is properly grounded have it checked by a licensed electrician If codes permit the use of a separate ground wire w...

Страница 12: ...ler must replace the 5 surface burner orifices and 2 oven orifices with the provided LP orifice set and reverse the GPR adapter WARNING These adjustments must be made by a qualified service technician...

Страница 13: ...behind the range under the oven control panel at the top and bottom of the oven door and under the lower warming or storage drawer Large scratches on or sharp blows to the door glass can cause the gl...

Страница 14: ...ce burners unattended at HIGH flame settings Boilovers cause smoking and greasy spillovers can ignite Stand away from the range when frying Adjust the top burner flame size so it does not extend beyon...

Страница 15: ...they should only be flamed under a ventilation hood that is on Always make sure foods being fried are thawed and dried Moisture of any kind can cause hot fat to bubble up and over the sides of the pan...

Страница 16: ...tored items can be damaged or ignite Keep the oven free from grease buildup Reposition oven racks only when the oven is cool to prevent burning or personal injury Do not heat unopened containers Press...

Страница 17: ...d or steam can cause burns or personal injury Do not use aluminum foil to line the lower drawer Aluminum foil will trap heat and alter the warming performance of the drawer It could also damage the in...

Страница 18: ...ning operation Never self clean with the lower drawer or drawer pan placed in the oven If the self cleaning operation malfunctions turn off the oven disconnect the power supply and contact a qualified...

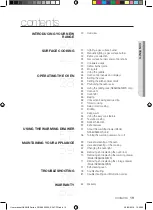
Страница 19: ...g 41 Timed cooking 43 Delay timed cooking 45 Broiling 47 Keep warm 48 Using the easy cook feature 51 Favorite cooking 53 Sabbath function 55 Extra features USING THE WARMING DRAWER 57 57 About the war...

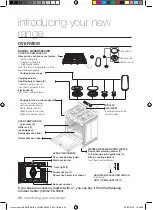
Страница 20: ...k position guide Oven light 1 Bake oven burner Broil oven burner Convection fan 1 Convection heater not shown Cooktop burner control knobs 5 Left front burner control Left rear burner control Center b...

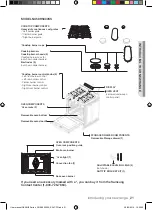
Страница 21: ...rner control Right front burner control OVEN COMPONENTS Oven racks 2 Removable oven bottom Removable oven door STORAGE DRAWER COMPONENTS Removable Storage drawer 1 DISPLAY OVEN VENT centered under ove...

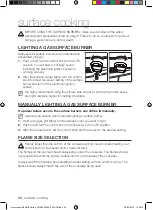
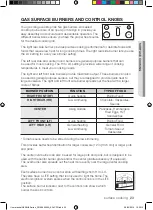
Страница 22: ...NUALLY LIGHTING A GAS SURFACE BURNER If a power failure occurs the surface burners can still be lit manually Use extreme caution when manually lighting a surface burner 1 Hold a long gas grill lighter...

Страница 23: ...out the heat with a larger circle of flames BURNER POSITION FUNCTION TYPE OF FOOD RIGHT FRONT RF Quick heating Boiling Food RIGHT REAR RR Low simmering Chocolate Casseroles Sauces CENTER Using Griddl...

Страница 24: ...but discolors easily STAINLESS STEEL Slow heat conductor with uneven cooking results Is durable easy to clean and resists staining CAST IRON A poor conductor but retains heat very well Cooks evenly o...

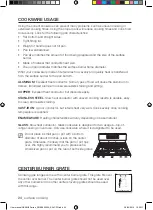
Страница 25: ...the cooktop grates surfaces and wok grate are completely cooled When using the cooktop oven or broil systems the wok grate on the cooktop may become very hot Always use oven gloves when placing or re...

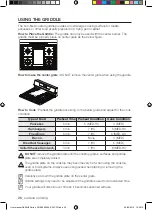
Страница 26: ...tion Pancakes 5 min 5 MED HI 4 MED Hamburgers 5 min 7 HI 5 MED HI Fried Eggs 5 min 7 HI 5 MED LO Bacon None 4 MED Breakfast Sausages 5 min 7 HI 5 MED Grilled Cheese Sandwich 4 min 7 HI 6 MED HI DO NOT...

Страница 27: ...damage the griddle surface Do not use the griddle as a cutting board DO NOT place or store items on the griddle plate DO NOT use the griddle after turning it over on the grate DO NOT use the griddle...

Страница 28: ...lectronic touch pads Use the following pads to program and operate all oven cooking cleaning and timing functions All programmed settings and cooking statuses will show on the digital display 2 3 4 5...

Страница 29: ...will not work and the oven door will stay locked until this function is turned off 9 NUMBER PADS Touch these pads to set the desired times temperatures and preset oven functions 10 KEEP WARM Touch thi...

Страница 30: ...CONVECTION BAKE 150 F 66 C 550 F 288 C CONVECTION ROAST 150 F 66 C 550 F 288 C KEEP WARM 3 hours WARMING DRAWER 3 hours BREAD PROOF 12 hours Model NX58H5650WS Only If you set Conversion On for Convec...

Страница 31: ...ill show the time of day and the Start indicator will blink 3 Press the START SET pad to set and start the clock The display will show the time of day and the Start indicator will turn off How to chan...

Страница 32: ...splay will show Timer and hr min will blink in the display hr min characters are not displayed on the NX58H5600SS hr 2 Press the number pads to enter the amount of time you want in minutes or hours an...

Страница 33: ...the rack is stably situated on the embossed stop Oven rack positions TYPE OF FOOD RACK POSITION Hamburgers and steaks 6 or 7 Toasts 5 or 6 Biscuits muffins brownies cookies 4 Bundt or pound cakes 3 An...

Страница 34: ...ally when preparing heavier dishes The Gliding Rack has 2 glide tracks that allow you to extend the food out the oven with touching the sided of the oven walls Installing the Gliding rack With the Gli...

Страница 35: ...of the oven vent Proper air circulation prevents oven burner combustion problems and ensures good cooking results Since the vent and area around the vent can become hot use care when placing items ne...

Страница 36: ...g The display will show a blinking along with 150 Bake and the bake element icon until the oven reaches 150 Then the display will just show the actual oven temperature When the oven reaches the desire...

Страница 37: ...adjustments 3 Press the number pads for the desired temperature adjustment for example 1 0 The display will show AdJ and 10 4 Press the START SET pad The oven will beep twice and the display will sho...

Страница 38: ...n convection baking on a single rack place the oven rack in position 3 or 4 When convection baking on multiple racks place the oven racks in position 2 and 5 The oven automatically adjusts the tempera...

Страница 39: ...e oven reaches 150 Then the display will just show the actual oven temperature When the oven reaches the desired baking or roasting temperature it will beep 6 times 5 Place the food in the oven and cl...

Страница 40: ...hops 30 40 total 350 F 177 C 170 F 77 C 4 chops 40 50 total 350 F 177 C 170 F 77 C 6 chops 45 55 total 350 F 177 C 170 F 77 C Poultry Chicken Whole 2 5 to 3 5 lb 26 30 375 F 191 C 180 F 82 C Turkey Wh...

Страница 41: ...d food can result in sickness from food poisoning How to set the oven for timed cooking 1 Position the oven rack in the desired location Place the food in the oven and close the oven door 2 Press the...

Страница 42: ...n will automatically shut off and the display will show the time of day hr To change a programmed baking temperature press the BAKE pad enter the new baking temperature and press the START SET pad If...

Страница 43: ...n result in sickness from food poisoning How to set the oven for delay timed cooking 1 Position the oven rack in the desired location Place the food in the oven and close the oven door 2 Press the pad...

Страница 44: ...time press the DELAY START pad enter the new starting time and then press the START SET pad The oven will start cooking at the new start time To change a programmed baking temperature press the BAKE...

Страница 45: ...42 Close the oven door 2 Press the BROIL pad once for Hi and twice for Lo The oven will beep every time a pad is pressed The Start indicator will blink to the right of Hi or Lo and Broil on the displa...

Страница 46: ...l Done 6 12 14 6 8 Medium 1 5 in thick 2 to 2 5 lbs 6 15 18 14 17 Well Done 6 18 22 17 19 Chicken 1 whole cut up 2 to 2 5 lbs Split lengthwise 4 30 35 15 20 Broil skin side down first Spread open Brus...

Страница 47: ...display 3 Press the START SET pad The oven will automatically light and start preheating to the Keep Warm temperature approx 170 F 77 C The display will show the oven element icon Warm and the time of...

Страница 48: ...he Slow Cook feature can be used to cook food more slowly at lower oven temperatures The extended cooking times allow better distribution of flavors in many recipes This feature is ideal for roasting...

Страница 49: ...mode 4 When the food is dehydrate press the OFF CLEAR pad Do not preheat the oven for this function After drying the food keep it in a cool and dry place If the temperature setting is out of range an...

Страница 50: ...functions produce the best results when started while the oven is cool we recommend that you wait until the oven has cooled down and Hot disappears from the display To avoid lowering the oven temperat...

Страница 51: ...oking temperature skip to step 3 2 Press the number pads for the desired cooking temperature for example 3 7 5 The selected cooking temperature will blink on the display 3 Press the FAVORITE COOK pad...

Страница 52: ...lt or actual temperature until the selected temperature is reached The oven will beep 6 times The default or actual temperature the cooking function the cooking function icon and the time of day will...

Страница 53: ...function 1 Position the oven rack in the desired location See page 30 2 Press the BAKE pad The oven will beep every time a pad is pressed until the Sabbath function is activated The default temperatur...

Страница 54: ...The display will not count down the set cook time but the oven will shut off at the end of the set time How to change the temperature and cancel the Sabbath function To change a programmed baking temp...

Страница 55: ...r or OFF Hr 3 Press the START SET pad to save and start the feature settings Fahrenheit or Centigrade Temperature Selection The oven control can be programmed to display temperatures in Fahrenheit or...

Страница 56: ...l show Con On enabled or Con OFF disabled The default setting is Con OFF 2 Press the 0 pad to select Con On or Con OFF 3 Press the START SET pad to save and set the auto conversion feature Sound On Of...

Страница 57: ...drawer with aluminum foil Foil is an excellent heat insulator and will trap heat beneath it This will upset the performance of the drawer and could damage the interior finish Do not put liquid or wat...

Страница 58: ...drawer shuts off Pressing the OFF CLEAR pad does not turn off the warming drawer Recommended settings DRAWER SETTING TYPE OF FOOD LOW Soft rolls empty dinner plates MED Roasts beef pork lamb casserol...

Страница 59: ...water Never use steel wool or abrasive cleansers Protect the surface from sharp objects All of the above items can damage the surface Oven control panel 1 To lock the oven controls and the oven door p...

Страница 60: ...d stainless steel cleaner to a damp clean cloth or paper towel Clean a small area carefully following the instructions on the cleaner Stainless steel should always be cleaned with the grain in the sta...

Страница 61: ...29A If you want to buy directly connect to http www samsungparts com Default aspx To lubricate the slides 1 Remove the rack from the oven See removing the gliding rack in the USING THE GLIDING RACK se...

Страница 62: ...different cleaning techniques The gasket on the inside surface of the oven door should never be cleaned or moved to clean other surfaces The gasket is made of woven material which is essential for a...

Страница 63: ...in warm soapy water Rinse and completely dry all surfaces including back and stem hole Do not use spray cleaners on the surface burner control panel Spray entering the valve holes could contact electr...

Страница 64: ...ners on any burner part 6 Rinse thoroughly and completely dry all parts before they are reassembled Starter electrodes are not removable and should only be wiped clean when the controls are in the OFF...

Страница 65: ...Simmer Burner RR Flat surface Concave line 9 Replace burner grates on top of the range cooktop 10 Push in and turn each surface burner control knob to the LITE position let each burner light and then...

Страница 66: ...ke sure all surface burners are OFF 2 When surfaces have cooled remove the burner grates Do not remove or lift the cooktop during cleaning Doing so could damage the gas lines leading to the surface bu...

Страница 67: ...1 Make sure the oven and the light bulb are cool 2 Open the oven door If the oven racks are in the way they can be repositioned or removed before you change the oven light 3 Turn the glass light cover...

Страница 68: ...door is removed To remove the door 1 Completely open the oven door 2 Unlock the two hinge locks Pull each hinge lock down towards the door frame to unlock them so they look like the illustration to th...

Страница 69: ...m sides of the door frame When the door is held at about 5 degrees the hinge arms will slide in and down 4 Completely open the oven door If the door will not fully open the hinge arms are not correctl...

Страница 70: ...ft up on the right clip to release the clips Pull the drawer the rest of the way out 3 Clean the drawer in warm soapy water Rinse and dry thoroughly To replace the warming drawer 1 Position the ends o...

Страница 71: ...r sides come out of the two nylon drawer guides Then lift to remove the drawer 3 Clean the drawer in warm soapy water Rinse and dry thoroughly To replace the storage drawer 1 Place the top of both dra...

Страница 72: ...ing system The door automatically locks when the self cleaning cycle is started and stays locked until the cycle is cancelled and the oven temperature is below 350 F Be careful opening the oven door a...

Страница 73: ...Clean and the selected cleaning cycle time and the Lock icon will blink until the door is locked Then the Lock icon will stay on until the cycle is over and the oven temperature is below 350 F 177 C T...

Страница 74: ...ted cleaning cycle time hr 3 Press the DELAY START pad The display will show Delay and 4 Press the number pads to set the time you want the oven to turn on e g 4 3 0 The Start indicator will blink und...

Страница 75: ...the door unlocks Escaping hot air and or steam could burn you The internal oven temperature must be below 350 F for the automatic door lock to disengage The door lock must be disengaged before anothe...

Страница 76: ...is level strong and stable If the floor sags or slopes contact a carpenter Check and level the range See the Installation Instructions The kitchen cabinets are not properly aligned and make the range...

Страница 77: ...door lock is turned on The display will show the Lock icon Hold the oven door open and press the START SET pad for 3 seconds The oven will beep and the Lock icon will turn off Gas Pressure Regulator...

Страница 78: ...or 3 seconds Oven light lamp will not turn on The oven door lock is turned on The display will show the Lock icon Hold the oven door open and press the START SET pad for 3 seconds The oven will beep a...

Страница 79: ...elf cleaning cycle This is the first time the oven has been cleaned This is normal The oven will always smoke more the first time it is cleaned Wipe up all excessive soiling before starting the self c...

Страница 80: ...hen the oven meets the preheat temperature Warming drawer will not work Model NX58H5650WS The controls are not set properly Reset the controls as described on page 57 and 58 The Self Clean or Sabbath...

Страница 81: ...at least 30 seconds and then reconnect the power If this does not solve the problem call for service See the instructions below this chart Oven sensor opened problem Oven sensor shorted problem Oven o...

Страница 82: ...p caused by the use of cleaners other than the recommended cleaners and pads and damage to the cooktop caused by hardened spills of sugary materials or melted plastic that are not cleaned according to...

Страница 83: ...m ca support www samsung com ca_fr support REGISTRATION Please register your product online at www samsung com register QUESTIONS For questions about features operation performance parts accessories o...

Страница 84: ...a support English www samsung com ca_fr support French www samsung com us support www samsung com us support Please be advised that the Samsung warranty does NOT cover service calls to explain product...

Страница 85: ...produit Samsung Afin de b n ficier du meilleur du service apr s vente enregistrez votre appareil sur le site suivant www samsung com register 1 800 SAMSUNG 726 7864 NX58H5650WS NX58H5600SS Ce manuel...

Страница 86: ...ortant que toutes les marques concurrentes pr sentes sur les march s am ricain et canadien Il vous est d sormais plus facile de cuisiner pendant les f tes ou pour le plaisir Table de cuisson 5 br leur...

Страница 87: ...d g ts mat riels ATTENTION Afin de r duire les risques d incendie d explosion d lectrocution ou de blessures lors de l utilisation de votre cuisini re gaz vous devez respecter ces r gles de s curit de...

Страница 88: ...ournisseur de gaz Si vous n arrivez pas joindre votre fournisseur de gaz appelez les pompiers L installation et l entretien doivent tre effectu s par un installateur qualifi une agence de maintenance...

Страница 89: ...er tout risque d incendie d lectrocution de blessures graves ou mortelles incluant Installation et entretien Cette cuisini re doit tre correctement plac e et install e conform ment aux consignes d ins...

Страница 90: ...nt sans surveillance dans la pi ce o est install e la cuisini re Ne les autorisez jamais monter sur une quelconque partie de la cuisini re Ne laissez pas de petits enfants toucher la cuisini re Les gr...

Страница 91: ...ci L eau pourrait couler dans les syst mes d alimentation en gaz et dans les circuits lectriques de la cuisini re entra nant un risque d lectrocution ou un niveau lev de monoxyde de carbone d la corr...

Страница 92: ...ernes risquent de rouiller Allumez les br leurs de la table de cuisson uniquement lorsque leurs chapeaux sont correctement install s Si les chapeaux des br leurs ne sont pas correctement install s les...

Страница 93: ...de d installation du gaz naturel CAN CGA B149 1 en vigueur ou au Propane Installation Code Code d installation du propane CAN CGA B149 2 en vigueur ainsi qu aux codes locaux qui s appliquent Cette cui...

Страница 94: ...mpris mais sans limitation le benz ne le monoxyde de carbone le formald hyde et la suie qui sont principalement d gag s par une combustion incompl te du gaz naturel ou du GPL DANS LE COMMONWEALTH DU M...

Страница 95: ...laire mise la terre et tre conforme aux normes lectriques en vigueur Si vous n tes pas s r que la prise est correctement mise la terre consultez un lectricien qualifi afin qu il v rifie Si les normes...

Страница 96: ...les 5 orifices des br leurs de surface et les 2 orifices des br leurs du four doivent tre remplac s par le kit d orifices GPL fourni et l adaptateur du potentiel de mise la terre GPR doit tre invers A...

Страница 97: ...re de la cuisini re sous le tableau de commande du four en haut et en bas de la porte du four ainsi que sous le tiroir de chauffe plat et de rangement inf rieur De larges rayures ou des soufflements...

Страница 98: ...bouton sur Off D sactiver et attendez jusqu ce que le gaz chapp ait disparu Si vous utilisez la cuisini re alors que le br leur ne s est pas correctement allum le gaz chapp peut provoquer une explosio...

Страница 99: ...sque de faire fondre le plastique ou d augmenter la pression de fa on dangereuse dans des r cipients en plastique ferm s Cette table de cuisson n est pas con ue pour faire flamber des aliments ou pour...

Страница 100: ...r peuvent tre endommag s ou s enflammer vitez l accumulation de graisses dans le four Replacez les grilles du four uniquement lorsque le four est froid afin d viter des br lures ou des blessures Ne fa...

Страница 101: ...t ou la vapeur sortant du tiroir peuvent provoquer des br lures et des blessures N utilisez pas de papier aluminium pour tapisser le tiroir inf rieur Le papier aluminium enfermerait la chaleur et modi...

Страница 102: ...d aluminium avant de d marrer le cycle d auto nettoyage Ne lancez jamais l auto nettoyage si une l chefrite du tiroir ou du tiroir sup rieur se trouve dans le four En cas de dysfonctionnement du mode...

Страница 103: ...n et r tissage par convection 41 Cuisson minut e 43 Cuisson minut e diff r e 45 Cuisson au gril 47 maintien au Chaud 48 Utilisation de la fonction Cuisson facile 51 Cuisson personnalis e 53 Fonctionb...

Страница 104: ...ur pour cuisson Br leur de four pour gril Ventilateur de convection 1 R sistance de convection non illustr Boutons de commande des br leurs de la table de cuisson 5 Commande du br leur avant gauche Co...

Страница 105: ...nd du four amovible Porte du four amovible COMPOSANTS DU TIROIR DE RANGEMENT Tiroir de rangement amovible 1 COMMANDE NUM RIQUE DU FOUR VENTILATION DU FOUR centr e sous le tableau de commande du four C...

Страница 106: ...BR LEUR DE SURFACE GAZ En cas de coupure d lectricit les br leurs de surface peuvent toujours tre allum s manuellement Soyez extr mement prudents lorsque vous allumez un br leur de surface manuellemen...

Страница 107: ...it et gauche diffusent la chaleur gr ce un cercle de flammes plus large POSITION DU BR LEUR FONCTION TYPE D ALIMENTS AVANT DROIT AvD Cuisson rapide Faire bouillir des aliments ARRI RE DROIT ArD Mijota...

Страница 108: ...ducteur thermique mais se d colore facilement ACIER INOXYDABLE Conducteur thermique lent entra nant une cuisson in gale Durable facile nettoyer et r sistant aux taches FONTE Mauvais conducteur mais co...

Страница 109: ...elle m me les autres grilles et la surface de cuisson n aient totalement refroidies Attention la grille du wok peut devenir tr s chaude lorsque vous utilisez la table de cuisson le four ou les syst me...

Страница 110: ...on Type d aliment Temps de pr chauffage Condition de pr chauffage Condition de cuisson Cr pes 5 min 5 MED HI MOYEN LEV 4 MED MOYEN Hamburgers 5 min 7 HI LEV 5 MED HI MOYEN LEV ufs au plat 5 min 7 HI L...

Страница 111: ...S surchauffer le gril Ceci pourrait endommager le rev tement non fix N utilisez PAS d ustensiles en m tal pouvant endommager la surface du gril Ne vous servez PAS du gril comme d une planche d couper...

Страница 112: ...ctiles Utilisez les touches suivantes pour programmer et utiliser les fonctions de cuisson de nettoyage et de minuterie Les r glages programm s et l tat des modes de cuisson s affichent sur l cran num...

Страница 113: ...ur viter de faire basculer la cuisini re Les touches ne fonctionnent pas et la porte du four est verrouill e tant que cette fonction reste activ e 9 TOUCHES NUM RIQUES Permettent de r gler les dur es...

Страница 114: ...50 F 288 C R TISSAGE PAR CONVECTION 150 F 66 C 550 F 288 C MAINTIEN AU CHAUD 3 heures TIROIR CHAUFFE PLAT 3 heures BREAD PROOF LEV E 12 heures Model NX58H5650WS Only Si vous choisissez Conversion On a...

Страница 115: ...et le symbole Start D marrage clignote 3 Appuyez sur le bouton START SET D PART R GLAGE pour r gler et d marrer l horloge L cran affiche l heure et le symbole Start D marrage s teint Comment passer du...

Страница 116: ...erie L cran affiche Timer Minuterie et hr min clignote l cran les caract res hr min ne s affchent pas sur le mod le NX58H5600SS hr 2 Saisissez la dur e de votre choix minutes ou heures et minutes l ai...

Страница 117: ...de fa on stable sur le stoppeur brocard afin de ne pas tomber Hauteurs de grille TYPE D ALIMENTS HAUTEUR DE GRILLE Hamburgers et steaks 6 ou 7 Toasts 5 ou 6 Biscuits muffins brownies cookies ou tarte...

Страница 118: ...la pr paration des plats en particulier lorsqu ils sont cuisin s dans des r cipients lourds La grille est quip e de deux rails coulissants vous permettant de faire sortir le plat du four sans risquer...

Страница 119: ...probl me de combustion des br leurs du four et permet une meilleure cuisson La ventilation et la surface qui l entoure peuvent chauffer faites donc attention en pla ant des l ments pr s de la ventila...

Страница 120: ...affiche un clignotant ainsi que 150 Bake Cuisson traditionnelle et le symbole du mode de cuisson jusqu ce que le four atteigne cette temp rature Ensuite l cran n affiche que la temp rature actuelle d...

Страница 121: ...ntre les r glages de temp rature ou 3 Appuyez sur les chiffres de la temp rature souhait e 1 0 L cran affiche AdJ et 10 4 Appuyez sur la touche START SET D PART R GLAGE Un signal sonore retentit deux...

Страница 122: ...nvection sur une seule grille placez la sur la position 3 ou 4 Si vous utilisez la cuisson par convection sur plusieurs grilles placez les sur les positions 2 et 5 Le four r gle automatiquement la tem...

Страница 123: ...temp rature Ensuite l cran n affiche que la temp rature actuelle du four Lorsque le four atteint la temp rature de cuisson ou de r tissage souhait e un signal sonore retentit 6 fois 5 Placez les alim...

Страница 124: ...50 F 77 C 160 F 4 c telettes 40 50 min au total 177 C 350 F 77 C 160 F 6 c telettes 45 55 min au total 177 C 350 F 77 C 160 F Volaille Poulet entier 1 1 1 5 kg 2 5 3 5 lb 26 30 191 C 375 F 82 C 180 F...

Страница 125: ...rmin e La consommation d aliments g t s peut entra ner des maladies li es un empoisonnement alimentaire Comment r gler le four pour la cuisson minut e 1 Positionnez la grille sur l emplacement de votr...

Страница 126: ...ment et l cran affiche l heure actuelle hr Pour changer une temp rature de cuisson programm e appuyez sur la touche BAKE CUISSON TRADITIONNELLE entrez la nouvelle temp rature puis appuyez sur la touch...

Страница 127: ...four une fois la cuisson termin e La consommation d aliments g t s peut entra ner des maladies li es un empoisonnement alimentaire Comment r gler le four pour la cuisson minut e diff r e 1 Positionne...

Страница 128: ...ntrez la nouvelle heure puis appuyez sur la touche START SET D PART R GLAGE Le four commence la cuisson la nouvelle heure Pour changer une temp rature de cuisson programm e appuyez sur la touche BAKE...

Страница 129: ...ppuyez sur la touche BROIL GRIL une fois pour s lectionner Hi lev ou deux fois pour s lectionner Lo Faible Un signal sonore retentit chaque fois que vous appuyez sur une touche Le symbole Start D marr...

Страница 130: ...1300 g 2 2 5 lbs de 3 8 cm d paisseur 1 5 po 6 15 18 14 17 Bien cuit 6 18 22 17 19 Poulet 1 poulet entier de 900 1300 g 2 2 5 lbs coup dans la longueur 4 30 35 15 20 Grillez d abord le c t peau vers l...

Страница 131: ...z sur la touche START SET D PART R GLAGE Le four s claire automatiquement et commence le pr chauffage de la temp rature Keep Warm Maintien au chaud environ 77 C 170 F L cran affiche le symbole du four...

Страница 132: ...uisson lente peut tre utilis e pour cuire les aliments plus lentement une temp rature plus basse Un temps de cuisson plus long permet une meilleure diffusion des ar mes dans de nombreuses recettes Cet...

Страница 133: ...ratation 4 Lorsque les aliments sont d shydrat s appuyez nouveau sur le bouton OFF CLEAR ARR T EFFACER Cette fonction ne n cessite pas de pr chauffage Une fois que les aliments sont d shydrat s conser...

Страница 134: ...il est pr f rable de d marrer cette fonction four froid C est pourquoi nous vous conseillons d attendre que le four ait refroidi et que l indication Hot Chaud disparaisse de l affichage Pour viter de...

Страница 135: ...temp rature par d faut est celle que vous d sirez passez l tape 3 2 Appuyez sur les chiffres de la temp rature de cuisson souhait e 3 7 5 La temp rature de cuisson choisie clignote l cran 3 Appuyez s...

Страница 136: ...yez sur la touche START SET D PART R GLAGE clignote gauche de la temp rature par d faut ou actuelle jusqu ce que la temp rature s lectionn e soit atteinte Un signal sonore retentit 6 fois La temp ratu...

Страница 137: ...omment r gler la fonction Sabbath 1 Positionnez la grille sur l emplacement de votre choix Voir page 30 2 Appuyez sur le bouton BAKE CUISSON TRADITIONNELLE Un signal sonore retentit chaque fois que vo...

Страница 138: ...nnul e Le d compte du temps de cuisson ne s affiche pas mais le four s teint automatiquement la fin du temps programm Comment r gler la fonction Sabbath Shabbat Pour changer une temp rature de cuisson...

Страница 139: ...ner ON ACTIV 12Hr ou OFF D SACTIV Hr 3 Appuyez sur la touche START SET D PART R GLAGE pour enregistrer et d marrer le dispositif S lection de la temp rature en Fahrenheit ou en Centigrade Le four peut...

Страница 140: ...ur par d faut est Con OFF 2 Appuyez sur la touche num rique 0 pour s lectionner Con On Conv activ e ou Con OFF Conv d sactiv e 3 Appuyez sur la touche START SET D PART R GLAGE pour enregistrer et r gl...

Страница 141: ...m Le papier d aluminium est un excellent isolant thermique et aurait pour cons quence d emprisonner la chaleur Son utilisation est susceptible de perturber le fonctionnement du tiroir et d endommager...

Страница 142: ...T jusqu ce qu il s teigne Appuyer sur la touche OFF CLEAR ARR T EFFACER ne permet pas d teindre le tiroir chauffe plat R glages recommand s R GLAGE DU TIROIR TYPE D ALIMENTS FAIBLE Petits pains mous a...

Страница 143: ...les surfaces des objets coupants Tous les objets cit s peuvent endommager la surface Tableau de commande du four 1 Pour verrouiller les commandes et la porte du four maintenez la touche OFF CLEAR ARR...

Страница 144: ...s 2 et 3 si n cessaire Ne vaporisez aucun type de nettoyant dans les trous du panneau de la coupelle Dans ces trous se trouvent des commutateurs d allumage supportant le courant qui claire la surface...

Страница 145: ...rnal sous la grille pour vous faciliter le nettoyage 3 Si vous constatez la pr sence de d bris sur les glissi res essuyez les l aide d une serviette en papier Le lubrifiant au graphite retir lors de l...

Страница 146: ...techniques de nettoyage diff rentes Le joint sur la surface int rieure de la porte du four ne doit jamais tre nettoy ou enlev pour nettoyer d autres surfaces Le joint est constitu d un mat riau tiss...

Страница 147: ...de savonneuse Rincez et s chez int gralement toutes les surfaces dont l arri re et le trou de la tige N utilisez pas de spray nettoyant sur le tableau de commande des br leurs de surface Si des clabou...

Страница 148: ...ettoyants abrasifs sur une des parties du br leur 6 Rincez abondamment et s chez int gralement toutes les parties avant de les rassembler Les lectrodes de d marrage ne sont pas amovibles et ne doivent...

Страница 149: ...de mijotage pr cis ArD Surface plate Ligne concave 9 Replacez les grilles des br leurs sur la plaque de cuisson de la cuisini re 10 Enfoncez et tournez chaque bouton de commande des br leurs de surfac...

Страница 150: ...sont teints 2 Lorsque les surfaces ont refroidi enlevez les grilles des br leurs N enlevez pas ou ne soulevez pas la plaque de cuisson pendant le nettoyage Sinon vous risquez d endommager les conduite...

Страница 151: ...ids 2 Ouvrez la porte du four Si les grilles du four g nent elles peuvent tre chang es de place ou retir es avant le changement de l ampoule du four 3 Tournez le cache en verre de l ampoule situ dans...

Страница 152: ...s que la porte est retir e Pour retirer la porte 1 Ouvrez compl tement la porte du four 2 D verrouillez les deux verrous de la charni re Rabattez chaque verrou vers le cadre de la porte pour les d ver...

Страница 153: ...de la porte Lorsque la porte est tenue environ 5 degr s les bras de la charni re glissent vers le bas l int rieur 4 Ouvrez compl tement la porte du four Si la porte ne s ouvre pas enti rement les bra...

Страница 154: ...ez le droit pour les lib rer Retirez le tiroir enti rement 3 Nettoyez le tiroir l eau chaude savonneuse Rincez et s chez minutieusement Comment remettre le tiroir chauffe plat en place 1 Placez les ex...

Страница 155: ...en nylon du tiroir Ensuite soulevez le tiroir pour l enlever 3 Nettoyez le tiroir l eau chaude savonneuse Rincez et s chez minutieusement Comment remettre le tiroir de rangement en place 1 Placez la...

Страница 156: ...lorsque le cycle d auto nettoyage commence et reste verrouill e jusqu ce que le cycle soit annul et que la temp rature du four descende en dessous de 177 C 350 F Soyez prudent en ouvrant la porte du f...

Страница 157: ...Effacer ainsi que la dur e de cycle s lectionn e apparaissent l cran et le symbole Lock Verrouillage clignote jusqu ce que la porte soit ferm e Puis le symbole Lock Verrouillage reste jusqu la fin du...

Страница 158: ...s lectionn e hr 3 Appuyez sur la touche DELAY START D PART DIFF R L cran affiche Delay Retard et 4 Appuyez sur les chiffres de la dur e pendant laquelle vous souhaitez que le four fonctionne ex 4 3 0...

Страница 159: ...d air chaud et ou de vapeur pourraient vous br ler La temp rature interne du four doit tre inf rieure 177 C 350 F pour que la porte se d verrouille automatiquement Le verrouillage automatique doit tre...

Страница 160: ...sol est affaiss ou inclin contactez un charpentier V rifiez et mettez la cuisini re niveau Reportez vous aux consignes d installation Les placards de la cuisine ne sont pas correctement align s et do...

Страница 161: ...nt pas Le verrouillage des commandes du four est activ L ic ne de verrouillage s affiche Maintenez la touche START SET D MARRAGE R GLAGE enfonc e pendant 3 secondes Un signal sonore retentit et le sym...

Страница 162: ...verrouillage des commandes du four est activ L ic ne de verrouillage s affiche Maintenez la touche START SET D MARRAGE R GLAGE enfonc e pendant 3 secondes Un signal sonore retentit et le symbole de ve...

Страница 163: ...pour la premi re fois Ceci est tout fait normal Lors du premier nettoyage du four la fum e d gag e sera plus importante Essuyez toutes les claboussures importantes avant de d marrer le cycle d auto n...

Страница 164: ...ume automatiquement lorsque le four atteint la temp rature de pr chauffe Le tiroir chauffe plat ne fonctionne pas mod le NX58H5650WS Les commandes n ont pas t correctement r gl es R initialisez les co...

Страница 165: ...es puis r tablissez la Si le probl me n est pas r solu contactez le service technique Reportez vous au bas de ce tableau Capteur du four coup Capteur du four court circuit Surchauffe du four Erreur de...

Страница 166: ...s pi ces et produits de rechange sont prot g s pour le reste de la p riode de garantie initiale ou pour quatre vingt dix 90 jours selon l ventualit la plus loign e La pr sente garantie limit e ne peut...

Страница 167: ...ectuer des r parations Pour b n ficier d un service d assistance couvert par votre garantie contactez SAMSUNG l adresse suivante Samsung Electronics America Inc 85 Challenger Road Ridgefield Park NJ 0...

Страница 168: ...ca_fr support French www samsung com us support www samsung com us support Veuillez noter que la garantie Samsung n inclut pas les d placements du service apr s vente pour expliquer le fonctionnement...

Отзывы: