


English 45
Maint
aining y
our applianc
e
Cleaning painted parts and decorative trim
•
For general cleaning, use a cloth with hot, soapy water.
•
For more difficult residue and built-up grease, apply a liquid detergent directly
onto the area and leave for 30 to 60 minutes. Wipe with a damp cloth and dry.
Do not use abrasive cleaners on any of these surfaces. They can scratch.
Cleaning stainless steel surfaces
1.
Shake the bottle of Stainless Steel Appliance Cleaner or Polish well.
2.
Place a small amount of stainless steel appliance cleaner or polish on a damp
cloth or damp paper towel.
3.
Clean a small area, rubbing with the grain of the stainless steel if applicable.
4.
Dry and buff with a clean, dry paper towel or soft cloth.
5.
Repeat as necessary.
NOTE
•
Do not use a steel-wool pad. It will scratch the surface.
•
If a mineral oil-based stainless steel appliance cleaner has been used before to
clean the appliance, wash the surface with dishwashing liquid and water prior
to using the Stainless Steel Appliance Cleaner or Polish.
Oven racks
•
If the racks are left in the oven during a self-cleaning cycle, their color will turn
slightly blue and the finish will be dull. After the self-cleaning cycle is complete
and the oven has cooled, rub the sides of the racks with wax paper or a cloth
containing a small amount of oil. This will help the racks glide more easily on
their tracks.
•
Gliding racks may be cleaned by hand with an abrasive cleaner or steel wool.
During cleaning, be careful not to allow water or cleaner to enter the slides on
the sides of rack.
NOTE
•
Do not clean in a dishwasher.
•
If the rack becomes hard to remove or replace, lightly wipe the oven rack
guides with cooking oil. Do not wipe cooking oil on the slides.
•
If the rack becomes difficult to slide, the rack may need to be lubricated using a
graphite lubricant.
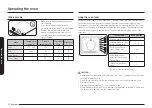
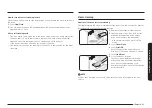
Oven door
Don’t hand
Don’t hand
clean the
clean the
oven door
oven door
gasket.
gasket.
You may
You may
hand clean
hand clean
the door.
the door.
•
Use soap and water to thoroughly clean
the top, sides, and front of the oven door.
Rinse well. You may use a glass cleaner
on the outside glass of the oven door. DO
NOT immerse the door in water.
DO NOT
spray or allow water or the glass cleaner
to enter the door vents.
DO NOT use
oven cleaners, cleaning powders, or any
harsh abrasive cleaning materials on the
outside of the oven door.
•
DO NOT clean the oven door gasket.
The
oven door gasket is made of a woven
material which is essential for a good
seal. Care should be taken not to rub,
damage, or remove this gasket.
Drawer Handle
Remove dust with soft brush or soft cloth covered with water.
CAUTION
Do not use alkaline detergents, sulfuricacid,
hydrochloric acid, organic solvents, or
disinfectants.
•
Surface can be damaged.
Содержание NSE6D 81 Series
Страница 1: ...Electric Range User manual NSE6D 81...