background image

English  71

O

v

en (L

o

w

er O

v

en)

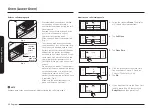
Display
1. 

Brightness

You can change the brightness of the display screen.

• 

Tap 

Settings

 > 

Display

 > 

Brightness

, and then use the bar next to Brightness 

to adjust the brightness of the screen.

2. 

Screen saver

If screen saver is turned off, the Clock theme and Timeout menu are disabled.

• 

Tap 

Settings

 > 

Display 

Screen saver

, and then tap 

Off

 in the right screen.

3. 

Clock theme

• 

Tap 

Settings

 > 

Display

 > 

Clock theme

, and then tap in the right screen. You 

can select a theme.

4. 

Timeout

• 

Tap

 Settings

 > 

Display

 > 

Timeout

, and then tap in the right screen. You can 

select a time from 5 minutes to 60 minutes, or Always on.

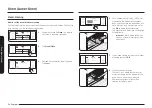
Date & Time

To enable automatic date and time

1. 

Turn on the Wi-Fi connection.

2. 

Tap 

Settings

 > 

Date & Time

 > 

Automatic date and time

, and then tap

 On

 in the 

right screen. The date and time are set automatically.

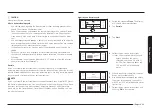
To manually input date and time

1. 

Tap 

Settings

 > 

Date & Time

 > 

Automatically date and time

, and then tap 

Off

 in 

the right screen. Time zone, set date, and set time are activated.

2. 

You can set the time zone, date, and time.

To change the time format

1. 

Tap 

Settings

 > 

Date & Time

 > 

Select time format

, and then tap in the right 

screen.

2. 

You can select 12-hour clock or 24-hour clock.

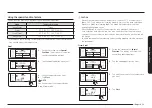
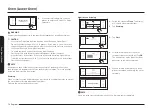
Settings

In Settings, you can change the default settings to your preference or diagnose 
problems with the network connection.


Cook Time

None

Delay Start

None


No Preheat


Off


4:35 PM


Convection Bake

Faster, more even baking

325

°F

Start


OVEN

MODE

TIP

Lower

Faster, more even baking

Convection Bake

TIP

Lower

OVEN
MODE

Start

Off

No Preheat

None

Delay Start

None

Cook Time

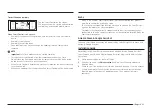
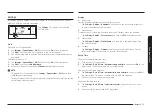
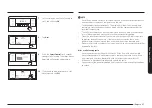
Tap 

Settings

. The display will show the

Setting item.

Wi-Fi

To enable a Wi-Fi connection

1. 

Tap 

Settings

 > 

Connections

 > 

Wi-Fi

, and then tap 

On

 in the right screen.

2. 

Tap 

Wi-Fi

, and then tap a Wi-Fi network in the list that appears.

3. 

You will be prompted to provide a password for a secure network. Enter the 
password.

To manually input an IP

1. 

Tap 

Settings

 > 

Connections

 > 

Wi-Fi

, and then tap 

On

 in the right screen.

2. 

Tap 

Wi-Fi

, and then tap 

Add Network

.

3. 

Enter an IP manually, and then tap 

Connect

 to apply your settings.

NOTE

• 

To disable a Wi-Fi connection, Tap 

Settings

 > 

Connections

 > 

Wi-Fi

, and then 

tap 

Off

 in the right screen.

• 

For details about the Wi-Fi connection and using the SmartThings app, see the 
SmartThings app user manual.

Содержание NQ70 700D Series

Страница 1: ...Built InMicrowaveCombiOven User manual NQ70 700D...

Страница 2: ...peration can result in harmful exposure to microwave energy It is important not to defeat or tamper with the safety interlocks B Do not place any object between the oven front face and the door or all...

Страница 3: ...ur body This device and its antenna s must not be co located or operated in conjunction with any other antenna or transmitter If this equipment does cause harmful interference to radio or television r...

Страница 4: ...ection 30 Speed Broil 30 Air Fry Auto Cook 31 Healthy Cook 33 Sensor Cook 35 Auto Cook 38 Defrost 40 Oven Lower Oven 41 Push to open door 41 Timed cooking 42 Delay start 43 Using the Temp probe 43 Twi...

Страница 5: ...tructions before using your oven to prevent the risk of fire electric shock personal injury or damage when using the oven This guide does not cover all possible conditions that may occur Always contac...

Страница 6: ...cavity for storage purposes Do not leave paper products cooking utensils or food in the cavity when not in use CALIFORNIA PROPOSITION 65 WARNING WARNING Cancer and Reproductive Harm www P65Warnings ca...

Страница 7: ...f the blower may vary when the microwave oven is on Cooking times may be longer too 20 Liquids such as water milk coffee or tea can be overheated beyond the boiling point without appearing to be boili...

Страница 8: ...may lead to glass breakage Do not cook on a product with broken glass Shock fire or cuts may occur FOR YOUR SAFETY When using electrical appliances you should follow basic safety precautions includin...

Страница 9: ...pliance by a person responsible for their safety If there is a fire in the oven during self cleaning turn the oven off and wait for the fire to go out Do not force the door open The introduction of fr...

Страница 10: ...y become hot during use To avoid burns young children should be kept away ELECTRICAL SAFETY Use only the factory installed flexible power cord to connect to the power supply Do not use a 3rd party pow...

Страница 11: ...ot use harsh abrasive cleaners or sharp metal scrapers to clean the oven door glass They can scratch the surface which may result in the glass shattering OVEN DO NOT TOUCH THE HEATING ELEMENTS OR INTE...

Страница 12: ...N Do not attempt to operate the oven during a power failure If the power fails always turn the oven off If the oven is not turned off and the power returns the oven may begin to operate again Food lef...

Страница 13: ...ectric shock or fire If the power cord is damaged contact your nearest Samsung service center CRITICAL INSTALLATION WARNINGS WARNING This appliance must be installed by a qualified technician or servi...

Страница 14: ...ce such as water has entered the appliance contact your nearest Samsung service center Failing to do so may result in electric shock or fire CRITICAL USAGE WARNING CAUTION If the appliance is flooded...

Страница 15: ...that have shells eggs chestnuts etc with a knife before cooking them Failing to do so may result in burns or injury Never heat plastic or paper containers and do not use them for cooking Failing to do...

Страница 16: ...may be very hot after heating Especially when feeding a child make sure the food or beverage has cooled sufficiently Do not heat food wrapped in paper from magazines newspapers etc This may result in...

Страница 17: ...object This may result in the glass being damaged or broken Do not store anything directly on top of the appliance when it is in operation Use caution when heating liquids such as water or other beve...

Страница 18: ...corrosion Keep the inside of the oven clean Food particles or spattered oils stuck to the oven walls or floor can cause paint damage and reduce the efficiency of the oven Do not use sealed containers...

Страница 19: ...ms at the same time Temp probe The Temp probe lets you cook meat to the exact internal temperature you want taking the guess work out of determining whether a piece of meat is done or not Air Fry tray...

Страница 20: ...with a you can purchase by calling the Samsung Contact Center 1 800 726 7864 or visit our website www samsung com us support Assembling the steam container applicable models only The Steam container a...

Страница 21: ...temperature and to save energy If cooking time is more than 30 minutes you can switch the oven off 5 10 minutes before the end of the cooking time to save energy The residual heat will complete the c...

Страница 22: ...then slide it out to remove 2 Open the reservoir cap and then fill the reservoir with 22 oz 650 ml of drinkable water NOTE You can open the reservoir by removing the rubber cap or by removing the cle...

Страница 23: ...TempProbe Cook Time None None DelayStart Off NoPreheat 01 07 05 06 03 02 04 01 Indicator area Timer When the timer is set the Timer indicator is displayed Door lock Displayed when the oven door is lo...

Страница 24: ...1 Cancel or turn off all functions 2 Touch Settings for 3 seconds Child Lock Child Lock 3 The display will change to the control lock screen and the control lock confirmation will appear at the bottom...

Страница 25: ...ed the oven will beep and the display will show the Timer has finished Timer Timer 01 01 52 48 Pause Delete Cancel Timer Pause Delete Cancel Timer 01 Add You can pause cancel or delete the timer at an...

Страница 26: ...which is reinforced by microwave energy Speed Broil 10 70 30 1 Hr 30 min The heating elements generate heat which is reinforced by microwave energy Feature Temp Power range Default Temp Power Max time...

Страница 27: ...zen or fresh fish meat or poultry chill them in the refrigerator first Even when chilled they should not stand in the oven for more than 1 hour before cooking begins and should be removed promptly whe...

Страница 28: ...100 0hr 0min 00sec 4 35 PM Microwave 30sec Microwave Hea ng Upper Power 100 Start Microwave Heating Microwave Upper OVEN MODE Start 30sec Power 100 hr min sec 4 35 PM Microwave 30sec 0hr 0min 30sec M...

Страница 29: ...tion fan You can use a microwave rack or a combination of a rack and hot plate on the turntable Use this mode for biscuits individual scones rolls and cakes as well as fruit cakes choux pastries and s...

Страница 30: ...r 30 3 Tap Power and then flick the screen to specify a power level between 10 and 70 default 30 Speed Power Convection 4 35 PM Speed Power Conv Temp 350 F 30 Power 30sec 0hr 0min 00sec Upper Power Co...

Страница 31: ...t Use high rack Bone in Chicken Pieces Upper Start Unit 1 0lb min sec 6 Tap Start to start cooking 7 If you want to pause cooking tap Pause In Pause you can cancel or continue cooking by tapping Off o...

Страница 32: ...n a hot plate then place the plate on the high rack Food Amount Instructions Bone in Chicken Pieces 1 0 lb 2 0 lbs Place the chicken pieces skin side down on the high rack and hot plate on the turntab...

Страница 33: ...tic wrap while cooking Green Beans 1 serving 2 servings 3 servings 4 servings Place the green beans in the microwave safe bowl Add 1 4 tbsps of water 1tbsp per serving Cover with vented 1 inch vent pl...

Страница 34: ...microwave safe bowl Add 1 4 tbsps of water 1tbsp per serving Cover with vented 1 inch vent plastic wrap while cooking Zucchini 1 serving 2 servings 3 servings 4 servings Place the zucchini in the mic...

Страница 35: ...before using it again Sensor Cook The oven offers 11 different sensor cook options for your convenience which include pre programmed cooking times You do not need to set either the cooking time or th...

Страница 36: ...en vegetables in a microwave safe ceramic glass or plastic dish and add 2 4 tbs water Cover with vented 1 inch vent plastic wrap to cook Stir before letting stand for 3 5 minutes Let the oven cool for...

Страница 37: ...harts in this manual Always use microwave safe containers and cover them with their lids or with plastic wrap When using plastic wrap turn back one corner to allow steam to escape at the proper rate A...

Страница 38: ...utter min sec Upper Start Unit 0 25lb 4 Tap the weight area to select the food weight screen OK 0 5 0 25lb Cancel 0 25lb 0 5 OK Cancel 5 Flick the screen to select the food weight 6 Tap OK 4 35 PM Mel...

Страница 39: ...sh on the low rack and cook Frozen Pretzels 2 ea 4 ea Place the frozen pretzels on the hot plate then place the plate on the low rack Frozen Churros 2 ea 4 ea Place the frozen churros on the hot plate...

Страница 40: ...venience The time and power levels are automatically adjusted according to your selection 4 35 PM Defrost Jump start meal prepara ons Meat Fish Poultry Bread Upper Defrost Jump start meal preparations...

Страница 41: ...r whole chicken as well as for chicken portions Fish 0 1 3 5 lbs Shield the tail of a whole fish with aluminium foil Turn the fish over when the oven beeps This program is suitable for whole fish as w...

Страница 42: ...ns on immediately and cooks for the length of time you select At the end of the cooking time the oven turns off automatically You can use the timed cooking feature only with another cooking operation...

Страница 43: ...Convection Bake Faster more even baking UPPER 325 F Start OVEN MODE TIP Lower Faster more even baking Convection Bake Start TIP Lower OVEN MODE Off No Preheat 5 35PM Delay Start 1hr 45min Cook Time Th...

Страница 44: ...200 F 6 If you want to use the Cook time or Delay start select the desired function 7 Tap Start 8 When the desired internal temperature is reached the function automatically stops and an alarm sounds...

Страница 45: ...e setting ranges Using the divider you can divide the oven into two compartments upper and lower This is also called twin mode When you use the upper and lower compartments in the oven at the same tim...

Страница 46: ...5 F 105 C O Proof 95 F 35 C or 105 F 40 C O Steam Proof 95 F 35 C or 105 F 40 C O Keep Warm 175 F 80 C O O Available Not Available To use the twin oven functionality you must insert the divider into t...

Страница 47: ...des as if they were cooked on a rotisserie The heated air seals in juices quickly for moist and tender results while at the same time creating a rich golden brown exterior Steam Bake Steam Bake provid...

Страница 48: ...ditions for vegetables such as potatoes tomatoes onions carrots bell peppers broccoli and It creates optimal texture and taste for vegetable by increasing moisture content when compared to general con...

Страница 49: ...ay timed cooking operation You should not use this mode to reheat cold food Broiling recommendation guide The size weight thickness starting temperature and your doneness preference will affect broili...

Страница 50: ...elow the Air Fry Tray for getting any drippings This will help to reduce splatter and smoke for high fat foods such as chicken wings Air Fry is designed for baking on a single oven rack Place food on...

Страница 51: ...re Time Tips Frozen Frozen Chicken Nuggets 24 28 oz 400 F 425 F 15 25 min Frozen Chicken Wings 30 35 oz 425 F 20 30 min Frozen Onion Rings 20 25 oz 425 F 15 20 min Frozen Fish Fingers 20 25 oz 425 F 1...

Страница 52: ...2 Tap the mode you want Setting the temperature 4 35 PM Convection Bake Faster more even baking 325 F Start OVEN MODE TIP Temp Probe 100 No Preheat Off Delay Start None Lower Faster more even baking...

Страница 53: ...ium Steam 4 35PM Delay Start 0hr 40min Cook Time Steam Bake Steam Roast a If you selected Steam Bake or Steam Roast the display will show the steam level information The default is Medium b Tap the St...

Страница 54: ...an may turn on or off while the oven is operating This oven is designed for closed door broiling The oven door must be closed during broiling CAUTION Always broil with the oven door closed Use care wh...

Страница 55: ...routs Steam container Wire rack steam 1 15 20 Peeled potato halves Steam container Wire rack steam 1 25 35 Spinach Steam container Wire rack steam 1 10 13 White fish fillets Steam container Wire rack...

Страница 56: ...s that can be safely eaten raw Air Sous Vide recommendation guide Food Doneness Temperature F Time hrs Beef Steak 1 5 thick Rare 130 F 2 5 4 Steak 1 5 thick Medium 140 F 2 5 4 Steak 1 5 thick Well don...

Страница 57: ...shes are best served immediatly after cooking If not served immediately after cooked put the food in ice water and cool down completely Then store them under 40 F 5 C to keep the fragrance and texture...

Страница 58: ...bsite offers special menus and recipes to enjoy cooked vegetables on the guide table you can download detailed recipes for each feature from the our website www samsung com us support Convection Veget...

Страница 59: ...is mode won t function properly Wait until the oven cools down Do not use Proof for warming food The proofing temperature is not hot enough to keep food warm Place the dough in a heat safe container o...

Страница 60: ...Mode Rack position Keep Warm 2 Steam Proof 2 or 3 Stone Bake Mode 1 or 2 Dehydrate 3 or 4 Using the smart control feature Lower oven only To use the oven s Smart Control you must download the SmartTh...

Страница 61: ...n the oven off When oven cooking is finished or cancelled Smart Control will be deactivated Bixby Bixby is the name of Samsung s artificial intelligence solution that makes it possible to control the...

Страница 62: ...food cakes small roasts 2 Turkeys large roasts hams fresh pizza 1 This table is for reference only Oven rack positions with divider twin mode 01 03 A 02 04 B The upper compartment has 2 rack positions...

Страница 63: ...ulation resulting in poor baking and may damage the oven bottom Arrange the oven racks only when the oven is cool Rack and Pan placement Single Oven Rack Single Oven Rack 3 4 Multiple Oven Racks Multi...

Страница 64: ...ding rack makes food preparation easier especially when you are preparing heavier dishes The Gliding rack has 2 glide tracks that allow you to extend the rack well out of the oven without touching the...

Страница 65: ...m foil Doing so will result in poor heat distribution poor baking results and cause permanent damage to the oven interior Aluminum foil will melt and adhere to the interior surface of the oven The ove...

Страница 66: ...to use the Delay Start feature go to Step 8 Otherwise tap Delay Start and then go to Step 7 Before a self cleaning cycle Fig 1 Fig 1 Fig 2 Fig 2 Don t hand Don t hand clean the clean the oven door ov...

Страница 67: ...them with a soap filled steel wool pad and rinse thoroughly with a vinegar and water mixture If the oven is not clean after one cycle repeat the cycle You cannot set the oven for cooking until the ove...

Страница 68: ...a significant amount of water remaining on the bottom of the oven after a steam cleaning cycle Remove the residual water with a sponge or soft dry cloth Steam Cleaning How to set the oven for steam cl...

Страница 69: ...50ml ofwater intoWaterReservoirto rinse Descale CAUTION Wear gloves during cleaning After a steam cleaning cycle Use caution when opening the door before a steam cleaning procedure has ended The water...

Страница 70: ...e Cleaning is complete Wipe oven interior Clean Water Reservoir and Drip Tray OK OK Wipe oven interior Clean WaterReservoirand Drip Tray Cleaning is complete 8 When rinsing is complete use oven gloves...

Страница 71: ...change the time format 1 Tap Settings Date Time Select time format and then tap in the right screen 2 You can select 12 hour clock or 24 hour clock Settings In Settings you can change the default sett...

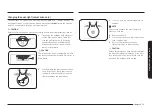
Страница 72: ...he next page Language Choose a display language 1 Tap Settings Language and then tap in the right screen 2 You can select English Spanish or French Volume Adjust the volume level for beeps and melodie...

Страница 73: ...during the Sabbath touch Light before activating the Sabbath feature Once the oven light is turned on and the Sabbath feature is active the oven interior light will remain on until the Sabbath feature...

Страница 74: ...after you have started Sabbath mode to allow the oven to reach the set temperature Note that for best performance the oven fan operates only when the oven temperature is rising How to use the Sabbath...

Страница 75: ...of the Air fry tray using a plastic scouring pad NOTE The air fry tray is dishwasher safe CAUTION Do not leave the air fry tray in the oven during the self cleaning cycle The extreme heat generated i...

Страница 76: ...ribute the lubricant 7 Replace the cap on the lubricant and shake it again Turn the rack over and repeat steps 3 4 5 and 6 8 Close the rack turn the rack right side up and then place in oven See Insta...

Страница 77: ...ges of the oven door Lift and pull the oven door toward you and remove You may need to gently shift the door from side to side as you pull 7 Set the oven door aside on the prepared covered work surfac...

Страница 78: ...arness and re insert the rubber CAUTION After replacing the door make sure to reconnect the wires Push them inward to arrange them as they were before you removed the door Wires that are not connected...

Страница 79: ...r The broil heater should loosen and tilt down CAUTION The broil heater is not a removable part Do not force the broil heater down Do not let it drop down 2 While holding the glass cover with one hand...

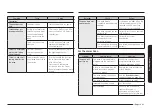
Страница 80: ...le in operation The user has opened the door to turn food over After turning over the food press the Start button again to start operation Troubleshooting At Samsung we want to ensure that you don t h...

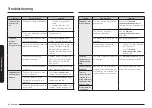
Страница 81: ...sparks during cooking Metal containers are used during oven thawing functions Do not use metal containers Symptom Cause Action The power turns off during operation The oven has been cooking for an ex...

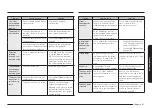
Страница 82: ...remove the food from the heating elements Food is too close to the grill Put the food a suitable distance away while cooking Food is not properly prepared and or arranged Make sure food is properly pr...

Страница 83: ...operly See the Basic operations section starting on page 23 The oven is too hot Allow the oven to cool Incomplete service wiring Call for service Power outage Check to see if the house lights will tur...

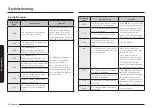
Страница 84: ...r remains in the oven Problem Possible cause Solution The oven light will not turn on The light is loose or defective Tighten or replace the lamp Call for service if the door light does not turn on Th...

Страница 85: ...tripped or there was a power failure while the oven door was locked Activate Control Lockout and then unlock the control See the Oven Control Lockout section on page 24 Problem Possible cause Solutio...

Страница 86: ...reconnect the power If does not solve the problem call the service The steam sensor is short when the oven is operating C 72 There are drain system related problems C A2 The cooling motor is operatin...

Страница 87: ...this limited warranty Please contact SAMSUNG at the number below for assistance with any of these issues Samsung will charge a repair fee for replacing an accessory or repairing cosmetic damage if th...

Страница 88: ...tion an authorized servicer can be dispatched to perform such installation EXCLUSION OF IMPLIED WARRANTIES IMPLIED WARRANTIES INCLUDING THE IMPLIED WARRANTIES OF MERCHANTABILITY OR FITNESS FOR A PARTI...

Страница 89: ...nics Canada Inc 2050 Derry Road West Mississauga Ontario L5N 0B9 Canada 1 800 SAMSUNG 726 7864 and www samsung com ca support English www samsung com ca_fr support French SAMSUNG will repair or replac...

Страница 90: ...oduct by contacting our support team via http opensource samsung com Please use the Inquiry menu It is also possible to obtain the complete corresponding source code in a physical medium such as a CD...

Страница 91: ...Memo...
Страница 92: ...OMMENTS COUNTRY CALL OR VISIT US ONLINE AT U S A Consumer Electronics 1 800 SAMSUNG 726 7864 www samsung com us support CANADA 1 800 SAMSUNG 726 7864 www samsung com ca support English www samsung com...

Отзывы: