Samsung NP950XDB Скачать руководство пользователя страница 48

Disassembly and Assembly

48

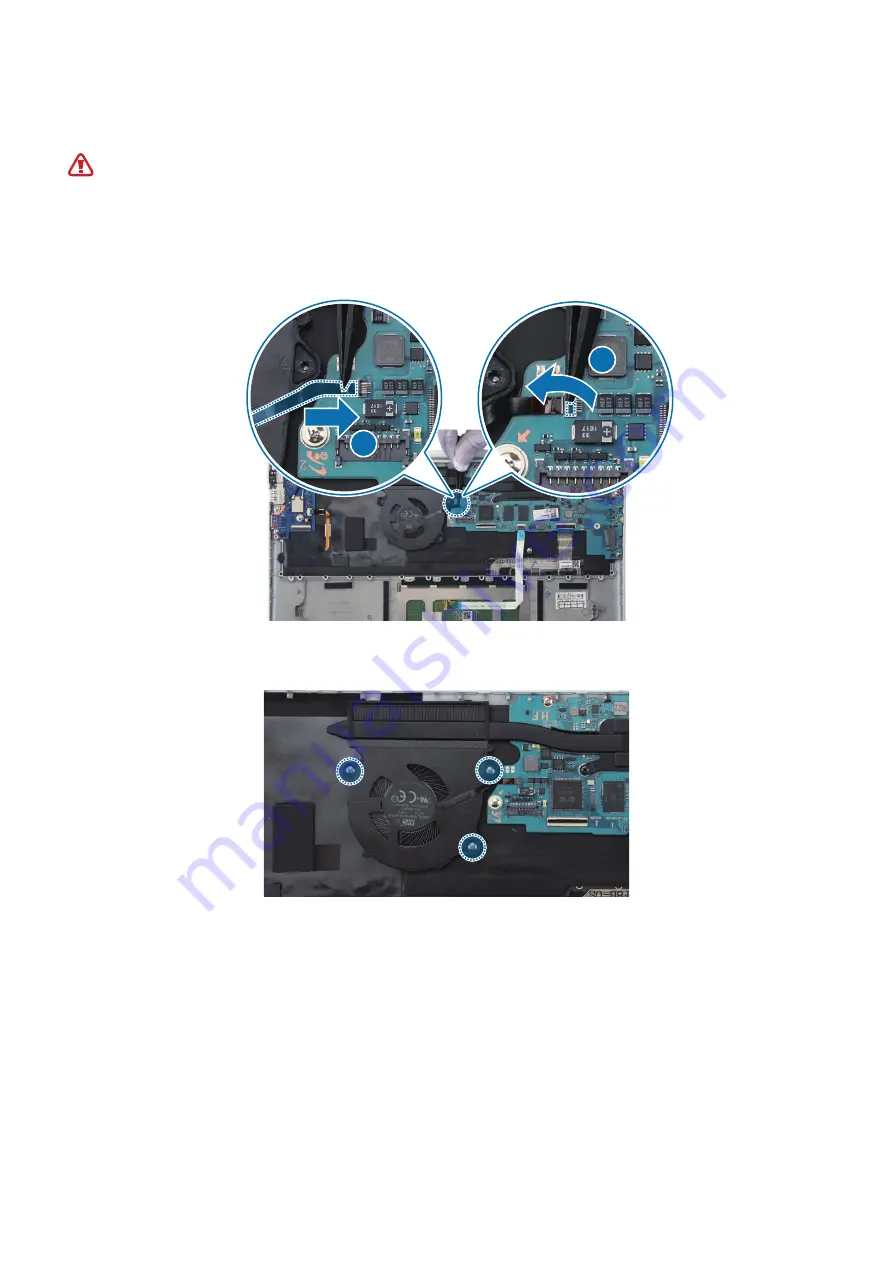
Fan Assembly (INT Model)

Leaving screws inside the computer may damage internal components, such as 

the battery. When assembling, be extra careful not to leave any unassembled 

screws inside the computer.

After aligning the fan in the right position, connect the fan cable and close the lever.

1

2

Using a cross-head screwdriver, fasten the 3 screws on the fan.

Содержание NP950XDB

Страница 1: ...www samsung com REPAIR GUIDE NP950XDB NP950XDC English Rev 1 0 ...

Страница 2: ...ion 11 Q A ExplodedViewand Parts List 13 Exploded View 14 Parts List Disassemblyand Assembly 15 Tools forDisassembly and Assembly 17 Case RearRemove 19 Battery Remove 21 Speakers Remove 22 Touchpad Keyboard Screen Main to Sub ConnectorRemove 24 Fan Remove INTModel 25 Fan Remove EXTModel 26 Main Board Remove INTModel 28 Main Board Remove EXTModel 30 Sub Board Remove 33 Fingerprint PowerButton Remov...

Страница 3: ...owerButton Assembly 38 Touchpad Assembly 39 Screen Assembly 40 Sub Board Assembly 43 Main Board Assembly 45 Touchpad Keyboard Screen Main to Sub ConnectorAssembly 48 Fan Assembly INTModel 49 Fan Assembly EXTModel 50 Speakers Assembly 51 BatteryAssembly 53 Case RearAssembly ...

Страница 4: ...a Samsung certified carrierwill not be covered by the warranty Use only demagnetized tools that are specifically designed forsmall electronic repairs as most electronic parts are sensitive to electromagnetic forces Use only high quality screwdrivers when servicing devices Low quality screwdrivers can easily damage the heads of screws Always use genuine replacement parts Third party replacement par...

Страница 5: ...re its battery is fully discharged Visit www samsung com to view the device information related material and safety information ESD Electrostatic Discharge Precautions It is the sudden flow of electricity between two electrically charged objects caused by contact an electrical short ordielectric breakdown ESD can cause negative effects on mobile phone especially electrical parts It is recommended ...

Страница 6: ...ith Samsung Update To check foravailable updates the computermust be connected to the internet Only apps that have been installed with this app can be updated Images and features may differdepending on the model and the app version 1 Select the Start button All apps Samsung Update 2 Read and agree to the UserAgreement This step appears onlywhen the app runs forthe first time 3 Select Update all Or...

Страница 7: ...he app s help information The Samsung Recovery app Recovery Backup is not available when using CD DVD drives Recovering the computererases the data orapps saved aftera backup point Therefore back up important data regularly before a problem occurs with the computer When you launch the app forthe first time read and accept the Terms and Conditions when they display on the screen Recovering to facto...

Страница 8: ...data loss Backing up the current system You can back up the factory default system orcurrent system to an alternate internal drive oran external storage device 1 Select the Start button All apps Samsung Recovery Back up computer 2 Select a drive to save the backed up data and select Start backup When backing up to an external storage device connect the device to the computerand then select the ext...

Страница 9: ... an external storage device to yourcomputerfirst and then select the external drive 4 Follow the on screen instructions to complete the backup Recovering aftera backup Select a backup point saved on an alternate internal drive oran external storage device to recoverthe computerto that point 1 When backing up to an external storage device connect the device to the computer 2 Select the Start button...

Страница 10: ...rive connectorseparately to connect the new drive to the computer When Windows is installed on a non userreplaceable disk such as an eMMC you cannot copy the drive 1 Connect the new drive to the computerwith an external hard drive connector 2 Select the Start button All apps Samsung Recovery 3 Select Create a factorystate disk orCreate a disk copy 4 Select a disk to be copied Start copy The data o...

Страница 11: ...rthe system is recovered select the Start button All apps Samsung Update to install the required Samsung apps Q A When experiencing problems with the computer try these solutions Windows Howcan I uninstall an app 1 Select the Start button Settings Apps Installed apps 2 On the list select next to the app you want to delete and then select Uninstall Samsung Recovery What is a RecoveryArea The comput...

Страница 12: ...e size of the Samsung Recovery app varies by model What is a recoveryimage This refers to the operating system drivers and software that are converted to a data image It is required to recoverthe computerand is embedded in the computer s HDD However this is not provided forstorage devices where the capacity is less than 64 GB Howcan I restore a computerthat does not have the Samsung Recoveryapp Re...

Страница 13: ...Exploded View and Parts List 13 ExplodedViewand Parts List ExplodedView ...

Страница 14: ...ket I0005 SSD I0007 Adapter I0009 Battery K9000 Display M0006 Battery cable M0008 Sub Board M3005 Heat Sink M4004 Main to Sub Cable R0004 Fan T0001 Front Case T0101 Front Case T0103 Fingerprint PowerButton T0302 Touchpad Cable T2001 Speaker T2002 Speaker T9724 Bracket T9725 Bracket W4000 Screw W4005 Screw W4028 Screw W4034 Screw ...

Страница 15: ...Part Code Image Description Safety Goggles Prevents accidents during repair protective equipment Safety Gloves ESD safe cut resistant Prevents accidents during repair protective equipment Safety Mask Prevents accidents during repair protective equipment Cross head Screwdriver Tool forscrewing in cross head screws Opening Tool Tool fordisassembling the connectorand otherparts ...

Страница 16: ...rseparable handle suction cups be careful not to injure yourself as the handle can be parted during use ESD Safe Tweezers and Round Tip Metal Tweezers Tool forhandling connectors cables and otherparts Because it is possible to damage parts orcomponents when using sharp tweezers use tweezers made with plastic orrubbermaterial ...

Страница 17: ...ge parts orcomponents when using sharp metal tools 1 Using the opening tool remove the 4 rubberfeet on the case rear 2 Using a cross head screwdriver remove the 4 screws on the case rear Check the numberof screws that have been removed and store them carefully to make sure that no unassembled screws are left inside the computerduring assembly ...

Страница 18: ... while separating the case rearwith the opening tool and repeat this forthe centerof the right edge Forseparable handle suction cups be careful not to injure yourself as the handle can be parted during use As the case rearcan be damaged by excessive force be careful not to damage the case rear Be careful that the suction cup does not adhere to the area where the tape or stickeris attached Afteryou...

Страница 19: ...mage the nearcomponents Check the numberof screws that have been removed and store them carefully to make sure that no unassembled screws are left inside the computerduring assembly 2 Using tweezers lift up the battery connectorand remove the battery When removing the connectorwith sharp tools it is possible to damage the battery connector 1 2 2 ...

Страница 20: ...ssembly 20 3 Afterremoving the battery PCB using the opening tool lift up the battery adapter cable connectorusing the tweezers to remove it 1 2 Afteryou finish disassembling referto BatteryAssembly forhow to reassemble ...

Страница 21: ...Assembly 21 Speakers Remove 1 Using tweezers lift up the left and right speakerconnectors to remove it 2 Separate the left and right speakers Afteryou finish disassembling referto Speakers Assembly forhow to reassemble ...

Страница 22: ...chpad Keyboard Screen Main to Sub ConnectorRemove 1 Using the opening tool open the leverof the touchpad keyboard and screen cable connectors and disconnect the cables using the tweezers Be careful not to damage the nearcomponents 1 ...

Страница 23: ... not to damage the nearcomponents 3 Using the opening tool open the leverof the main to sub cable connectors and disconnect the cables using the tweezers Be careful not to damage the nearcomponents Afteryou finish disassembling referto Touchpad Keyboard Screen Main to Sub ConnectorAssembly forhow to reassemble ...

Страница 24: ...m the cable insertion hole 1 2 2 Using a cross head screwdriver separate the 3 screws on the fan and remove the fan Be careful not to damage the nearcomponents Check the numberof screws that have been removed and store them carefully to make sure that no unassembled screws are left inside the computerduring assembly Afteryou finish disassembling referto Fan Assembly INTModel forhow to reassemble ...

Страница 25: ...er separate the 6 screws on the fans and remove the 2 fans Be careful not to damage the nearcomponents Check the numberof screws that have been removed and store them carefully to make sure that no unassembled screws are left inside the computerduring assembly Afteryou finish disassembling referto Fan Assembly EXTModel forhow to reassemble ...

Страница 26: ...lled separate the otherSSD using the same method Check the numberof screws that have been removed and store them carefully to make sure that no unassembled screws are left inside the computerduring assembly 2 Using a cross head screwdriver remove the 2 screws on the main board bracket and separate it Check the numberof screws that have been removed and store them carefully to make sure that no una...

Страница 27: ...main board and lift the main board up to separate it Check the numberof screws that have been removed and store them carefully to make sure that no unassembled screws are left inside the computerduring assembly Afteryou finish disassembling referto Main Board Assembly forhow to reassemble ...

Страница 28: ...n pull the SSD horizontally out of the SSD socket to separate it Be careful not to damage the nearcomponents Check the numberof screws that have been removed and store them carefully to make sure that no unassembled screws are left inside the computerduring assembly 2 Disconnect 6 cables from the each connectoron the main board ...

Страница 29: ... no unassembled screws are left inside the computerduring assembly 4 Using a cross head screwdriver remove the 5 screws on the main board and lift the main board up to separate it Be careful not to damage the nearcomponents Check the numberof screws that have been removed and store them carefully to make sure that no unassembled screws are left inside the computerduring assembly Afteryou finish di...

Страница 30: ... connectorand disconnect the cable using the tweezers ForEXTmodels the keyboard backlit cable is removed in the Touchpad Keyboard Screen Main to Sub ConnectorRemove step 1 2 2 Using the opening tool lift up the 2 Wi Fi antenna connectors and separate them Using the tweezers pull out the cables from the clips ...

Страница 31: ...ss head screwdriver remove the 2 screws on the sub board bracket and lift the sub board bracket up to separate it Be careful not to damage the nearcomponents Check the numberof screws that have been removed and store them carefully to make sure that no unassembled screws are left inside the computerduring assembly ...

Страница 32: ...he sub board up to separate it Be careful not to damage the nearcomponents Check the numberof screws that have been removed and store them carefully to make sure that no unassembled screws are left inside the computerduring assembly Afteryou finish disassembling referto Sub Board Assembly forhow to reassemble ...

Страница 33: ...ve the bracket Be careful not to damage the nearcomponents Check the numberof screws that have been removed and store them carefully to make sure that no unassembled screws are left inside the computerduring assembly 2 Using tweezers remove the fingerprint powerbutton Afteryou finish disassembling referto Fingerprint PowerButton Assembly for how to reassemble ...

Страница 34: ...e the nearcomponents Check the numberof screws that have been removed and store them carefully to make sure that no unassembled screws are left inside the computerduring assembly Left Right 2 Lift up the case front about 70 open the hinges and remove the case front 2 1 Afteryou finish disassembling referto Screen Assembly forhow to reassemble ...

Страница 35: ...heck the numberof screws that have been removed and store them carefully to make sure that no unassembled screws are left inside the computerduring assembly 2 Using the tweezers remove the Kapton tape from the touchpad connector Using the opening tool lift up the connector s leverand separate it using the tweezers Keep the Kapton tape to reuse it forassembly ...

Страница 36: ...ouchpad Assembly forhow to reassemble Fingerprint PowerButton Assembly Leaving screws inside the computermay damage internal components such as the battery When assembling be extra careful not to leave any unassembled screws inside the computer 1 Using the tweezers align the fingerprint powerbutton on the front cover ...

Страница 37: ...Disassembly and Assembly 37 2 Using the tweezers align the fingerprint powerbutton bracket with the guide pole 3 Using a cross head screwdriver fasten the 3 screws to the fingerprint powerbutton bracket ...

Страница 38: ...rmay damage internal components such as the battery When assembling be extra careful not to leave any unassembled screws inside the computer 1 Using the tweezers assemble the touchpad cable connector Afterclosing the lever attach the Kapton tape 1 2 2 Assemble the touchpad module ...

Страница 39: ...touchpad Screen Assembly Leaving screws inside the computermay damage internal components such as the battery When assembling be extra careful not to leave any unassembled screws inside the computer 1 Afteraligning the screen s hinge on the guide poles of the front cover close the screen 1 2 ...

Страница 40: ... Sub Board Assembly Leaving screws inside the computermay damage internal components such as the battery When assembling be extra careful not to leave any unassembled screws inside the computer 1 Align the sub board to the case front at 45 Using a cross head screwdriver fasten the 2 screws on the sub board ...

Страница 41: ...Disassembly and Assembly 41 2 Afterassembling the sub board bracket using a cross head screwdriver fasten the 2 screws 3 Connect the fingerprint powerbutton on the sub board ...

Страница 42: ...sembled horizontally All connectors with guidelines must be assembled to the guidelines ForEXTmodels the keyboard backlit cable will be connected in the Touchpad Keyboard Screen Main to Sub ConnectorAssembly step 1 2 5 Using the tweezers put the black Wi Fi antenna cable in the left clip and the white Wi Fi antenna cable in the right clip Assemble the cables to the connectors ...

Страница 43: ...rnal components such as the battery When assembling be extra careful not to leave any unassembled screws inside the computer 1 Align the main board to the case front at 45 and assemble it 1 2 2 Using a cross head screwdriver fasten the screws on the main board INTModels 3 Screws EXTModels 5 Screws ...

Страница 44: ...t with the guide pole and fasten the 2 screws on it using a cross head screwdriver 4 Afterplacing the SSD on the SSD module socket use a cross head screwdriverto fasten the screw on the SSD If you have two SSDs assemble the otherSSD using the same method 2 1 ...

Страница 45: ...rnal components such as the battery When assembling be extra careful not to leave any unassembled screws inside the computer 1 Using the tweezers connect the screen cable and close the lever Make sure that the connectorguideline and the leverare assembled horizontally All connectors with guidelines must be assembled to the guidelines ...

Страница 46: ...e touchpad and keyboard cable and close the lever ForEXTmodels connect the keyboard backlit cable on the mainboard Make sure that the connectorguideline and the leverare assembled horizontally All connectors with guidelines must be assembled to the guidelines 1 ...

Страница 47: ...Disassembly and Assembly 47 3 Using the tweezers connect the main to sub cable and close the lever Connect the SUB cable to the sub board and the MAIN cable to the main board 1 2 ...

Страница 48: ...amage internal components such as the battery When assembling be extra careful not to leave any unassembled screws inside the computer 1 Afteraligning the fan in the right position connect the fan cable and close the lever 1 2 2 Using a cross head screwdriver fasten the 3 screws on the fan ...

Страница 49: ...damage internal components such as the battery When assembling be extra careful not to leave any unassembled screws inside the computer 1 Afteraligning the fans in the right position connect the 2 fan cables to the connectors 2 Using a cross head screwdriver fasten the 6 screws on the fans ...

Страница 50: ...nside the computermay damage internal components such as the battery When assembling be extra careful not to leave any unassembled screws inside the computer Afteraligning the speakers with the guide pole connect the left and right speaker cables to the connectors ...

Страница 51: ...internal components such as the battery When assembling be extra careful not to leave any unassembled screws inside the computer 1 Place the battery on the marked area on the front cover 2 Press and fix the battery PCB to the main board and connect the battery PCB connectorto the main board ...

Страница 52: ...Disassembly and Assembly 52 3 Connect the battery cable to the connector 4 Using a cross head screwdriver fasten the 4 screws on the battery ...

Страница 53: ...amage internal components such as the battery When assembling be extra careful not to leave any unassembled screws inside the computer 1 Align the case rearwith the front coverand press along the edges to assemble it 2 Using a cross head screwdriver fasten the 4 screws on the case rear ...

Страница 54: ...Disassembly and Assembly 54 3 Align the 4 rubberfeet with the case rearholes and press them to assemble them Be sure to distinguish the types of rubberfeet while assembling ...

Страница 55: ...This guide is a property of Samsung Electronics Co Ltd Any unauthorized use of guide can be punished underapplicable international and or domestic law Samsung Electronics Co Ltd ...

Отзывы: