background image

12


English

English


12

English


13

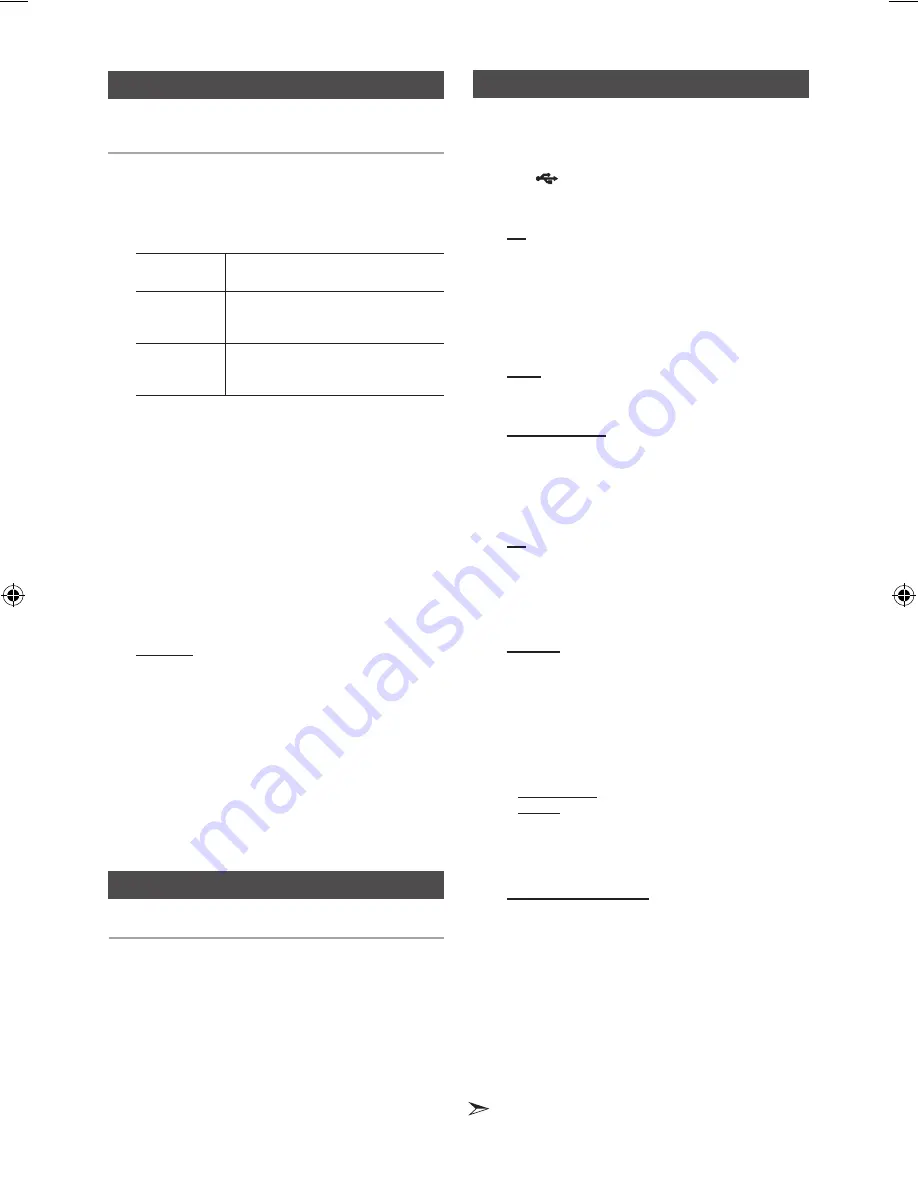
You can store up to: 

15 FM stations, 15 AM stations.

1. 

Select 

FM 

or

 AM


by pressing the 

TUNER/AUX


button.

2. 

To sear

ch for 

a station


Press the TUNING MODE button

Preset

One or more times until 

PRESET

 is  

displayed. You can search the stored 

frequencies in the Preset mode.

Manually

One or more times until 

MANUAL 

is 

displayed. You can search the frequen-

cies one by one in the Manual mode.

3. 

Select th

e station to be stored by:

• 

Pressing t

he 

TUNING/ALBUM


,

 or 

.

 button on the 

remote control to select the preset station.

• 

 P

ress and hold the 

TUNING/ALBUM


,

 or 

button 

on the remote control to automatically search for active 

broadcasting stations.

4. 

Press the


MO/ST

 button to switch between stereo and 

mono.

• 

In a poor re

ception area, select 

MONO

 for a   

clear, interference-free broadcast.

• 

This applies only when listening to an FM station.


5. 

 If you do

 not want to store the radio station found, 

return to Step 

3

 and search for another station.

Otherwise:

a.

  Press the 

ENTER

 button.

b.

  Or, press the 

TUNING/ALBUM

 button on the    


 remote control to select a program number.

c.

  Press the 

ENTER

 button to save the preset.

6. 

To store

 additional radio frequencies, repeat Steps 3 

through 5.


In Tuner mode

• 

 In the Ma

nual mode, you can use the 

[

 or 

]

 button 

on the main unit to manually  search for a radio station.

• 

 In the Pr

eset mode, you can use the 

[

 or 

button 

on the main unit to search for a stored radio station.

You can listen to a stored radio station.

1. 

Select


FM 

or

 AM

 by pressing the 

TUNER/AUX


button.

2. 

Press

 the 

TUNING MODE

 button on the remote 

control until “

PRESET

” is displayed.

3. 

 Press the 

[

 or 

]

 button on the main unit or the 

TUNING/ALBUM


,

 or 

.

 on the remote control to 

select a desired preset number.

Selecting a Stored Station

Recording Function

Listening to Radio

You can record from a CD, radio broadcast, or an 
external source to a USB storage device.  

1. 


Connect an external USB storage device to the 

USB (

) jack on your product.

2. 

 Play a disc, tune to a station, or connect an 

external source to your product.

CD  

• 

Press

 the 

MP3/CD

 button on the main unit to select 

the CD function.

• 

 Press

 the 

OPEN/CLOSE 

button to open the disc tray.

• 

 Insert 

a CD and press the 

OPEN/CLOSE 

button to 

close the disc tray.

• 

 Use t

he CD selection ( 

[

 or 

]

 ) buttons to select the 

desired song.

Tuner

• 

Select

 TUNER by pressing the 

TUNER/AUX

 button.

• 

Tune to a station

 you want to record.

External Source 

• 

Conn

ect an External Component/MP3 player to your 

product.

• 

Press

 the 

TUNER/AUX

 button to select <AUX> input.

• 

Pla

y a song from the external device.

3. 


Press the

 USB REC

 button to start recording.

CD  

• 

“TRACK RECORDING” is displ

ayed and  CD 

   recording starts.

• 

 Press and

 hold the 

USB REC

 button to start recording 

all tracks on the disc. "FULL CD RECORDING" is 

displayed.

MP3-CD 

• 

Press the 

USB REC

 button. The currently playing file 

is copied onto the USB device.

• 

Press and hold the 

USB REC

 button. All the files of 

the current folder are copied onto the USB device.


•  When you connect a Microphone, press the 

USB 

REC 

button. The currently playing file is recorded onto  

the USB device, and the sound from the Microphone 

is  recorded too. 


MP3 RECORDING: "MP3 RECORDING"

"RECORD" 

CD COPY: “CHECK”

“START”

“COPY XX”

“COPY END” 

is displayed. When the recording is done, “STOP” will 

be displayed. 

• 

If there is a duplicate file name, "FILE EXIST" is 


displayed, and the function is canceled.

Tuner /External Source

• 

RECORD is displayed

.

4. 

 To stop recording, press the 

STOP 

(

@

) button. The 

unit automatically creates and saves recorded files 
in .MP3 format (SAM-XXXX.MP3).

5. 

To remove the USB device safely, press the 

STOP 

(

@

)      

 button once again.

 After recording, a directory named 

“RECORDING(DISCxxxx)”(FULL CD RECORDING), 
“RECORDING”(TRACK RECORDING), “CD 
COPY”(MP3 CD), “MP3 RECORDING”(MP3 CD), 
“TUNER RECORDING” or “AUX RECORDING”


is 

created on your USB device.

• 

Do not disconnect the USB or the AC Cord during recording as 

this may cause damage to the file.  

• 

WMA/MP2 files can be copied but not recorded. 

MX-F630-F730-ZP-ENG-0201-EQ.indd   13

2013-2-25   9:45:18

Содержание MX-F630

Страница 1: ... MP3 CD WMA CD CD R RW Playback user manual Imagine the possibilities Thank you for purchasing this Samsung product To receive more complete service please register your product at www samsung com register MX F630 MX F730 ...

Страница 2: ...tric shock match the wide blade of the plug to the wide slot in the wall outlet Fully insert the plug into the wall outlet This product satisfies FCC regulations when shielded cables and connectors are used to connect the unit to other equipment To prevent electromagnetic interference with electric appliances such as radios and televisions use shielded cables and connectors for connections FCC NOT...

Страница 3: ...s near wall outlets and the point where they exit from the apparatus 11 Only use attachments and accessories specified by the manufacturer 12 Use only with the cart stand tripod bracket or table specified by the manufacturer or sold with the apparatus When a cart is used use caution when moving the cart apparatus combination to avoid injury from tip over 13 Unplug this apparatus during lightning sto...

Страница 4: ...MB 74 minute CD R discs Do not use CD R discs over 700MB 80 minutes as they may not be played back Some CD RW Rewritable media may not be playable Only CD Rs that are properly closed can be fully played If the session is closed but the disc is left open you may not be able to fully play the disc CD R MP3 Discs Only CD R discs with MP3 files in ISO 9660 or Joliet format can be played MP3 file names...

Страница 5: ...ack 9 Searching for a Specific Music Passage on a CD 9 Repeat One or All Tracks on a Compact Disc 9 A B Repeat Playback 10 10 Skip Function 10 CD Programming 10 Checking or Editing the Programmed Tracks 10 Auto Change function 10 Playing a USB Device 11 To Select a Track from a USB Device 11 To Search a Folder Quickly 11 To Use High Speed Search 11 To repeat 11 To delete a file 11 To skip 10 track...

Страница 6: ...arch Skip button 6 STOP Tuning Mode button 7 USB button 8 MP3 CD button 9 TUNER AUX button 10 MIC jack 11 Disc Tray 12 USB jack 13 USB REC button 14 DELETE button 15 OPEN CLOSE button 16 PLAY PAUSE button 17 Search Skip button 18 VOLUME Control 19 LOCAL EQ button 20 FOOTBALL MODE button 21 GIGA SOUND BLAST button 1 2 3 6 5 4 7 9 21 14 15 16 17 18 19 13 8 12 20 11 10 ...

Страница 7: ...UX IN Terminals 1 Use an Audio Cable not supplied to connect AUX IN on the product to Audio Out on an external analog component Be sure to match connector colors If the external analog component has only one Audio Out jack connect to either the left or right terminal Press the TUNER AUX button to select the AUX input When the unit is in AUX mode if none of the buttons on the front panel are pushed...

Страница 8: ...r function The Dimmer function is selected and the display darkens Display ON The Display turns on Clock ON The Clock you set is displayed 1 2 3 4 5 6 7 8 9 10 11 12 13 14 15 16 17 18 19 20 22 21 23 24 25 26 27 28 29 30 31 32 33 Installing batteries in the Remote Control Match the and ends of the batteries with the diagram inside the battery compartment Always replace both batteries at the same ti...

Страница 9: ...t to prevent dust from entering You can load or unload a compact disc when the radio USB or auxiliary source function is selected Also when you press the OPEN CLOSE button the product will automatically change to the MP3 CD mode If no buttons are pressed on the product or remote control for more than 3 minutes when the product is in Pause mode the product will change to Stop mode If no buttons are...

Страница 10: ...ode When the auto change mode is ON the unit cannot record When the auto change mode is ON the REPEAT and SLEEP functions automatically change to OFF When the auto change mode is ON the CD REC SPEED USB REC REPEAT PROGRAM DELETE and SLEEP functions do not work and the unit displays AUTO CHANGE ON When the DISC play ends if there s no USB the unit will continue to play the disc When the USB play en...

Страница 11: ...lays all tracks RANDOM Plays tracks in random order To delete a file You can delete a file on your USB device 1 Play a file you want to delete 2 Press the DELETE button 3 Press or to select YES 4 Press the ENTER button on the remote control or the DELETE button The selected file will be deleted The NTFS file system is not supported To skip 10 tracks Press the 10 or 10 button while in playback mode ...

Страница 12: ...n to set the hours b Press the ENTER button Result The minutes flash c Press the TUNING ALBUM or button to set the minutes d Press the ENTER button Result OFF is displayed for a few seconds You can now set the timer switch off time 5 Set the timer switch off time a Press the TUNING ALBUM or button to set the hours Timer Function After you have set the timer the unit will start auto matically at th...

Страница 13: ...age device 1 Connect an external USB storage device to the USB jack on your product 2 Play a disc tune to a station or connect an external source to your product CD Press the MP3 CD button on the main unit to select the CD function Press the OPEN CLOSE button to open the disc tray Insert a CD and press the OPEN CLOSE button to close the disc tray Use the CD selection or buttons to select the desir...

Страница 14: ... press this button the sound switches as follows OFF GIGA SOUND BLAST 2 To cancel this function press the GIGA SOUND BLAST button until OFF is displayed The GIGA SOUND mode may be different depending on your region GIGA SOUND function Your mini compact system provides predefined equalizer settings that are optimized for particular music genre You can also adjust the bass middle and treble levels m...

Страница 15: ...and hold the STOP button on the main unit for longer than 5 seconds Using the RESET function will erase all stored settings Do not use this unless necessary Can t receive radio broadcast Is the antenna connected properly If the antenna s input signal is weak install an external FM antenna in an area with good reception Connecting a Microphone You can insert a microphone to sing along with your fav...

Страница 16: ...6 m sec Maximum Play Time 74 min Amplifier MX F630 220 Watts MAX Front speaker output 110 W CH 4 Ω 100 Hz MX F730 550 Watts MAX Front speaker output 275 W CH 4 Ω 100 Hz Frequency range 20 Hz 20 KHz S N Ratio 80 dB Channel separation 65 dB Input sensitivity AUX 800 mV Nominal specification Samsung Electronics Co Ltd reserves the right to change the specifications without notice Weight and dimension...

Страница 17: ...w samsung com Rumania 1 08010 SAMSUNG 72678 doar din reţeaua Romtelecom tarif local 2 021 206 01 10 din orice reţea tarif normal www samsung com Serbia 0700 Samsung 0700 726 7864 www samsung com Area Contact Centre Web Site Slovakia 0800 SAMSUNG 726 7864 www samsung com Spain 902 1 SAMSUNG 902 172 678 www samsung com Sweden 0771 726 7864 SAMSUNG www samsung com Switzerland 0848 SAMSUNG 7267864 CHF...

Страница 18: ...Code No AH68 02604J Rev 0 0 ...

Отзывы: