background image

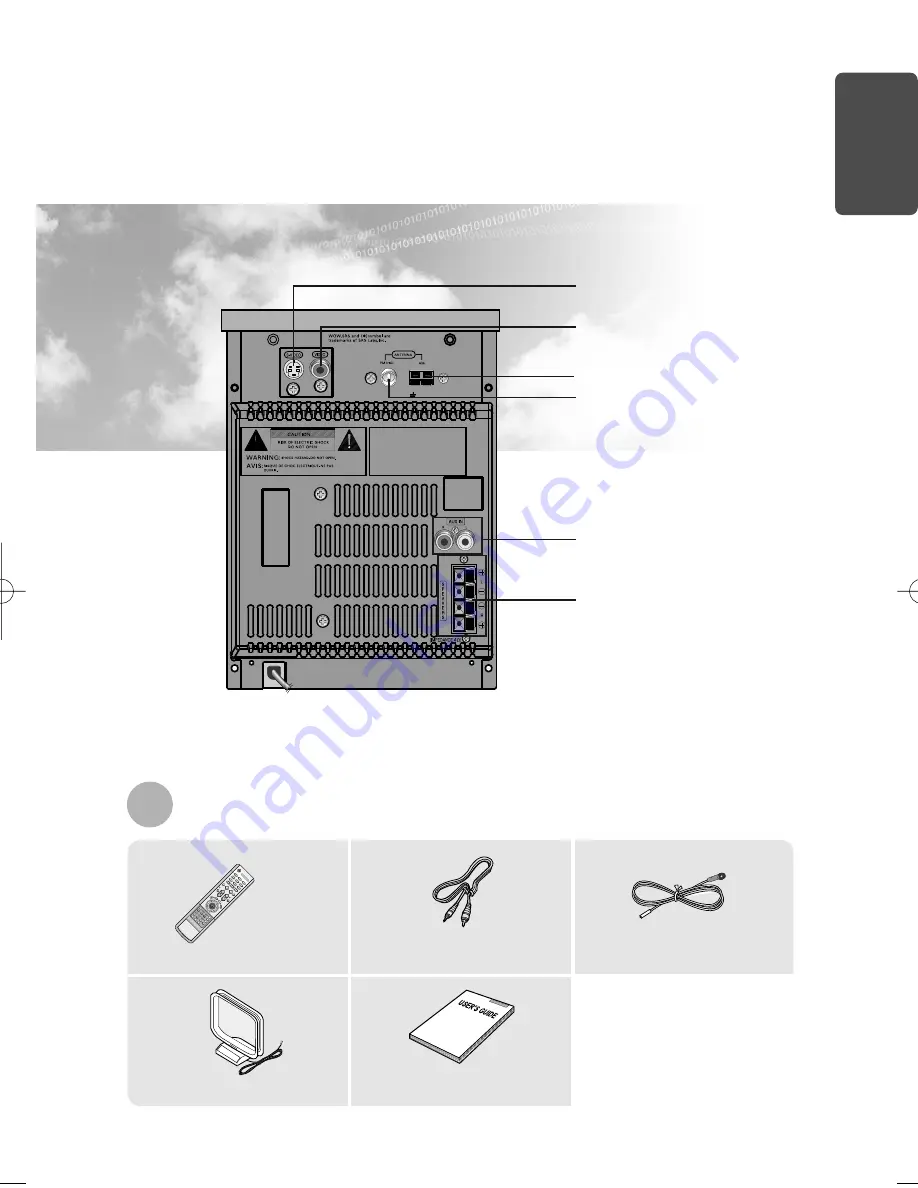
—Rear Panel—

OPEN/CLOSE

DVD

TUNER

AUX

EZ VIEW

NTSC/P

AL

SLOW

SUB TITLE

STEP

TUNING

PL II

RETURN

MEN

U

IN

FO

MUTE

MODE

ENTER

SOUND EDIT

TEST TONE

SLEEP

LOGO

DIGEST

SLIDE MODE

CANCEL

ZOOM

TUNER 

MEMOR

Y

PL II

EFFECT

VOLUME

DSP/EQ

REPEA

T

BAND

MO/ST

REMAIN

DIMMER

Video Cable

FM Antenna 

Remote Control 

User's Manual 

AM Antenna

6

Accessories 

Loudspeaker Connector Terminals

AUX-Input

S-Video Output Connector

If the TV is equipped with an S-Video
input connector (S-VIDEO IN), connect
it to the player's S-Video output jack.

Video Output Connector

Connect the TV's video input jacks 
(VIDEO IN) to the VIDEO OUT connector.

FM Antenna Connector 

AM Antenna Connector 

PREP

ARA

TION

 1p~28p(DJ8)-RUS  9/3/04 9:24  Page 9

Содержание MM-DJ8S

Страница 1: ...PERSONAL MICRO COMPONENT SYSTEM MM DJ8 MM DJ8S V I D E O COMPACT DIGITAL AUDIO COMPACT DIGITAL VIDEO Instruction Manual ...

Страница 2: ...nough to reach a power point you should obtain a suitable safety approved extension lead or consult your dealer for assistance However if there is no alternative to cutting off the plug remove the fuse and then safely dispose of the plug Do not connect the plug to a main socket as there is a risk of shock hazard from the bared flexible cord Never attempt to insert bare wires directly into a main s...

Страница 3: ... a long period of time Protect the player from moisture i e vases and excess heat e g fireplace or equipment creating strong magnetic or electric fields i e speakers Disconnect the power cable from the AC supply if the player malfunctions Your player is not intended for industrial use Use of this product is for personal use only Condensation may occur if your player or disc have been stored in col...

Страница 4: ...ese realistic effects in the home as if you were in a movie theater or concert hall V I D E O DVD players and the discs are coded by region These regional codes must match in order for the disc to play If the codes do not match the disc will not play The Region Number for this player is given on the rear panel of the player Your DVD player will only play DVDs that are labeled with identical region...

Страница 5: ...Setting TV Screen type 33 Setting Parental Controls Rating Level 35 Setting the Password 36 Setting the Wallpaper 37 Setting the DRC Dynamic Range Compression 39 AV SYNC Setup 40 RADIO OPERATION Listening to Radio 41 Presetting Stations 42 About RDS broadcasting 43 TAPE DECK Listening to a Cassette 45 REPEAT A B Function 46 Selecting the Cassette Playback Mode 46 Tape Counter 46 MISCELLANEOUS Time...

Страница 6: ...ONS TUNING MODE OR STOP BUTTON 5 DEMO DIMMER 6 SLEEP 7 HEADPHONE JACK CONNECTOR 8 MIC 9 REVERSE MODE 10 CD SYNCHRO REC PAUSE 11 VOLUME CONTROL 12 SRS WOW 13 DISC TRAY 14 CD DOOR OPEN CLOSE 15 BASS LEVEL 16 TREBLE LEVEL 17 PUSH EJECT CASSETTE DOOR OPEN CLOSE 1 2 3 4 5 6 7 9 8 10 11 12 14 13 15 16 17 ...

Страница 7: ...DSP EQ REP EAT BA ND MO ST REM AIN DIM ME R Video Cable FM Antenna Remote Control User s Manual AM Antenna 6 Accessories Loudspeaker Connector Terminals AUX Input S Video Output Connector If the TV is equipped with an S Video input connector S VIDEO IN connect it to the player s S Video output jack Video Output Connector Connect the TV s video input jacks VIDEO IN to the VIDEO OUT connector FM Ant...

Страница 8: ...button REMAIN button SUB TITLE button SLOW MO ST button REPEAT button INFO button MUTE button Direction Enter button EQ S BASS button VOLUME button SLIDE MODE button TREBLE BASS button DIGEST button TIMER ON OFF button TIMER CLOCK button CANCEL button TUNER MEMORY button DVD button Play Pause Tape Play button CD Skip Tape Search button Stop Tuning Mode button TAPE button TUNER BAND button Number 0...

Страница 9: ...ry cover on the back of the remote by pressing down and sliding the cover in the direction of the arrow 1 Insert two 1 5V AAA batteries paying attention to the correct polarities and 2 Replace the battery cover 3 Follow these precautions to avoid leaking or cracking cells Place batteries in the remote control so they match the polarity to and to Use the correct type of batteries Batteries that loo...

Страница 10: ...lace to prevent any safety accident caused by falling of the speaker Do not take the speaker apart from TV or computer monitor The speaker near the TV or computer monitor may influence the quality of the screen display Position of the DVD Player Place it on a stand or cabinet shelf or under the TV stand Selecting the Listening Position The listening position should be located about 2 5 to 3 times ...

Страница 11: ...he player to Video In on your TV 1 Connect S Video Out to S Video In on your TV 1 Composite Video A single video signal that is a composite of the black and white information Y and the color information C S Video A video transmission standard that provides a sharper brighter picture than ordinary composite video by separating brightness and color signals Note CONNECTIONS Press the TV VIDEO button ...

Страница 12: ...ctor colors 1 Example Analog signal components such as a VCR Camcorder and TV Connecting to an External Analog Component Connecting to External Components L R Audio Cable If the external analog component has only one Audio Out connect either left or right Press AUX to select AUX AUX appears in the display 2 ...

Страница 13: ...tdoor antenna Before attaching a 75Ω coaxial cable with a standard type connector disconnect the supplied FM antenna 1 Connect the AM loop antenna supplied to the AM and terminals 2 If reception is poor connect an outdoor single vinyl covered wire to the AM terminal Keep the AM loop antenna connected Snap the tabs on the loop into the slots of the base to assemble the AM loop antenna If FM recepti...

Страница 14: ...minutes flash Increase the hours Decrease the hours 3 Press ENTER The hour flashes Note Checking the Remaining Time CHAPTER REMAIN TITLE REMAIN CHAPTER ELAPSED TITLE ELAPSED TRACK REMAIN TOTAL ELAPSED TOTAL REMAIN TRACK ELAPSED Each time the REMAIN button is pressed Press the REMAIN button For checking the total and remaining time of a title or chapter being played DVD CD VCD By default the video ...

Страница 15: ...rts automatically If the TV is on a list of MP3s on the CD will appear on the TV screen Something like you Back for good Love of my life More than words I need you My love Uptown girl DVDRECEIVER SMARTNAVI Note To resume playback press PLAY PAUSE button again To temporarily pause playback press PLAY PAUSE during playback If pressed once PRESS PLAY is displayed and the stop position will be stored ...

Страница 16: ... you press button if there are over 2 files in the disk Press and hold button Each time the button is held down during playback the playback speed changes as follows DivX files can be played in Zoom X2 mode only Note Zoom Function 2 Press Cursor buttons to move to the area you want to enlarge 1 Press ZOOM button Each time you press the button your selection will toggle between ZOOM X2 and ZOOM OFF...

Страница 17: ...pported For WMV V1 V2 V3 and V7 formats are possible Audio compatibility MP3s encoded at bitrates from 80kbps to 320kbps AC3s from 128kbps to 448kbps and WMAs from 56kbps to 160kbps are supported In addition for subtitles this unit will support Text format SMI SPEC VIDEO Compatibility DivX3 11 Up to the latest VERSION WMV WMV V1 V2 V3 V7 AUDIO Compatibility MP3 CBR 80kbps 320kbps AC3 CBR 128kbps 4...

Страница 18: ...alled chapters appears on the TV screen If this symbol appears on the TV screen while buttons are being operated that operation is not possible with the disc currently being played What is a Track File A section of video or a music file recorded on a VCD CD or MP3 CD Screen Display DVD display VCD display CD display MP3 CD display CHAPTER display TRACK FILE display TITLE display REPEAT PLAYBACK di...

Страница 19: ... button is held down during playback the playback speed changes as follows Press SLOW button Each time the button is pressed during playback the playback speed changes as follows Slow Playback OPERATION DVD VCD DivX Reverse slow playback does not work with VCDs and DivX Note 18 ...

Страница 20: ... frame each time the button is pressed during playback Playing Frame by Frame Press STEP button When watching a VCD with a track longer than 15 minutes each time is pressed playback will skip back or forward 5 minutes TITLE 01 05 CHAPTER 002 040 TITLE 01 05 CHAPTER 004 040 Note Something like you Back for good Love of my life More than words I need you My love Uptown girl DVDRECEIVER SMARTNAVI Som...

Страница 21: ...or button to move to ANGLE display 1Press INFO button 1 3 Each time the button is pressed the angle changes as follows 3 Press Cursor buttons or numeric buttons to select the desired angle 2 3 3 3 1 3 1 3 The Angle function works only with discs on which multiple angles have been recorded Note OPERATION ...

Страница 22: ...s if PBC is turned on To use Repeat Playback on a VCD with PBC you should set the PBC to OFF in the disc menu See page 29 CHAPTER Repeatedly plays the selected chapter TITLE Repeatedly plays the selected title RANDOM Plays tracks in random order A track that has already been played may be played again TRACK Repeatedly plays the selected track DIR Repeatedly plays all tracks in the selected folder ...

Страница 23: ...can select Repeat Play in PBC off mode Note 2 Press Cursor button to move to REPEAT PLAYBACK display 1Press INFO button twice 4 Press ENTER button 3 Press Cursor button to select the desired Repeat Playback mode DVD VCD CD To Select a Repeat Playback Mode in the Disc Information Screen OPERATION For a VCD or CD Press INFO button once ...

Страница 24: ...Repeat Playback from the information display screen press REP A B 2 Press REP A B at the end of the section 1 Press REP A B at the beginning of the section you want to repeat To cancel AB Repeat Playback press REP A B to select REPEAT PLAYBACK OFF DVD VCD CD Note REPEAT A REPEAT OFF REPEAT A B ...

Страница 25: ...Press ENTER button Press EZ VIEW button Each time the button is pressed the zoom function will switch between On and Off When a movie is played in Widescreen format black bars at the top and bottom of the TV screen can be removed by pressing the EZ VIEW button This function will not work if the DVD is recorded with multi camera angle format Black bars may not disappear because some DVD discs have ...

Страница 26: ...ss INFO button twice SP 2 3 FR 3 3 You can use the SUBTITLE button on the remote control to select a subtitle language Depending on the disc the Subtitle and Audio Language functions may not work Audio Language Selection Function DVD Subtitle Language Selection Function DVD Note EN 1 3 EN 01 03 OFF SP 02 03 FR 03 03 OFF 03 2 Press Cursor button to move to SUBTITLE display 1Press INFO button twice ...

Страница 27: ...esired chapter and then press ENTER button 01 05 025 040 0 00 01 1 1 Moving to a Chapter 6 Press the numeric buttons to select the desired time and then press ENTER button 01 05 028 040 1 30 00 1 1 Moving to a Specific Time 3 Press Cursor buttons to move to Chapter display Moving to a Chapter 01 05 025 040 1 17 30 1 1 5 Press Cursor buttons to move to time display Moving to a Specific Time Press t...

Страница 28: ...p to the next slide 1 Playback starts automatically Each image is shown for 5 seconds before another image is displayed Press the OPEN CLOSE button 2 Playback starts automatically Each time the button is pressed the image makes the transition as follows Press SLIDE MODE button 3 From top to bottom From bottom to top Rectangular shape in the center Vertical curtain shape Each time a new image is di...

Страница 29: ...to select the desired image and then press ENTER button 1 Press DIGEST button during playback JPEG files will be shown in 9 windows You can view 9 JPEG images on the TV screen The selected image is played for 5 seconds before moving to the next image 28 To view the previous or next image with 9 windows press Press Cursor buttons during playback Original Image OPERATION ...

Страница 30: ...top mode Press Cursor buttons to move to DISC MENU and then press ENTER button 4 Press ENTER button 3 Press Cursor buttons to select the desired item PBC Playback Control Function When playing a VCD version 2 0 you can select and view various scenes according to the menu screen PBC ON This VCD disc is version 2 0 The disc is played back according to the menu screen Some functions may be disabled W...

Страница 31: ...f each movie Depending on the disc this function may either not work at all or may work differently 2 Press Cursor button to move to Title Menu DVD 1Press MENU button in the stop mode 3 Press ENTER button The title menu appears 30 Press MENU button to exit the setup screen OPERATION ...

Страница 32: ...ge is set to English by default 2 1Press MENU button in the stop mode Press Cursor button to move to Setup and then press ENTER button Press RETURN button to return to the previous level Press MENU button to exit the setup screen 31 ...

Страница 33: ...n the disc 4 Once the setup is complete if the language was set to English OSD will be displayed in English 3 Selecting the Subtitle Language recorded on the disc Selecting the Disc Menu Language recorded on the disc Press ENTER button 5 Press Cursor button to select the desired item and then press ENTER button Press Cursor button to select the desired language and then press ENTER button SETUP 32...

Страница 34: ... ENTER button Once the setup is complete you will be taken to the previous screen Press Cursor button to move to TV DISPLAY and then press ENTER button Press Cursor button to select the desired item and then press ENTER button Press RETURN button to return to the previous level Press MENU button to exit the setup screen ...

Страница 35: ...our wide screen TV You can enjoy the wide screen aspect Select this to play a 16 9 picture in the letter box mode on a conventional TV Black bars will appear at the top and bottom of the screen Select this to play a 16 9 picture in the pan scan mode on a conventional TV You can see the central portion of the screen only with the sides of the 16 9 picture cut off 4 3LB 4 3 Letterbox WIDE 4 3PS 4 3 ...

Страница 36: ... mode Press Cursor button to move to Setup and then press ENTER button 4 The password is set to 7890 by default Once the setup is complete you will be taken to the previous screen If you have selected Level 6 you cannot view DVDs with Level 7 or higher The higher the level the closer the content is to violent or adult material 3 5 Press Cursor button to move to PARENTAL and then press ENTER button...

Страница 37: ... move to Setup and then press ENTER button 4 Enter the old password a new password and confirm new password The setting is complete 3 5 Press Cursor button to move to PASSWORD and then press ENTER button Press ENTER button Enter the password and then press ENTER button Setting the Password You can set the password for the Parental rating level setting SETUP ...

Страница 38: ... Steps 1 and 2 to set up to 3 wallpapers 2 1 4 3 During playback press PLAY PAUSE button when the image you like comes up Press LOGO button Press OPEN CLOSE to close the disc tray The power will turn off and then back on and the disc tray will open automatically PAUSE LOGO COPY DATA Setting the Wallpaper Select this to set the Samsung Logo image as your wallpaper Select this to set the desired ima...

Страница 39: ... ENTER button Press Cursor button to move to LOGO and then press ENTER button To Change the Wallpaper 5 4 Press MENU button to exit the setup screen Press to select the desired USER and then press ENTER Press RETURN button to return to the previous level Press MENU button to exit the setup screen 38 ...

Страница 40: ...U button in the stop mode Press Cursor button to move to Audio and then press ENTER button The Cursor button is pressed the greater the effect and the Cursor button is pressed the smaller the effect 3 4 If DRC is selected press ENTER Press Cursor to adjust the DRC Press RETURN button to return to the previous level Press MENU button to exit the setup screen ...

Страница 41: ...R button Press Cursor buttons to move to AV SYNC and then press ENTER button Press the MENU button in the stop mode 4 You can set the audio delay time between 0 ms and 300 ms Set it to the optimal status Press Cursor buttons to select the Delay Time of AV SYNC and then press the ENTER button Video may look slower than the audio if it is connected with digital TV In this case adjust the delay time ...

Страница 42: ...tomatically search the band AutomaticTuning2 Press STOP to select MANUAL and then briefly press to tune in to a lower or higher frequency Manual Tuning Each time the button is pressed the sound switches between STEREO and MONO In a poor reception area select MONO for a clear interference free broadcast Press MO ST button to listen in Mono Stereo This applies only when listening to an FM station Pr...

Страница 43: ...BAND button and select the FM band Press the TUNER MEMORY button before PROG disappears from the display PROG disappears from the display and the station is stored in memory 5 4 You can select between 1 and 15 Press the TUNER MEMORY button Press the TUNER MEMORY button 6 To preset another station repeat steps 2 to 5 Press to select preset number kHz MHz kHz MHz kHz MHz kHz MHz kHz MHz RADIO OPERAT...

Страница 44: ...mposed of maximum 64 characters 4 CT Clock Time Decodes the real time clock from the FM frequency Some stations may not transmit PTY RT or CT information therefore this may not be displayed in all cases 5 TA Traffic Announcement When this symbol flashes it shows that the traffic announcement is in progress Note Note You can see the RDS signals the station sends on the display TO show the RDS signa...

Страница 45: ...u have selected and tunes in that station 3 Display NEWS AFFAIRS INFO SPORT EDUCATE DRAMA CULTURE SCIENCE VARIED POP M ROCK M M O R M LIGHT M CLASSIC OTHER M WEATHER FINANCE CHILDREN SOCIAL A RELIGION PHONE IN TRAVEL LEISURE JAZZ COUNTRY NATION M OLDIES FOLK M DOCUMENT Program Type News including an announced opinion and report Several matters including a current incident documentary discussion an...

Страница 46: ... cassette door shut 2 1 3 Press TAPE on the player to select the Tape function Switch the system on by pressing POWER Rewind the cassette DOWN button Fast forward the cassette UP button 5 4 Side A Tape button once Side B Tape button twice Press the PUSH EJECT of the cassette deck to open the cassette door and insert a cassette Press the button if necessary 6 When you have finished playback press S...

Страница 47: ...is displayed to enable you to take note of the counter value at the start of each track and thus start playback at the beginning of the track to which you wish to listen Press REV MODE until the appropriate symbol is displayed One side of the selected cassette and then stops One side of the cassette The other side of the cassette and then stops Both sides of the cassette indefinitely until you pre...

Страница 48: ...ff automatically at the required times 8 7 9 Press or button to select the source to be played when the system switches on Press ENTER to confirm the timer Press POWER to set the system to standby mode 5 4 a Set the hour by pressing or button b Press ENTER The minutes flash c Set the minutes by pressing or button d Press ENTER OFF TIME is displayed instead of the equalizer symbols for a few second...

Страница 49: ...by After having set the timer it will start automatically as shown by the TIMER indication on the display If you no longer wish to use the timer you must cancel it is no longer displayed To cancel the timer press TIMER ON OFF once is displayed again To resume the timer press TIMER ON OFF again MISCELLANEOUS ...

Страница 50: ...oor insert a cassette and then close the cassette door Insert the cassette with the safety tabs 2 1 3 Insert a blank cassette in Deck Switch the system on by pressing POWER When stopped press the button to start the recording from the first piece of music Press and hold CD SYNCHRO button during the playback of CD to start the recording from the first part of the music being played 5 4 Use the CD s...

Страница 51: ...oor insert a cassette and then close the cassette door Insert the cassette with the safety tabs 2 1 3 Insert a blank cassette in Deck Switch the system on by pressing POWER Recording will begin To stop recording press button 5 4 Use the CD selection buttons to select the desired song Load a compact disc Press REC PAUSE button Press the DVD CD button Direct recording The cassette tape you want to r...

Страница 52: ...ect on the recording 2 1 3 Insert a blank cassette in Deck Switch the system on by pressing POWER REC is displayed in red and recording starts 5 4 Select the TUNER function by pressing TUNER BAND Press REC PAUSE button 6 To stop recording press button Select the radio station that you wish to record by pressing DOWN or UP button ...

Страница 53: ...to the type of music you are listening to The function of Power Sound amplifies bass and improves high key or bass twice as much for you to appreciate powerful real sound Each time the button is pressed the selection changes as follows TRU BASS SRS SRS WOW PASS TruBASS Function Enhances the bass and low frequencies to produce deep and rich bass sounds SRS Function Provides the surround sound that ...

Страница 54: ...nt panel to select from BASS 07 to BASS 07 total 15 steps 1 You can select the level of low tones you desire 2 TREBLE Function Treble function stresses low tones providing thudding sound effects Turn TREBLE knob on the front panel to select from TRE 07 to TRE 07 total 15 steps 1 You can select the level of high tones you desire 2 ...

Страница 55: ... the button is pressed the selection changes as follows 90 MIN 60 MIN 45 MIN 30 MIN 15 MIN OFF Press SLEEP button Sleep Timer Function You can set the time that the DVD player will shut itself off To cancel the sleep timer press SLEEP button until OFF appears on the display MUTE appears in the display To turn off mute press the button again Mute Function This is useful when answering a doorbell or...

Страница 56: ...ou can view the various functions available on your system To cancel this function press DEMO DIMMER again Press and hold DEMO DIMMER button Each time the button is press the brightness changes as follows DIMMER ON Dim DIMMER OFF Bright DIMMER Function You can adjust the brightness of the display on the main unit so it won t interfere with your movie viewing Press DEMO DIMMER button DEMO Function ...

Страница 57: ...s Microphone You can connect a set of headphones to your micro component system so that you can listen to music or radio programmers without disturbing other people in the room The earphones must have a 3 5ø jack or an appropriate adapter Prolonged use of headphones at a high volume may damage your hearing Note Plug the microphone with a 3 5ø MIC jack into microphone terminal ...

Страница 58: ...f warm air comes into contact with cold parts inside the player When condensation forms inside the player the player may not operate correctly If this occurs remove the disc and let the player stand for 1 or 2 hours with the power on Note Check that the tape in the cassette is sufficiently taut To prevent erasing a cassette that you wish to keep remove the safety tab on the upper edge of the casse...

Страница 59: ...e Play Pause button is pressed No sound is heard during fast playback slow playback and step motion playback Are the speakers connected properly Is the speaker setup correctly customized Is the disc severely damaged Sound is not produced Was the DVD player suddenly moved from a cold place to a warm one When condensation forms inside the player remove the disc and let the player stand for 1 or 2 ho...

Страница 60: ...s INITIAL appears on the display and all settings will return to the default values Press the POWER button Using the RESET function will erase all stored settings Do not use this unless necessary Turn off the power and hold the SRS WOW button on the main unit for longer than 5 seconds Using the RESET function will erase all stored settings Do not use this unless necessary The password for rating l...

Страница 61: ...all Disc Recording Format CD R MP3 Discs Only CD R discs with MP3 files in ISO 9660 or Joliet format can be played MP3 file names should be 8 characters or less in length and contain no blank spaces or special characters If the name of a file is in Korean the name will be displayed on the TV screen in Korean and will be shown in the display of the main unit Use discs recorded with a compression de...

Страница 62: ...e menu displayed on the TV monitor Both the DVD player and DVD discs are encoded with a region number If the region number on the DVD disc does not correspond to the region number of the DVD player the player cannot play the disc Translated appearing at the bottom of the screen A DVD disc can contain up to 32 subtitle languages These numbers are recorded on DVD discs When a disc contains two or mo...

Страница 63: ...U N E R F M T U N E R MW LW SW VIDEO OUTPUT A M P L I F I E R 85W 11 5Kg 194 x 172 x 310 mm 5 C 35 C 10 75 3dB 60dB 1 0 56dB 40dB 40dB 2 1 0Vp p 75Ω load Luminance signal 1 0Vp p 75Ω load Color Signal 0 286Vp p 75Ω load 2X35W 20Hz 20kHz 75dB 50dB AUX 500mV 62 MISCELLANEOUS Impedance Frequency range Output sound pressure level Rated input Maximum input Dimensions W x H x D Weights S P E A K E R spe...

Страница 64: ...Memo ...

Страница 65: ...AH68 01407P THIS APPLIANCE IS MANUFACTURED BY ...

Отзывы: