background image

You can check or change your selection of tracks at any time.

Press 

once if you have started listening to the selection.

Press 

PROGRAM/SET 

button twice.

Result: The following indications are displayed:   

(01 = Program no., – – = Track no. on the disc)

If you have already programmed 24 tracks, 

CH 

is displayed

instead of 

PG

when you press 

PROGRAM/SET

.

Press 

PROGRAM/SET

one or more times until the track to be

changed is displayed.

Press 

or

to select a different track.

Press 

PROGRAM/SET

to confirm your change.

Press 

MP3-CD/CD

(

) to start listening to the selection.

Result: The first track selected is played.

1
2

3

4
5

6

Checking or Changing Programmed
Tracks

15

14

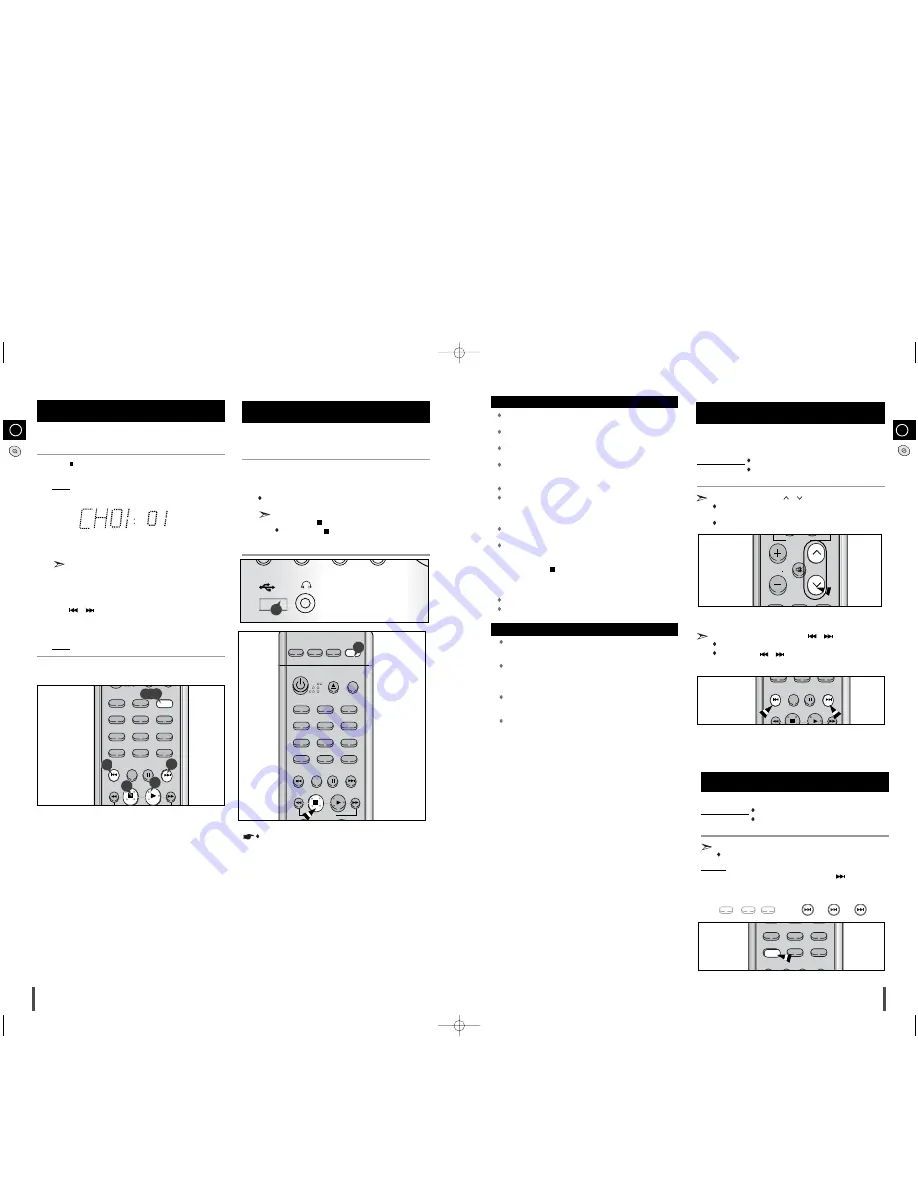
Playing USB

You can play MP3/WMA files by connecting to various external USB
storage devices such as USB flash memory or HDD. 

Connect the external USB storage device to your player.

Select USB function by using the 

USB

button.

The first track of the first directory plays automatically.

1
2

Please be aware of the followings before using USB.

Depending on the type of external USB storage device, it may not
work even if it’s connected to the player.

With external HDD, FAT format can be played, but not NTFS
format.

With USB 2.0 HDD, connect to a separate power source. 
If it’s not connected to a separate power source, it may not work.

If memory of an external USB storage device is segmented
into several parts, MP3 files of only the first hard disk drive
can be played.

Regarding directories, up to fourth directory can be played.

DRM applied files are not played.
Digital Rights Management: Technology and service that protect the
profit and rights of copyright owners by disallowing unauthorized use
of digital contents.

Even if the file name ends with .mp3, the file does not play if actual
file format is MPEG layer 1 or 2.

Disconnect the external USB storage device only in safe
removal mode(“USB REMOVE” display ON/OFF). Otherwise,
internal file can be damaged.
Press the Stop (

) button more than 2 times to get into the

safe removal mode.
If you want to play files in the safe removal mode, disconnect
and reconnect the external USB storage device.

USB hub will not be recognized.

Directory names are shown up to 14 letters, and MP3 file names up
to 30 letters.

Delay

When selecting USB function, depending of the speed of the 
external USB storage device, reading (READ-IN) internal information
can take several minutes.

When playing a USB device, recording or finding next track may
introduce some delay. Especially with a mass storage device such as
HDD, depending on the type and the number of files, the delay might
be several minutes.

Even with the external USB storage devices of same capacity,
depending on the speed of each product, the amount of oper-
ating time can vary.

If the external USB storage device supports only USB VER 1.1 and
the access speed is slow, the recording may not work well or noise
can be recorded.

To stop playing

Press the Stop (

) button to stop playing.

Press the Stop (

) button once to pause, 

and press the button twice to stop completely.

Do not connect USB charging device to the USB connection port
of the player, because it may cause damage to the product.

Selecting a Track from USB Device

You can select a desired directory and an MP3 file during the play or
when it stopped.

Before you begin!

Connect the external USB storage device to your player.

Select USB function by using the USB button.

Press the 

TUNING/ALBUM

buttons to move the directory.

Each time you press the button, it will move to the directory before
or after and play.

This function works only in the remote control.

If you want to move the file, press the 

button shortly.

It moves the file within the directory.

If you press the 

button more times than the number of

the files in the directory, it will move over to the next directory.

To skip next 10 tracks

Before you begin!

Connect the external USB storage device to your player.

Select USB function by using the USB button.

Press the 

+10

button on the remote control shortly during the play.

A track that is 10 tracks after the current track plays.

Example:

If you want to select 43rd track while 15th track is playing, press
the +10 button 3 times and then press the 

button 3 times.

15 

20 

30 

40 

41 

42 

43

+10

+10

+10

TIMER 

SLEEP TREB/BASS

+10

REPEAT 

MO/ST 

DEMO 

DIMMER

TIMER/CLOCK 

PROGRAM/SET 

ON/OFF 

SHUFFLE

REP A-B 

STOP 

DISPLAY

PLAY

PAUSE

2,3,5

4

4

6

1

TIMER 

POWER 

SLEEP TREB/BASS

+10

REPEAT 

MO/ST 

DEMO 

DIMMER

TIMER/CLOCK 

PROGRAM/SET 

ON/OFF 

CD

TUNER

SHUFFLE

REP A-B 

STOP 

DISPLAY

PLAY

PAUSE

USB

AUX

CANCEL

USB/MP3-CD/CD

VOLUME

P.SOUND

EQ

TUNING

 MODE

MUTE

TUNING/

ALBUM

USB/MP3-CD/CD

+10

MO/ST 

DEMO 

DIMMER

SHUFFLE

REP A-B 

DISPLAY

PAUSE

STOP 

DISPLAY

PLAY

PAUSE

USB

2

ENG

ENG

1

• The USB function  of this product does not support all USB

devices.For the information  on the supported devices,pls see
the page 24.

MM-A15(GB)-NO-8.25  8/26/08  9:39  Page 14

Содержание MM-A15

Страница 1: ...Micro Component Audio system CD MP3 CD WMA CD CD R RW Playback user manual MM A15 imagine the possibilities MM A15 GB NO 8 25 8 26 08 9 39 Page 1 ...

Страница 2: ...ntrol 7 Connecting to an External Source 8 Speaker Connection 8 Connecting the FM Aerial 9 DEMO Function 10 DIMMER Function 10 DISPLAY Function 10 Setting the Clock 10 MP3 WMA CD CD PLAYER To play the CD MP3 WMA CD 11 Selecting a Track 11 To select the MP3 WMA CD album and track 11 Searching for a Specific Music Passage on a CD 12 Function to skip through 10 tracks at a time 12 Repeating One or Al...

Страница 3: ...ON OFF 6 SLEEP 7 DEMO 8 FM MO STEREO 9 10 10 DISPLAY 11 USB MP3 CD CD STOP 12 FAST FORWARD FAST BACK 13 VOLUME CONTROL 14 POWER SOUND 15 EQ 16 TUNING MODE 17 MUTE 18 TUNING UP OR DOWN ALBUM SKIP 19 USB MP3 CD CD PLAY 20 USB MP3 CD CD SKIP OR SEARCH 21 PAUSE 22 SHUFFLE 23 REPEAT A B 24 DIMMER 25 REPEAT 26 TREB BASS 27 PROGRAM SET 28 OPEN CLOSE 29 CANCEL 30 AUX 31 USB 1 2 3 4 5 6 7 16 8 9 10 11 12 1...

Страница 4: ...Component System Connecting your System to the Power Supply 2 6 Rear Panel View 1 FM Aerial Connector Terminal 2 AUX Input 3 Loudspeaker Connector Terminals 4 Voltage Selecor Option Inserting Remote Control Batteries Insert or replace remote control batteries when you Purchase the micro component system Find that the remote control is no longer operating correctly When replacing the batteries use ...

Страница 5: ...f the micro component system Connect the To the connector marked Red jack R right White jack L left For optimum sound quality do not invert the right and left channels Plug the system back into the main socket and press to switch it on Select the AUX source by pressing AUX Result AUX is displayed Switch the external source on Example You can watch a film and take advantage of stereo sound provided...

Страница 6: ...rted according to titles directory Other languages besides English may not be indicated The English name of the track may not be indicated depending on the characteristics of the MP3 WMA CD Adjust the volume according to needs with the following procedures Turn the VOLUME control of the main unit or Press the VOLUME or button of the remote control The volume level can be adjust in VOL MIN VOL 1 VO...

Страница 7: ...ast listened to Press the PROGRAM SET button while your MP3 WMA CD is being played back The LAST ON and LAST OFF may be repeatedly selected 13 What is WMA WMA means Windows Media Audio the global standard for audio signal compression technology You can decide The order of the track desired to listen The track not desired to listen A maximum of up to 24 order of tracks desired to listen may be prog...

Страница 8: ... internal information can take several minutes When playing a USB device recording or finding next track may introduce some delay Especially with a mass storage device such as HDD depending on the type and the number of files the delay might be several minutes Even with the external USB storage devices of same capacity depending on the speed of each product the amount of oper ating time can vary I...

Страница 9: ...ting a Stored Station on Select the station to be stored by Pressing or buttons on the front panel or or buttons on the remote control to increase or decrease the frequency respectively To scroll through the frequencies faster when searching manually hold down the or buttons The automatic search procedure may stop on a frequency that does not correspond to a radio station If this happens use the m...

Страница 10: ... the volume level and press PROGRAM SET Result The source to be selected is displayed Press or button to select the source to be played when the system switches on If you select You must also TUNER radio a Press PROGRAM SET b Select a preset station by pressing or MP3 CD compact disc Load a compact disc USB connect usb Press PROGRAM SET to confirm the timer Timer Function 7 5 6 1 2 3 4 Press to se...

Страница 11: ...ou can Check the remaining time by pressing SLEEP Change the remaining time by repeating Steps 1 and 2 To cancel SLEEP function press SLEEP until SLEEP OFF is dis play Setting the System to Switch off Automatically 1 2 3 90 MIN 90 MIN 60 MIN 45 MIN SLEEPOFF 15 MIN 30 MIN You can connect a set of headphones to your micro component system so that you can listen to music or radio program mers without...

Страница 12: ...sunlight where they will not be exposed to high temperatures Always use compact discs marked Precautions When Using Compact Discs Before Contacting the After Sales Service COMPACT DIGITAL AUDIO Problem The system does not work There is no sound The Timer does not work In case it does not work even the action is taken as above The compact disc player does not start playing Reception is poor or no r...

Страница 13: ...era Optio 33LF Pentax Digital Camera Optio MX Pentax Digital Camera Digimax 420 Samsung Digital Camera Digimax 400 Samsung Digital Camera Sora PDR T30 Toshiba Digital Camera Coolpix 5900 Nikon Digital Camera Coolpix S1 Nikon Digital Camera Coolpix 7600 Nikon Digital Camera DMC FX7 Panasonic Digital Camera Dimage Xt Minolta Digital Camera AZ 1 Olympus Digital Camera Product Company Type Digital Cam...

Страница 14: ...MM A15 GB NO 8 25 8 26 08 9 39 Page 26 ...

Отзывы: