background image

cleaning and maintaining your microwave oven 

_21

05 CLEANING ANd mAINT

AINING

CLEANING ThE TURNTAbLE ANd 

ROLLER RINGS

Clean the roller rings periodically and wash the turntable 

as required. You can wash the turntable safely in your 

dishwasher.

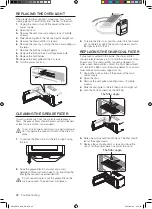
CLEANING ThE STIRRER fAN 

ASSEmbLy

The function of the stirrer fan is to distribute the 

microwave energy within the oven cavity. In order to

assure even cooking of your food and optimum 

performance of this unit the stirrer fan should be

cleaned from time to time.

1. 

Disconnect the power cord and open the oven door.

2. 

Remove the plastic pin clip by pulling straight down. 

If you can not pull it out by hand, you may need to use 

pliers or carefully pry it out using a small screwdriver.

3. 

The stirrer cover can now be rotated clockwise slightly 

to the left. Please note that it will only move about 

1/8”, (3mm), or so.

4. 

Pull the cover and the stirrer fan straight down to 

remove it from the oven.

5. 

Inspect the fan and cover assembly for any damage 

or broken parts.

6. 

Clean both the fan and the cover using a dish brush 

and a solution of warm water and detergent. Be 

careful not to bend the stirrer fan. Dry both parts 

thoroughly.

7. 

Place the fan on the pin and confi rm that it moves 

freely.

8. 

Reinstall the stirrer assembly into the oven making 

certain the hole for the plastic pin clip is towards you 

at the six‐o‐clock position.

9. 

Rotate the cover assembly counter‐clockwise until 

you can insert the plastic pin clip.

10. 

Reconnect the power cord and confi rm the operation 

of the oven.

The condition of the grease fi lters and/or charcoal fi lter 

may be a good guide for determining how frequently the 

stirrer fan should be inspected and cleaned for proper 

operation.

STORING ANd REPAIRING yOUR 

mICROWAvE OvEN

If you need to store your microwave oven for a short or 

extended period of time, choose a dust-free, dry location. 

Dust and dampness may adversely aff ect the ability of the 

microwave parts.

WARNING

•  Do not repair, replace or service any part of your 

microwave oven yourself. Allow only a qualifi ed 

service technician to perform repairs. If the oven 

is faulty and needs servicing, or you are in doubt 

about its condition, unplug the oven from the 

power outlet and contact your nearest service 

center. 

•  Do not use the oven if it is damaged, in 

particular, if the door or door seals are damaged. 

Door damage includes a broken hinge, a worn 

out seal, or distorted/bent casing.

•  Do not remove the oven from its casing. 
•  This microwave oven is for home use only and is 

not intended for commercial use.

REPLACING ThE COOkTOP/NIGhT 

LIGhT

When replacing the cooktop/night light, make sure that 

you are wearing gloves to avoid injury from the heat of the 

bulb.

1. 

Unplug the oven or turn off  the power at the main 

power supply.

2. 

Remove the screw from the light cover and lower the 

cover.

3. 

Disconnect 2 connectors.

4. 

Remove 2 screws securing LED lamp board.

5  

Replace LED lamp board.

To purchase a new LED lamp board, visit an 

authorized service center or call 1-800-SAMSUNG 

(726-7864).

Pin Clip

Stirrer Cover

Stirrer Fan

Screw

Lamp Cover

Connector

SMH2117S_XAA_EN.indd   21

2011-08-08     9:14:46

Содержание ME21F707MJT

Страница 1: ...purchasing this Samsung product Please register your product at www samsung com register 1 800 SAMSUNG 726 7864 Microwave Oven user manual SMH2117S ENGLISH This manual is made with 100 recycled paper SMH2117S_XAA_EN indd 1 2011 08 08 9 14 40 ...

Страница 2: ...ad this manual to take full advantage of your microwave oven s many benefits and features What you need to know about safety instructions Warnings and Important Safety Instructions in this manual do not cover all possible conditions and situations that may occur It is your responsibility to use common sense caution and care when installing maintaining and operating your microwave oven PRECAUTIONS ...

Страница 3: ...d away from heated surfaces including the back of the oven 15 Do not let the cord hang over the edge of a table or counter 16 When cleaning surfaces of the door and oven that come together when the door closes use only mild nonabrasive soaps or detergents applied with a sponge or soft cloth Unplug the microwave before cleaning Save these instructions 17 To reduce the risk of fire in the oven cavit...

Страница 4: ...cracks in the door or a door that is not lined up correctly If there is any damage do not operate the oven and notify your dealer immediately Make sure to install your oven in a location with adequate space Remove all foreign substances such as dust or water from the power plug terminals and contact points using a dry cloth on a regular basis Unplug the power plug and clean it with a dry cloth Fai...

Страница 5: ...may spread Always observe Safety Precautions when using your oven Never try to repair the oven on your own There is dangerous voltage inside If the oven needs to be repaired contact an authorized service center near you Do not attempt to repair disassemble or modify the appliance yourself Because a high voltage current enters the product chassis during operation opening the chassis can result in e...

Страница 6: ...o so may result in children burning themselves Do not place food or heavy objects over the door when opening the door The food or object may fall and this may result in burns or injury Do not abruptly cool the door the inside of the appliance or the dish by pouring water over it during or just after cooking This may result in damage to the appliance The steam or water spray may result in burns or ...

Страница 7: ...on 14 Soften Melt button 14 Kids Meals button 15 Snacks button 15 Microwave Cooking Times Power Levels 16 Custom Cook button 16 Warm Hold cookware guide 16 16 Microwave safe utensils cooking guide 17 17 General microwave tips 18 Cooking meat 18 Cooking poultry 19 Cooking seafood 19 Cooking eggs 19 Cooking vegetables 19 Recipes cleaning and maintaining your microwave oven 20 20 Cleaning the exterio...

Страница 8: ...provide the specific model and serial number information which is usually located on the back or bottom of the product Please record these numbers in the spaces provided below along with the other requested information Keep this information in a safe place as a permanent record of your purchase to aid in identification in case of theft or loss Also keep a copy of your sales receipt as a proof of p...

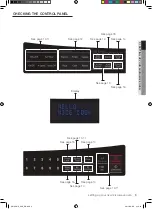
Страница 9: ...wave oven Checking the control panel Display See page 12 See page 14 See page 13 See page 15 See page 10 11 See page 10 See page 10 See page 16 See page 10 See page 16 See page 14 See page 15 See page 10 11 See page 10 11 SMH2117S_XAA_EN indd 9 2011 08 08 9 14 42 ...

Страница 10: ...bs Kg 2 Sound on off control 1 2 Sound ON Sound OFF 3 Clock display control 1 2 12HR 24HR 4 Display 1 2 3 Slow speed Normal speed Fast speed 5 Remind end signal 1 2 ON OFF 6 Demo mode 1 2 ON OFF 7 Daylight Saving time 1 2 ON OFF using your microwave oven Cooking has never been easier than with your new Samsung microwave oven The following section describes everything you need to know about using y...

Страница 11: ...ime CAUTION Do not use a microwave browning dish on the shelf The shelf could overheat Do not use the oven with the shelf on the microwave floor This could damage the microwave Use pot holders when handling the shelf as it may be hot Do not use the metal shelf when cooking popcorn Food cooks best on the turntable For best results Uneven results The shelf gives you the option to reheat more than on...

Страница 12: ...rozen breakfast 4 to 8 oz Follow the package instructions for covering and letting stand Use this button for frozen sandwiches breakfast entrees pancakes waffles etc Let the oven cool for at least 5 minutes before using it again Chicken breast 8 to 16 oz Place the chicken breasts on a microwave safe plate and cover with plastic wrap Cook to an internal temperature of 170 F Let stand for 5 minutes ...

Страница 13: ...eaks Chops Fish 0 5 3 0 lbs After each stage rearrange the food If there are any warm or thawed portions of food shield them with narrow flat pieces of aluminum foil Remove any pieces of food that are nearly defrosted Let stand covered for 5 10 minutes Ground Meat 0 5 3 0 lbs After each stage remove any pieces of food that are nearly defrosted Let stand covered with foil for 5 10 minutes Whole Chi...

Страница 14: ... to cycle through the available options 2 Press the number 1 or 2 buttons to select the amount Refer to the Kids meals table for the serving size 3 Press the Start button to begin cooking Kids meals table Menu item No Amount Remarks 1 Chicken nuggets frozen 1 1 serving Place a paper towel on a plate and arrange the nuggets in a spoke like fashion on the paper towel Do not cover Let stand for 1 min...

Страница 15: ... 1 to High 10 One stage cooking For simple one stage cooking you only need to set the cooking time The power level is automatically set to High If you want to set the power level to any other level use the Power Level button 1 Use the number buttons to set a cooking time You can enter a time from one second right up to 99 minutes and 99 seconds To select a time greater than one minute enter the se...

Страница 16: ...covered during Warm Hold Below are the amounts of food we recommend you apply the Warm and Hold function to by Food Type Food type Recommended Quantity Liquid 1 2 cups Dry 5 10 oz cookware guide For food to cook in the microwave oven the microwaves must be able to penetrate the food without being reflected or absorbed by the dish It is important to choose the correct cookware therefore look for co...

Страница 17: ...exture should be heated at a low power level to prevent them from becoming tough Foods with a non porous skin such as potatoes or hot dogs should be pierced to prevent bursting Putting heating oil or fat in the microwave is not recommended Fat and oil can suddenly boil over and cause severe burns Some ingredients heat faster than others For example the jelly in a jelly doughnut will be hotter than...

Страница 18: ...is time to complete cooking in the center without overcooking the outer areas All liquids such as soup or hot chocolate should be shaken or stirred when cooking is complete Let liquids stand a moment before serving When heating baby food stir well and test the temperature before serving Adding moisture Microwave energy is attracted to water molecules Food that is uneven in moisture content should ...

Страница 19: ...ng towards the edge of the dish and the tips toward the center When cooking cut vegetables always cover the dish with a lid or vented microwavable plastic wrap Whole unpeeled vegetables such as potatoes squash eggplant etc should have their skins pierced in several spots before cooking to prevent them from bursting For a more even cooking result stir or rearrange whole vegetables halfway through t...

Страница 20: ... to clean spills on the outside of your microwave oven as they occur Use a soft cloth and warm soapy water Rinse and dry CAUTION Do not get water into the vents Never use abrasive products or chemical solvents such as ammonia or alcohol as they can damage the appearance of your microwave Cleaning under your microwave oven Regularly clean grease and dust from the bottom of your microwave using a so...

Страница 21: ...e power cord and confirm the operation of the oven The condition of the grease filters and or charcoal filter may be a good guide for determining how frequently the stirrer fan should be inspected and cleaned for proper operation STORING ANd REPAIRING yOUR mICROWAvE OvEN If you need to store your microwave oven for a short or extended period of time choose a dust free dry location Dust and dampnes...

Страница 22: ... in hot water and a mild detergent Rinse well and shake to dry Brushing the filter lightly can remove embedded dirt WARNING Do not use ammonia or put the grease filter in the microwave oven The aluminum will darken The angle 3 To return the filter to its position slide it into the frame slot on the left or right then push it upwards and to the right or left to lock it REPLACING ThE ChARCOAL fILTER...

Страница 23: ...7S Oven Cavity 2 1 cu ft Timer 99 minutes 99 seconds Controls 10 power levels including defrost Power Source 120 VAC 60 Hz Power Output 1000 Watts Power Consumption 1700 Watts Net Shipping Weight 55 9 64 2 lbs Outside Dimensions 29 7 8 W X 16 15 16 H X 18 1 2 D Oven Cavity Dimensions 22 1 8 W X 10 13 16 H X 14 13 16 D Shipping Dimensions 33 3 8 W X 19 7 16 H X 20 13 16 D warranty SAMSUNG OVER THE ...

Страница 24: ...MPLIED INCLUDING BUT NOT LIMITED TO ANY IMPLIED WARRANTIES OF MERCHANTABILITY OR FITNESS FOR A PARTICULAR PURPOSE SHALL APPLY AFTER THE EXPRESS WARRANTY PERIODS STATED ABOVE AND NO OTHER EXPRESS WARRANTY OR GUARANTY GIVEN BY ANY PERSON FIRM OR CORPORATION WITH RESPECT TO THIS PRODUCT SHALL BE BINDING ON SAMSUNG SAMSUNG SHALL NOT BE LIABLE FOR LOSS OF REVENUE OR PROFITS FAILURE TO REALIZE SAVINGS O...

Страница 25: ...notes SMH2117S_XAA_EN indd 25 2011 08 08 9 16 06 ...

Страница 26: ...notes SMH2117S_XAA_EN indd 26 2011 08 08 9 16 06 ...

Страница 27: ...notes SMH2117S_XAA_EN indd 27 2011 08 08 9 16 06 ...

Страница 28: ...www samsung com SMH2117S_XAA_EN indd 28 2011 08 08 9 16 07 ...

Страница 29: ...do este producto Samsung Por favor registre su producto en www samsung com register 1 800 SAMSUNG 726 7864 Horno de microondas manual del usuario SMH2117 ESPAÑOL Este manual está impreso en papel 100 reciclado SMH2117S_XAA_Mes indd 1 2011 08 08 9 23 00 ...

Страница 30: ...so y el cuidado de su electrodoméstico Lea detenidamente el manual y podrá así aprovechar todas las ventajas y las funciones del horno de microondas Lo que necesita saber sobre las instrucciones de seguridad Las advertencias y las instrucciones de seguridad importantes de este manual no cubren todos los problemas y situaciones que podrían ocurrir Es su responsabilidad usar el sentido común ser pre...

Страница 31: ... en agua 14 Mantenga el cable alejado de superficies calientes incluso la parte posterior del horno 15 No permita que el cable cuelgue del borde de una mesa o mesada 16 Cuando limpie las superficies de la puerta y del horno que se ensamblan al cerrar la puerta utilice sólo jabones o detergentes suaves no abrasivos aplicados con una esponja o paño suave Desenchufe el horno de microondas antes de li...

Страница 32: ...aduras en la puerta o una puerta que no esté correctamente alineada Si hay algún daño no ponga el horno en funcionamiento y notifique de inmediato al distribuidor Asegúrese de instalar su horno en un lugar con espacio suficiente Retire todas las sustancias extrañas como polvo o agua de los terminales y puntos de contacto del enchufe con un paño seco regularmente Desenchufe la alimentación y limpie...

Страница 33: ...uerta el fuego puede expandirse Siempre respete las Precauciones de seguridad cuando utilice su horno Nunca intente reparar el horno Contiene voltaje peligroso en el interior Si se debe reparar el horno comuníquese con un centro de servicio técnico autorizado cercano No intente reparar desarmar ni modificar el electrodoméstico Dado que una corriente de alta tensión ingresa en el chasis del product...

Страница 34: ...acerquen demasiado al electrodoméstico No hacerlo puede provocar quemaduras en los niños No coloque alimentos ni objetos pesados sobre la puerta del horno cuando la abra Los alimentos o el objeto podrían caerse y provocar quemaduras o lesiones No enfríe abruptamente la puerta el interior del electrodoméstico ni el plato vertiendo agua sobre estas partes durante o después de la cocción Esto puede p...

Страница 35: ...Botón 1 pound Defrost Descongelamiento 1 libra 14 Botón Soften Melt Ablandar derretir 14 Botón Kids Meals Comidas para niños 15 Botón Snacks Botanas 15 Tiempos de cocción y niveles de potencia del microondas 16 Botón Custom Cook Cocción personalizada 16 Warm Hold Calentar y mantener caliente guía de recipientes y utensilios de cocina 16 16 Recipientes y utensilios aptos para microondas guía de coc...

Страница 36: ...con Samsung indique el modelo específico y el número de serie que por lo general se encuentra en la parte posterior o inferior del producto Registre los números en los espacios provistos a continuación junto con la demás información solicitada Conserve esta información en un lugar seguro como un registro permanente de su compra para ayudarlo en la identificación en caso de robo o pérdida También c...

Страница 37: ... 10 11 Consulte la página 12 Consulte la página 14 Consulte la página 15 Consulte la página 14 Consulte la página 13 Consulte la página 16 Consulte la página 15 Consulte la página 10 11 Consulte la página 15 Consulte la página 16 Consulte la página 10 11 Consulte la página 10 Consulte la página 10 SMH2117S_XAA_Mes indd 9 2011 08 08 9 23 03 ...

Страница 38: ...ad de peso 1 lb 2 kg 2 Control de sonido 1 Sonido activado 2 Sonido desactivado 3 Control del reloj 1 12 HR 2 24 HR 4 Pantalla 1 Velocidad lenta 2 Velocidad normal 3 Velocidad rápida 5 Señal de finalización 1 ACTIVADA 2 DESACTIVADO 6 Modo demostración 1 ACTIVADA 2 DESACTIVADO 7 Hora de verano 1 ACTIVADA 2 DESACTIVADO uso del horno de microondas Cocinar nunca ha sido más sencillo que con su nuevo h...

Страница 39: ...zador y el botón 0 para cancelar el temporizador Estante metálico Utilice el estante metálico para cocinar más de un plato al mismo tiempo CAUTION No utilice un recipiente dorador apto para microondas sobre el estante El estante podría recalentarse No utilice el horno con el estante sobre el piso del microondas Podría dañar el horno de microondas Use guantes protectores para tomar el estante ya qu...

Страница 40: ...strucciones del paquete para cubrir y dejar reposar Use este botón para emparedados congelados entradas de desayuno crepas wafles etc Deje que el horno se enfríe por al menos 5 minutos antes de volver a usarlo Pechuga de pollo 8 16 oz Coloque las pechugas de pollo sobre un plato apto para microondas y cúbralo con un envoltorio de plástico Cocine a una temperatura interna de 170 F Deje reposar dura...

Страница 41: ...minutos Steaks chuletas pescado 0 5 3 0 lb Después de cada etapa reacomode el alimento Si hay alguna parte caliente o descongelada cúbrala con pedacitos finos de papel de aluminio Quite cualquier parte del alimento que esté casi descongelada Déjelos reposar cubiertos durante 5 10 minutos Carne molida 0 5 3 0 lb Después de cada etapa retire cualquier parte del alimento que esté casi descongelada De...

Страница 42: ...otón repetidas veces para ver todas las opciones disponibles 2 Presione los botones 1 o 2 para seleccionar la cantidad Consulte la tabla de comidas para niños para obtener información acerca del tamaño de las porciones 3 Presione el botón Start Inicio para empezar la cocción Tabla de comidas para niños Menú Alimento N º Cantidad Comentarios 1 Trocitos de pollo congelados 1 1 porción Coloque una to...

Страница 43: ...ivel de potencia se programa automáticamente en Alta Si usted desea programar el nivel de potencia en cualquier otro nivel utilice el botón Power Level Nivel de potencia 1 Use los botones numéricos para ingresar el tiempo de cocción Puede ingresar el tiempo desde un segundo hasta 99 minutos con 99 segundos Para seleccionar un tiempo mayor a 1 minuto ingrese los segundos también Por ejemplo para pr...

Страница 44: ... a fuego lento 2 Bajo 7 Mediano alto 3 Descongelar 8 Recalentar 4 Mediano bajo 9 Saltear 5 Media 10 Alto Botón Custom Cook Cocción personalizada El botón Custom Cook Cocción personalizada le permite almacenar un conjunto personalizado de instrucciones de cocción y recordar estas configuraciones a partir de la memoria del horno para comenzar a cocinar rápidamente Se puede almacenar sólo un conjunto...

Страница 45: ...os alimentos más livianos Los alimentos con una textura delicada deben calentarse a un nivel de potencia bajo para evitar que se endurezcan Los alimentos con una piel no porosa tales como las papas o las salchichas deben pincharse para evitar que exploten No se recomienda freír con aceite caliente o grasa en el microondas La grasa y el aceite pueden hervir de repente y causar quemaduras graves Alg...

Страница 46: ...das y vegetales enteros Las carnes asadas necesitan este tiempo para completar la cocción en el centro sin cocinar en exceso las áreas exteriores Todos los líquidos como por ejemplo la sopa o el chocolate caliente deben agitarse o revolverse cuando finaliza la cocción Deje que los líquidos reposen un momento antes de servirlos Cuando calienta alimentos para bebés revuélvalos bien y controle la tem...

Страница 47: ...a o envoltorio plástico para microondas con ventilación Los vegetales enteros sin pelar tales como las patatas calabazas berenjenas etc deben pincharse en varios lugares antes de cocinarlos para evitar que estallen Para obtener resultados de cocción más parejos revuelva o reacomode los vegetales enteros a la mitad del tiempo de cocción Por lo general cuanto más denso es el alimento mayor será el t...

Страница 48: ...araciones innecesarias y prolonga su vida útil Limpieza del exterior Lo mejor es limpiar los derrames en la parte externa de su microondas no bien ocurren Utilice un paño suave y tibio agua con jabón Enjuague y seque PRECAUCIÓN No permita que el agua llegue a los orificios de ventilación No utilice nunca productos abrasivos o solventes químicos como amoníaco o alcohol ya que pueden dañar el aspect...

Страница 49: ...omo sea necesario El plato giratorio puede lavarse perfectamente en el lavavajillas LIMPIEZA DEL MONTAjE DEL VENTILADOR AgITADOR La función del ventilador agitador es distribuir la energía de microondas dentro de la cavidad del horno Para garantizar una cocción uniforme de los alimentos y un óptimo funcionamiento de esta unidad se debe limpiar el ventilador agitador periódicamente 1 Desconecte el ...

Страница 50: ...un detergente suave Enjuáguelo bien y sacúdalo hasta que se seque Al cepillar el filtro ligeramente podrá quitar la suciedad incrustada ADVERTENCIA No utilice amoníaco ni coloque el filtro de grasa dentro del horno de microondas El aluminio se oscurecerá 3 Para colocar nuevamente el filtro en su posición deslícelo en la ranura del marco sobre la izquierda o derecha luego empújelo hacia arriba y ha...

Страница 51: ...del horno 1 8 pies cúbicos Temporizador 99 minutos 99 segundos Controles 10 niveles de potencia e incluye descongelamiento Fuente de alimentación 120 VCA 60 Hz Salida de potencia 1100 Vatios Consumo de potencia 1700 Vatios Peso neto envío ST 51 8 61 2 lbs B W 50 4 59 7 lbs Dimensiones externas 29 7 8 Ancho X 16 15 16 Alto X 17 5 16 Profundidad Dimensiones de la cavidad del horno 20 13 16 Ancho X 1...

Страница 52: ...ÁCTER TAXATIVO TODA GARANTÍA TÁCITA DE COMERCIABILIDAD O APTITUD PARA UN PROPÓSITO ESPECIAL SE APLICARÁ DESPUÉS DE LOS PERÍODOS DE GARANTÍA ESTABLECIDOS MÁS ARRIBA Y NINGUNA OTRA GARANTÍA EXPRESA O GARANTÍA OTORGADA POR PERSONA COMPAÑÍA O CORPORACIÓN ALGUNA CON RESPECTO AL PRESENTE PRODUCTO REVESTIRÁ CARÁCTER VINCULANTE PARA SAMSUNG SAMSUNG NO SERÁ RESPONSABLE POR PÉRDIDA DE INGRESOS O LUCRO CESAN...

Страница 53: ...notes SMH2117S_XAA_Mes indd 25 2011 08 08 9 24 25 ...

Страница 54: ...notes SMH2117S_XAA_Mes indd 26 2011 08 08 9 24 25 ...

Страница 55: ...notes SMH2117S_XAA_Mes indd 27 2011 08 08 9 24 25 ...

Страница 56: ...www samsung com SMH2117S_XAA_Mes indd 28 2011 08 08 9 24 25 ...

Отзывы: