background image

English  17

Using y

our micr

o

w

av
e o
v

en

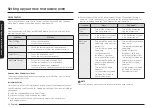
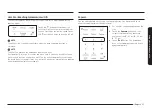
Popcorn

You can cook popcorn easily using the Popcorn button. You do not need to set 
either the cooking time or the power level.

03

02

02

1. 

Put a bag of unpopped popcorn on the 
tray.

2. 

Touch the 

Popcorn

 button and then 

select size of popcorn by touching 
numeric button(

- 3.5 oz / 

- 3.0 oz / 

- 1.5 oz).

3. 

Touch 

START

 button. The microwave 

oven will automatically operate by pre-
programmed time.

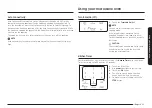
Vent Fan (Boost/High/Medium/Low/Off)

The vent fan removes steam and other vapors that result from cooking on the 
cooktop below.

01

Touch the 

 button once for boost fan, 

twice for high fan, three times for medium 
fan and four times for low fan speed. Touch 
the 

 button five times to turn the fan off.

NOTE

The exhaust fan’s speed may decrease when the oven’s cooking function is 
activated.

NOTE

The Vent Fan protects the microwave from excess heat.
It automatically turns on if it senses too much heat. If you have turned the fan on, 
you may find that you cannot turn it off. The fan will automatically turn off when 
the internal parts are cool. It may stay on for 30 minutes or more after the cooktop 
and microwave controls are turned off.

Содержание ME11A7510 Series

Страница 1: ...Microwave Oven User manual ME11A7510 ME11A7710 ME11CB7510...

Страница 2: ...Cookware guide 24 Recommended cooking utensils 24 Limited use items 25 Not recommended 25 Testing utensils 25 Cooking guide 26 Cooking techniques 26 General cooking recommendations 27 Guide for cookin...

Страница 3: ...te on the sealing surface C Do not operate the oven if it is damaged It is particularly important that the oven door close properly and that there is no damage to the 1 Door bent 2 Hinges and latches...

Страница 4: ...cing the bags in the oven c If materials inside the oven ignite keep the oven door closed turn the oven off and disconnect the power cord or shut off the power at the fuse or circuit breaker panel If...

Страница 5: ...appliance 2 The extension cord must be a grounding type 3 wire cord and it must be plugged into a 3 slot outlet 18 Liquids such as water milk coffee or tea can be overheated beyond the boiling point w...

Страница 6: ...nearest service center for a replacement or repair 3 The longer cord should be arranged so that it will not drape over the counter top or tabletop where it can be pulled on by children or tripped ove...

Страница 7: ...or fire You may be exposed to electromagnetic waves If your microwave oven requires repair contact your nearest Samsung service center If any foreign substance such as water enters the microwave unpl...

Страница 8: ...lems with the product Do not place the appliance over a fragile object such as a sink or glass object This may result in damage to the sink or glass object Do not touch the power plug with wet hands T...

Страница 9: ...the appliance while it is cooking or when opening the door just after cooking Take care that children do not come too close to the appliance Failing to do so may result in children burning themselves...

Страница 10: ...parts com Setting up your new microwave oven Be sure to follow these instructions closely so that your new microwave oven works properly Checking the parts Carefully unpack your microwave oven and mak...

Страница 11: ...ton 12 START Button 13 Light Button Hi Low Off 14 Turntable On Off Button 15 Vent Button 4 Speed On Off Setting up your microwave oven damp cloth damp cloth 1 Open the door by pulling the handle on th...

Страница 12: ...Remind The filter remind function can be turned on and off On Off 8 Wi Fi The Wi Fi function can be turned on and off On Off Set Time Your microwave oven is equipped with a built in clock Set the clo...

Страница 13: ...fan speed cooktop lamp NOTE For safety reasons you cannot turn on the microwave oven remotely and you must specify the cooking time to enable remote control Smart Control will not work properly if the...

Страница 14: ...ave hood fan hood fan speed to low medium high NOTE For safety reasons you cannot turn on the microwave oven remotely Voice Control To use the microwave oven s Voice Control function you need Bixby Am...

Страница 15: ...ch the button 2 Use numeric buttons to set the time 3 Touch the OK button 4 The display counts down and then beeps when the time has elapsed 5 To cancel the timer setting touch the STOP button Auto Co...

Страница 16: ...to activate or deactivate the child lock function touch the Lock button for 3 seconds The display will show when the oven is locked Stop Button The STOP button allows you to clear instructions you ha...

Страница 17: ...ves steam and other vapors that result from cooking on the cooktop below 01 Touch the button once for boost fan twice for high fan three times for medium fan and four times for low fan speed Touch the...

Страница 18: ...automatically operate by pre programmed time Potato You can cook potatoes easily using the Potato button You do not need to set either the cooking time or the power level 03 04 04 03 02 1 Put potatoe...

Страница 19: ...ve safe dish and add cup of water Cover with vented 1 inch vent plastic wrap while cooking and stir before letting stand 2 4 servings Category Food Amount Instructions 1 Snack 1 Fish sticks 1 1 servin...

Страница 20: ...ory Food Amount Instructions 3 Frozen Vegetables 1 Broccoli 1 1 serving Place the broccoli in the microwave safe bowl Add 1 4 tbs of water 1 tbs per serving Cover with vented 1 inch vent plastic wrap...

Страница 21: ...the center of the turntable 2 2 servings 4 Fresh prawns 1 1 serving Place the prawns in the microwave safe dish and cover with plastic wrap Place the dish on the center of the turntable 2 2 servings C...

Страница 22: ...before serving Contents Soup refrigerated 2 2 servings 3 3 servings 4 4 servings 7 Beverage 1 cup Use a measuring cup or mug and do not cover Place the beverage in the oven After heating stir well 2 1...

Страница 23: ...6 0 lbs 100 2700 gr See the table following 3 Touch START button 4 The oven will beep during the defrosting process Open the oven door and turn the food over If you do not turn the food over when the...

Страница 24: ...Microwave Safe and follow all directions Check the food in several places Conventional thermometers may be used once the food has been removed from the oven One stage cooking 01 03 04 04 01 02 1 In st...

Страница 25: ...e narrow strips of foil to prevent overcooking of exposed areas Using too much foil can damage your oven so be careful Ceramic porcelain and stoneware Use these if they are labeled Microwave Safe If t...

Страница 26: ...ed by the water fat and sugar molecules in the food The microwaves cause the molecules in the food to move rapidly The rapid movement of these molecules creates friction and the resulting heat cooks t...

Страница 27: ...pleted while a dish of peas can be served immediately General cooking recommendations Dense foods such as potatoes take longer to heat than lighter foods Food with a delicate texture should be heated...

Страница 28: ...after cooking Wash the tray carefully in warm sudsy water or in the dishwasher Cleaning the turntable and roller rings Clean the roller rings periodically and wash the turntable as required The turnt...

Страница 29: ...If you need to store your microwave oven for a short or extended period of time choose a dust free dry location Dust and dampness may adversely affect the functionality of the microwave parts WARNING...

Страница 30: ...placing the oven light make sure that you are wearing gloves to avoid injury from the heat of the lamp Hook Hook 1 Unplug the oven or turn off the power at the main power supply 2 Remove the vent cove...

Страница 31: ...filter Check the instructions on Cleaning the grease filter 3 Push the charcoal filter backwards by using handle of it and then tilt it 4 Pull the filter out to remove it 5 Slide a new charcoal filte...

Страница 32: ...lied Make sure power is supplied Confirm the microwave is plugged in Check your fuses or circuit breakers Troubleshooting Check points If you encounter a problem with your oven first check the tables...

Страница 33: ...water is heated reduce the amount of food and start the function again Use a cooking container with a flat bottom Problem Cause Action There is a popping sound during operation and the oven doesn t w...

Страница 34: ...with a flat bottom Problem Cause Action The interior light is dim or does not turn on The door has been left open for a long time The interior light may automatically turn off when the Eco function o...

Страница 35: ...ring cooking are not malfunctions Cooking is finished but the cooling fan is still running To ventilate the oven the cooling fan continues to run for about 3 minutes after cooking is complete This is...

Страница 36: ...display Check the table below for the code and then follow the directions Code Description Action C 10 The GAS sensor is open Unplug the power cord of the oven and then contact a local Samsung servic...

Страница 37: ...or replacement under these excluded circumstances shall be the customer s responsibility Visits by an authorized servicer to explain product functions maintenance or installation are not covered by th...

Страница 38: ...to this product shall be binding on SAMSUNG To obtain warranty service please contact SAMSUNG at Samsung Electronics America Inc 85 Challenger Road Ridgefield Park NJ 07660 1 800 SAMSUNG 726 7864 and...

Страница 39: ...d to normal aging SAMSUNG does not warrant uninterrupted or error free operation of the product Warranty CANADA Samsung over the range OTR microwave oven Limited warranty to original purchaser This SA...

Страница 40: ...AGAINST SAMSUNG BE GREATER IN AMOUNT THAN THE PURCHASE PRICE OF THE PRODUCT SOLD BY SAMSUNG AND CAUSING THE ALLEGED DAMAGE WITHOUT LIMITING THE FOREGOING PURCHASER ASSUMES ALL RISK AND LIABILITY FOR L...

Страница 41: ...English 41 Memo...

Страница 42: ...COMMENTS COUNTRY CALL OR VISIT US ONLINE AT U S A Consumer Electronics 1 800 SAMSUNG 726 7864 www samsung com us support CANADA 1 800 SAMSUNG 726 7864 www samsung com ca support English www samsung c...

Страница 43: ...Horno de microondas Manual del usuario ME11A7510 ME11A7710 ME11CB7510...

Страница 44: ...n multietapas M ximo de 2 etapas 23 Gu a de utensilios de cocina 24 Utensilios de cocci n recomendados 24 Elementos de uso limitado 24 No recomendado 24 Utensilios de prueba 25 Gu a de cocci n 25 T c...

Страница 45: ...a ado Es de especial importancia que la puerta del horno cierre correctamente y que no haya da os en 1 La puerta doblada 2 Las bisagras y los pestillos rotos o sueltos 3 Las juntas de la puerta y la s...

Страница 46: ...ntos u objetos No deje productos de papel utensilios de cocina ni alimentos en el interior cuando no utiliza el horno 18 Los l quidos tales como agua leche caf o t pueden recalentarse m s all del punt...

Страница 47: ...r puede parpadear y la velocidad del ventilador puede variar cuando el horno de microondas est encendido Los tiempos de cocci n tambi n pueden ser m s largos a No caliente demasiado los l quidos b Rev...

Страница 48: ...o tirando nicamente del enchufe No hacerlo puede provocar una descarga el ctrica o un incendio Si se da a el enchufe o el cable de alimentaci n comun quese con el centro de servicio t cnico m s cercan...

Страница 49: ...nto abrir el producto puede provocar descargas el ctricas o incendios Podr a estar expuesto a ondas electromagn ticas Si es necesario reparar el horno de microondas comun quese con el centro de servic...

Страница 50: ...nas pueden producirse descargas el ctricas un incendio o problemas en el producto No coloque el electrodom stico sobre un objeto fr gil como un fregadero o un objeto de vidrio Hacerlo puede provocar d...

Страница 51: ...l electrodom stico mientras est cocinando o al abrir la puerta inmediatamente despu s de la cocci n Aseg rese de que los ni os no se acerquen demasiado al electrodom stico No hacerlo puede provocar qu...

Страница 52: ...seguir estas instrucciones atentamente para que su nuevo horno de microondas funcione de manera adecuada Control de las piezas Desembale su horno de microondas con cuidado y aseg rese de haber recibid...

Страница 53: ...11 Bot n 30 sec 30 s 12 Bot n START INICIO 13 Bot n Light Luz alta baja apagada 14 Bot n Turntable On Off Activar Desactivar plato giratorio 15 Bot n Vent Ventilador 4 velocidades y activar desactivar...

Страница 54: ...ci n Recordatorio de filtro puede activarse y desactivarse Activado Desactivado 8 Wi Fi La funci n Wi Fi puede activarse y desactivarse Activado Desactivado Establecer la hora Su horno de microondas c...

Страница 55: ...to de la l mpara de la cubierta velocidad del ventilador NOTA Por motivos de seguridad no puede encender el horno de microondas de manera remota y debe especificar el tiempo de cocci n para permitir e...

Страница 56: ...el Asistente de Google Bixby Inicie una conversaci n con Bixby en su m vil SAMSUNG diciendo Hi Bixby o presionando la tecla lateral Amazon Alexa y el Asistente de Google Los electrodom sticos intelige...

Страница 57: ...El modo Eco reduce el uso de potencia en el estado de espera Cuando toca una vez el bot n STOP Eco DETENER Eco la pantalla se apaga y se conecta el modo que minimiza el uso de la potencia Para cancela...

Страница 58: ...utom ticamente si detecta demasiado calor Si fue usted quien encendi el ventilador quiz s note que no puede apagarlo El ventilador se apagar autom ticamente cuando las partes internas est n fr as El v...

Страница 59: ...Colocar en el plato giratorio al estilo de los rayos de una rueda Despu s de cocinar dejar reposar las papas durante 3 5 minutos 2 4 c u 2 Batatas 1 2 c u Pinchar cada batata varias veces con un tened...

Страница 60: ...ntro del plato giratorio 2 2 porciones 6 Croquetas congeladas 1 1 porci n Colocar las croquetas en el recipiente apto para microondas Colocar el plato en el centro del plato giratorio 2 2 porciones 7...

Страница 61: ...orciones 4 4 porciones Categor a Alimento Cantidad Instrucciones 2 Verduras frescas 1 Br coli 1 1 porci n Lavar y limpiar el br coli Colocar las cabezuelas de br coli en el bol apto para microondas Ag...

Страница 62: ...remover bien y luego presionar START INICIO para continuar A menos que est revuelto las pepitas de chocolate mantendr n su forma incluso cuando haya acabado el tiempo para calentar 4 Ablandar helado...

Страница 63: ...o congelado 1 1 paquete No colocar latas de jugo de metal en el microondas Quitar la tapa de pl stico y colocar en el centro del microondas Remover bien despu s 7 Derretir queso 1 1 taza Colocar el qu...

Страница 64: ...ubierta con papel de aluminio durante 5 10 minutos Alimento Cantidad Instrucciones 3 Plato de comida 1 1 porci n Utilizar solo alimentos precocidos refrigerados Cubrir el plato con un envoltorio de pl...

Страница 65: ...ia hasta Alta 1 Siga los pasos 1 2 y 3 de la secci n Cocci n en una sola etapa 2 Toque el bot n OK Aceptar para pasar a la segunda etapa 3 Siga los pasos 1 2 3 y 4 de la secci n Cocci n en una sola et...

Страница 66: ...croondas Gu a de utensilios de cocina Al cocinar alimentos en el horno de microondas las microondas deben ser capaces de penetrar en los alimentos sin que sean reflejadas o absorbidas por el recipient...

Страница 67: ...elgadas o delicadas hacia el centro del plato giratorio Proteger Proteja los alimentos con tiras angostas de papel de aluminio para evitar el exceso de cocci n Las reas que requieren protecci n son la...

Страница 68: ...cer caramelo en el horno de microondas ya que puede calentarse hasta llegar a temperaturas muy altas Recuerde esto para evitar lesiones Gu a para cocinar huevos en el microondas Nunca cocine huevos co...

Страница 69: ...za de agua cuando cocine verduras densas tales como papas zanahorias en cubos y jud as verdes Las verduras peque as zanahorias rebanadas arvejas frijoles etc se cocinan m s r pido que las verduras m s...

Страница 70: ...y no ha sido dise ado para un uso comercial Limpieza de la puerta y las trabas de la misma Siempre aseg rese de que las trabas de la puerta est n limpias y de que la puerta cierre adecuadamente Tenga...

Страница 71: ...mpara LED contin e con el orden inverso de las instrucciones anteriores 7 Enchufe el horno o encienda la electricidad de la fuente de alimentaci n principal Configure el reloj nuevamente NOTA Para adq...

Страница 72: ...lesiones personales o de da os materiales no encienda la campana del horno sin el filtro en su lugar Retirar Retirar Empujar Empujar 1 Para retirar el filtro presione la manija del filtro de grasa 2...

Страница 73: ...reloj nuevamente Resoluci n de problemas Puntos de verificaci n Si encuentra alg n problema con el horno verifique primero las siguientes tablas e intente poner en pr ctica las recomendaciones Si el p...

Страница 74: ...e Desenchufe los dem s electrodom sticos y dispositivos del enchufe El horno no recibe corriente No se recibe corriente Aseg rese de que se reciba corriente Confirme que el microondas est enchufado Co...

Страница 75: ...cantidad de alimentos y vuelva a iniciar la funci n Utilice un recipiente de cocci n con la base plana Problema Causa Acci n La funci n de calentar no funciona El horno no funciona se est n calentand...

Страница 76: ...horno La fuente de alimentaci n o el tomacorriente no tienen una conexi n a tierra adecuada Conecte adecuadamente a tierra la alimentaci n y el tomacorriente Problema Causa Acci n Gotea agua Puede ge...

Страница 77: ...lrededor de la tecla Si vuelve a aparecer apague el horno de microondas d jelo reposar durante m s de 30 segundos y luego vuelva a configurarlo Si vuelve a aparecer este c digo llame a su Centro de At...

Страница 78: ...itada es v lida nicamente para productos comprados y usados en Estados Unidos que fueron instalados operados y mantenidos de acuerdo con las instrucciones adjuntas o provistas con el producto Para rec...

Страница 79: ...ezas y los productos reemplazados son propiedad de SAMSUNG y deben ser devueltos a SAMSUNG La presente garant a limitada cubre defectos de fabricaci n de los materiales o la mano de obra que ocurran d...

Страница 80: ...r original est garantizado por SAMSUNG contra defectos de fabricaci n de los materiales y la mano de obra durante el per odo limitado de la garant a de UN 1 A O PARA LAS PIEZAS Y LA MANO DE OBRA CINCO...

Страница 81: ...e con SAMSUNG a 1 800 SAMSUNG 726 7864 o www samsung com ca support English www samsung com ca_fr support French Se brindar n servicios a domicilio durante el per odo de garant a de mano de obra sujet...

Страница 82: ...COMENTARIOS PA S LLAME AL O VIS TENOS EN L NEA EN U S A Consumer Electronics 1 800 SAMSUNG 726 7864 www samsung com us support CANADA 1 800 SAMSUNG 726 7864 www samsung com ca support English www sams...

Страница 83: ...Four micro ondes Manuel d utilisation ME11A7510 ME11A7710 ME11CB7510...

Страница 84: ...sson en une tape 23 Cuisson en plusieurs tapes 2 tapes maximum 23 Guide des r cipients 24 Ustensiles de cuisine recommand s 24 l ments utilisation limit e 24 Non recommand 24 Essai des ustensiles 25 G...

Страница 85: ...celui ci est endommag Veillez toujours ce que la porte soit ferm e herm tiquement et que les composants suivants ne soient pas endommag s 1 Porte risque de d formation 2 Charni res et loquets cass s o...

Страница 86: ...mptoir 16 Lorsque vous nettoyez les zones de la porte et du four qui entrent en contact une fois la porte ferm e utilisez uniquement une ponge ou un chiffon doux imbib e d un produit m nager doux et n...

Страница 87: ...terre et branch e sur une prise femelle tripolaire d N entreposez pas d objets l int rieur du four Ne laissez pas de papiers d ustensiles de cuisine ou d aliments l int rieur du four lorsque celui ci...

Страница 88: ...on d alimentation est endommag e contactez le centre de d pannage le plus proche pour demander ce qu elle soit remplac e 3 En cas d utilisation d un cordon plus long celui ci ne doit pas passer par de...

Страница 89: ...micro ondes n cessite des r parations contactez le centre de d pannage Samsung le plus proche de chez vous Si une substance trang re telle que de l eau p n tre dans l appareil d branchez le puis cont...

Страница 90: ...eil Ces substances sont non seulement nocives pour la sant mais elles peuvent galement entra ner une lectrocution un incendie ou une d faillance de l appareil Ne placez pas l appareil sur un support f...

Страница 91: ...lors de l ouverture de la porte juste apr s la cuisson Veillez ce que les enfants ne s approchent pas trop pr s de l appareil Le non respect de cette consigne risque d entra ner des br lures pour les...

Страница 92: ...o ondes Respectez scrupuleusement les instructions suivantes afin d assurer le fonctionnement correct de votre nouveau four micro ondes Contr le du contenu Sortez le four micro ondes de son emballage...

Страница 93: ...3 Bouton Light clairage lev faible d sactiv 14 Bouton Turntable On Off Marche Arr t du plateau tournant 15 Bouton Vent Ventilation 4 vitesses et activation d sactivation Pr paration de votre four micr...

Страница 94: ...d sactiv Activ D sactiv 8 Wi Fi La fonction Wi Fi peut tre activ e ou d sactiv e Activ D sactiv R glez le temps de cuisson Votre four micro ondes est quip d une horloge int gr e L horloge doit tre r...

Страница 95: ...a vitesse du ventilateur de la lampe de la table de cuisson REMARQUE Pour des raisons de s curit vous ne pouvez pas allumer le four micro ondes distance et vous devez sp cifier le temps de cuisson pou...

Страница 96: ...oin des applications Bixby Amazon Alexa ou Assistant Google sur votre t l phone portable Bixby D marrez la conversation avec Bixby sur un appareil mobile SAMSUNG en disant Hi Bixby ou en appuyant sur...

Страница 97: ...ne seule fois sur le bouton STOP ARR T Mode co 01 Le mode Eco co permet de r duire la consommation en veille Lorsque vous appuyez une fois sur le bouton STOP Eco ARR T co l cran s teint et le four mic...

Страница 98: ...omatiquement s il d tecte une chaleur trop importante Si vous avez activ le ventilateur il arrive que vous ne puissiez plus l teindre Il se coupera automatiquement une fois que tous les composants int...

Страница 99: ...terre cuites 1 2 ea Piquez chaque pomme de terre plusieurs fois l aide d une fourchette Disposez les en toile sur le plateau laissez les pommes de terre reposer 3 5 minutes 2 4 ea 2 Patates douces 1...

Страница 100: ...portions 6 Croquettes surgel es 1 1 portion Placez les croquettes dans un plat adapt aux micro ondes Placez le plat au centre du plateau tournant 2 2 portions 7 Burritos 1 1 chacun Suivez les consign...

Страница 101: ...2 portions 3 3 portions 4 4 portions Cat gorie Aliment Quantit Instructions 2 L gumes frais 1 Brocoli 1 1 portion Lavez et nettoyez le brocoli Placez les fleurons de brocoli dans un plat adapt aux mic...

Страница 102: ...puyez sur le bouton START D MARRER pour continuer moins d tre remu s les copeaux de chocolat conserveront leur forme m me lorsque le temps de chauffage sera termin 4 Faire ramollir la cr me 1 1 bac Re...

Страница 103: ...el 1 1 paquet Ne placez pas de canettes de jus en m tal dans le micro ondes Retirez le couvercle en plastique et placez le au centre du micro ondes Remuez bien ensuite 7 Faire fondre le fromage 1 1 ta...

Страница 104: ...iande hach e Couvrez d une feuille d aluminium et laissez reposer pendant 5 10 minutes Aliment Quantit Instructions 3 Assiette d ner 1 1 portion Utilisez uniquement des aliments pr cuits et conserv s...

Страница 105: ...permet de r gler la chaleur de Warm Chaud High Elev 1 Suivez les tapes 1 2 et 3 de la section Cuisson en une tape 2 Appuyez sur le bouton OK pour passer la seconde phase 3 Suivez les tapes 1 2 3 et 4...

Страница 106: ...iments dans votre four micro ondes il est n cessaire que les micro ondes p n trent dans les aliments sans tre r fl chies ou absorb es par le plat contenant les aliments Il est par cons quent important...

Страница 107: ...on placez les morceaux fins ou d licats au centre du plateau tournant Protection Recouvrez les aliments de bandelettes de papier aluminium pour viter la surcuisson Les extr mit s des ailes ou des cuis...

Страница 108: ...maniques lorsque vous retirez les aliments du four et apprenez aux enfants proc der de m me Il n est pas recommand de faire des bonbons dans le micro ondes car le sucre peut atteindre des temp rature...

Страница 109: ...es l gumes avant de proc der la cuisson Il est souvent inutile d ajouter de l eau Pour les l gumes chair dense tels que les pommes de terre les carottes et les haricots verts ajoutez environ de verre...

Страница 110: ...les joints de la porte soient propres et ce que celle ci ferme correctement Nettoyez avec un soin tout particulier les joints de la porte afin qu aucune particule ne s accumule et ne nuise l tanch it...

Страница 111: ...ordre inverse des instructions ci dessus 7 Branchez le four ou ouvrez l alimentation au niveau de la prise d alimentation secteur R glez l horloge nouveau REMARQUE Pour obtenir une nouvelle barrette...

Страница 112: ...our viter tout risque de blessures ou de dommages mat riels ne faites jamais fonctionner la hotte du four sans le filtre Tirez Tirez Poussez Poussez 1 Pour retirer le filtre poussez la poign e du filt...

Страница 113: ...tion secteur R glez l horloge nouveau D pannage Points de contr le Si vous rencontrez un probl me avec votre four consultez tout d abord les tableaux commen ant ci dessous et essayez les recommandatio...

Страница 114: ...n est pas sous tension Il n y a pas d alimentation Assurez vous que la prise est aliment e Confirmez que le micro ondes est branch V rifiez vos fusibles ou disjoncteurs Probl me Cause Action Un cr pi...

Страница 115: ...d aliments et d marrez nouveau la fonction Utilisez un r cipient de cuisson fond plat Probl me Cause Action La fonction de maintien au chaud ne fonctionne pas Le four peut ne pas fonctionner si trop d...

Страница 116: ...vous que la source d alimentation et la prise lectrique sont correctement reli es la terre Probl me Cause Action De l eau goutte En fonction des aliments concern s de l eau ou de la vapeur peut tre g...

Страница 117: ...para t teignez le four micro ondes laissez le reposer pendant plus de 30 secondes puis r essayez de le r gler Si ce code r appara t communiquez votre centre de service la client le SAMSUNG local Probl...

Страница 118: ...e ne s applique qu aux produits achet s et utilis s au sein des tats Unis et ayant t install s utilis s et entretenus conform ment aux instructions jointes ou fournies avec le produit Pour se pr valoi...

Страница 119: ...pi ces et produits de rechange sont garantis pendant la partie restante de la garantie initiale du produit ou alors pendant quatre vingt dix 90 jours selon la p riode qui est la plus longue Toute pi...

Страница 120: ...pport Garantie CANADA Four micro ondes hotte int gr e de samsung Garantie limit e l acqu reur d origine Ce produit de la marque SAMSUNG fourni et distribu par Samsung Electronics Canada Inc SAMSUNG et...

Страница 121: ...Fran ais 39 Garantie...

Страница 122: ...40 Fran ais Garantie Garantie...

Страница 123: ...conditions et proc dera au remplacement ou au reconditionnement des pi ces ou des produits si ces derniers s av rent d fectueux dans la limite de la p riode de garantie mentionn e pr c demment Toute p...

Страница 124: ...E QUESTION UN COMMENTAIRE PAYS N DE T L PHONE SITE INTERNET U S A Consumer Electronics 1 800 SAMSUNG 726 7864 www samsung com us support CANADA 1 800 SAMSUNG 726 7864 www samsung com ca support Englis...

Отзывы: