background image

GB

4

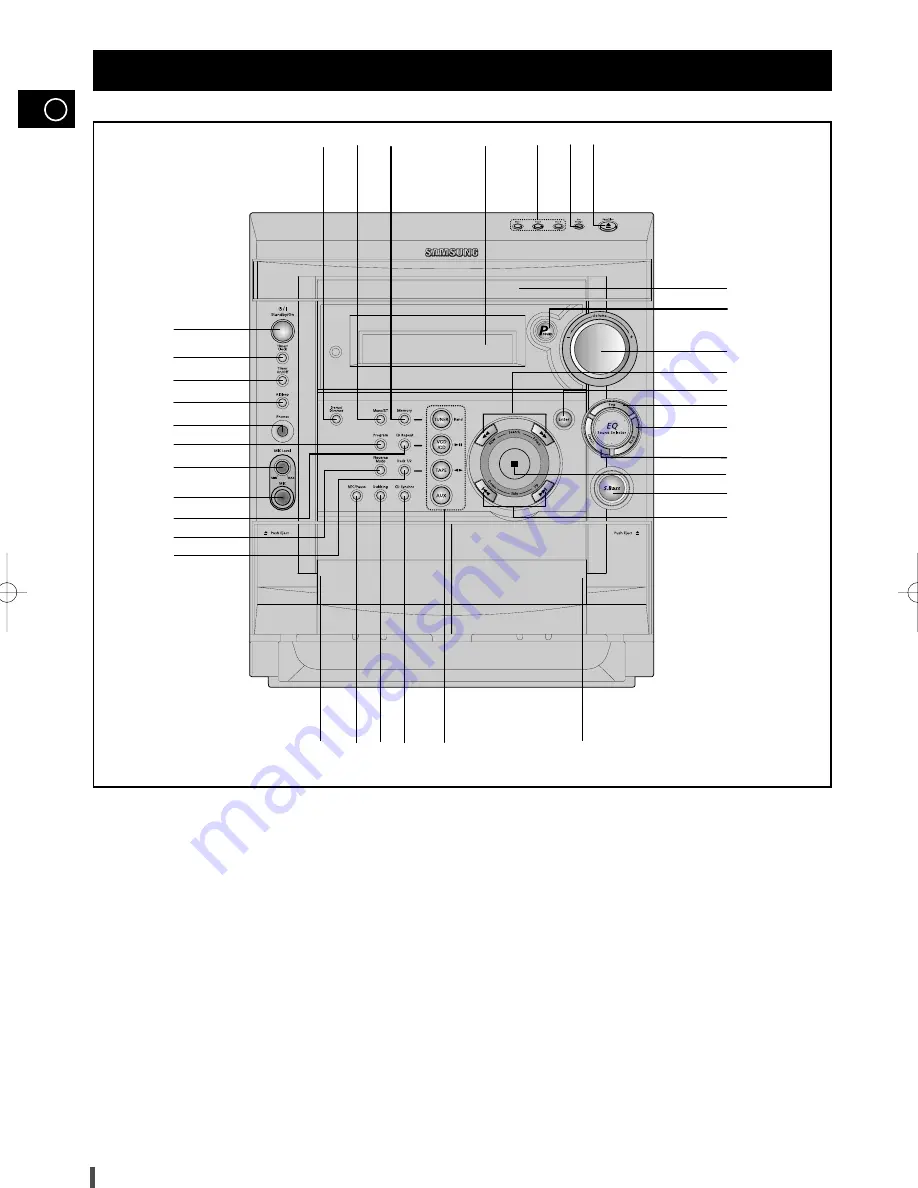
Front Panel View

1

2

3
4

5
6

7

8
9

11

12

13

15

14

16

17

18

19

20

21

22

23

24

25

26

28
27

29

30

32

33

34

31

10

35

1.

Standby/On    

2.

Timer/Clock      

3.

Timer On/Off   

4.

AI Sleep     

5.

Headphone Jack Connector  

6.

Program button 

7.

MIC Level (option)   

8.

MIC Jack(option)

9.

CD Repeat

10.

Reverse Mode 

11.

Deck 1/2  

12.   Cassette Deck 1
13.

Record/Pause   

14.   TAPE Normal Dubbing
15.

CD Synchro Recording

16.

Function Selection buttons

17.

Cassette Deck 2

18.

Skip Function buttons    

19.

Super.Bass

20.

Stop button

21.

EQ Preset Classic    

22.

EQ Preset Rock

23.

EQ Preset Pop

24.

Enter     

25.

Search Function buttons

26.

Volume   

27.

Power Sound

28.

Compact Disc Compartment

29.

CD Open/Close

30.

Disc Change 

31.

Disc Selection buttons

32.   Window Display   
33.

Memory Function

34.

Mono/Stereo

35.

Demo/Dimmer

 MAX-VS530 GB-1~18  10/17/03 16:03  Page 4

Содержание MAX-VS530

Страница 1: ...Instruction Manual THREE CD CHANGER VIDEO CD MINI COMPACT SYSTEM MP3 CD CD R RW PLAYBACK MAX VS530 ...

Страница 2: ... present inside this unit This symbol alerts you to important operating and maintenance instructions accompanying the unit WARNING To reduce the risk of fire or electric shock do not expose this appliance to rain or moisture CAUTION TO PREVENT ELECTRIC SHOCK MATCH WIDE BLADE OF PLUG TO WIDE SLOT FULLY INSERT CLASS 1 LASER PRODUCT KLASSE 1 LASER PRODUKT LUOKAN 1 LASER LAITE KLASS 1 LASER APPARAT PR...

Страница 3: ...16 When adjusting play speed 17 NTSC PAL Selection Method 17 Sound Select Function 17 KEY CONTROL Function 17 VCD View Function 18 ZOOM Function 18 Last Memory Function 18 TUNER Searching for and Storing the Radio Stations 19 Selecting a Stored Station 19 Improving Radio Reception 19 TAPE DECK Listening to a Cassette 20 CD Synchro Record Feature 20 Recording a Compact Disc 20 Recording a Radio Pro...

Страница 4: ...se Mode 11 Deck 1 2 12 Cassette Deck 1 13 Record Pause 14 TAPE Normal Dubbing 15 CD Synchro Recording 16 Function Selection buttons 17 Cassette Deck 2 18 Skip Function buttons 19 Super Bass 20 Stop button 21 EQ Preset Classic 22 EQ Preset Rock 23 EQ Preset Pop 24 Enter 25 Search Function buttons 26 Volume 27 Power Sound 28 Compact Disc Compartment 29 CD Open Close 30 Disc Change 31 Disc Selection ...

Страница 5: ... 13 AI Sleep 14 VCD CD Shuffle Play MP3 CD Random Play 15 VCD Sound 16 VCD Slow Play 17 Key Control 18 Key Control 19 Return 20 Time Search Last Memory 21 TAPE Stop 22 TAPE Play 23 Tuner Band 24 Tuning Mode 25 Volume Increase 26 Disc Number Skip 27 Disc Play Pause 28 Track Next 29 Disc View 30 Sound Mode 31 Super Bass 32 Timer On Off 33 Mute 18 17 19 20 21 22 24 23 25 26 27 28 29 30 31 32 33 2 1 4...

Страница 6: ...7 8 5 6 GB 6 1 FM Aerial Connector Terminal 2 AM Aerial Connector Terminals 3 AUX Input 4 Loudspeaker Connector Terminals 5 Voltage Selector option 6 SW Aerial Connector Terminal option 7 Audio DISC Output 8 Video DISC Output ...

Страница 7: ...tem Find that the remote control is no longer operating correctly When replacing the batteries use a new set of batteries and never mix alkaline and manganese batteries Place your thumb on the position marked on the battery compartment cover rear of the remote control and push the cover in the direction of the arrow Insert two AA LR6 or equivalent batteries taking care to respect the polarities on...

Страница 8: ...is displayed Switch the external source on Adjust the volume and balance as required Volume Equalizer Example You can watch a film and take advantage of stereo sound provided that the original sound track is in stereo as if you were in a cinema Connecting to an External Source 1 2 3 4 5 6 L R Directions in Installing Speaker Installation in a place near heating apparatus under direct lay of light ...

Страница 9: ...with the Audio Input Terminals Left Right of the Video Input Cassette Recorder so as to Record VCD Using the Video Cord Connect the Video Output Terminal of the system with the Video Input Terminal of TV Turn on the TV and Select the Video mode by pressing the TV VIDEO SELECT button to the VIDEO Position Please Pay Attention not to Connect the Audio Output Terminals left right of the System with t...

Страница 10: ...tes Decrease the minutes When the correct time is displayed press Enter Result The clock starts and is displayed even when the system is in standby mode You can display the time even when you are using another function by pressing Timer Clock once All functions available on the system can be viewed on the display and the display s brightness can be switched between on and off Press the Demo Dimmer...

Страница 11: ...bles the playback of audio CD CD R CD RW and MP3 CD and does not possess the function that saves MP3 files Do not use CDs of irregular shapes like heart or octagon shapes The performance of the player may be degraded At least more than one CD should be inserted for playbacks Press the Standby On button to switch on the power Press the VCD CD of the main unit to select the CD function Insert more t...

Страница 12: ...lt All the discs will be played in turn starting with the one selected If you wish to play the current disc only press CD Repeat on the front panel one or more times until 1 CD is displayed If you use the Disc 1 2 3 function when listening to the radio or to a tape the system switches automatically to the CD mode If the disc selected is not loaded the next disc is played automatically Selecting a ...

Страница 13: ...ample If you want to select track 43 during playback of track 15 press the 10 0 button four times and then press the button three times or Digit 3 button once Function to skip through 10 tracks at a time In selecting a track on MP3 CD digit 0 will be entered if the button of 10 0 is pressed Example If you want to select a track 40 during the playback of a certain track press both buttons of 4 and ...

Страница 14: ...nt track by pressing When you have finished the random playback press or press the Shuffle button again The Repeat and CD Synchro function is not supported from the Shuffle playback mode Playback of video CD Version 2 0 When pressing the Shuffle button during the playback the operation will stop When pressing the Shuffle button during the stop the playback will operate with reading the video CD Ve...

Страница 15: ... should be stopped This function may be used simultaneously with the CD Repeat function If the CD function is selected stop the player by pressing Load the selected CDs Press Program Result The following indications are displayed 01 Programme No DI Disc No Track No on the disc If necessary select the disc containing the required track by pressing the corresponding Disc 1 2 3 button Select the requ...

Страница 16: ...ll picture Result Pause is displayed a still picture appears and the sound is muted To return to normal playback press VCD CD button Press the Stop button to stop playback Please make sure that the VIDEO CD S to be played is not flawed optically as this may cause a distorted sound or the unit to malfunction Video CD Player Playback 1 2 3 4 5 6 7 8 You can find a certain passage faster during playb...

Страница 17: ...l parts is played back through both the right and left speakers Rch MONO Only the right channel vocal parts is played back through both the right and left speakers STEREO Cancels the Multiplex Sound normal stereo playback resumes You can select between listening to the tone from the left channel the right channel or both channels Sound Select Function Lch MONO Rch MONO STEREO L CH R CH This functi...

Страница 18: ...e in the state of double sized zoom Result The picture being reproduced is enlarged four times as large as the initial one Press Zoom button in the state of four times sized zoom Result The picture will return to the initial size During operating the zoom function if you want to move the picture upward downward leftward rightward please press the respective Digits button 2 4 6 8 ZOOM Function When...

Страница 19: ...e by pressing Mono ST If you do not want to store the radio station found revert to Step 4 and search for another station Otherwise a Press Memory Result The PRGM is displayed for a few seconds b Press Tuning Down and Up to assign a programme number between 1 and 15 c Press Memory to store the radio station Result PRGM is no longer displayed and the station is stored To store any other radio frequ...

Страница 20: ... two different ways Synchronised recording Direct recording This feature enables you to synchronize the start of the recording with the start of the disc or track of your choice Switch the system on by pressing Standby On Insert a blank cassette in Deck 2 Select the CD function by pressing VCD CD on the front panel Load a compact disc Select the required disc Select the required track and press CD...

Страница 21: ...to insert the tape to be copied in Deck 2 as it will be erased when you start recording Switch your system on by pressing Standby On Insert a blank cassette in Deck 2 Insert the tape to be copied in Deck 1 To copy a cassette at Press Normal speed dubbing Dubbing Result The appropriate indications are displayed and the cassette in Deck 1 is copied to the cassette in Deck 2 Press on the front panel ...

Страница 22: ...ttons d Press Enter Result VOL XX is displayed where XX corresponds to the vol ume already set Press Tuning Down and Up to adjust the volume level and press Enter Result The source to be selected is displayed pressing the buttons to select the source to be played when the system switches on If you select You must also TAPE cassette Insert a recorded cassette in one of the decks before setting the ...

Страница 23: ...ower Sound The function of Power Sound amplifies bass and improves high key or bass twice as much for you to appreciate powerful real sound To select P SOUND Press P SOUND button on the front panel P SOUND is displayed To cancel this function press P SOUND button again and OFF is displayed for a few seconds Selecting an Equalizer Preset Power Sound Function Mute Function 2 1 You can freely set the...

Страница 24: ...is function makes the sound more powerful and real Press the S Bass button on the front panel Result S BASS is displayed and SBS ON is displayed for a few seconds To cancel this function press S Bass button again You can connect a set of headphones to your mini compact system so that you can listen to music or radio programmers without disturbing other people in the room The earphones must have a ...

Страница 25: ...ng appliances or in direct sunlight etc If the unit emits an unpleasant odor when in use unplug it from the main supply and contact the after sales service Cleaning Your Mini Compact System 1 1 2 2 3 2 1 VOLUME UP DOWN The following diagrams illustrate the precautions to be taken when using or moving your mini compact system Safety Precautions Ambient operating conditions Ambient temperature 5 C 3...

Страница 26: ... does not work In case it does not work even the action is taken as above The compact disc player does not start playing The mp 3 CD player cannot be played The tape does not start playing The volume falls off The cassette is not erased correctly There is excessive wow and flutter Reception is poor or no radio sta tions are received at all G E N E R A L C D M P 3 C D R A D I O C A S S E T T E S Ch...

Страница 27: ...e ratio 58 dB Usable sensitivity 10 dB Total harmonic distortion 0 6 COMPACT DISC PLAYER Capacity 3 discs Frequency range 20 Hz 20 KHz 1 dB Signal noise ratio 85 dB at 1 KHz with filter Distortion 0 05 at 1 KHz Channel separation 74 dB Disc sizes Diameter 120 or 80 mm Thickness 1 2 mm TAPE DECK Frequency range 125 Hz 8 KHz Signal noise ratio 40 dB Channel separation 35 dB Erasing effect 50 dB AMPL...

Страница 28: ...ELECTRONICS THIS APPLIANCE IS MANUFACTURED BY AH68 01231A ...

Отзывы: