background image

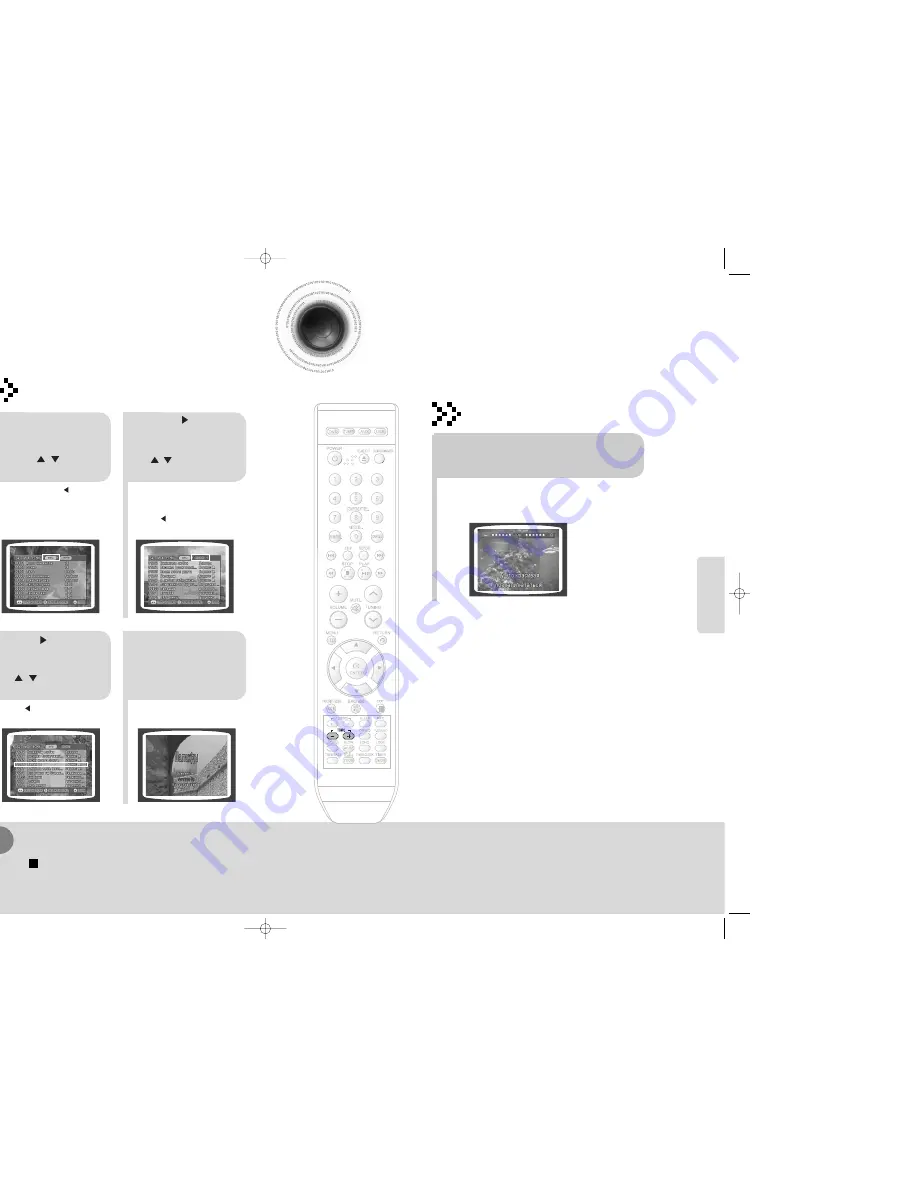
Search Song Function

You can easily do song search on screen without viewing the song list book.

2

1

4

3

During the stop mode,
press the 

SEARCH

SONG

button and then

press      ,      button to
select the HITS SONGS.

Press       button to
move to the detailed
items and then press   

,    button to select

the hits song.

Press       button to move
to the song list on the
bottom and then press     

,      button to select

the song you want.

Press the 

ENTER

button to play back
selected song.

Searching by HITS SONGS

Press        button if you want to
move to the previous stage.

To Exit Search Song Screen

• Press       (STOP) button or 

SEARCH SONG

button.

At this time, press        button to
move to the song list on the
bottom.

You can select the song among

MODERN

➝ 

30-60S

➝ 

70S/80S

CHILDREN

➝ 

ARMY

.

Press       button if you want to move
to the previous stage.

Tempo Control

• 

Each time 

+

button is pressed, the tempo gets faster,

and each time 

button is pressed the tempo gets

slower.

During the playback, press the

TEMPO

buttons.

Tempo Control

You can easily do song search on screen without viewing the song list book.

57

58

SETUP

36P~76P(kX75/76)-NO GB-5.11  2007.5.23  1:40 PM  Page 50

Содержание MAX-KX75

Страница 1: ...DVD KARAOKE MINI SYSTEM DVD CD MP3 CD CD R RW PLAYBACK MAX KX75 Instruction Manual AH68 01939A UFACTURED BY V I D E O COMPACT DIGITAL VIDEO M Page 2 ...

Страница 2: ...ing the winter wait approximately 2 hours until the unit has reached room temperature before using During thunderstorms disconnect AC main plug from the wall outlet Voltage peaks due to lightning could damage the unit Do not expose the unit to direct sunlight or other heat sources This could lead to overheating and malfunction of the unit The battery used with this product contain chemicals that a...

Страница 3: ...ent Music 49 Priority Playing Accompaniment Music 50 Favorite Song Function 51 Search Song Function 53 Tempo Control 58 Male Female Key Control 59 Setting the chorus 60 Setting the Fanfare 61 Setting the Average Score 62 RADIO OPERATION Listening to Radio 63 Presetting Stations 64 MISCELLANEOUS Timer Function 65 Canceling the Timer 66 POWER SOUND and Sound Field DSP EQ Function 67 Sleep Timer Func...

Страница 4: ...t format can be played JPEG file names should be 8 characters or less in length and contain no blank spaces or special characters Only a consecutively written multisession disc can be played If there is a blank segment in the multisession disc the disc can be played only up to the blank segment A maximum of 9 999 images can be stored on a single CD When playing a Kodak Fuji Picture CD only the JPE...

Страница 5: ...hese jacks 3 SCART JACK 4 HDMI OUT 5 LINE OUT 6 Video Output Connector Connect the TV s video input jacks VIDEO IN to the VIDEO OUT connector 7 2 0 Channel Speaker Output Terminals 15 KEY CONTROL 16 DEMO DIMMER 17 ECHO 18 TREBLE 19 MULTI JOG 20 ENTER 21 USB 22 AUX 23 VOLUME 24 EJECT BUTTON 13 14 16 15 17 18 19 20 22 21 24 23 7 of SEARCH BUTTON on the main set and the DVD KARAOKE DISC SONG LIST BOO...

Страница 6: ...eters in a straight line It can also be operated at a horizontal angle of up to 30 from the remote control sensor Range of Operation of the Remote Control Caution Remove the battery cover in the direction of the arrow 1 Insert two 1 5V AAA batteries paying attention to the correct polarities and 2 Replace the battery cover 3 Follow these precautions to avoid leaking or cracking cells Place batteri...

Страница 7: ...Choose one of the four methods for connecting to a TV If your television is equipped with Component Video inputs connect a Component video cable not supplied from the Component Video Output Pr Pb and Y jacks on the back of the DVD Player to the Component Video Input jacks on your TV COMPONENT SELECT Function 1 With the main unit turned off press and hold the COMPONENT SEL button on the remote cont...

Страница 8: ...MI connection cable and audio is output through your TV speakers only OFF Video is transmitted over the HDMI connection cable only and audio is output through the home theater speakers only Press the RETURN button to return to the previous level Press the EXIT button to exit the setup screen Setting the HDMI Audio MOVE ENTER EXIT RETURN MOVE SELECT EXIT RETURN 14 The default setting of this functi...

Страница 9: ... holes are covered with a newspaper or cloth heat may build up inside the unit and fire may result Cooling Fan FM antenna connection 1 Connect the FM antenna supplied to the FM 75Ω COAXIAL terminal as a temporary measure 2 Slowly move the antenna wire around until you find a location where reception is good then fasten it to a wall or other rigid surface If reception is poor connect an outdoor ant...

Страница 10: ...n Video Mode and then finalized Where a particular DVD type is mentioned it is indicated separately If a DVD R RW disc has not been recorded properly in DVD Video format it will not be playable DVD Icon Term Definition DVD CD MP3 JPEG DivX CAUTION NOTE DVD CD CD MP3 JPEG DivX This involves a function available with DVD or DVD R DVD RW discs that have been recorded and finalized in Video Mode This ...

Страница 11: ...pending on the recording mode some MP3 WMA CDs may not play Table of contents of a MP3 CD varies depending on the MP3 WMA track format recorded on the disc Note 2 In Stop mode use to select the album and then press the ENTER button The MP3 WMA menu screen will appear and playback will start The appearance of the menu depends on the MP3 WMA disc WMA DRM files cannot be played Use to select the trac...

Страница 12: ...contain the audio and video data these must be stored on CD in the ISO 9660 format MPEGs containing DivX can be divided into Video and Audio Video compatibility All versions of DivX later than 3 11 including the latest 5 1 are supported In addition XviD is supported For WMV V1 V2 V3 and V7 formats are possible The initial resolution is 720X480 and may support up to 720X576 Audio compatibility MP3s...

Страница 13: ...r are not supported 4 USB HDD and USB Flash Drive Devices that support USB2 0 or USB1 1 You may experience a difference in playback quality when you connect a USB1 1 device For a USB HDD make sure to connect an auxiliary power cord to the USB HDD for proper operation 5 USB card Reader One slot USB card reader and Multi slot USB card reader Depending on the manufacturer the USB card reader may not ...

Страница 14: ...VD disc at is a Chapter ch title on a DVD disc is divided into several smaller sections called chapters appears on the TV screen his symbol appears on the TV screen while buttons are being operated that eration is not possible with the disc currently being played at is a Track File ection of video or a music file recorded on a CD or MP3 CD TRACK FILE display AUDIO LANGUAGE display SUBTITLE display...

Страница 15: ...time the button is pressed the angle changes as follows 3 Press Cursor buttons or numeric buttons to select the desired angle The Angle function works only with discs on which multiple angles have been recorded Note g Scenes Songs MP3 ng playback the previous or next chapter y 28 OPERATION ion DVD time the button is pressed nd step motion playback M Page 30 ...

Страница 16: ... CD Press INFO button once Playback epeatedly play a chapter title track song or directory MP3 file k the repeat playback mode changes as follows P3 JPEG CHAPTER Repeatedly plays the selected chapter TITLE Repeatedly plays the selected title RANDOM Plays tracks in random order A track that has already been played may be played again TRACK Repeatedly plays the selected track DIR Repeatedly plays al...

Страница 17: ...TER button th DivX MP3 or JPEG discs e REPEAT PLAYBACK display A and then press the ENTER egment ed position will be stored in memory he desired segment y Cursor button to select JPEG File Playback Images captured with a digital camera or camcorder or JPEG files on a PC can be stored on a CD and then played back with this DVD player JPEG Rotate Flip Function button Flip Vertically button Flip Hori...

Страница 18: ...n press ENTER button 01 05 028 040 1 30 00 1 1 Moving to a Specific Time 3 Press Cursor buttons to move to Chapter display Moving to a Chapter 01 05 025 040 1 17 30 1 1 5 Press Cursor buttons to move to time display Moving to a Specific Time Press the numeric buttons You can press on the remote control to move directly to the desired title chapter or track Depending on the disc you may not be able...

Страница 19: ...le Menu DVD 1In stop mode Press MENU button 3 Press ENTER button The title menu appears Press EXIT button to exit the setup screen sc Menu audio language subtitle language profile etc disc to disc you select the disc menu that is not orted by the disc the This menu is not orted message appears on the screen Press Cursor buttons o move to DISC MENU and then press ENTER button Press ENTER button 36 ...

Страница 20: ...9 Hausa 1353 Moldavian 1513 Siswati 1052 Azerbaijani 1217 Hindi 1356 Marathi 1514 Sesotho 1053 Bashkir 1226 Croatian 1357 Malay 1515 Sundanese 1057 Byelorussian 1229 Hungarian 1358 Maltese 1516 Swedish 1059 Bulgarian 1233 Armenian 1363 Burmese 1517 Swahili 1060 Bihari 1235 Interlingua 1365 Nauru 1521 Tamil 1069 Bislama 1239 Interlingue 1369 Nepali 1525 Tegulu 1066 Bengali Bangla 1245 Inupiak 1376 ...

Страница 21: ...V select either 4 3PS or 4 3LB option according to personal preference Select WIDE HDTV if you have a widescreen TV Adjusting the TV Aspect Ratio Screen Size 4 3PS 4 3 Pan Scan Select this to play a 16 9 picture in the pan scan mode on a conventional TV You can see the central portion of the screen only with the sides of the 16 9 picture cut off 4 3LB 4 3 Letterbox Select this to play a 16 9 pictu...

Страница 22: ... aken to the previous screen 3 5 Press Cursor button to move to PARENTAL and then press ENTER button Enter the password and then press ENTER button Note 2 1 Press MENU button Press Cursor button to move to Setup and then press ENTER button 4 Enter the old password a new password and confirm new password The setting is complete 3 5 Press Cursor button to move to PASSWORD and then press ENTER button...

Страница 23: ...n to move to LOGO and then press ENTER button To Change the Wallpaper 5 4 Press EXIT button to exit the setup screen Press to select the desired USER and then press ENTER e as Select this to set the desired image as your wallpaper Press RETURN button to return to the previous level Press EXIT button to exit the setup screen 44 COPY LOGO DATA will be displayed on the TV screen displayed to set up t...

Страница 24: ...nnected with digital TV In this case adjust the delay time of audio to optimal status to fit the video Press Cursor buttons to move to AV SYNC and then press ENTER button Press the MENU button DRC Dynamic Range Compression o enjoy Dolby Digital sound when watching movies at 2 ss MENU button Press Cursor button to move to Audio and then press ENTER button 4 If DRC is selected press ENTER Press Curs...

Страница 25: ... the accompaniment starts 48 Press the STOP button o Clear Incorrectly Entered Song Numeric Press the STOP button o Stop During Accompaniment SETUP VD OK Discs only DVD Ok verison 6 disk is availabel Setting the Shadow 2 1 Load a DVD OK discs Press MENU button 3 Each time the button is pressed the selection changes as follows ON OFF 4 Press Cursor button to move to Shadow Press ENTER button to sel...

Страница 26: ...PAUSE button 50 Priority Playing Accompaniment Music SETUP To Cancel the Reservation 2 1 Enter the numeric of the song you have reserved Press the CANCEL button Each time the button is pressed the selection changes as follows REPEAT OFF REPEAT ONE REPEAT ALL RANDOM Press the REPEAT button DVD OK Repeat Play Note REPEAT function will not operate if RESERVE function is set while DVD OK is played Not...

Страница 27: ...n to save it ing FAVORITE SONG Saving FAVORITE SONG ng the stop mode press the FAVORITE SONG button s button to select the song to delete s the CANCEL button SETUP 52 2 1 4 3 During the stop mode press the FAVORITE SONG button Press button to select the location of song among FAVORITE 1 2 3 Press button to select the song you want Press the ENTER button to play back selected song Singing FAVORITE ...

Страница 28: ...to move to the detailed items and then press button to select the NAME or SINGER 4 5 Press button to move to the song list on the bottom and then press button to select the song you want Press the ENTER button to play back selected song To Exit Search Song Screen Press STOP button or SEARCH SONG button SETUP 54 Search by Language Press button if you want to move to the previous stage 3 Press butto...

Страница 29: ...ed items and then press button to select the genre you want Press button to move to the song list on the bottom and then press button to select the song you want Press the ENTER button to play back selected song Searching by Genre To Exit Search Song Screen Press STOP button or SEARCH SONG button Press button if you want to move to the previous stage Press button if you want to move to the previou...

Страница 30: ... Searching by HITS SONGS Press button if you want to move to the previous stage To Exit Search Song Screen Press STOP button or SEARCH SONG button At this time press button to move to the song list on the bottom You can select the song among MODERN 30 60S 70S 80S CHILDREN ARMY Press button if you want to move to the previous stage Tempo Control Each time button is pressed the tempo gets faster and...

Страница 31: ...ack press the FEMALE MALE button Male Female Key Control Setting the Chorus 2 1 Load a DVD OK discs Press MENU button 3 Each time the button is pressed the selection changes as follows ON OFF 4 Press Cursor button to move to Chorus Press ENTER button to select the desired item Note Chorus function may not work depending on information recorded in the disk You can set the chorus to ON or OFF 0 PM P...

Страница 32: ...tton to select the desired item out after singing a song Setting the Average Score 2 1 Load a DVD OK discs Press MENU button 3 Each time the button is pressed the selection changes as follows LOW MIDDLE HIGH RANDOM OFF 4 Press Cursor button to move to Average Score Press ENTER button to select the desired item You can set the grade of scores displayed in the screen in advance 0 PM Page 54 ...

Страница 33: ...Presetting FM 89 10 in the memory This unit does not receive AM broadcasts 1 Press the TUNER button to select the FM band 2 Press the button to select 89 10 3 Press the TUNER MEMORY button PRGM flashes in the display 4 Press the button to select preset number You can select between 1 and 15 presets 5 Press the TUNER MEMORY button again Press the TUNER MEMORY button before PRGM disappears from the ...

Страница 34: ...s POWER to set the system to standby mode t the hour by pressing or tton ess ENTER The minutes flash t the minutes by pressing or tton ess ENTER VOL 10 is displayed where 10 corresponds to the volume already set Set the timer switch off time 6 Press or button to adjust the volume level and press ENTER MISCELLANEOUS on and off times are identical the word ERROR is displayed Multi Jog or button on t...

Страница 35: ...F appears on the display MUTE appears in the display To turn off mute press the button again Mute Function This is useful when answering a doorbell or telephone call Press MUTE button kHz MHz kHz MHz nd sound field DSP EQ Function Turn DSP EQ on the front panel or Press DSP EQ on the remote control until the required option is selected Your mini compact system is equipped with a preset equalizer t...

Страница 36: ...nt panel to select from TRE 08 to TRE 08 total 9 steps 1 You can select the level of high tones you desire 2 n turn on the n this booklet to the n lable on To cancel this function press DEMO DIMMER again tton nction DIMMER Function tion Each time the button is press the brightness changes as follows DIMMER ON Dim DIMMER OFF Bright DIMMER Function You can adjust the brightness of the display on the...

Страница 37: ...st the MIC level Press the ECHO button to select ECHO1 ECHO2 and ECHO OFF During using the microphone you can press the REC PAUSE button to record your favorite When connected a MIC HDMI output is not available es n hones to your micro component system so that you grammers without disturbing other people in the room ø jack or an appropriate adapter igh F when Plug the microphone with a 6 3ø MIC ja...

Страница 38: ...de but 4 3 DVDs can be seen in 4 3 ratio only Refer to the DVD disc jacket and then select the appropriate function Aspect ratio cannot be changed alling for Service s unit does not function properly If the problem you are experiencing is not elow does not help turn off the unit disconnect the power cord and contact Samsung Electronics Service Center the power cord plugged securely into the outlet...

Страница 39: ...io S40 Pentax Digital Camera Optio S50 Pentax Digital Camera Optio 33LF Pentax Digital Camera Optio MX Pentax Digital Camera Digimax 420 Samsung Digital Camera Digimax 400 Samsung Digital Camera Sora PDR T30 Toshiba Digital Camera Coolpix 5900 Nikon Digital Camera Coolpix S1 Nikon Digital Camera Coolpix 7600 Nikon Digital Camera DMC FX7 Panasonic Digital Camera Dimage Xt Minolta Digital Camera AZ ...

Страница 40: ...optical disc on which high quality pictures and sound have been means of digital signals Incorporating a new video compression MPEG 2 and high density recording technology a DVD disc wo 0 6 mm thick discs bonded together D player and DVD discs are encoded with a region number number on the DVD disc does not correspond to the region number layer the player cannot play the disc ppearing at the botto...

Отзывы: