Samsung MAX-KC650 Скачать руководство пользователя страница 17

*

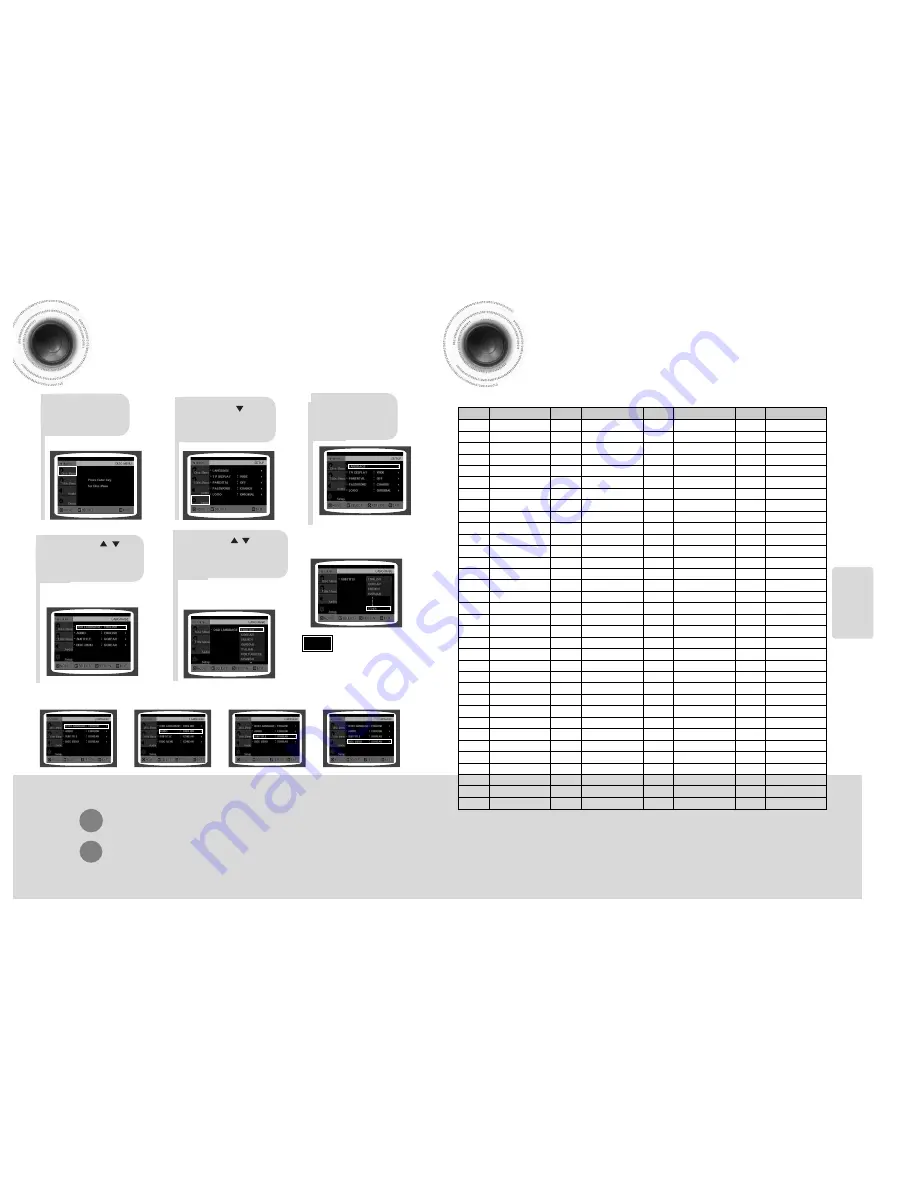
If the language you selected is
not recorded on the disc, menu
language will not change even
if you set it to your desired
language.

Selecting the 

OSD Language

Selecting the 

Audio Language

(recorded on the disc)

Setting the Language

OSD language is set to English by default.

2

1

Press 

MENU

button.

Press Cursor       button to

move to ‘Setup’ and then

press 

ENTER

button.

4

• Once the setup is complete, if the language was set

to English, OSD will be displayed in English.

3

Selecting the 

Subtitle Language

(recorded on the disc)

Selecting the Disc Menu

Language (recorded on the disc)

Press 

ENTER

button.

5

Press Cursor         ,        button to
select the desired item and then
press 

ENTER

button.

Press Cursor         ,         button to select
the desired language and then press

ENTER

button.

Press 

RETURN

button to return to the previous level.

Press 

MENU

button to exit the setup screen.

SETUP

31

32

• To select other language, select OTHER

and enter the language code of your
country. (See 32 page for language code
of countries)
AUDIO, SUB TITLE and DISC MENU
language can be selected. 

Note

Language Code List

Code

Language

Code

Language

Code

Language

Code

Language

1027

Afar

1181

Frisian

1334

Latvian, Lettish

1506

Slovenian

1028

Abkhazian

1183

Irish

1345

Malagasy

1507

Samoan

1032

Afrikaans

1186

Scots Gaelic

1347

Maori

1508

Shona      

1039

Amharic

1194

Galician

1349

Macedonian

1509

Somali  

1044

Arabic

1196

Guarani

1350

Malayalam

1511

Albanian  

1045

Assamese

1203

Gujarati

1352

Mongolian

1512

Serbian   

1051

Aymara

1209

Hausa

1353

Moldavian

1513

Siswati  

1052

Azerbaijani

1217

Hindi

1356

Marathi

1514

Sesotho   

1053

Bashkir

1226

Croatian

1357

Malay

1515

Sundanese  

1057

Byelorussian

1229

Hungarian

1358

Maltese

1516

Swedish   

1059

Bulgarian

1233

Armenian

1363

Burmese

1517

Swahili            

1060

Bihari                 1235

Interlingua

1365

Nauru

1521

Tamil             

1069

Bislama               1239

Interlingue

1369

Nepali

1525

Tegulu   

1066

Bengali; Bangla        1245

Inupiak

1376

Dutch

1527

Tajik              

1067

Tibetan               1248

Indonesian

1379

Norwegian

1528

Thai              

1070

Breton                1253

Icelandic

1393

Occitan

1529

Tigrinya           

1079

Catalan               1254

Italian

1403

(Afan) Oromo

1531

Turkmen  

1093

Corsican              1257

Hebrew

1408

Oriya

1532

Tagalog   

1097

Czech

1261

Japanese

1417

Punjabi

1534

Setswana  

1103

Welsh

1269

Yiddish

1428

Polish

1535

Tonga     

1105

Danish

1283

Javanese

1435

Pashto, Pushto 

1538

Turkish            

1109

German

1287

Georgian

1436

Portuguese

1539

Tsonga   

1130

Bhutani

1297

Kazakh

1463

Quechua

1540

Tatar              

1142

Greek

1298

Greenlandic

1481

Rhaeto-Romance

1543

Twi               

1144

English

1299

Cambodian

1482

Kirundi

1557

Ukrainian   

1145

Esperanto

1300

Kannada

1483

Romanian

1564

Urdu              

1149

Spanish

1301

Korean

1489

Russian

1572

Uzbek   

1150

Estonian

1305

Kashmiri

1491

Kinyarwanda

1581

Vietnamese   

1151

Basque

1307

Kurdish

1495

Sanskrit

1587

Volapuk    

1157

Persian

1311

Kirghiz

1498

Sindhi

1613

Wolof   

1165

Finnish

1313

Latin                 1501

Sangro

1632

Xhosa   

1166

Fiji

1326

Lingala                1502

Serbo-Croatian

1665

Yoruba 

1171

Faeroese

1327

Laothian              1503

Singhalese

1684

Chinese   

1174

French

1332

Lithuanian             1505

Slovak 

1697

Zulu

Enter the appropriate code number for the initial settings “Disc Audio”, “Disc Subtitle”
and/or “Disc Menu” (See page 31).

Содержание MAX-KC650

Страница 1: ...al AH68 01781A THIS APPLIANCE IS MANUFACTURED BY CD SYNCHRO FAVORITE SONG SEARCH SONG INFO MUT E RETU RN MENU VOLUME SOUND MODE TUNER MEMORY P SCAN TUNING OPEN CLOSE CANCEL DVD OK DVD TAPE TUNER RESERVE TUNER TAPE AUX SLEEP BAND TAPE 1 2 DISC SKIP ZOOM SLOW SUBTITLE STEP TEMPO KEY CONTROL FEMALE MALE MELODY AUDIO EZ VIEW SLIDE MODE REPEAT LOGO REMAIN ...

Страница 2: ...ic shock do not expose this appliance to rain or moisture CAUTION TO PREVENT ELECTRIC SHOCK MATCH WIDE BLADE OF PLUG TO WIDE SLOT FULLY INSERT CLASS 1 LASER PRODUCT KLASSE 1 LASER PRODUCT LUOKAN 1 LASER LAITE KLASS 1 LASER APPARAT PRODUCTO LASER CLASE 1 RISK OF ELECTRIC SHOCK DO NOT OPEN CAUTION TO REDUCE THE RISK OF ELECTRIC SHOCK DO NOT REMOVE REAR COVER NO USER SERVICEABLE PARTS INSIDE REFER SE...

Страница 3: ...l 52 Male Female Key Control Melody Function 53 Setting the Chorus 54 Setting the Fanfare 55 Setting the Average Score 56 Setting the Shadow 57 RADIO OPERATION Listening to Radio 58 Presetting Stations 59 TAPE DECK Listening to a Cassette 60 Selecting the Cassette Playback Mode 61 Tape Counter 61 Coping a Cassette Dubbing 62 Recording a Compact Disc 63 Recording a Radio Program 65 MISCELLANEOUS Ti...

Страница 4: ... these jacks 8 Video Output SELECT 9 Speaker Connector Terminals 10 SCART JACK Connect to a TV with scart input jack 11 Voltage Selector Option 9 10 11 1 STANDBY ON 2 FUNCTIONS SELECT BUTTONS 3 DEMO DIMMER 4 ECHO 5 MIC LEVEL Option 6 RESERVE 7 MIC Option 8 CANCEL 9 PHONES 10 CASSETTE DECK 1 11 SEARCH FUNCTIONS BUTTONS TUNING MODE OR STOP BUTTONS 12 REC PAUSE 13 DUBBING 14 CD SYNCHRO 15 TAPE 1 2 16...

Страница 5: ...r flame Remote Control 7 Description Caution VOLUME button SOUND MODE button MENU button RETURN button SEARCH SONG button POWER button TAPE PLAY button CANCEL button FEMALE MALE button SLIDE MODE button REPEAT button MELODY button AUDIO button KEY CONTROL button TEMPO button TUNER BAND button SLEEP button TAPE 1 2 button Number 0 9 buttons RESERVE button AUX button INFO button MUTE button Directio...

Страница 6: ...duct be sure to turn off the power and disconnect the power cord Speakers Place these speakers in front of your listening position facing inwards about 45 toward you Place the speakers so that their tweeters will be at the same height as your ear Position of the DVD Player Place it on a stand or cabinet shelf or under the TV stand Selecting the Listening Position The listening position should be l...

Страница 7: ...ng gaps left by the odd field to form a single frame One frame displayed every 1 30th of a second contains two interfaced fields thus a total of 60 fields are displayed every 1 60th of a second The interlaced scanning method is intended for capturing a still object Interlaced Scan 1 FRAME 2 FIELDS The progressive scanning method scans one full frame of video consecutively down the screen line by l...

Страница 8: ...a wire around until you find a location where reception is good then fasten it to a wall or other rigid surface If reception is poor connect an outdoor antenna Before attaching a 75Ω coaxial cable with a standard type connector disconnect the supplied FM antenna 1 Connect the AM loop antenna supplied to the AM and terminals 2 If reception is poor connect an outdoor single vinyl covered wire to the...

Страница 9: ...r each step you have a few seconds to set the required options If you exceed this time you must start again CLOCK is displayed 2 Press TIMER CLOCK twice 1 Switch the system on by pressing POWER button TIMER appears in the display The current time is now set 5 When the correct time is displayed press ENTER Increase the minutes Decrease the minutes 4 When the correct hour is displayed press ENTER Th...

Страница 10: ...o 320kbps AC3s from 128kbps to 448kbps and WMAs from 56kbps to 160kbps are supported In addition for subtitles this unit will support Text format SMI SPEC VIDEO Compatibility DivX3 11 Up to the latest VERSION WMV WMV V1 V2 V3 V7 AUDIO Compatibility MP3 CBR 80kbps 320kbps AC3 CBR 128kbps 448kbps WMA CBR 56kbps 160kbps Each time you press the button your selection will toggle between SUBTITLE ON and...

Страница 11: ...sible with the disc currently being played Screen Display CD display VCD display DVD display CHAPTER display TITLE display MP3 CD display REPEAT PLAYBACK display ELAPSED TIME display TRACK FILE display STEREO L R display SUBTITLE display AUDIO LANGUAGE display ANGLE display DOLBYDIGITALdisplay Depending on the disc the disc information display may appear different Note DivX DivX display Reverse sl...

Страница 12: ...ack or directory file will be played But you cannot skip chapters consecutively The picture moves forward one frame each time the button is pressed during playback Playing Frame by Frame Press STEP button When watching a VCD with a track longer than 15 minutes each time is pressed playback will skip back or forward 5 minutes TITLE 01 05 CHAPTER 002 040 TITLE 01 05 CHAPTER 004 040 Something like yo...

Страница 13: ... 1 Press Cursor button to move to REPEAT PLAYBACK display 2 Press Cursor button to select the desired Repeat Playback mode 3 DVD VCD CD For MP3 and JPEG discs you cannot select Repeat Play from the information display screen Press ENTER button 4 DVD VCD CD MP3 JPEG Repeat Playback Options Note Zoom Function This function allows you to enlarge a particular area of the displayed image Zoom Screen En...

Страница 14: ...ng to a Specific Time Press the numeric buttons You can press on the remote control to move directly to the desired title chapter or track Depending on the disc you may not be able to move to the selected title or time Something like you Back for good Love of my life More than words I need you My love Uptown girl DVDRECEIVER SMARTNAVI SELECT 03 Move Select Stop Note Selecting Audio Subtitle Langua...

Страница 15: ...tray Each time the button is pressed the slide moves backward or forward Press to skip to the next slide 1 Playback starts automatically Each image is shown for 5 seconds before another image is displayed Press the OPEN CLOSE button 2 Playback starts automatically Each time the button is pressed the image makes the transition as follows Press SLIDE MODE button 3 From top to bottom From bottom to t...

Страница 16: ...een PBC ON and OFF When you select the disc menu that is not supported by the disc the This menu is not supported message appears on the screen 1Press MENU button Press Cursor buttons to move to DISC MENU and then press ENTER button 4 Press ENTER button 3 Press Cursor buttons to select the desired item PBC Playback Control Function When playing a VCD version 2 0 you can select and view various sce...

Страница 17: ...lian 1512 Serbian 1051 Aymara 1209 Hausa 1353 Moldavian 1513 Siswati 1052 Azerbaijani 1217 Hindi 1356 Marathi 1514 Sesotho 1053 Bashkir 1226 Croatian 1357 Malay 1515 Sundanese 1057 Byelorussian 1229 Hungarian 1358 Maltese 1516 Swedish 1059 Bulgarian 1233 Armenian 1363 Burmese 1517 Swahili 1060 Bihari 1235 Interlingua 1365 Nauru 1521 Tamil 1069 Bislama 1239 Interlingue 1369 Nepali 1525 Tegulu 1066 ...

Страница 18: ...t your TV or monitor For a standard TV select either 4 3LB or 4 3PS option according to personal preference Select 16 9 if you have a wide screen TV Select this to view a 16 9 picture in the full screen mode on your wide screen TV You can enjoy the wide screen aspect Select this to play a 16 9 picture in the letter box mode on a conventional TV Black bars will appear at the top and bottom of the s...

Страница 19: ...d Level 6 you cannot view DVDs with Level 7 or higher The higher the level the closer the content is to violent or adult material 3 5 Press Cursor button to move to PARENTAL and then press ENTER button Press Cursor button to select the desired rating level and then press ENTER button Enter the password and then press ENTER button Note 2 1 Press MENU button Press Cursor button to move to Setup and ...

Страница 20: ...press ENTER button To Change the Wallpaper 5 4 Press MENU button to exit the setup screen Press to select the desired USER and then press ENTER Select this to set the Samsung Logo image as your wallpaper Select this to set the desired image as your wallpaper Press RETURN button to return to the previous level Press MENU button to exit the setup screen 37 38 COPY LOGO DATA will be displayed on the ...

Страница 21: ... Cursor button is pressed the greater the effect and the Cursor button is pressed the smaller the effect SETUP AV SYNC Setup Audio menu appears 2 1 Setup menu appears AV SYNC screen appears 3 Press Cursor buttons to move to Audio and then press ENTER button Press Cursor buttons to move to AV SYNC and then press ENTER button Press the MENU button 4 You can set the audio delay time between 0 ms and ...

Страница 22: ... Entered Song Numeric Press the STOP button To Stop During Accompaniment Connecting Microphone 2 1 You can connect up to one microphones Each time the button is pressed the selection changes as follows ECHO 1 ECHO 2 ECHO OFF Turn the MIC LEVEL to adjust the volume of the micro phone Connect the microphone to the MIC jack on the front panel 3 Press the ECHO button Note To record your voice with mic...

Страница 23: ...0 9 buttons to select the song you want to play back Press the PLAY PAUSE button 43 44 Priority Playing Accompaniment Music SETUP To Cancel the Reservation 2 1 Enter the numeric of the song you have reserved Press the CANCEL button Each time the button is pressed the selection changes as follows REPEAT OFF REPEAT ONE REPEAT ALL RANDOM Press the REPEAT button DVD OK Repeat Play Note REPEAT function...

Страница 24: ... want Press the RESERVE button to save it Deleting FAVORITE SONG Saving FAVORITE SONG 45 1 During the stop mode press the FAVORITE SONG button 2 Press button to select the song to delete 3 Press the CANCEL button SETUP 46 2 1 4 3 During the stop mode press the FAVORITE SONG button Press button to select the location of song among FAVORITE 1 2 3 Press button to select the song you want Press the EN...

Страница 25: ...ect 4 5 Press button to move to the song list on the bottom and then press button to select the song you want Press the ENTER button to play back selected song To Exit Search Song Screen Press STOP button or SEARCH SONG button SETUP 47 48 Search by Language Press button if you want to move to the previous stage 3 Press button if you want to move to the previous stage Press button to move to alphab...

Страница 26: ...utton to move to the detailed items and then press button to select the genre you want Press button to move to the song list on the bottom and then press button to select the song you want Press the ENTER button to play back selected song Searching by Genre To Exit Search Song Screen Press STOP button or SEARCH SONG button Press button if you want to move to the previous stage Press button if you ...

Страница 27: ...previous stage To Exit Search Song Screen Press STOP button or SEARCH SONG button At this time press button to move to the song list on the bottom You can select the song among MODERN 30 60S 70S 80S CHILDREN ARMY Press button if you want to move to the previous stage Key Control Tempo Control Each time button is pressed the key is increased and each time b button is pressed the key is decreased Du...

Страница 28: ...ction changes as follows OFF MILD STANDARD STRONG Select Melody ON to hear to the melody during accompaniment During the playback press the MELODY button Melody Function Setting the Chorus 2 1 Load a DVD OK discs Press MENU button 3 Each time the button is pressed the selection changes as follows LOW MIDDLE HIGH OFF 4 Press Cursor button to move to Chorus Press ENTER button to select the desired i...

Страница 29: ...button to select the desired item You can set Fanfare to come out after singing a song Setting the Average Score 2 1 Load a DVD OK discs Press MENU button 3 Each time the button is pressed the selection changes as follows LOW MIDDLE HIGH OFF 4 Press Cursor button to move to Average Score Press ENTER button to select the desired item You can set the grade of scores displayed in the screen in advanc...

Страница 30: ...og Knob to select the preset station AutomaticTuning1 Press the TUNER button to select the desired band FM AM Press the STOP button to select AUTO and then press and hold button or turn Multi Jog Knob to automatically search the band AutomaticTuning2 Press STOP to select MANUAL and then briefly press or turn Multi Jog Knob to tune in to a lower or higher frequency Manual Tuning Each time the butto...

Страница 31: ... FM Frequency Modulation AM Medium Wave You can store up to 15 stations each for FM and AM Listening to a Cassette Always treat your cassettes with care refer if necessary to the section entitled Precautions When Using Audio Cassettes on page 73 Insert a cassette with the recording playback side facing the cassette holder and then push the cassette door shut 2 1 3 Press TAPE on the player to selec...

Страница 32: ...e decks a counter is displayed to enable you to take note of the counter value at the start of each track to start playback at the beginning of the track to which you wish to listen Selecting the Cassette Playback Mode Tape Counter TAPE DECK Coping a Cassette Dubbing You can copy a cassette from TAPE 1 to TAPE 2 Normal speed dubbing in selecting Tape function mode You do not need to adjust the vol...

Страница 33: ... played 5 4 Use the CD selection buttons to select the desired song Load a compact disc Press CD SYNCHRO button 6 To stop recording press button Press the DVD OK button Synchronised recording Note You can use CD SYNCHRO button only in CD Playback Mode 64 Press the OPEN CLOSE button to open the CD door Insert a CD and press the OPEN CLOSE button to close the CD door Press the PUSH EJECT button to o...

Страница 34: ...f the equalizer symbols for a few seconds followed by any switch on time already set you can set the timer switch on time The source to be selected is displayed 2 1 3 Switch the system on by pressing STANDBY ON Press TIMER CLOCK until TIMER is displayed Press the ENTER button 7 Press or button to select the source to be played when the system switches on 5 4 a Set the hour by pressing or button b ...

Страница 35: ...alance suitable for hall HALL Balance suitable for live LIVE Balance suitable for cinema CINEMA Turn SOUND MODE on the front panel or Press SOUND MODE on the remote control until the required option is selected Selecting SOUND MODE Your mini compact system is equipped with a preset equalizer that allows you to choose the most appropriate balance between treble and bass frequencies according to the...

Страница 36: ... again Mute Function This is useful when answering a doorbell or telephone call Press MUTE button Sleep Timer Mute Function MISCELLANEOUS The various functions available are listed in turn on the display All these functions are described in detail in this booklet For instructions on how to use them refer to the appropriate sections DEMO Function You can view the various functions available on your...

Страница 37: ...ing Discs Cautions on Handling and Storing Discs Small scratches on the disc may reduce sound and picture quality or cause breaks in playback Be especially careful not to scratch discs when handling them Condensation may form if warm air comes into contact with cold parts inside the player When condensation forms inside the player the player may not operate correctly If this occurs remove the disc...

Страница 38: ...being operated within its operation range of angle and distance Are the batteries exhausted The remote control does not work Audio language and subtitles will not work for DVDs not containing them And depending on the disc they may work differently Audio language and subtitles do not work The TAPE function has not been selected The cassette has not been inserted correctly The cassette player has n...

Страница 39: ...of 500 tracks can be played If more than 300 folders are recorded on a single CD a maximum of 300 folders can be played What is MP3 MP3 is short for MPEG 1 Audio Layer 3 and MPEG is an acronym for Moving Pictures Experts Group MP3 is a file format with compression ratio of 1 12 128 Kbps That is you can use MP3 format to record about 12 times the usual amount of data on a regular CD Notes on Discs ...

Страница 40: ... Signal noise ratio 85 dB at 1 KHz with filter Distortion 0 05 at 1 KHz Channel separation 75 dB Disc sizes Diameter 120 or 80 mm Thickness 1 2 mm TAPE DECK Frequency range 125 Hz 10 KHz Signal noise ratio 40 dB Channel separation 30 dB Erasing effect 50 dB without filter AMPLIFIER Output power Main Speaker 6 Ω 80 Watts CH RMS IEC total harmonic distortion 10 Channel separation 40 dB Signal noise ...

Отзывы: