background image

ENG

OPERATION

26

USB Host Specification 

USB Host Specification

• Supports USB 1.1 or USB 2.0 compliant devices.
• Supports devices connected using the USB A type cable.
• Supports UMS (USB Mass Storage Device) V1.0 compliant devices.
•  Supports the device of which the connected drive is formatted in the FAT(FAT, FAT16, 

FAT32) file system.

Non-compliance

•  Does not support a device that requires installing a separate driver on the PC (Windows).
•  Does not support connection to a USB hub.
•  A USB device that is connected using the USB extension cable may not be recognized.
•  A USB device requiring a separate power source needs to be connected to the player 

with the separate power connection.

Operational Limitations

•  If the connected device has multiple drives (or partitions) installed, only one drive 


(or partition) can be connected.

•  A device supporting USB 1.1 alone may cause a difference in the picture quality, 

depending on the device.

Compliant Devices

USB Storage Device

1. 

MP3 Player

2. 

Digital Camera

3. 

Removable HDD

4. 

Removable HDDs equipped with less than 160 Gbytes are supported. Removable HDDs 

• 

equipped with 160Gbytes or more may not be recognized, depending on the device.
If the connected device does not work due to insufficient power supply, you can use a separate 

• 

power cable to supply power so that it can work properly. The connector of the USB cable may 
differ, depending on the manufacturer of the USB device.

USB card Reader: One slot USB card reader and Multi slot USB card reader.

5. 

Depending on the manufacturer. the USB card reader may not be supported.

• 

If you install multiple memory devices into a multi card reader, you may experience problems.

• 

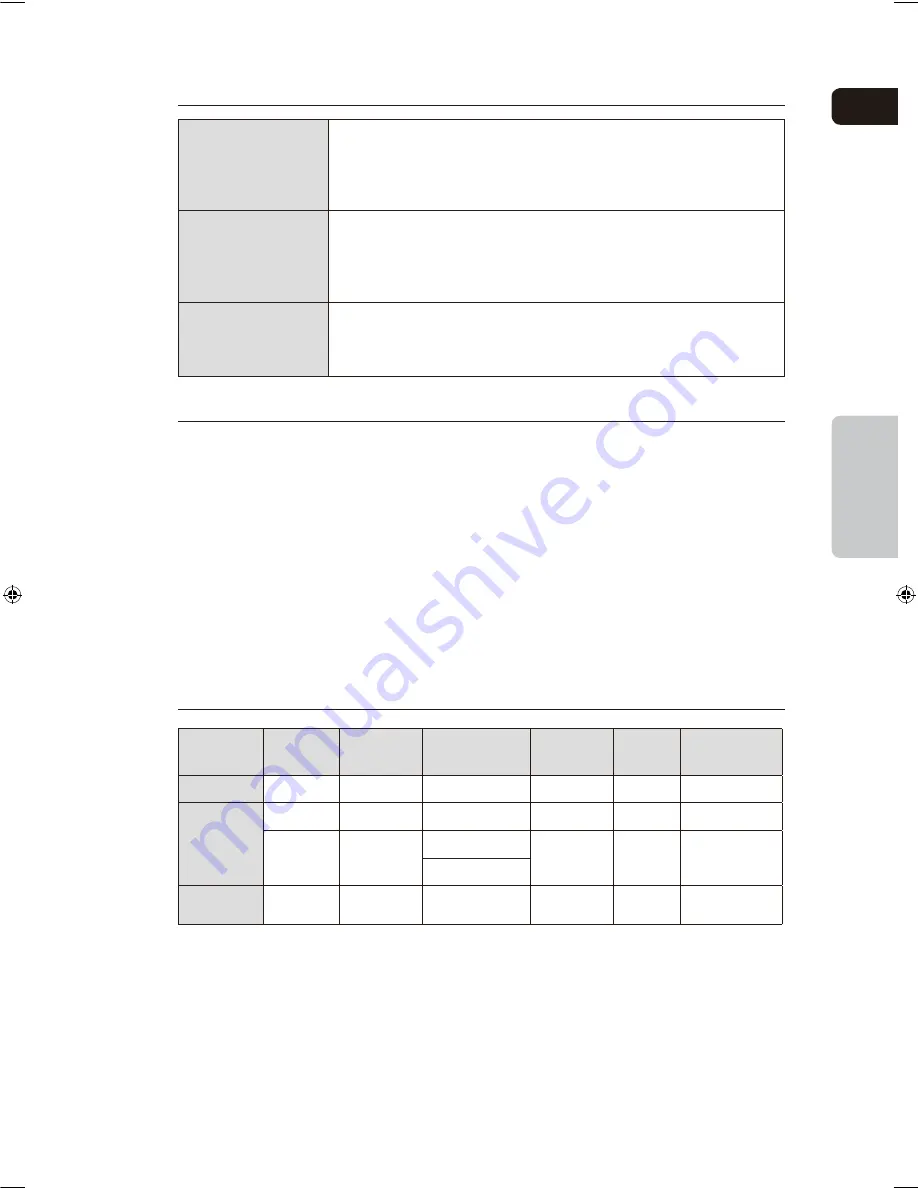
Compliant File Formats

Format

File name File extension

Bit rate

Version

Pixel

Sampling  

Frequency

Still Picture

JPG

JPG  .JPEG

640x480

Music

MP3

.MP3

8~320kbps

44.1kHz

WMA

.WMA

Stereo:48~384kbps

V8

44.1kHz

Mono:64~192kbps

Movie

DivX

.AVI

4Mbps

DivX3.11~


DivX5.1, XviD

720x480

44.1KHz~48KHz

CBI (Control/Bulk/Interrupt) is not supported.

• 

Digital Cameras that use PTP protocol or require additional program installation when connected to a 

• 

PC are not supported.
  A device using NTFS file system is not supported. (Only FAT 16/32 (File Allocation Table 16/32) file  

• 

system is supported.)
  Does not operate with Janus enabled MTP (Media Transfer Protocol) devices.

• 


• 

MPEG 1 Layer 1 (MP1) is not supported.

MAX-DG86-Latin-ENG-1.indd   29

2009-5-8   10:03:59

Содержание MAX-DG86

Страница 1: ...AH68 02165K ...

Страница 2: ...H USB HOST DVD CD MP3 CD CD R RW PLAYBACK user manual MAX DG86 imagine the possibilities Thank you for purchasing a Samsung product To receive a more complete service please register your product at www samsung com global register ...

Страница 3: ...sc player is classified as a CLASS 1 LASER product Use of controls adjustments or performance of procedures other than those specified herein may result in hazardous radiation exposure CAUTION INVISIBLE LASER RADIATION WHEN OPEN AND INTERLOCKS DEFEATED AVOID EXPOSURE TO BEAM WARNING To reduce the risk of fire or electric shock do not expose this appliance to rain or moisture CAUTION TO PREVENT ELE...

Страница 4: ...layer ensure the disc tray is empty This player is designed for continuous use Switching off the DVD player to the stand by mode does not disconnect the electrical supply In order to disconnect the player completely from the power supply remove the main plug from the wall outlet especially when left unused for a long period of time Protect the player from moisture i e vases and excess heat e g fir...

Страница 5: ...itches itself into the power saving mode after 20 minutes in the screen saver mode Power Saving Function The MAX DG86 automatically shuts itself off after 20 minutes in the stop mode Multi Disc Playback FM Tuner USB HOST The MAX DG86 combines the convenience of multi disc playback capability including DVD CD MP3 CD CD R CD RW DivX JPEG and DVD R RW with a sophisticated FM tuner USB HOST all in a s...

Страница 6: ...ack 32 Zoom Function 33 Selecting Audio Subtitle Language 34 Moving Directly to a Scene Song 35 Using Disc Menu 36 Using the Title Menu 37 SETUP Setting the Language 38 Setting TV Screen type 39 Setting Parental Controls Rating Level 41 Setting the Password 42 Setting the DRC Dynamic Range Compression 43 AV SYNC Setup 44 RADIO OPERATION Listening to Radio 45 Presetting Stations 46 MISCELLANEOUS CD...

Страница 7: ...be played on this player If such discs are played a This disc cannot be played Please check the disc message appears on the TV screen DVD discs purchased abroad may not play on this player If such discs are played a This disc cannot be played Please check the regional code message appears on the TV screen Many DVD discs are encoded with copy protection Because of this you should only connect your ...

Страница 8: ... Kodak Fuji Picture CDs may take longer to start playing or may not play at all CD R MP3 Discs Only CD R discs with MP3 files in ISO 9660 or Joliet format can be played MP3 file names should be 8 characters or less in length and contain no blank spaces or special characters Use discs recorded with a compression decompression data rate greater than 128Kbps Only files with the mp3 and MP3 extensions...

Страница 9: ...1 0 1 0 1 0 1 0 1 0 1 0 1 0 1 0 1 0 1 0 1 0 1 0 1 0 1 0 1 0 1 0 1 0 1 0 1 0 1 0 1 0 1 0 1 0 1 0 1 0 1 0 1 0 1 0 1 0 1 0 1 0 1 0 1 0 1 0 1 0 1 0 1 0 1 0 1 0 1 0 1 0 1 0 1 0 1 0 1 0 1 0 1 0 1 0 1 0 1 0 1 0 1 0 0 1 0 1 0 1 0 1 0 1010101001010101010101010101010101011 7 Description Front Panel 1 Compact Disc Compartment 2 MIC 1 JACK 3 MIC 2 JACK 4 Headphone Jack 5 AUX IN 1 JACK 6 usb jack 7 window disp...

Страница 10: ...ot clean Do not tap on the touch screen with gloves on The touch screen may not function if you use a fingernail or other instruments such as a ballpoint pen 1 2 3 4 5 6 7 8 9 1 2 1 Channel Speaker Output Terminals 2 Cooling fan 3 Voltage Selector option 4 Video Output Connector Connect the TV s video input jacks VIDEO IN to the VIDEO OUT connector 5 HDMI OUT Connector 6 AUX IN 2 Connector 7 Compo...

Страница 11: ... 0 1 0 1 0 1 0 1 0 1010101001010101010101010101010101011 9 Description Remote Control DSP EQ button VOLUME button MENU button TIMER CLOCK button POWER button TIMER ON OFF button CANCEL button PAUSE button Number 0 9 buttons PORT button AUX button TUNER button DVD button DEMO DIMMER button OPEN CLOSE button REMAIN button ANGLE button POWER BASS button MIC VOLUME button TUNER MEMORY button MIC VOLUM...

Страница 12: ... the direction of the arrow 1 Insert two 1 5V AAA batteries paying attention to the correct polarities and 2 Replace the battery cover 3 Follow these precautions to avoid leaking or cracking cells Place batteries in the remote control so they match the polarity to and to Use the correct type of batteries Batteries that look similar may differ in voltage Always replace both batteries at the same ti...

Страница 13: ...ng the Listening Position The listening position should be located about 2 5 to 3 times the distance of the TV s screen size away from the TV Example For 32 TVs 2 2 4m 6 8feet For 55 TVs 3 5 4m 11 13feet Front Speakers Place these speakers in front of your listening position facing inwards about 45 toward you Place the speakers so that their tweeters will be at the same height as your ear R SW LS ...

Страница 14: ... DVD Player to the Component Video Input jacks on your TV METHOD 2 Component Video Better Quality Connect the supplied Video cable from the VIDEO OUT jack on the back of the DVD Player to the VIDEO IN jack on your TV METHOD 3 Composite Video Good Quality Resolutions available for the HDMI output are 480p 576p 720p 1080i 1080p See page 15 for resolution setting This product operates in Interlace sc...

Страница 15: ...s require an Analogueue video audio signal However when playing a DVD the data transmitted to a TV is digital Therefore either a digital to Analogueue converter in the Mini Component System or an Analogueue to digital converter in the TV is required During this conversion the picture quality is degraded due to noise and signal loss HDMI technology is superior because it requires no D A conversion ...

Страница 16: ...f you turn off the TV Power the Mini Component doesn t automatically turn off the Power You can select to use the BD Wise menu only if the Mini Component is connected to a Samsung TV that supports BD Wise using an HDMI cable What is BD Wise BD Wise automatically adjusts BD Wise compliant Samsung products to the optimal settings between them This feature is enabled only if BD Wise compliant Samsung...

Страница 17: ...akers only Press the RETURN button to return to the previous level Press the EXIT button to exit the setup screen In Stop mode press the 111 MENU button Press the Cursor 222 button to move to Setup and then press the ENTER button Press the Cursor 333 button to move to Display Setup and then press the ENTER button Press the Cursor 444 button to move to HDMI Resolution and then press the ENTER butto...

Страница 18: ... a frame consists of two interlaced fields odd and even where each field contains every other horizontal line in the frame The odd field of alternating lines is displayed first and then the even field is displayed to fill in the alternating gaps left by the odd field to form a single frame One frame displayed every 1 25th of a second contains two interfaced fields thus a total of 50 fields are dis...

Страница 19: ... 17 Connecting External Components AUX1 Connecting an External Component MP3 player AUX1 Front Panel Audio Cable not supplied Components such as an MP3 Player 1 Connect AUX IN 1 Audio on the MINI COMPACT front panel to the Audio Out of the external component MP3 player 2 Press the AUX button to select AUX1 input The mode switches as follows AUX 1 AUX 2 AUX2 Rear Panel Audio Cable not supplied If t...

Страница 20: ...101010101010101011 Connecting the FM Antennas 18 CONNECTIONS 1 Connect the FM antenna supplied to the FM 75Ω COAXIAL Jack 2 Slowly move the antenna wire around until you find a location where reception is good then fasten it to a wall or other rigid surface This unit does not receive AM broadcasts Note The cooling fan supplies cool air to the unit to prevent overheating Please observe the followin...

Страница 21: ... is displayed 2 Press TIMER CLOCK twice 1 Switch the system on by pressing POWER button TIMER appears in the display The current time is now set 5 When the correct time is displayed press ENTER Increase the minutes Decrease the minutes 4 When the correct hour is displayed press ENTER The minutes flash Increase the hours Decrease the hours 3 Press ENTER The hour flashes You can display the time eve...

Страница 22: ...ill be stored in memory If PLAY button is pressed playback resumes from the stop position This function works only with DVDs If pressed twice STOP is displayed and if PLAY button is pressed playback starts from the beginning To stop playback press STOP button during playback For mixed discs the play order is as below MP3 WMA DIVX JPEG Depending on the content of the disc the initial screen may app...

Страница 23: ...1 0 1 0 1 0 1 0 1 0 0 1 0 1 0 1 0 1 0 1010101001010101010101010101010101011 MP3 WMA CD Playback Depending on the recording mode some MP3 WMA CDs may not be played Table of contents of a MP3 CD varies depending on the MP3 WMA track format recorded on the disc Note 2 Use to select the album and then press the ENTER button The MP3 WMA menu screen will appear and playback will start The appearance of ...

Страница 24: ... 0 0 1 0 1 0 1 0 1 0 1010101001010101010101010101010101011 JPEG File Playback Images captured with a digital camera or camcorder or JPEG files on a PC can be stored on a CD and then played back with this DVD player JPEG 22 OPERATION Rotate Flip Function Slide Show play Function Press Cursor buttons during playback Press INFO button during playback and then press INFO button or Cursor buttons to se...

Страница 25: ...1 0 1 0 1 0 1 0 1 0 1 0 1 0 1 0 1 0 1 0 1 0 1 0 1 0 1 0 1 0 1 0 1 0 1 0 1 0 1 0 1 0 1 0 1 0 1 0 1 0 1 0 1 0 1 0 1 0 1 0 1 0 1 0 1 0 1 0 1 0 1 0 1 0 1 0 1 0 1 0 0 1 0 1 0 1 0 1 0 1010101001010101010101010101010101011 23 Fast playback DivX Playback Skip Forward Back During playback press the button Go to the next file whenever you press button if there are over 2 files in the disk Go to the previous...

Страница 26: ...ture Table DivX Supported Avi files are used to contain the audio and video data these must be stored on CD in the ISO 9660 format MPEGs containing DivX can be divided into Video and Audio Video compatibility All versions of DivX later than 3 11 including the latest 5 1 are supported In addition XviD is supported Audio compatibility MP3s encoded at bit rates from 8kbps to 320kbps AC3s from 32kbps ...

Страница 27: ...ng the USB cable The play order is as follow MP3 WMA DIVX JPEG Note 2 Press the FUN button on the main set or the PORT button on the remote control to select the USB mode USB SORTING screen appears on the TV screen and the saved file is played 1Connect the USB cable You can connect and play files from external USB storage devices such as MP3 players USB flash memory etc using the player s USB func...

Страница 28: ...pported Removable HDDs equipped with 160Gbytes or more may not be recognized depending on the device If the connected device does not work due to insufficient power supply you can use a separate power cable to supply power so that it can work properly The connector of the USB cable may differ depending on the manufacturer of the USB device USB card Reader One slot USB card reader and Multi slot US...

Страница 29: ... 0 1 0 1 0 1 0 0 1 0 1 0 1 0 1 0 1010101001010101010101010101010101011 27 Displaying Disc Information You can view playback information on the disc on the TV screen Press INFO button Press Cursor buttons select the desired item and then press ENTER button to select the desired item DVD DIVX Display disappears Display disappears What is a Title A movie contained in a DVD disc What is a Chapter Each...

Страница 30: ... 1 0 1 0 0 1 0 1 0 1 0 1 0 1010101001010101010101010101010101011 Fast Slow Playback Fast Playback DVD DVD CD CD MP3 MP3 16 32 128 16 32 128 Press buttons Each time you press either button during playback the playback speed changes as follows 28 OPERATION To resume normal playback press PLAY button Press SLOW button Each time the button is pressed during playback the playback speed changes as follo...

Страница 31: ...0 1 0 1 0 1 0 1 0 1 0 1 0 1 0 1 0 1 0 1 0 1 0 1 0 1 0 1 0 1 0 1 0 1 0 1 0 1 0 1 0 1 0 1 0 1 0 1 0 1 0 1 0 1 0 1 0 1 0 1 0 1 0 1 0 1 0 1 0 1 0 1 0 1 0 1 0 1 0 1 0 1 0 1 0 0 1 0 1 0 1 0 1 0 1010101001010101010101010101010101011 29 Skipping Scenes Songs DVD JPEG MP3 DIVX CD DVD DVD JPEG DIVX MP3 CD Briefly press Each time the button is pressed briefly during playback the previous or next chapter trac...

Страница 32: ... 1 0 1 0 1 0 1 0 1 0 1 0 1 0 1 0 1 0 1 0 1 0 1 0 1 0 1 0 1 0 1 0 1 0 1 0 1 0 1 0 1 0 1 0 1 0 1 0 1 0 1 0 1 0 1 0 1 0 1 0 1 0 1 0 1 0 1 0 1 0 1 0 1 0 1 0 1 0 1 0 1 0 1 0 1 0 1 0 1 0 0 1 0 1 0 1 0 1 0 1010101001010101010101010101010101011 Angle Function This function allows you to view the same scene in different angles 30 OPERATION DVD 1Press ANGLE button Each time the button is pressed the angle c...

Страница 33: ...g or directory MP3 file Press REPEAT button Each time the button is pressed during playback the repeat playback mode changes as follow DVD DVD CD MP3 DIVX CD MP3 DIVX Repeat Playback Options Track Repeatedly plays the selected track Folder Repeatedly plays all tracks in the selected folder Title Repeatedly plays the selected title Chapter Repeatedly plays the selected chapter Off Cancels Repeat Pl...

Страница 34: ...1 0 1 0 1 0 1 0 1010101001010101010101010101010101011 32 OPERATION A B Repeat Playback DVD DVD DVD DVD CD CD CD CD MP3 MP3 MP3 MP3 DIVX DIVX DIVX DIVX The A B Repeat function does not operate with JPEG disc The time space of point A and B should be more than 6 seconds 2 Press the REPEAT A B button at the point where you want repeat play to stop B 1 Press the REPEAT A B button at the point where yo...

Страница 35: ...0 1 0 1 0 1 0 1 0 1 0 1 0 1 0 1 0 1 0 1 0 1 0 1 0 1 0 1 0 1 0 1 0 1 0 1 0 1 0 1 0 1 0 1 0 1 0 1 0 1 0 1 0 1 0 1 0 1 0 1 0 1 0 1 0 1 0 1 0 1 0 1 0 1 0 1 0 1 0 1 0 1 0 1 0 1 0 1 0 1 0 1 0 1 0 0 1 0 1 0 1 0 1 0 1010101001010101010101010101010101011 33 Zoom Function This function allows you to enlarge a particular area of the displayed image Each time the button is pressed the zoom level changes as fo...

Страница 36: ...FO button Press Cursor buttons to select 222 the Audio Press Cursor buttons to select 333 the desired Audio language Depending on the number of languages on a DVD disc a different audio language ENGLISH SPAIN FRENCH etc is selected each time the button is pressed Press 111 INFO button Press Cursor buttons to 222 select the Subtitle Press Cursor buttons to 333 select the desired Subtitle language 3...

Страница 37: ...1010101010101011 35 Moving Directly to a Scene Song You can press on the remote control to move directly to the desired chapter Depending on the disc you may not be able to move to the selected title or time Note Press 111 INFO button Press Cursor buttons to select 222 the Title Press Cursor or numeric 333 buttons to select the desired Title and then press ENTER button Press 111 INFO button Press ...

Страница 38: ... 1 0 1 0 1 0 1 0 1 0 1 0 1 0 1 0 1 0 1 0 0 1 0 1 0 1 0 1 0 1010101001010101010101010101010101011 36 OPERATION Using Disc Menu You can use the menus for the audio language subtitle language profile etc DVD menu contents differ from disc to disc DVD 2 1 In stop mode press MENU button Press Cursor buttons to move to DISC MENU and then press ENTER button 4 3 Press Cursor buttons to select the desired ...

Страница 39: ...0 1 0 1 0 1 0 1 0 1 0 1 0 1 0 1 0 1 0 1 0 1 0 0 1 0 1 0 1 0 1 0 1010101001010101010101010101010101011 Using the Title Menu For DVDs containing multiple titles you can view the title of each movie Depending on the disc this function may either not work at all or may work differently 2 Press Cursor button to move to Title Menu and then press ENTER button DVD 1 In stop mode press MENU button Press ME...

Страница 40: ... it to your desired language Selecting the Player Menu Language Selecting the Disc Menu Language recorded on the disc Setting the Language OSD language is set to English by default 2 1 In stop mode press MENU button Press Cursor button to move to Setup and then press ENTER button 3 Once the setup is complete if the language was set to English OSD will be displayed in English Selecting the Audio La...

Страница 41: ...01010101010101010101010101011 39 Setting TV Screen type 2 1 You can select 4 3 Letter Box 4 3 Pan Scan or 16 9 Wide mode for your TV You can select I SCAN or P SCAN see the page 16 about P SCAN or I SCAN mode You can select On or Off On you can see the screen messages Off you can t see the screen messages 4 6 3 5 In stop mode press MENU button Press Cursor button to move to Setup and then press EN...

Страница 42: ... this to view a 16 9 picture in the full screen mode on your wide screen TV You can enjoy the wide screen aspect Select this to play a 16 9 picture in the letter box mode on a conventional TV Black bars will appear at the top and bottom of the screen Select this to play a 16 9 picture in the pan scan mode on a conventional TV You can see the central portion of the screen only with the sides of the...

Страница 43: ...violent DVDs you do not want children to view This function works only if a DVD disc contains the rating level information Press RETURN button to return to the previous level Press MENU button to exit the setup screen 2 1 In stop mode press MENU button Press Cursor button to move to Setup and then press ENTER button 4 The password is set to 7890 by default Once the setup is complete you will be ta...

Страница 44: ...1 0 1 0 1 0 1010101001010101010101010101010101011 42 Press RETURN button to return to the previous level Press MENU button to exit the setup screen 4 Press Cursor button to select the Change Password and then press ENTER button 2 1 In stop mode press MENU button Press Cursor button to move to Setup and then press ENTER button Enter the old password a new password The setting is complete 3 5 Press ...

Страница 45: ...0 1 0 1 0 1 0 1 0 1 0 1 0 1 0 1 0 1 0 1 0 1 0 0 1 0 1 0 1 0 1 0 1010101001010101010101010101010101011 43 Setting the DRC Dynamic Range Compression You can use this function to enjoy Dolby Digital sound when watching movies at low volume at night 1 2 In stop mode press MENU button Press Cursor button to move to Audio and then press ENTER button 3 4 Press Cursor to adjust the DRC Press RETURN button...

Страница 46: ...0 1 0 1 0 1010101001010101010101010101010101011 44 SETUP AV SYNC Setup 2 1 3 Press Cursor buttons to move to Audio and then press ENTER button 4 You can set the audio delay time between 0 ms and 300 ms Set it to the optimal status Press Cursor buttons to select the Delay Time of AV SYNC and then press the ENTER button Video may look slower than the audio if it is connected with digital TV In this ...

Страница 47: ...oadcast station Press the STOP button to select PRESET and then press button to select the preset station PresetTuning1 Press the FUN button to select the FM band Press the STOP button to select AUTO and then press button to automatically search the band AutomaticTuning2 Press STOP to select MANUAL and then briefly press to tune into a lower or higher frequency Manual Tuning Each time the button i...

Страница 48: ... 1 0 1 0 1 0 1 0 1 0 1 0 1 0 1 0 1 0 1 0 1 0 1 0 1 0 0 1 0 1 0 1 0 1 0 1010101001010101010101010101010101011 46 Presetting Stations Refer to Step 2 on page 45 to automatically or manually tune in to a station 2 1 3 Example Presetting FM 89 1 in the memory Press TUNING to select 89 10 Press the Tuner button and select the FM band If you can t press TUNER MEMORY in 5 seconds the preset disappears an...

Страница 49: ... the USB device When the USB memory is not enough it will be displayed RIPPING ERROR DTS CD can t for CD Ripping With external HDD FAT format the USB can be CD Ripping but not NTFS The CD Ripping function of this product does not support all USB devices When you use CD high speed search function or in the Pause or Stop mode the CD Ripping can t work During CD Ripping do not deal impact If is shock...

Страница 50: ...o be selected is displayed 2 1 3 Switch the system on by pressing POWER Press TIMER CLOCK until TIMER is displayed Press the ENTER button is displayed to the top right of the time indicating that the timer has been set The system will switch on and off automatically at the required times 8 7 9 Press or button to select the source to be played when the system switches on Press ENTER to confirm the ...

Страница 51: ... 0 1 0 1 0 1 0 1 0 1 0 1 0 1 0 1 0 1 0 1 0 1 0 1 0 1 0 1 0 1 0 1 0 1 0 1 0 1 0 1 0 1 0 1 0 1 0 1 0 1 0 1 0 1 0 1 0 1 0 1 0 1 0 1 0 1 0 1 0 0 1 0 1 0 1 0 1 0 1010101001010101010101010101010101011 Canceling the Timer Note You can cancel the timer while the power is on or while the player is in standby After having set the timer it will start automatically as shown by the TIMER indication on the disp...

Страница 52: ...tton Each time the button is pressed the selection changes as follows P SOUND OFF When CD Ripping the P SOUND function can t work and the P SOUND automatically covert to OFF mode POWER SOUND Function Your mini compact system is equipped with the function of POWER SOUND mode The function of POWER SOUND mode amplifies bass and improves high key or bass twice as much for you to appreciate powerful re...

Страница 53: ...P EQ Function Press the DSP EQ button Each time the button is pressed the selection changes as follows PASS ROCK JAZZ POP CLASSIC DANCE PARTY HIP HOP PASS POP JAZZ ROCK Depending on the genre of music you can select POP JAZZ and ROCK CLASSIC Select this when listening to classical music DANCE Simulates the sound of a dance club with a throbbing bass beat PARTY Provides the feeling of a party club ...

Страница 54: ... 0 1010101001010101010101010101010101011 52 MISCELLANEOUS Sleep Timer Function Mute Function The remaining time before the DVD player will shut itself off is displayed Pressing the button again changes the sleep time from what you have set earlier To confirm the sleep timer setting press SLEEP button Each time the button is pressed the selection changes as follows 90 MIN 60 MIN 45 MIN 30 MIN 15 MI...

Страница 55: ...or instructions on how to use them refer to the appropriate sections DEMO Function You can view the various functions available on your system DEMO Function DIMMER Function ECO Function Each time the button is press the brightness changes as follows DEMO ON DIMMER ON Dim DIMMER OFF Bright DIMMER Function You can adjust the brightness of the display on the main unit so it won t interfere with your ...

Страница 56: ... MISCELLANEOUS Connecting Headphones Microphone The loudspeakers are no longer used to output the sound Connect the headphones to the headphones jack on the front panel Prolonged use of headphones at a high volume may damage your hearing P SOUND P BASS DSP EQ function is not available when using headphones Note Plug a microphone with a 3 5ø MIC jack into the Mic terminal Connect one Microphone Pre...

Страница 57: ...side of the disc Hold the disc by the edges so that fingerprints will not get on the surface Do not stick paper or tape on the disc When you get fingerprints or dirt on the disc clean it with a mild detergent diluted in water and wipe with a soft cloth When cleaning wipe gently from the inside to the outside of the disc Handling discs Handling and Storing Discs Cautions on Handling and Storing Dis...

Страница 58: ...from abroad may not be playable CD ROMs and DVD ROMs cannot be played on this DVD player Make sure that the rating level is correct Are you using a deformed disc or a disc with scratches on the surface Wipe the disc clean Disc tray does not open Playback does not start Playback does not start immediately when the Play Pause button is pressed No sound is heard during fast playback slow playback and...

Страница 59: ...his unless necessary Turn off the power and hold the STOP button on the main unit or on the remote control for longer than 5 seconds Using the RESET function will erase all stored settings Do not use this unless necessary The password for rating level has been forgotten The main unit is not working Example The power goes out or strange noise is heard The DVD player is not working normally Is the a...

Страница 60: ... a new video compression technology MPEG 2 and high density recording technology a DVD disc comprises two 0 6 mm thick discs bonded together An acronym for Pulse Code Modulation another name for digital audio This is recorded on a video CD version 2 0 Selected scenes or information can be chosen from the menu displayed on the TV monitor Both the DVD player and DVD discs are encoded with a region n...

Страница 61: ... 1 0 1 0 1 0 1 0 1 0 0 1 0 1 0 1 0 1 0 1010101001010101010101010101010101011 59 Specifications radio FM FM Frequency Range 87 5 108 0MHz Signal noise ratio 62 dB Usable sensitivity 10 dB Total harmonic distortion 0 4 compact disc player Capacity 1 disc Frequency range 20 Hz 20 KHz 2 dB Signal noise ratio 70 dB at 1 KHz with filter Distortion 0 1 at 1 KHz Channel separation 50 dB Disc sizes Diamete...

Страница 62: ... 60 MISCELLANEOUS Contact SAMSUNG WORLD WIDE If you have any questions or comments relating to Samsung products please contact the SAMSUNG customer care centre Region Country Customer Care Center Web Site ...

Отзывы: