


ENG
9
ENG
8
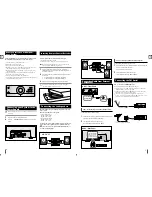
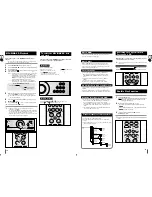
Please load a 12 cm or 8 cm CD disc in the disc compact.
Never force the compact disc carrousel when opening and
closing the compartment.
Never press down or place objects on the carrousel.
Always treat your compact discs with care, refer, if necessary, to
the section entitled “
Precautions When Using Compact Discs
” on
page 19
.
Switch the system on by pressing STANDBY/ON.
Press the OPEN/CLOSE(
) button on the front panel.
Result: The compartment opens.
Place one disc in the front slots of the carrousel, with the label on the
discs facing upwards.
Check that the compact disc has been correctly inserted in
the holder before closing the compartment.
Close the compartment by pressing the OPEN/CLOSE(
) button
again.
Press the PLAY (
) button on the remote control,
playback starts automatically.
To temporarily pause playback, press PLAY(
)button during play-
back.
To resume playback, press the PLAY (
) button again.
To stop playback, press STOP(
)button during playback.
If pressed, (
) is displayed, and if PLAY (
)
button is pressed, playback starts from the
beginning.
Keep the compartment closed whenever you are not using
it, to prevent dust from entering.
Disc Playback
1
2
3
4
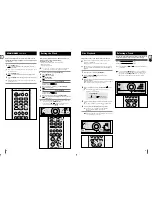
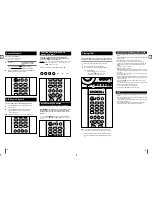
Your system is equipped with a clock which allows you to
turn your system on and off automatically.
You should set the clock:
When you first purchase the mini-compact system
After a power failure
After unplugging the unit
For each step, you have a few seconds to set the required
options. If you exceed this time, you must start again.
Switch the system on by pressing STANDBY/ON.
Press TIMER/CLOCK twice.
Result:
CLOCK
is displayed.
Press PROGRAM/SET .
Result: The hour flashes.
To...
Press Tuning/Album...
Increase the hours
Decrease the hours
When the correct hour is displayed, press PROGRAM/SET.
Result: The minutes flash.
To...
Press Tuning/Album...
Increase the minutes
Decrease the minutes
When the correct time is displayed, press PROGRAM/SET.
Result: The clock starts and is displayed, even when the system is in
standby mode.
You can display the time, even when you are using another
function, by pressing
TIMER/CLOCK
once.
You can also use
/
buttons on the panel front to
instead of Tuning/Album
/
in step
4
,
6
.
Setting the Clock
1
2
3
4
5
6
7
VOLUME
AUX IN 1
MIC1
MIC2
MIC VOL
ECHO
STANDBY/ON
TUNER
MP3-CD/CD
USB
AUX
1
2,4
VOLUME
AUX IN 1
MIC1
MIC2
MIC VOL
ECHO
STANDBY/ON
TUNER
MP3-CD/CD
USB
AUX
4,6
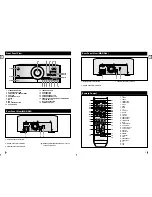
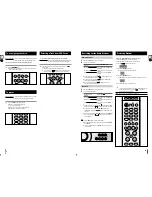
DEMO/DIMMER function
All functions available on the system can be viewed on the
display and the display's brightness can be switched between
"on" and "off".
Press the DEMO button.
Result: All functions available on the system appear on the front
panel display.
Each of these are explained in detail in this guide. Please refer to
the relevant section.
Press the DIMMER button.
Result: The Dimmer function is selected and the display darkens.
Press the DIMMER button once again to brighten the front panel dis-
play.
A display brightness control can only be performed while the
system power is on.
2
1
POWER
TIMER
MO/ST
DEMO
DIMMER
SHUFFLE
+10
MIC VOL
REP A-B
SLEEP
ECHO
REPEAT
ON/OFF
TIMER/CLOCK PROGRAM/SET
EQ
OPEN/
CLOSE
3
1
2,3
1
4,6
TIMER
MO/ST
DEMO
DIMMER
SHUFFLE
+10
P.SOUND
P.BASS TUNING MODE
MIC VOL
USB/MP3-CD/CD
MUTE
VOLUME
TUNING/
ALBUM
REP A-B
SLEEP
ECHO
REPEAT
ON/OFF
TIMER/CLOCK PROGRAM/SET
4,6
3,5,7
2
4,6
5
6
6
4,5,6
USB/MP3-CD/CD
MUTE
TUNING/
4,5,6
6
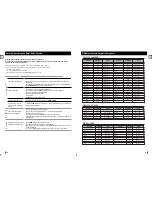
<CD Playback>
Track Indicator
Playtime Indicator
Play mode Indicator
You can select the track you wish to listen to, either when the
compact disc player is stopped or when a disc is playing.
To start playback at the beginning of the...
Press...
Next track
Previous track
You can also use the
and
buttons on the front panel to
select a track.
If you hold the
OPEN/CLOSE
button over 5 seconds until
“LOCK”is on the display,the CD door will be locked.In the case,
you should hold the
OPEN/CLOSE
button once again until
“UNLOCK”is on the display,the CD door will be unlocked.
Selecting a Track
USB/MP3-CD/CD
MUTE
TUNING/
VOLUME
AUX IN 1
MIC1
MIC2
MIC VOL
ECHO
STANDBY/ON
TUNER
MP3-CD/CD
USB
AUX
Содержание MAX-A65
Страница 13: ...AH68 02058P ...


