background image

4

GB

Using this Instruction Booklet

You have just purchased a SAMSUNG microwave oven. Your Owner’s
Instructions contain much valuable information on cooking with your
microwave oven:

Safety precautions

Suitable accessories and cookware

Useful cooking tips

Inside the cover you will find a quick look-up guide explaining three
basic cooking operations:

Cooking food

Auto power defrosting of food

Adding extra cooking time

At the front of the booklet you will find illustrations of the oven, and
more importantly the control panel, so that you can find the buttons
more easily.

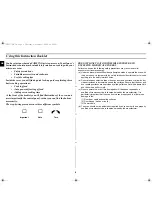
The step-by-step procedures use three different symbols.

PRECAUTIONS TO AVOID POSSIBLE EXPOSURE TO
EXCESSIVE MICROWAVE ENERGY

Failure to observe the following safety precautions may result in harmful
exposure to microwave energy.
(a) Under no circumstances should any attempt be made to operate the oven with

the door open or to tamper with the safety interlocks (door latches) or to insert
anything into the safety interlock holes.

(b) Do not place any object between the oven door and front face or allow food or

cleaner residues to accumulate on sealing surfaces. Ensure that the door and
door sealing surfaces are kept clean by wiping after use first with a damp cloth
and then with a soft dry cloth.

(c) Do not operate the oven if it is damaged until it has been repaired by a

qualified microwave service technician trained by the manufacturer. It is
particularly important that the oven door closes properly and that there is no
damage to the:
(1) Door, door seals and sealing surfaces
(2) Door hinges (broken or loose)
(3) Power cable

(d) The oven should not be adjusted or repaired by anyone other than a properly

qualified microwave service technician trained by the manufacturer.

Important

Note

Turn

tX`^^TniU”GGwˆŽŒG[GG{œ™š‹ˆ SGu–Œ”‰Œ™G^SGYWWYGGXYaW\Gwt

Содержание M1977N

Страница 1: ...ting 8 Power Levels 9 Stopping the Cooking 9 Adjusting the Cooking Time 10 Using the Auto Reheat Cook Feature 10 Auto Reheat Cook Settings 11 Using the Instant Reheat Feature 12 Instant Reheat Settings 12 Using the Auto Power Defrost Feature 12 Auto Power Defrost Settings 13 Using the Deodorization Feature 13 Switching the Beeper Off 14 Safety Locking Your Microwave Oven 14 Manual Stop Turntable F...

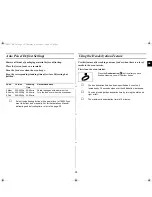
Страница 2: ... oven beeps four times when cooking is over 1 Place the frozen food in the oven Press the Power Defrost button which you want the required number of time 2 Select the weight by turning the dial knob it is possible to set up to a maximum of 2000g 3 Press the button 1 Leave the food in the oven Press 30s button one or more times for each extra 30 seconds that you wish to add VENTILATION HOLES DOOR L...

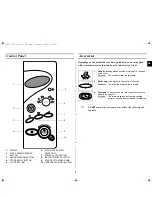
Страница 3: ...TION 7 POWER LEVEL SETTING 8 INSTANT REHEAT BUTTON 9 START BUTTON DIAL KNOB 10 TURNTABLE ON OFF BUTTON 1 2 3 5 6 4 7 8 9 10 1 Coupler already placed over the motor shaft in the base of the oven Purpose The coupler rotates the turntable 2 Roller ring to be placed in the centre of the oven Purpose The roller ring supports the turntable 3 Turntable to be placed on the roller ring with the centre fitt...

Страница 4: ...gy a Under no circumstances should any attempt be made to operate the oven with the door open or to tamper with the safety interlocks door latches or to insert anything into the safety interlock holes b Do not place any object between the oven door and front face or allow food or cleaner residues to accumulate on sealing surfaces Ensure that the door and door sealing surfaces are kept clean by wip...

Страница 5: ... may burn yourself if the container is too hot A risk of delayed eruptive boiling exists To prevent delayed boiling and possible scalding you should put a plastic spoon or glass stick into the beverages and stir before during and after heating Reason During the heating of liquids the boiling point can be delayed this means that eruptive boiling can start after the container is removed from the ove...

Страница 6: ...d as the power cable supplied with the oven Wipe the interior and the door seal with a damp cloth before using your microwave oven for the first time Setting the Time Your microwave oven has an inbuilt clock The time can be displayed in either the 24 hour or 12 hour notation You must set the clock When you first install your microwave oven After a power failure Do not forget to reset the clock whe...

Страница 7: ...correctly at all times First place a bowl of water on the turntable Then close the door The oven must be plugged into an appropriate wall socket The turntable must be in position in the oven If a power level other than the maximum is used the water takes longer to boil 1 The microwaves generated by the magnetron are distributed uniformly as the food rotates on the turntable The food is thus cooked...

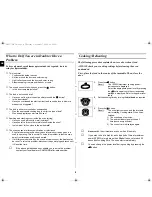
Страница 8: ... aerials If interference is detected by the oven s microprocessor the display may be reset To solve this problem disconnect the power plug and reconnect it Reset the time If the above guidelines do not enable you to solve the problem contact your local dealer or SAMSUNG after sales service Cooking Reheating The following procedure explains how to cook or reheat food ALWAYS check your cooking setti...

Страница 9: ...ooking by simply pressing Cancel Power Level Output FULL HIGH MEDIUM HIGH MEDIUM MEDIUM LOW DEFROST LOW KEEP WARM 1000 W 850 W 600 W 450 W 300 W 180 W 100 W Time Increasing Time Up to 1 min 1 3 min 3 10 min 10 20 min 20 40 min 40 99 min 5 sec unit 10 sec unit 30 sec unit 1 min unit 2 min unit 5 min unit 1 To stop temporarily Open the door Result Cooking stops To resume cooking close the door and p...

Страница 10: ...e the food in the centre of the turntable Then close the door Use only recipients that are microwave safe Press the 30s button once for each 30 seconds to be added During the cooking to increase or decrease the cooking time of your food turn the dial knob right or left 1 Select the type of food that you are cooking by pressing the Auto Reheat Cook Auto button one or more times 2 Select the size of...

Страница 11: ...0 g 700 750 g 3 mins Weigh the vegetables after washing cleaning and cutting into similar size Put them into a glass bowl with lid Add 30 ml 2 tablespoons water when cooking for 100 250 g add 45 ml 3 tablespoons for 300 450 g and add 60 75 ml 4 5 tablespoons for 500 750 g Stir after cooking When cooking bigger quantities stir once during cooking Button Food Serving Size Standing Time Recommendatio...

Страница 12: ...h a power level of 180W Refer to the section entitled Cooking Reheating on page 8 for further details 1 Press the Instant Reheat button which you want the required number of times Result Cooking starts after about two seconds When it has finished 1 The oven beeps four times 2 The end reminder signal will beep 3 times once every minute 3 The current time is displayed again Button Food Serving Size ...

Страница 13: ...cooking odorous food or when there is a lot of smoke in the oven interior First clean the oven interior The deodorization time has been specified as 5 minutes It increases by 30 seconds whenever the 30s button is pressed You can also adjust deodorization time by turning the dial knob right or left The maximum deodorization time is 15 minutes Food Portion Standing Time Recommendation 1 Meat 2 Poult...

Страница 14: ...e turntable without food in the oven Reason This may cauce fire or damage to the unit Don t press Turntable on off button during cooking process 1 Press the and buttons at the same time Result The oven will not beep each time you press a button 2 To switch the beeper back on press the and buttons again at the same time Result The oven operates with the beeper on again 1 Press the and buttons at th...

Страница 15: ...ng Polystyrene cups containers Paper bags or newspaper Recycled paper or metal trims Can be used to warm food Overheating may cause the polystyrene to melt May catch fire May cause arcing Glassware Oven to table ware Fine glassware Glass jars Can be used unless decorated with a metal trim Can be used to warm foods or liquids Delicate glass may break or crack if heated suddenly Must remove the lid ...

Страница 16: ...ok covered for the minimum time see table Continue cooking to get the result you prefer Stir twice during cooking and once after cooking Add salt herbs or butter after cooking Cover during standing time Cooking Guide for rice and pasta Rice Use a large glass pyrex bowl with lid rice doubles in volume during cook ing Cook covered After the cooking time is over stir before standing time and salt or ...

Страница 17: ...centre Courgettes 250g 4 4 3 Cut courgettes into slices Add 30 ml 2 tbsp water or a knob of butter Cook until just tender Egg Plants 250g 3 3 3 Cut egg plants into small slices and sprinkle with 1 tablespoon lemon juice Leeks 250g 4 4 3 Cut leeks into thick slices Mushrooms 125g 250g 1 2 2 3 3 Prepare small whole or sliced mushrooms Do not add any water Sprinkle with lemon juice Spice with salt an...

Страница 18: ...fety precautions REHEATING LIQUIDS Always allow a standing time of at least 20 seconds after the oven has been switched off to allow the temperature to even out Stir during heating if necessary and ALWAYS stir after heating To prevent eruptive boiling and possible scalding you should put a spoon or glass stick into the beverages and stir before during and after heating REHEATING BABY FOOD BABY FOO...

Страница 19: ...nstructions Drinks coffee milk tea water with room temperature 150 ml 1 cup 300 ml 2 cups 450 ml 3 cups 600 ml 4 cups 1000W 1 1 1 2 2 3 3 4 1 2 Pour into a ceramic cup and reheat uncovered Place 1 cup in the centre 2 opposite of each other and 3 or 4 in a circle Stir carefully before and after standing time be careful while taking them out of oven Soup chilled 350g 450g 550g 1000W 3 4 3 4 4 5 2 3 ...

Страница 20: ...r this hint while freezing and defrosting food For defrosting of frozen food with a temperature of about 18 to 20 C use the fol lowing table as a guide All frozen food should be defrosted using defrosting power level 180W Food Portion Time min Standing Time min Instructions Meat Pork steaks 250g 8 9 5 20 Place the meat on a flat ceramic plate Shield thinner edges with aluminium foil Turn over afte...

Страница 21: ...minutes COOKING PUDDING Mix pudding powder with sugar and milk 500 ml by following the manufacturers instructions and stir well Use a suitable sized glass pyrex bowl with lid Cook covered for 6 to 7 minutes using 1000 W Stir well several times during cooking BROWNING ALMOND SLICES Spread 30 g sliced almonds evenly on a medium sized ceramic plate Stir several times during browning for 3 to 4 minute...

Страница 22: ...entre If you wish to store your oven away temporarily choose a dry dust free place Reason Dust and damp may adversely affect the working parts in the oven This microwave oven is not intended for commercial use Technical Specifications SAMSUNG strives to improve its products at all times Both the design specifications and these user instructions are thus subject to change without notice Model M1977...

Страница 23: ...23 GB Note tX TniU GGw GYZGG SGu G SGYWWYGGXYaW Gwt ...

Страница 24: ...tX TniU GGw GY GG SGu G SGYWWYGGXYaW Gwt ...

Отзывы: