background image

Español

Símbolo

Pulse

Importante

Nota

Botón de una

pulsación

Contenido

INFORMACIÓN GENERAL

Listado de características ..................................................................

2

Accesorios..........................................................................................

2

Aspecto general del panel de control ................................................

3

Aspecto general del panel de conexiones .........................................

4

Mando a distancia..............................................................................

6

Instalación de las pilas en el mando a distancia ...............................

7

CONEXIONES

Conexión de antenas de VHF y UHF ................................................

7

Conexión de TV por cable .................................................................

8

Conexión de un reproductor de vídeo ...............................................

9

Conexión de un reproductor de vídeo S-VHS ...................................

9

Conexión de una videocámara .......................................................... 10

Conexión de un reproductor de DVD ................................................ 10

Conexión de un DVD o un Decodificador digital mediante DVI ........ 10

Conexión a un DVD/receptor de TV digital a través de un HDMI ..... 11

Conexión de un sistema de audio digital........................................... 11

Conexión de un amplificador/DVD para cine en casa ....................... 12

Conexión a un PC.............................................................................. 12

FUNCIONAMIENTO

Encendido o apagado del TV  ........................................................... 13

Función Plug & Play........................................................................... 13

Cambio de canales ............................................................................ 14

Ajuste del volumen............................................................................. 15

Visualización de la pantalla................................................................ 15

Visualización de los menús................................................................ 15

Memorización de los canales............................................................. 16

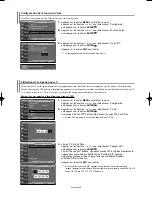
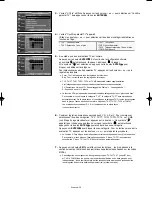
Configuración del mando a distancia................................................. 17

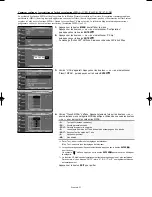
Para seleccionar la fuente  ................................................................ 22

Edición del Nombre de la Fuente de entrada  ......................................... 22

CONTROL DE LA IMAGEN

Uso de los parámetros de imagen automáticos........................... 23

Ajuste del Color del fondo ............................................................ 24

Demo DNIe (Motor de imagen natural digital).............................. 24

Cambio del tamaño de la pantalla................................................ 25

Congelación de la imagen ............................................................ 26

Visualización Imagen en imagen.................................................. 26

CONTROL DE SONIDO

Personalización del sonido........................................................... 28

Uso de los parámetros de sonido automáticos ............................ 28

Configuración del TruSurround XT (SRS TSXT) .......................... 28

Selección de una pista de sonido multicanal (MTS) - Digital ........... 29

Selección de una pista de sonido multicanal (MTS) - Analogo ....... 29

Selección del silencio interno ....................................................... 30

Control automático de volumen.................................................... 30

Ajuste de la melodía de encendido/apagado ............................... 31

Escuchar el sonido de la sub imagen del PIP.............................. 31

CONTROL DE LOS CANALES

Selección de la antena ................................................................. 32

Configuración del Gestor de Canales .......................................... 32

Para configurar los canales favoritos ........................................... 33

Manejo de la Lista de Canales ..................................................... 34

Visualización de la lista de canales.............................................. 34

Etiquetado de canales .................................................................. 35

Sintonización fina de los canales analógicos ............................... 35

Comprobación de la potencia de la señal digital ......................... 36

LNA (Low Noise Amplifier - Amplificador de ruido bajo)............... 36

PANTALLA DE PC

Uso del TV como pantalla de ordenador (PC) ............................. 37

Modos de visualización ................................................................ 37

Ajuste del televisor con el ordenador ........................................... 38

AJUSTE DE LA HORA

Configuración del Reloj ................................................................ 40

DESCRIPCIÓN DE LAS FUNCIONES

Selección del idioma de menú ..................................................... 43

Ajuste del modo Pantalla Azul...................................................... 43

Selección del Modo película......................................................... 44

Reducción digital del ruido ........................................................... 44

Uso del Modo Juego..................................................................... 44

Visión de subtítulos (mensajes de texto en pantalla) - Analógico ..... 45

Visión de subtítulos (mensajes de texto en pantalla) - Digital ..... 46

Nivel Transparencia del menú ...................................................... 47

Uso de la función de ahorro de energía....................................... 47

Ajuste de la función de ayuda   .................................................... 48

Uso de V-Chip .............................................................................. 48

APÉNDICE

Identificación de problemas.......................................................... 55

Instalación del soporte.................................................................. 56

Desconexión del soporte .............................................................. 56

Función de base giratoria ............................................................. 56

Instalacion del Kit de montaje en la pared 

(LN-S3292D/LN-S4092D)............................................................. 57

Instalación del Kit de montaje en la pared (LN-S4692D)............. 58

Uso del cierre antirrobo kensington.............................................. 60

Especificaciones ........................................................................... 60

Español-1

Antes de usar el equipo lea este manual para evitar

fallas y guarde para futuras referencias.

BN68-01001D-X1Spa.qxd  6/30/06  6:32 AM  Page 1

Содержание LNS3292D

Страница 1: ...Service Consommateurs Samsung Contacte con SAMSUNG WORLD WIDE Si tiene alguna pregunta o comentario referente a nuestros productos por favor contacte con nuestro Servicio de Atenci n al Cliente Countr...

Страница 2: ...e droite et au centre de l cran cause de la diff rence d mission de lumi re sur l cran La lecture d un DVD ou l utilisation d une console de jeu peut avoir un effet similaire sur l cran Les dommages p...

Страница 3: ...ng the TruSurround XT 28 Choosing a Multi Channel Sound MTS track Digital 29 Choosing a Multi Channel Sound MTS track Analog 29 Automatic Volume Control 30 Selecting the Internal Mute 30 Setting the O...

Страница 4: ...technology provides life like clear images SRS TruSurround XT SRS TruSurround XT provides a virtual Dolby surround system Accessories Please make sure the following items are included with your LCD T...

Страница 5: ...e remote control Press to change channels In the on screen menu use the buttons as you would use the and buttons on the remote control SPEAKERS REMOTE CONTROL SENSOR Aim the remote control towards thi...

Страница 6: ...al for audio HDMI DVI IN terminal does not support PC No sound connection is needed for an HDMI to HDMI connection ANT 1 IN ANT 2 IN Connect to an antenna or cable TV system PC IN Connect to the video...

Страница 7: ...Video inputs for external devices with an S Video output HEADPHONE Connect a set of external headphones for private listening Side Panel Jacks Use the left side panel jacks to connect a component that...

Страница 8: ...to store and delete channels to from memory SET Sets the remote to control your TV VCR Cable DVD or Set Top Box TV DVD STB CABLE VCR Press to operate your TV DVD STB CABLE box or VCR Refer to page 17...

Страница 9: ...UHF Antennas If you have two separate antennas for your TV one VHF and one UHF you must combine the two antenna signals before connecting the antennas to the TV This procedure requires an optional com...

Страница 10: ...r Cable Box Incoming cable Connecting to a Cable Box that Descrambles Some Channels If your cable box descrambles only some channels such as premium channels follow the instructions below You will nee...

Страница 11: ...ur VCR tape Each external input source device has a different back panel configuration When connecting an external device match the color of the connection terminal to the cable VCR Rear Panel TV Rear...

Страница 12: ...ables between the AV IN2 R AUDIO L jacks on the TV and the AUDIO OUT jacks on the camcorder Audio Cable Not supplied Video Cable Not supplied or S Video Cable Not supplied Connecting a DVD Player The...

Страница 13: ...e HDCP High Bandwidth Digital Copy Protection coding feature installed and supports multi channel digital audio Each external input source device has a different back panel configuration When connecti...

Страница 14: ...L on the Amplifier DVD Home Theater When an audio amplifier is connected to the AUDIO OUT L AUDIO R terminals Decrease the gain volume of the TV and adjust the volume level with the Amplifier s volum...

Страница 15: ...button to select Start If the antenna is connected to ANT 1 AIR select Air and if it is connected to ANT 2 CABLE select Cable If both ANT 1 AIR and ANT 2 CABLE are connected select the Air Cable In Ca...

Страница 16: ...Plug Play Press the ENTER button For further details on setting up options refer to the previous page Plug Play can only be accessed in the TV mode If you want to reset this feature Changing Channels...

Страница 17: ...ntrol The TV will display the channel the type of sound and the status of certain picture and sound settings The display identifies the current channel and the status of certain audio video settings P...

Страница 18: ...ton to display the menu Press the or buttons to select Channel then press the ENTER button 2 Press the ENTER button select Antenna Press the or buttons to select Air or Cable then press the ENTER butt...

Страница 19: ...es TV VCR Cable DVD or Set Top Box Pressing the corresponding button on the remote control allows you to switch between these modes and control whichever piece of equipment you choose The remote contr...

Страница 20: ...ol Modes DVD When your remote control is in DVD mode the volume buttons still control your TV s volume Setting Up the Remote to Operate Your Set Top Box 1 Turn off your STB 2 Press the STB button on y...

Страница 21: ...7 070 036 006 007 008 009 010 025 038 025 021 056 059 007 008 018 021 026 037 062 006 021 006 021 024 025 034 005 019 041 075 019 034 041 046 VCR Brand MONTGOMERY WARD MTC MULTITECH NEC OPTIMUS ORION...

Страница 22: ...3 051 108 109 073 059 100 106 107 074 075 025 031 057 058 054 055 056 076 093 074 094 073 048 049 050 052 053 144 074 105 072 076 092 119 044 045 046 047 023 Brand SAMSUNG GI HAMLIN HITACHI JERROLD MA...

Страница 23: ...6 049 050 063 058 059 061 062 016 065 066 051 052 053 065 066 064 057 026 020 027 031 005 006 007 064 064 054 060 015 017 028 029 030 072 060 066 016 021 037 055 056 057 024 031 068 Brand PANASONIC PH...

Страница 24: ...Game Camcorder DVD Combo PC VOD STB or TV input source then press the ENTER button Press the EXIT button to exit Use to select TV or other external input sources connected to the TV Use to select the...

Страница 25: ...eeds to be adjusted separately for each input 3 Press the or buttons to select Contrast Brightness Sharpness Color or Tint then press the ENTER button 4 Press the or buttons to decrease or increase th...

Страница 26: ...set DNIe Demo Digital Natural Image engine Samsung s new technology brings you more detailed images with contrast white enhancement and 3D noise reduction You can see how DNIe improves the picture by...

Страница 27: ...be selected 16 9 Zoom1 Zoom2 4 3 In TV DTV DVI PC HDMI COMPONENT 720p 1080i modes only 16 9 4 3 modes can be selected You must select Zoom with P Size button on the remote not in the OSD menu if you w...

Страница 28: ...in Picture 1 Press the MENU button to display the menu Press the or buttons to select Picture then press the ENTER button Press the or buttons to select PIP then press the ENTER button 2 Press the ENT...

Страница 29: ...he PIP window Press the ENTER buttons MAIN AV 1 2 S Video 1 2 Component PIP TV Digital MAIN PC HDMI 1 2 PIP TV Analog The channel can be active when the sub picture is set to TV Changing the Position...

Страница 30: ...NTER button to select Mode Press the or buttons to select Standard Music Movie Speech or Custom sound setting then press the ENTER button Press the EXIT button to exit Choose Standard for the standard...

Страница 31: ...ttons to select Sound then press the ENTER button Quick way to access the MTS menu Just press the MTS button on the remote control You can listen in a language other than your chosen language by press...

Страница 32: ...press the ENTER button Press the EXIT button to exit Sound output from the TV speakers is muted Automatic Volume Control 1 Press the MENU button to display the menu Press the or buttons to select Soun...

Страница 33: ...button Press the EXIT button to exit When the PIP feature is activated you can listen to the sound of the sub PIP picture English 31 Setting the On Off Melody 1 Press the MENU button to display the m...

Страница 34: ...nel Press MENU button to retum You can add or delete a channel so only channels you want are displayed Selecting the Antenna 1 Press the MENU button to display the menu Press the or buttons to select...

Страница 35: ...our Favorite channel selection press the ENTER button until the symbol is no longer highlighted Press the EXIT button to exit Only memorized channels can be set as favorite channels All favorite chann...

Страница 36: ...when you press the CH MGR button on the remote Added Shows Added channels when you press CH MGR button on the remote Favorite Shows Favorite channels when you press CH MGR button on the remote Viewing...

Страница 37: ...r optimal reception Labeling Channels 1 Press the MENU button to display the menu Press the or buttons to select Channel then press the ENTER button Press the or buttons to select Name then press the...

Страница 38: ...ifier boosts the incoming signal 1 Press the MENU button to display the menu Press the or buttons to select Channel then press the ENTER button 2 Press the or buttons to select Signal Strength then pr...

Страница 39: ...on exists on your display settings dialog box the correct value is 60 or 60 Hz Otherwise just click OK and exit the dialog box Display Modes If the signal from the system equals the standard signal mo...

Страница 40: ...ur PC 1 Press the MENU button to display the menu Press the or buttons to select Setup then press the ENTER button Press the or buttons to select PC then press the ENTER button Change to the PC mode f...

Страница 41: ...ENTER button 3 Press the or buttons to adjust the V Position Press the or buttons to adjust the H Position Press the ENTER button Press the EXIT button to exit Initializing the Screen Position 1 Pres...

Страница 42: ...2 Press the ENTER button to select Clock 3 Press the ENTER button to select Clock Mode Press the or buttons to select Manual then press the ENTER button 4 Press the or buttons to select Clock Set the...

Страница 43: ...ct Time Zone then press the ENTER button 5 Press the or buttons to highlight the time zone for your local area and to move the highlight to the appropriate time zone on the map of the United States th...

Страница 44: ...ess the MENU button to display the menu Press the or buttons to select Setup then press the ENTER button Press the or buttons to select Time then press the ENTER button 2 Press the or buttons to selec...

Страница 45: ...e If no signal is being received or the signal is very weak a blue screen automatically replaces the noisy picture background If you wish to continue viewing the poor picture you must set the Blue Scr...

Страница 46: ...up then press the ENTER button 2 Press the or buttons to select Game Mode then press the ENTER button 3 Select Off or On by pressing the or buttons then press the ENTER button 4 Press the EXIT button...

Страница 47: ...to exit The default is CC1 CC1 The Primary Synchronous Caption Service These are captions in the primary language that must be in sync with the sound preferably matched to a specific frame CC2 The Spe...

Страница 48: ...he desired sub menu options see options below then press ENTER Press the EXIT button to exit The availability of captions depends on the program being broadcast Default means to follow the standard se...

Страница 49: ...then press the ENTER button Select the required option Off Low Medium High by pressing or button Press the ENTER button Press the EXIT button to exit Menu Transparency Level Adjusts the transparency o...

Страница 50: ...buttons to select Change PIN then press the ENTER button The Change PIN screen will appear Choose any 4 digits for your PIN and enter them As soon as the 4 digits are entered the Confirm new PIN scre...

Страница 51: ...ing the or buttons will alternate between On and Off Press the ENTER button Press the EXIT button to exit How to Set up Restrictions Using the TV Parental Guidelines First set up a personal identifica...

Страница 52: ...l be blocked TV G TV PG TV 14 and TV MA The sub ratings D L S V work together similarly See next section 6 How to set the FV D L S and V sub ratings First select one of these TV Ratings TV Y TV Y7 TV...

Страница 53: ...hen press the ENTER button 4 The MPAA Rating screen will appear Repeatedly press the or buttons to select a particular MPAA category Pressing the or buttons will cycle through the MPAA categories Pres...

Страница 54: ...n Press the ENTER button to activate the restriction selected The symbol is indicated Press the EXIT button to exit Allow all Press to unlock all TV ratings Block all Press to lock all TV ratings E Ex...

Страница 55: ...ss the or buttons to select a appropriate restriction Press the ENTER button to activate the restriction selected The symbol is indicated Press the EXIT button to exit Allow all Press to unlock all TV...

Страница 56: ...downloaded from the broadcasting station However depending on the information from the broadcasting station it may not be available for use 4 Press the or buttons to select a appropriate restriction P...

Страница 57: ...ng it again Make sure the wall outlet is working Replace the remote control batteries Clean the upper edge of the remote control transmission window Check the battery terminals Ensure that the signal...

Страница 58: ...ll There should be enough space between the wall and the TV Place the TV on a flat and stable space to easily swivel the TV 15 15 The TV can be swiveled to the left or right You can adjust the angle u...

Страница 59: ...h the set bracket onto the rear side of the TV set and secure the screws 3 Insert three Hangers of the set bracket into the grooves of the wall bracket Fix set bracket and wall bracket with screws Not...

Страница 60: ...ft 1 Screw 11 M8 X L40 Anchor 11 Plastic Hanger 4 Screw 11 M4 X L20 Wall Bracket Accessories How to assemble the Wall Mount Bracket 1 Insert and tighten the Captive Screw in the direction of the arrow...

Страница 61: ...safety pin to securely hold the product to the bracket Wall Bracket Mount the product on the wall bracket and make sure it is properly fixed to the left and right plastic hangers Be careful when inst...

Страница 62: ...ze Diagonal Power Supply Power Consumption PC Resolution Sound Output Dimensions WxDxH Body With stand Weight With stand Environmental Considerations Operating Temperature Operating Humidity Storage T...

Страница 63: ...technologie TruSurround XT 28 S lection d une bande son canaux multiples MTS Num rique 29 S lection d une bande son canaux multiples MTS Analogique 29 S lection du mode Internal Mute Silence Int 30 Co...

Страница 64: ...e qualit d image La technologie DNIe offre des images d une nettet aussi vraie que nature SRS TruSurround XT SRS TruSurround XT offre un syst me surround Dolby virtuel Accessoires V rifiez que les l m...

Страница 65: ...ton pour changer de canal Dans le menu l cran utilisez les boutons de la m me mani re que les boutons et de la t l commande HAUT PARLEURS CAPTEUR DE LA T L COMMANDE Dirigez la t l commande vers de poi...

Страница 66: ...borne HDMI DVI IN ne prend pas en charge le PC Aucune connexion audio n est requise entre deux appareils HDMI ANT 1 IN ANT 2 IN Pour connecter une antenne ou un syst me de t l vision par c ble PC IN A...

Страница 67: ...ques externes avec sortie S Vid o PRISE CASQUE Pour connecter un ensemble d couteurs externes pour une coute individuelle Prises du panneau lat ral Les prises du panneau lat ral permettent de connecte...

Страница 68: ...u elle contr le votre t l viseur votre magn toscope votre lecteur DVD ou votre d codeur TV DVD STB CABLE VCR Permet de contr ler votre t l viseur votre lecteur DVD le STB votre d codeur ou votre magn...

Страница 69: ...en bas du panneau arri re Antennes VHF et UHF s par es Si vous disposez de deux antennes s par es pour votre t l vision une VHF et une UHF vous devez combiner les deux signaux des antennes avant de l...

Страница 70: ...de jonction servant d crypter certaines canal Si votre bo te de jonction ne d crypte que certaines canal comme les canal dites premium suivez les instructions ci dessous Pour ce faire vous avez besoin...

Страница 71: ...gn toscope La configuration arri re de chaque p riph rique source externe est diff rente suivant les appareils Lorsque vous connectez un p riph rique externe faites correspondre les couleurs de la bor...

Страница 72: ...Audio entre les prises AV IN 2 R AUDIO L du t l viseur et les prises AUDIO OUT du cam scope C ble Audio non fourni C ble Vid o non fourni ou C ble S Vid o non fourni Branchement d un lecteur DVD Les p...

Страница 73: ...DCP Syst me de protection du contenu num rique haute d finition et qu il prend en charge le son num rique multicanaux La configuration arri re de chaque p riph rique source externe est diff rente suiv...

Страница 74: ...D Lorsqu un amplificateur audio est connect aux bornes AUDIO OUT L AUDIO R Baissez le gain volume du t l viseur et r glez le volume l aide de la commande de volume de l amplificateur Amplificateur Hom...

Страница 75: ...on ENTER pour s lectionner D marrer Si l antenne est branch e dans la prise ANT 1 AIR s lectionnez Air et si elle est branch e sur la prise ANT 2 CABLE s lectionnez C ble Si les prises ANT 1 AIR et AN...

Страница 76: ...bouton ENTER Pour en savoir plus sur la configuration des options reportez vous la page pr c dente La fonction Pr t l emploi est accessible uniquement en mode TV Si vous souhaitez r initialiser ce par...

Страница 77: ...a t l commande La t l vision affiche la canal le type de son et l tat de certains param tres de son et d image L affichage identifie la canal en cours et l tat de certains param tres audio et vid o Ap...

Страница 78: ...sur le bouton ENTER 2 Appuyez sur le bouton ENTER pour s lectionner Antenne Appuyez plusieurs fois sur les boutons ou pour naviguer entre les options Air ou C ble puis appuyez sur le bouton ENTER App...

Страница 79: ...T l viseur Magn toscope C ble Lecteur DVD ou D codeur Une pression sur le bouton correspondant de la t l commande vous permet de basculer entre ces diff rents modes et de contr ler l appareil de votre...

Страница 80: ...t l commande Lecteur DVD Quand la t l commande est dans le mode DVD les touches de volume commandent toujours le volume du t l viseur Param trage de la t l commande pour contr ler votre d codeur 1 tei...

Страница 81: ...36 006 007 008 009 010 025 038 025 021 056 059 007 008 018 021 026 037 062 006 021 006 021 024 025 034 005 019 041 075 019 034 041 046 Codes de magn toscope Marque MONTGOMERY WARD MTC MULTITECH NEC OP...

Страница 82: ...109 073 059 100 106 107 074 075 025 031 057 058 054 055 056 076 093 074 094 073 048 049 050 052 053 144 074 105 072 076 092 119 044 045 046 047 023 Marque SAMSUNG GI HAMLIN HITACHI JERROLD MACOM MAGN...

Страница 83: ...0 063 058 059 061 062 016 065 066 051 052 053 065 066 064 057 026 020 027 031 005 006 007 064 064 054 060 015 017 028 029 030 072 060 066 016 021 037 055 056 057 024 031 068 Marque PANASONIC PHILIPS R...

Страница 84: ...mbo DVD PC D codeur VOD ou TV puis appuyez sur la touche ENTER Appuyez sur le bouton EXIT pour quitter A utiliser pour s lectionner le t l viseur ou une autre source d entr e externe connect e au t l...

Страница 85: ...entr e 3 Appuyez sur les boutons ou pour s lectionner Contraste Luminosit Nettet Couleur ou Teinte puis appuyez sur le bouton ENTER 4 Appuyez sur les boutons ou pour augmenter ou baisser la valeur d...

Страница 86: ...ialis s DNIe d mo Image naturelle num rique La nouvelle technologie de Samsung vous garantit des images plus pr cises gr ce un meilleur contraste l am lioration des blancs et la r duction du bruit 3D...

Страница 87: ...nibles 16 9 Zoom1 Zoom2 4 3 Dans les modes TV DTV DVI PC et HDMI COMPOSANT 720P 1080I seuls les modes 16 9 et 4 3 peuvent tre s lectionn s Vous devez s lectionner la fonction Zoom l aide du bouton P S...

Страница 88: ...z sur le bouton MENU pour afficher le menu Appuyez sur les boutons ou pour s lectionner Image puis appuyez sur le bouton ENTER Appuyez sur les boutons ou pour s lectionner ISI puis appuyez sur le bout...

Страница 89: ...ppuyez sur le bouton ENTER PRINCIPALE AV 1 2 S Vid o 1 2 Composant PIP TV num rique PRINCIPALE PC HDMI 1 2 PIP TV analogique La cha ne peut tre active lorsque l image secondaire est d finie sur TV Pou...

Страница 90: ...r glage du son Standard Musique Cin ma Parole ou Personn puis appuyez sur ENTER Appuyez sur le bouton EXIT Choisissez Standard pour les param tres usine standard Choisissez Musique quand vous regardez...

Страница 91: ...u pour s lectionner Son puis appuyez sur le bouton ENTER Raccourci vers le menu MTS Appuyez simplement sur le bouton MTS de la t l commande Vous pouvez couter le programme dans une langue autre que la...

Страница 92: ...bouton ENTER Appuyez sur le bouton EXIT pour quitter La sortie audio des haut parleurs du t l viseur est d sactiv e Contr le automatique du volume 1 Appuyez sur le bouton MENU pour afficher le menu Ap...

Страница 93: ...outon EXIT pour quitter Lorsque la fonction SIS est activ e vous pouvez couter le son de l image SIS secondaire Fran ais 31 Configuration de la m lodie de marche d arr t 1 Appuyez sur le bouton MENU p...

Страница 94: ...revennir au menu Vous pouvez ajouter ou supprimer une cha ne afin d afficher uniquement les cha nes de votre choix S lection de l antenne 1 Appuyez sur le bouton MENU pour afficher le menu Appuyez su...

Страница 95: ...es appuyez sur le bouton ENTER jusqu ce que le symbole ne soit plus en surbrillance Appuyez sur le bouton EXIT pour quitter Seules les cha nes d j en m moire peuvent faire partie de vos cha nes favor...

Страница 96: ...z sur le bouton CH MGR de la t l commande Ajoute Affiche les cha nes ajout es lorsque vous appuyez sur le bouton CH MGR de la t l commande Favorite Affiche vos cha nes pr f r es lorsque vous appuyez s...

Страница 97: ...ception d une cha ne Nom des cha nes 1 Appuyez sur le bouton MENU pour afficher le menu Appuyez sur les boutons ou pour s lectionner Cha ne puis appuyez sur le bouton ENTER Appuyez sur les boutons ou...

Страница 98: ...peut amplifier le signal et ainsi am liorer la r ception 1 Appuyez sur le bouton MENU pour afficher le menu Appuyez sur les boutons ou pour s lectionner Cha ne puis appuyez sur le bouton ENTER 2 Appuy...

Страница 99: ...Affichage R glage correct de la taille r solution Optimum 1360 x 768 pixels Si votre bo te de dialogue des param tres d affichage comporte une option de fr quence verticale la valeur correcte est 60...

Страница 100: ...re PC 1 Appuyez sur le bouton MENU pour afficher le menu Appuyez sur les boutons ou pour s lectionner Configuration puis appuyez sur le bouton ENTER Appuyez sur les boutons ou pour s lectionner PC pui...

Страница 101: ...puyez sur les boutons ou pour r gler Position vert Appuyez sur les boutons ou pour r gler Position hor Appuyez sur le bouton ENTER Appuyez sur le bouton EXIT pour quitter Initialiser la position de l...

Страница 102: ...es boutons ENTER pour s lectionner Horloge 3 Appuyez sur les boutons ENTER pour s lectionner Mode horloge Appuyez sur les boutons ou pour s lectionner Manuel puis appuyez sur le bouton ENTER 4 Appuyez...

Страница 103: ...seau hor puis appuyez sur le bouton ENTER 5 Appuyez sur les boutons ou pour s lectionner le fuseau horaire de votre r gion et pour d placer la s lection vers la zone appropri e sur la carte des tats U...

Страница 104: ...enu Appuyez sur les boutons ou pour s lectionner Configuration puis appuyez sur le bouton ENTER Appuyez sur les boutons ou pour s lectionner Heure puis appuyez sur le bouton ENTER 2 Appuyez sur les bo...

Страница 105: ...cun signal n est re u ou si le signal est tr s faible un cran bleu remplace automatiquement l arri re plan de l image parasit Pour continuer malgr tout afficher l image de mauvaise qualit vous devez d...

Страница 106: ...le bouton ENTER 2 Appuyez sur les boutons ou pour s lectionner Mode Jeu puis appuyez sur le bouton ENTER 3 Appuyez sur les boutons ou pour s lectionner On ou Off puis appuyez sur le bouton ENTER 4 App...

Страница 107: ...r ENTER Appuyez sur le bouton EXIT pour quitter La valeur par d faut est CC1 CC1 Sous titres principaux synchronis s Il s agit des sous titres fournis dans la langue principale qui doivent tre synchro...

Страница 108: ...s lectionnez les options de sous menu souhait es voir options ci dessous puis appuyez sur ENTER Appuyez sur le bouton EXIT pour quitter La disponibilit des sous titres d pend du programme diffus La va...

Страница 109: ...ER S lectionnez l option souhait e l aide du bouton ou Off Bas Moyen Haute Appuyez sur le bouton ENTER Appuyez sur le bouton EXIT pour quitter Niveau de transparence du menu Cette fonction permet de r...

Страница 110: ...utons ou pour s lectionner Changer NIP puis appuyez sur le bouton ENTER L cran Changer NIP s affiche Choisissez un code NIP 4 chiffres et saisissez le Lorsque vous avez entr le code NIP l cran Confirm...

Страница 111: ...ns ou alterne entre les modes On et Off Appuyez sur le bouton ENTER Appuyez sur le bouton EXIT pour quitter Comment configurer les restrictions l aide des Contr le parental TV R glez d abord le num ro...

Страница 112: ...nt alors bloqu es TV G TV PG TV 14 et TV MA Les valuations secondaires D L S V fonctionnent de la m me fa on voir section suivante 6 Comment r gler les valuations secondaires FV D L S et V Pour commen...

Страница 113: ...Chip appara t Appuyez sur les boutons ou pour s lectionner Classif MPAA puis appuyez sur le bouton ENTER 4 L cran Classif MPAA s affiche Appuyez plusieurs fois sur les boutons ou pour s lectionner une...

Страница 114: ...pri e Appuyez sur la touche ENTER pour activer la restriction s lectionn e Le s affiche Appuyez sur le bouton EXIT pour quitter Perm Tout D v verrouille tous les r glages du t l viseur Bloq Tout Verro...

Страница 115: ...ez sur la touche ou pour entrer une restriction appropri e Appuyez sur la touche ENTER pour activer la restriction s lectionn e Le s affiche Appuyez sur le bouton EXIT pour quitter Perm Tout D v verro...

Страница 116: ...isse pas l utiliser 4 Appuyez sur la touche ou pour entrer une restriction appropri e Appuyez sur la touche ENTER pour activer la restriction s lectionn e Le s affiche Appuyez sur le bouton EXIT pour...

Страница 117: ...branchez la t l vision pendant 30 secondes puis essayez de nouveau V rifiez que la prise lectrique fonctionne correctement Remplacez les piles de la t l commande Nettoyez la partie sup rieure de la t...

Страница 118: ...sur un chiffon doux ou un coussin sur une table 2 Retirez les 4 vis l arri re de la t l vision 3 Vous pouvez ensuite s parer la base du t l vision 4 Fermez l ouverture en utilisant un cache 2 3 4 Fonc...

Страница 119: ...port de la t l vision l arri re de la t l vision puis vissez les vis 3 Placez les 3 crochets du support dans les ouvertures du support mural Assemblez le support de la t l vision avec le support mural...

Страница 120: ...n murale Droite 1 Gauche 1 Vis 11 M8 X L40 VisAncrage 11 Dispositif de fixation en plastique 4 Vis 11 M4 X L20 Fixation murale Accessoires Comment installer la fixation pour montage mural 1 Ins rez la...

Страница 121: ...de s curit pour fixer solidement le produit au support Fixation murale Apr s avoir mont le produit sur la fixation murale assurez vous qu il est correctement fix aux suspensions en plastique droite et...

Страница 122: ...uche Droite Oui Oui Oui Specifications Mod le Taille de l cran diagonale Alimentation Consommation Maximum R solution PC Son Sortie Dimensions W X D X H TV Avec support Poids Avec support Consid ratio...

Страница 123: ...i n de una pista de sonido multicanal MTS Digital 29 Selecci n de una pista de sonido multicanal MTS Analogo 29 Selecci n del silencio interno 30 Control autom tico de volumen 30 Ajuste de la melod a...

Страница 124: ...le y los aparatos de v deo Calidad excelente de la imagen La tecnolog a DNIe proporciona im genes completamente reales SRS TruSurround XT SRS TruSurround XT proporciona un sistema surround Dolby virtu...

Страница 125: ...ncia Pulse para cambiar de canal En el men de la pantalla utilice estos botones del mismo modo que los botones y del mando a distancia ALTAVOCES SENSOR DEL MANDO A DISTANCIA Dirija el mando a distanci...

Страница 126: ...con el PC No se necesita conexi n de sonido alguna para una conexi n de HDMI a HDMI ANT 1 IN ANT 2 IN Efectuar una conexi n con una antena o con un sistema de televisi n por cable PC IN Se conecta a l...

Страница 127: ...rnos con salida S Video TOMA DE AURICULARES Efectuar una conexi n de un conjunto de auriculares exteriores para la audici n individual Tomas del panel lateral Use las tomas del panel lateral izquierdo...

Страница 128: ...controlar el televisor el aparato de v deo el reproductor de DVD y el receptor de televisi n digital o de cable TV DVD STB CABLE VCR P lselo para controlar el televisor el reproductor de DVD el recep...

Страница 129: ...s de VHF y UHF independientes Si dispone de dos antenas independientes para el TV una de VHF y otra de UHF debe combinar ambas se ales de la antena antes de conectarlas al TV Este procedimiento precis...

Страница 130: ...odificador que decodifica algunos canales Si su decodificador s lo decodifica algunos canales como los canales de pago siga las instrucciones siguientes Necesitar un divisor de dos v as un conmutador...

Страница 131: ...iere una configuraci n distinta en el panel posterior Cuando conecte un dispositivo externo debe hacer coincidir los colores del terminal de conexi n y del cable Panel posterior del VCR Panel posterio...

Страница 132: ...io entre las tomas AV IN 2 R AUDIO L del televisor y las tomas AUDIO OUT Salida de audio de la videoc mara Cable de Audio No incluido Cable de Video No incluido o Cable de S Video No incluido Conexi n...

Страница 133: ...del ancho de banda y es compatible con el sonido digital de varios canales Cada dispositivo de fuente de entrada externa requiere una configuraci n distinta en el panel posterior Cuando conecte un dis...

Страница 134: ...sa Cuando un amplificador de audio se conecta a los terminales AUDIO OUT L AUDIO R Reduzca la ganancia volumen del TV y ajuste el volumen con el control del amplificador Amplificador DVD para Cine en...

Страница 135: ...r Iniciar Si la antena est conectada a ANT 2 CABLE seleccione Cable si est conectada a ANT 1 AIR seleccione Aire Si ANT 1 AIR y ANT 2 CABLE est n conectadas seleccione Aire Cable En el modo de cable p...

Страница 136: ...g Play despu s pulse el bot n ENTER Si desea m s detalles sobre las opciones de configuraci n consulte la p gina anterior S lo se puede acceder a Plug Play en el modo TV Si desea reiniciar esta funci...

Страница 137: ...bot n INFO del mando a distancia El TV visualizar el canal el tipo de sonido y el estado de determinados ajustes de sonido e imagen La pantalla identifica el canal actual y el estado de algunos ajuste...

Страница 138: ...ra seleccionar Canal y despu s pulse el bot n ENTER 2 Pulse el bot n ENTER para seleccionar Antena Pulse los botones o para seleccionar Aire o Cable despu s pulse el bot n ENTER Pulse el bot n EXIT pa...

Страница 139: ...Top Box receptor TV digital Pulsando el bot n correspondiente del mando a distancia podr cambiar de un modo a otro y controlar cualquiera de estos equipos El mando a distancia quiz no sea compatible c...

Страница 140: ...mando a distancia est en el modo DVD los botones de volumen seguir n controlando el volumen del televisor Configuraci n del mando a distancia para controlar el STB 1 Apague el STB 2 Pulse el bot n ST...

Страница 141: ...070 036 006 007 008 009 010 025 038 025 021 056 059 007 008 018 021 026 037 062 006 021 006 021 024 025 034 005 019 041 075 019 034 041 046 C digos de v deo Marca MONTGOMERY WARD MTC MULTITECH NEC OPT...

Страница 142: ...8 109 073 059 100 106 107 074 075 025 031 057 058 054 055 056 076 093 074 094 073 048 049 050 052 053 144 074 105 072 076 092 119 044 045 046 047 023 Marca SAMSUNG GI HAMLIN HITACHI JERROLD MACOM MAGN...

Страница 143: ...063 058 059 061 062 016 065 066 051 052 053 065 066 064 057 026 020 027 031 005 006 007 064 064 054 060 015 017 028 029 030 072 060 066 016 021 037 055 056 057 024 031 068 Marca PANASONIC PHILIPS ROT...

Страница 144: ...DVD Juego Filmadora DVD Combo PC STB VOD o TV y a continuaci n pulse el bot n ENTER Pulse el bot n EXIT para salir Siga este procedimiento para seleccionar el televisor u otra fuente externa de entra...

Страница 145: ...se almacenar por separado seg n su modo de entrada 3 Pulse los botones o para seleccionar Contraste Luminos Definici n Color y Tinte despu s pulse el bot n ENTER 4 Pulse los botones o para aumentar o...

Страница 146: ...tor de imagen natural digital La nueva tecnolog a de Samsung brinda im genes con m s detalles m s contraste mejora de los blancos y una reducci n de ruidos 3D Puede ver c mo DNIe mejora la imagen acti...

Страница 147: ...s los modos de pantalla 16 9 Zoom1 Zoom2 4 3 En los modos TV DTV DVI PC HDMI y COMPONENTE 720P 1080i s lo pueden seleccionar los modos 16 9 y 4 3 En Zoom1 y Zoom2 se puede ajustar el tama o por medio...

Страница 148: ...ara ver el men en pantalla Pulse los botones o para seleccionar Imagen y despu s pulse el bot n ENTER Pulse los botones o para seleccionar PIP y despu s pulse el bot n ENTER 2 Pulse de nuevo el bot n...

Страница 149: ...AV 1 2 S Video 1 2 Componente PIP TV Digital IMAGEN PRINCIPAL PC HDMI 1 2 PIP TV Anal gica El canal puede estar activo cuando la imagen secundaria est configurada como TV Cambio de la posici n de la v...

Страница 150: ...bot n ENTER para seleccionar Modo Pulse los botones o para seleccionar el ajuste de sonido Normal M sica Cine Di logo o Favorito y pulse el bot n ENTER Pulse el bot n EXIT para salir Elija Normal si d...

Страница 151: ...pantalla Pulse los botones o para seleccionar Sonido y despu s pulse el bot n ENTER Forma r pida de acceder al men MTS Pulse el bot n MTS del mando a distancia Puede escuchar en un idioma distinto del...

Страница 152: ...ot n ENTER Pulse el bot n EXIT para salir Se silencia la salida de sonido desde los altavoces del televisor Control autom tico de volumen 1 Pulse el bot n MENU para ver el men en pantalla Pulse los bo...

Страница 153: ...se el bot n EXIT para salir Cuando la opci n PIP esta activada usted puede escuchar el sonido de la sub imagen del PIP Espa ol 31 Ajuste de la melod a de encendido apagado 1 Pulse el bot n MENU para v...

Страница 154: ...canal Pulse el bot n MENU para regresar Puede agregar o suprimir un canal para que se muestren s lo los canales que desee Selecci n de la antena 1 Pulse el bot n MENU para ver el men en pantalla Pulse...

Страница 155: ...de canales Favoritos presione el bot n ENTER hasta que el simbolo no este mas sobreindicado Pulse el bot n EXIT para salir S lo pueden seleccionarse como favoritos los canales memorizados Todos los ca...

Страница 156: ...ot n CH MGR del mando a distancia se muestran todos los canales Agregado Cuando se pulsa el bot n CH MGR del mando a distancia se muestran los canales agregados Favoritos Cuando se pulsa el bot n CH M...

Страница 157: ...ajustar manualmente un determinado canal a fin de que la recepci n sea ptima Etiquetado de canales 1 Pulse el bot n MENU para ver el men en pantalla Pulse los botones o para seleccionar Canal y despu...

Страница 158: ...previo de bajo ruido refuerza la se al entrante 1 Pulse el bot n MENU para ver el men en pantalla Pulse los botones o para seleccionar Canal y despu s pulse el bot n ENTER 2 Pulse los botones o para...

Страница 159: ...e una opci n de frecuencia vertical en el cuadro de di logo de configuraci n de la pantalla el valor correcto es 60 o 60 Hz Si no haga clic en Aceptar y salga del cuadro de di logo Modos de visualizac...

Страница 160: ...n MENU para ver el men en pantalla Pulse los botones o para seleccionar Configuraci n y despu s pulse el bot n ENTER Pulse los botones o para seleccionar PC y despu s pulse el bot n ENTER En primer lu...

Страница 161: ...ENTER 3 Pulse los botones o para ajustar Posici n V Pulse los botones o para ajustar Posici n H Pulse el bot n ENTER Pulse el bot n EXIT para salir Inicio de la configuraci n de Posici n de la pantal...

Страница 162: ...2 Pulse el bot n ENTER para seleccionar Reloj 3 Pulse el bot n ENTER para seleccionar Modo Reloj Pulse los botones o para seleccionar Manual y despu s pulse el bot n ENTER 4 Pulse los botones o para...

Страница 163: ...leccionar Zona Tiempo y despu s pulse el bot n ENTER 5 Pulse los botones o para resaltar la zona horaria del rea local y para mover la selecci n a la zona horaria apropiada en el mapa de Estados Unido...

Страница 164: ...ot n MENU para ver el men en pantalla Pulse los botones o para seleccionar Configuraci n y despu s pulse el bot n ENTER Pulse los botones o para seleccionar Tiempo y despu s pulse el bot n ENTER 2 Pul...

Страница 165: ...o se recibe ninguna se al o sta es muy d bil una pantalla azul sustituye de forma autom tica la imagen con interferencias Si desea continuar viendo la imagen deficiente debe definir el modo Pantalla A...

Страница 166: ...e el bot n ENTER 2 Pulse los botones o para seleccionar Modo Juego y despu s pulse el bot n ENTER 3 Pulse los botones o para seleccionar Enc o Apag y despu s pulse el bot n ENTER 4 Pulse el bot n EXIT...

Страница 167: ...ubt tulos sincronizados Son subt tulos en el idioma principal que debe estar sincronizado con el sonido preferiblemente que coincida con la secuencia espec fica CC2 Subt tulos especiales de uso no sin...

Страница 168: ...s de submen que desee vea las opciones en la pagina siguiente y pulse el bot n ENTER Pulse el bot n EXIT para salir La disponibilidad de los subt tulos depende del programa que se est emitiendo La opc...

Страница 169: ...y despu s pulse el bot n ENTER Seleccione la opci n deseada Apag Bajo Medio Alto pulsando los botones o Pulse el bot n ENTER Pulse el bot n EXIT para salir Nivel Transparencia del men Ajusta la trans...

Страница 170: ...botones o para seleccionar Cambiar C digo y despu s pulse el bot n ENTER Aparecer la pantalla Cambiar C digo Escriba un nuevo c digo PIN de 4 d gitos En cuanto introduzca los 4 d gitos aparece la pant...

Страница 171: ...otones o se alterna entre Enc y Apag Pulse el bot n ENTER Pulse el bot n EXIT para salir Configuraci n de Restricciones usando la secci n Gu as pater TV Primero establezca un n mero de identificaci n...

Страница 172: ...s TV G TV PG TV 14 y TV MA Las subclasificaciones D L S V funcionan de manera similar Consulte la secci n siguiente 6 C mo establecer las subclasificaciones FV D L S y V Primero seleccione una de las...

Страница 173: ...ulse el bot n ENTER 4 Aparecer la pantalla Clas MPAA Pulse varias veces los botones o para seleccionar una categor a concreta de MPAA Pulsando los botones o pasar secuencialmente por todas las categor...

Страница 174: ...TER para activar la restricci n seleccionada Est resaltada la Pulse el bot n EXIT para salir Perm todo Se pulsa para desbloquear todos los programas de televisi n Bloq todo Se pulsa para bloquear todo...

Страница 175: ...eleccionar la restricci n apropiada Pulse el bot n ENTER para activar la restricci n seleccionada Est resaltada la Pulse el bot n EXIT para salir Perm todo Se pulsa para desbloquear todos los programa...

Страница 176: ...ra su uso 4 Pulse los botones o para seleccionar la restricci n apropiada Pulse el bot n ENTER para activar la restricci n seleccionada Est resaltada la Pulse el bot n EXIT para salir Allow All Perm T...

Страница 177: ...undos y despu s intente que funcione otra vez Compruebe que la toma de la pared funciona Remplace las pilas del mando a distancia Limpie el borde superior del mando a distancia ventana de transmisi n...

Страница 178: ...a abajo el TV sobre un pa o suave o un almohad n sobre una mesa 2 Desmonte los 4 tornillos de la parte posterior del TV 3 Separe el soporte del TV 4 Cubra con una tapa el orificio inferior 2 3 4 Funci...

Страница 179: ...ple el soporte del aparato sobre la parte posterior del televisor y apriete los tornillos 3 Inserte los 3 Colgadores del soporte del aparato en los surcos del soporte de pared Fije el soporte del apar...

Страница 180: ...illo 11 M4 X L20 Soporte de pared Accesorios C mo montar el soporte de montaje mural 1 Inserte y apriete el tornillo de sujeci n en la direcci n de la flecha A continuaci n monte el soporte en la pare...

Страница 181: ...de seguridad para sujetar firmemente el aparato al soporte Soporte de pared Monte el aparato en el soporte de pared y aseg rese de que quede bien sujeto por los col gadores de pl stico izquierdo y der...

Страница 182: ...soluci n Sonido Salida Dimensiones An x Pr x Al Cuerpo principal Con soporte Peso Con el soporte Factores medioambientales Temperatura de funcionamiento Humedad de funcionamiento Temperatura de almace...

Страница 183: ...Esta pagina se ha dejado en blanco expresamente...

Отзывы: