background image

English-

12

C

O N N E C T I O N S

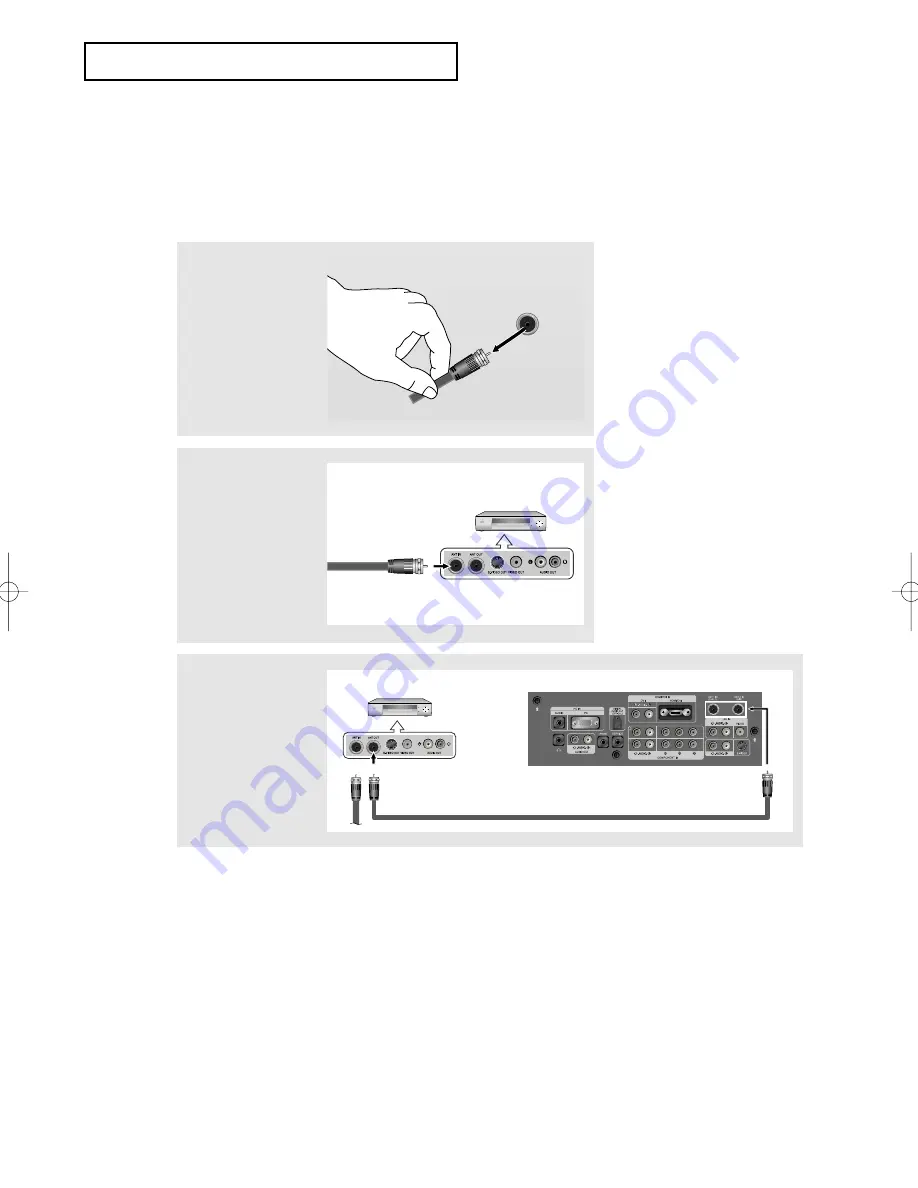
3

Connect an RF cable
between the
ANT OUT terminal
on the VCR and the
ANT 1 IN (CABLE) 
or ANT 2 IN (AIR)
terminal on the TV.

Connecting a VCR

These instructions assume that you have already connected your TV to an antenna or a
cable TV system (according to the instructions on pages 8-11).
Skip step 1 if you have not yet connected to an antenna or a cable system. 

1

Unplug the cable or
antenna from the
back of the TV.

2

Connect the cable or
antenna to the
ANT IN terminal
on the back of the
VCR.

VCR Rear Panel

Incoming Cable 

or Antenna

TV Rear Panel

RF Cable (Option)

VCR Rear Panel

ANT IN

01 BN68-00910A-03Eng.qxd  10/20/05 3:28 PM  Page 12

Содержание LNR269D

Страница 1: ...BN68 00910A 03 LN R269D LN R329D LN R409D LN R469D This device is a Class B digital apparatus Register your product at www samsung com global register 00910A 03 qxd 10 20 05 3 59 PM Page 1...

Страница 2: ...xed for an extended period of time the amount of light transmission will also remain varied and as a result the borders may leave traces Digital Ready TV When you select the wide screen 16 9 mode to w...

Страница 3: ...orders at the left right and the center of the screen remain fixed for an extended period of time the amount of light transmission will also remain varied and as a result the borders may leave traces...

Страница 4: ...an S VHS VCR 14 Connecting a Camcorder LN R329D LN R409D LN R469D 15 Connecting a DVD Player 15 Connecting a DVD Player Set Top Box via DVI 16 Connecting a DVD Player Set Top Box via HDMI 16 Connectin...

Страница 5: ...Sound 52 Using Automatic Sound Settings 53 Setting the Trusurround XT 54 Choosing a Multi Channel Sound MTS track Digital 55 Preferred Language 55 Multi Track Sound 56 Automatic Volume Control 57 Sele...

Страница 6: ...Canadian French 102 How to Reset the TV after the V Chip Blocks a Channel Emergency Escape 103 Electronic Program Guide 104 Viewing the Electronic Program Guide 104 Using the Electronic Program Guide...

Страница 7: ...ntrast Brightness Sensor Adjusts the screen brightness automatically depending on the brightness of the surrounding environment SRS TruSurround XT SRS TruSurround XT provides a virtual Dolby surround...

Страница 8: ...MI Also used to confirm your choice on the on screen menu MENU Press to see an on screen menu of your TV s features VOL Press to decrease or increase the volume Also used to select items on the on scr...

Страница 9: ...r panel jacks to connect an A V component that will be connected continuously such as a VCR or a DVD player For more information on connecting equipment see pages 8 18 The TV surface can be different...

Страница 10: ...C No sound connection is needed for an HDMI to HDMI connection ANT IN Connect to an antenna or to a cable TV system See pages 8 11 61 POWER INPUT Connect the supplied power cord KENSINGTON LOCK Refer...

Страница 11: ...ss to change the channel PRE CH Turns to the previous channel See page 19 CH and CH Channel UP Down Press to change channels See page 19 VOL and VOL Press to increase or decrease the volume See page 1...

Страница 12: ...age See page 40 SRS Selects TruSurround XT mode See page 54 SET Adjusts 5 separate devices TV VCR Cable DVD or Set Top Box See pages 29 31 INFO Use to see information on the current broadcast See page...

Страница 13: ...AAA size batteries Make sure to match the and ends of the batteries with the diagram inside the compartment Installing Batteries in the Remote Control 1 Slide the Cover out completely GENERAL INFORMA...

Страница 14: ...nas see Separate VHF and UHF Antennas on page 9 Antennas with 300 ohm Flat Twin Leads If you are using an off air antenna such as a roof antenna or rabbit ears that has 300 ohm twin flat leads follow...

Страница 15: ...R terminal on the bottom of the rear panel Antennas with 75 ohm Round Leads 1 Plug the antenna lead into the ANT 2 IN AIR terminal on the back of the TV Separate VHF and UHF Antennas If you have two s...

Страница 16: ...only some channels such as premium channels follow the instructions below You will need a two way splitter an RF A B switch and four lengths of RF cable These items are available at most electronics s...

Страница 17: ...B switch and the ANT 1 IN CABLE terminal on the rear of the TV After you have made this connection set the A B switch to the A position for normal viewing Set the A B switch to the B position to view...

Страница 18: ...lready connected your TV to an antenna or a cable TV system according to the instructions on pages 8 11 Skip step 1 if you have not yet connected to an antenna or a cable system 1 Unplug the cable or...

Страница 19: ...R tape Each external input source device has a different back panel configuration If you have a mono non stereo VCR use the Y connector not supplied to hook up to the right and left audio input jacks...

Страница 20: ...nd your TV Connecting an S VHS VCR Your Samsung TV can be connected to an S Video signal from an S VHS VCR This connection delivers a better picture as compared to a standard VHS VCR 2 Connect an audi...

Страница 21: ...Y jacks on the TV and the COMPONENT Y PB PR jacks on the DVD player Audio Cable Option Component Cable Option DVD Player Rear Panel TV Rear Panel Audio Cable Option DVD Player Rear Panel TV Rear Pane...

Страница 22: ...n be applied only if there is the HDMI Output connector on the external device 1 Connect an HDMI cable between the HDMI DVI connector on the TV and the HDMI connector on the DVD player Set Top Box Wha...

Страница 23: ...dio Cable Option Amplifier DVD Home Theater TV Rear Panel Note 5 1CH broadcasting is possible when it is connected to an external device supporting 5 1CH For an explanation of Component video see your...

Страница 24: ...provider 2 The pairing information containing a telephone number CableCARD ID Host ID and other information will be displayed in about 2 3 minutes If an error message is displayed please contact your...

Страница 25: ...ill switch to the last channel viewed To quickly switch between two channels that are far apart tune to one channel then use the number button to select the second channel Then use the PRE CH button t...

Страница 26: ...button on the remote control The TV will display the channel the type of sound and the status of certain picture and sound settings 1 With the power on press the MENU button The main menu appears on...

Страница 27: ...the language Press the UP DOWN buttons to select language then the ENTER button Select the antennas to memorize menu is automatically displayed 3 Press the UP DOWN buttons to memorize the channels of...

Страница 28: ...lar area At this point the signal source has been selected Proceed to Storing Channels in Memory LN R269D LN R329D 4 2 Press the UP DOWN buttons to select Digital Channel then press the ENTER button P...

Страница 29: ...ENTER button when channel memorization is complete Set to daylight savings time menu is automatically displayed 6 Press the ENTER button Press the UP DOWN buttons to select Yes or No then the ENTER b...

Страница 30: ...vious page Note Plug and Play can only be accessed in the TV mode 7 Press the UP DOWN buttons to highlight the time zone for your local area and to move the highlight to the appropriate time zone on t...

Страница 31: ...electing a broadcast source memorizing the channels automatic and adding and deleting channels manual Selecting the Video Signal source Before your television can begin memorizing the available channe...

Страница 32: ...buttons to select Channel then press the ENTER button 2 Press the UP DOWN buttons to select Auto Program then press the ENTER button 3 1 Press the UP DOWN buttons to select the antenna connection then...

Страница 33: ...English 27 OPERATION 4 After all the available channels are stored the Auto Program menu reappears Press the EXIT button to exit...

Страница 34: ...ct Channel then press the ENTER button 2 Press the UP DOWN buttons to select Add Delete then press the ENTER button 3 Repeatedly pressing the ENTER button will alternate between add channel and delete...

Страница 35: ...ume 1Turn off your VCR 2 Press the MODE button and make sure that the VCR appears on the LCD screen 3 Press the SET button on your TV s remote control 4 Using the number buttons on your remote control...

Страница 36: ...er buttons on your remote control enter three digits of the cable box code listed on page 32 of this manual for your brand of cable box Make sure you enter three digits of the code even if the first d...

Страница 37: ...remote control enter three digits of the DVD code listed on page 32 of this manual for your brand of DVD Make sure you enter three digits of the code even if the first digit is a 0 If there is more th...

Страница 38: ...036 056 059 008 007 018 021 026 036 037 062 018 007 026 037 008 062 064 021 056 071 072 021 036 056 059 021 036 019 026 036 053 017 019 002 021 035 041 043 057 068 000 018 024 018 019 006 024 028 029...

Страница 39: ...onent 2 PC or HDMI on the TV s rear panel HDMI input can only be selected when the external device is turned on and connected via HDMI LN R269D 2 2 Press the ENTER button to select Source List Press t...

Страница 40: ...English 34 Note You can choose only those external devices that are connected to the TV Alternate method Press the SOURCE button on the remote control to view an external signal source...

Страница 41: ...Input Press the UP DOWN buttons to select Edit Name then pressthe ENTER button 2 1 Press the UP DOWN buttons to select AV S Video Component1 Component2 PC or HDMI input jack then press the ENTER butt...

Страница 42: ...PC VOD STB or TV input source then press the ENTER button Press the EXIT button to exit 3 2 Press the UP DOWN buttons to select VCR DVD D VHS Cable STB HD STB Satellite STB PVR STB AV Receiver DVD Rec...

Страница 43: ...P DOWN buttons to select Picture then press the ENTER button 2 Press the ENTER button Press the ENTER button Press the UP DOWN buttons to select the Dynamic Standard Movie or Custom picture setting Pr...

Страница 44: ...essing the RIGHT button increases it Press the ENTER button Press the EXIT button to exit Tint doesn t operate in HDMI or any Component modes The Tint cannot be adjusted while watching Digital TV Each...

Страница 45: ...ss the UP DOWN buttons to select Picture then press the ENTER button 2 Press the ENTER button 3 Press the UP DOWN buttons to select Color Tone then press the ENTER button 4 Press the UP DOWN buttons t...

Страница 46: ...o then press the ENTER button 3 Press the UP DOWN buttons to select Off or On then press the ENTER button Press the EXIT button to exit This function doesn t work when Source is in PC mode DNIe Demo O...

Страница 47: ...s the UP DOWN buttons to select Size then press the ENTER button 3 Press the LEFT RIGHT buttons to select the screen format you want Press the ENTER button Press the EXIT button to exit 16 9 Sets the...

Страница 48: ...displays in this order 16 9 Panorama Zoom1 Zoom2 4 3 Note If you watch a still image or the 4 3 mode for a long time over 2 hours an image may be burned onto the screen View the TV in 16 9 or Panoram...

Страница 49: ...PICTURE CONTROL English 43 Freezing the Picture 1 Press the STILL button to freeze a moving picture Normal sound will still be heard Press again to cancel...

Страница 50: ...V Chip is in operation the PIP function cannot be used Activating Picture in Picture 1 Press the MENU button to display the menu Press the UP DOWN buttons to select Picture then press the ENTER butto...

Страница 51: ...pressing the UP DOWN buttons and press the ENTER button PC HDMI HDMI X O O O O X X MAIN TV ATV PIP HDMI The sub picture can serve different source selections based on what the main picture is set to N...

Страница 52: ...N buttons to select PIP Channel then press the ENTER button Press the UP DOWN buttons to select the desired channel in the PIP window Alternate method Press the PIP Channel buttons under the remote s...

Страница 53: ...ss the UP DOWN buttons to select Size then press the ENTER button Press the UP DOWN buttons to select the desired size of the PIP window Press the ENTER button Press the EXIT button to exit Changing t...

Страница 54: ...select My Color Control then press the ENTER button 2 Press the UP DOWN buttons to select Easy Control then press the ENTER button 3 Press the LEFT RIGHT buttons to select the desired My Color Control...

Страница 55: ...then press the ENTER button 2 Press the UP DOWN buttons to select Detail Control then press the ENTER button 3 Press the UP DOWN buttons to select the desired My Color Control color and press the ENT...

Страница 56: ...and adjusts to create optimum contrast 1 Press the MENU button to display the menu Press the UP DOWN buttons to select Picture then press the ENTER button 2 Press the UP DOWN buttons to select Dynami...

Страница 57: ...ht detecting sensor 1 Press the MENU button to display the menu Press the UP DOWN buttons to select Picture then press the ENTER button 2 Press the UP DOWN buttons to select Brightness Sensor then pre...

Страница 58: ...en press the ENTER button 2 Press the UP DOWN buttons to select Equalizer then press the ENTER button 3 Press the LEFT RIGHT buttons to select a particular frequency to adjust Press the UP DOWN button...

Страница 59: ...nd then press the ENTER button 2 Press the ENTER button to select Mode Press the UP DOWN buttons to select Standard Music Movie Speech or Custom sound setting then press the ENTER button Press the EXI...

Страница 60: ...fully compatible with all multichannel formats 1 Press the MENU button to display the menu Press the UP DOWN buttons to select Sound then press the ENTER button 2 Press the UP DOWN buttons to select S...

Страница 61: ...ENU button to display the menu Press the UP DOWN buttons to select Sound then press the ENTER button 2 Press the UP DOWN buttons to select Multi Track Options then press the ENTER button 3 Press the E...

Страница 62: ...UP DOWN buttons to select Multi Track Sound then press the ENTER button Press the UP DOWN buttons to select a setting you want then press the ENTER button Press the EXIT button to exit Choose Mono for...

Страница 63: ...ters 1 Press the MENU button to display the menu Press the UP DOWN buttons to select Sound then press the ENTER button 2 Press the UP DOWN buttons to select Auto Volume then press the ENTER button 3 P...

Страница 64: ...ed 1 Press the MENU button to display the menu Press the UP DOWN buttons to select Sound then press the ENTER button 2 Press the UP DOWN buttons to select Internal Mute then press the ENTER button Pre...

Страница 65: ...e MENU button to display the menu Press the UP DOWN buttons to select Sound then press the ENTER button 2 Press the UP DOWN buttons to select Digital Output then press the ENTER button Press the UP DO...

Страница 66: ...ered On or Off 1 Press the MENU button to display the menu Press the UP DOWN buttons to select Sound then press the ENTER button 2 Press the UP DOWN buttons to select Melody then press the ENTER butto...

Страница 67: ...select Antenna Press the UP DOWN buttons to select Air or Cable then press the ENTER button Press the EXIT button to exit Note If the antenna is connected to ANT 1 IN CABLE select CABLE and if it is c...

Страница 68: ...buttons to select Favorite Channels then press the ENTER button 2 Press the UP DOWN buttons to select your favorite channels to watch among the labeled channels Press the UP DOWN buttons to select a c...

Страница 69: ...button to switch to the next field which will be selected Select a second letter or digit by pressing the UP DOWN buttons as above Repeat the process to select the last three digits When you have fin...

Страница 70: ...ess the ENTER button Press the UP DOWN buttons to select All or Favorite then press the ENTER button 3 Press the UP DOWN buttons to select Channel and ENTER button To toggle between your favorite chan...

Страница 71: ...en press the ENTER button 3 Press the UP DOWN buttons to select Channel and ENTER button Then the channel can be deleted or added If deleted the channel number will be dimmed To make the deleted chann...

Страница 72: ...buttons to adjust the fine tuning 4 To store the fine tuning setting in the TV s memory press the ENTER button To reset the fine tuning setting press the DOWN button to select Reset then press the ENT...

Страница 73: ...adjust your antenna to improve the reception of available digital channels 1 Press the MENU button to display the menu Press the UP DOWN buttons to select Channel then press the ENTER button 2 Press...

Страница 74: ...ess the UP DOWN buttons to select Channel then press the ENTER button 2 Press the UP DOWN buttons to select LNA then press the ENTER button Press the UP DOWN buttons to select On then press the ENTER...

Страница 75: ...ll cases If not contact your computer manufacturer or Samsung Dealer 1 First click on Control Panel on the Windows start menu 4 Navigate to the Settings tab on the display dialog box The correct size...

Страница 76: ...e menu Press the UP DOWN buttons to select Setup then press the ENTER button Press the UP DOWN buttons to select PC then press the ENTER button 2 Press the UP DOWN buttons to select Auto Adjustment th...

Страница 77: ...ter of screen 2 Press the ENTER button to select Image Lock 1 1 Press the MENU button to display the menu Press the UP DOWN buttons to select Setup then press the ENTER button Press the UP DOWN button...

Страница 78: ...ct Coarse or Fine then press the ENTER button Press the LEFT RIGHT buttons to adjust the screen quality Vertical stripes may appear or the picture may be blurry Press the ENTER button Press the EXIT b...

Страница 79: ...elect Setup then press the ENTER button Press the UP DOWN buttons to select PC then press the ENTER button 1 2 Press the MENU button to display the menu Press the UP DOWN buttons to select Setup then...

Страница 80: ...English 74 3 Press the UP DOWN buttons to adjust the V Position Press the LEFT RIGHT buttons to adjust the H Position Press the ENTER button Press the EXIT button to exit...

Страница 81: ...ss the UP DOWN buttons to select Setup then press the ENTER button Press the UP DOWN buttons to select PC then press the ENTER button 1 2 Press the MENU button to display the menu Press the UP DOWN bu...

Страница 82: ...s the INFO button Option 1 Setting the Clock Manually 1 Press the MENU button to display the menu Press the UP DOWN buttons to select Setup then press the ENTER button Press the UP DOWN buttons to sel...

Страница 83: ...y Year Hour Minute or am pm Set the date and time you want by pressing the UP DOWN buttons then press the ENTER button Press the EXIT button to exit The current time will appear every time you press t...

Страница 84: ...the UP DOWN buttons to select Setup then press the ENTER button Press the UP DOWN buttons to select Time then press the ENTER button 2 Press the ENTER button to select Clock 3 Press the ENTER button t...

Страница 85: ...of the United States then press the ENTER button Depending on the broadcast station and signal the auto time may not be set correctly If this occurs set the time manually 6 Press the UP DOWN buttons...

Страница 86: ...n Press the UP DOWN buttons to select Time then press the ENTER button 2 Press the UP DOWN buttons to select Sleep Timer then press the ENTER button 3 Press the UP DOWN buttons to adjust Minute 4 Pres...

Страница 87: ...the RIGHT button to move to the next step Set other items using the same method as above When finished press the MENU button to return The current time will appear every time you press the INFO butto...

Страница 88: ...DOWN buttons to select Setup then press the ENTER button Press the UP DOWN buttons to select Language then press the ENTER button 2 Press the UP DOWN buttons to select the appropriate language Englis...

Страница 89: ...es off the Film mode 1 Press the MENU button to display the menu Press the UP DOWN buttons to select Picture then press the ENTER button 2 Press the UP DOWN buttons to select Film Mode then press the...

Страница 90: ...to help reduce any static and ghosting that may appear on the screen 1 Press the MENU button to display the menu Press the UP DOWN buttons to select Picture then press the ENTER button 2 Press the UP...

Страница 91: ...s the MENU button to display the menu Press the UP DOWN buttons to select Setup then press the ENTER button 2 1 Press the UP DOWN buttons to select Color Weakness then press the ENTER button FUNCTION...

Страница 92: ...hange then press the ENTER button Press the LEFT RIGHT buttons to change the value of the item then press the ENTER button Press the EXIT button to exit 3 Press the ENTER button Press the UP DOWN butt...

Страница 93: ...g RF channel mode or external signal mode 1 Press the MENU button to display the menu Press the UP DOWN buttons to select Setup then press the ENTER button 2 Press the UP DOWN buttons to select Captio...

Страница 94: ...ions This channel carries data that is intended to augment information carried in the program CC3 Secondary Synchronous Caption Service Alternate program related caption data typically second language...

Страница 95: ...ates on digital channels 1 Press the MENU button to display the menu Press the UP DOWN buttons to select Setup then press the ENTER button 2 Press the UP DOWN buttons to select Caption then press the...

Страница 96: ...en Service1 Service6 can be selected in Caption Mode SERVICE1 6 in digital caption mode may not be available depending on the broadcast 6 Press the UP DOWN buttons to select Size then press the ENTER...

Страница 97: ...Yellow Magenta and Cyan You can change the background color of the caption The default is Black Foreground Opacity This option consists of Default Transparent Translucent Solid and Flashing You can ch...

Страница 98: ...1 Press the MENU button to display the menu Press the UP DOWN buttons to select Setup then press the ENTER button 2 Press the UP DOWN buttons to select Menu Transparency then press the ENTER button P...

Страница 99: ...help on the menu functions 1 Press the MENU button to display the menu Press the UP DOWN buttons to select Setup then press the ENTER button 2 1 Press the UP DOWN buttons to select Function Help then...

Страница 100: ...UP DOWN buttons to select On then press the ENTER button Press the EXIT button to exit LN R269D LN R329D 3 2 Press the UP DOWN buttons to select On then press the ENTER button Press the EXIT button t...

Страница 101: ...OWN buttons to select V Chip then press the ENTER button The message Enter PIN will appear Enter your 4 digit PIN number The default PIN number of a new TV set is 0 0 0 0 3 The V Chip screen will appe...

Страница 102: ...N buttons to select V Chip then press the ENTER button The message Enter PIN will appear Enter your 4 digit PIN number 3 The V Chip screen will appear To enable the V Chip feature press the ENTER butt...

Страница 103: ...select Setup then press the ENTER button 2 Press the UP DOWN buttons to select V Chip then press the ENTER button The message Enter PIN will appear Enter your 4 digit PIN number 3 The V Chip screen w...

Страница 104: ...and V sub ratings First select one of these TV Ratings TV Y TV Y7 TV G TV PG TV 14 or TV MA See Step 4 on previous page and press the RIGHT button A symbol will be displayed for each sub rating While...

Страница 105: ...ll automatically block any programs that are coded with objectionable ratings either MPAA or TV Ratings 1 Press the MENU button to display the menu Press the UP DOWN buttons to select Setup then press...

Страница 106: ...ldren under 17 should be accompanied by an adult NC 17 No children under age 17 X X Adults only NR Not rated While a particular category is selected press the ENTER button to activate it A selected sy...

Страница 107: ...NTER button to activate the restriction selected The symbol is indicated Press the EXIT button to exit Allow All Press to unlock all TV ratings Block All Press to lock all TV ratings E Exempt programm...

Страница 108: ...to select a appropriate restriction Press the ENTER button to activate the restriction selected The symbol is indicated Press the EXIT button to exit Allow All Press to unlock all TV ratings Block Al...

Страница 109: ...ferent channel using CH or CH button Under certain conditions depending on the rating of the local TV programs the V Chip might lock out all the channels In this case use the V Chip function for an em...

Страница 110: ...rolls backwards quickly 2 hours Press the Green button on the remote control E Displays titles and other details about upcoming programs of particular channels Highlight the program and press the INFO...

Страница 111: ...to select Guide then press the ENTER button 2 Press the UP DOWN buttons to select Default Guide then press the ENTER button 3 Press the UP DOWN buttons to select Mini Guide or Full Guide then press th...

Страница 112: ...button on the remote control FUNCTION DESCRIPTION ENTER button Press to watch the current program or to add the program to remind list Red button Press to switch to the program guide for all channels...

Страница 113: ...Hours INFO button Displays detailed information for the selected digital program button Displays program information for each channel based on the time Select your desired program using the UP DOWN L...

Страница 114: ...he Program Guide and return to normal viewing mode Press the Blue button or the EXIT button Note The current time displayed on the program information is subject to the time information sent from the...

Страница 115: ...ould like to see then press the enter button The symbol will be displayed Each press of the ENTER button will switch between Reminded and Clear Press the EXIT button to exit Viewing the Remind List If...

Страница 116: ...he UP DOWN buttons to select Remind List then press the ENTER button 1 Press the UP DOWN buttons to select a program to be removed then press the ENTER button To cancel the channels added press the EN...

Страница 117: ...ce provider Prior to accessing this menu a CableCARD should be connected to the rear panel of the TV For detailed connection instructions refer to the Connecting CableCARD section of this manual Displ...

Страница 118: ...e CableCARD Setup Function LN R409D LN R469D Sets up the relevant options for CableCARD CableCARD Reset Resets CableCARD when the channels provided by CableCARD are not available 2 Press the UP DOWN b...

Страница 119: ...then press the ENTER button Channel List Reorganization Deletes and reorganizes the channel list provided by the Cable Company and authorized by the CableCARD 2 Press the UP DOWN buttons to select Cab...

Страница 120: ...ns Try another channel Adjust the antenna Try another channel Press the SOURCE button Make sure the TV is plugged in Check the antenna connections First check the volume of units connected to your TV...

Страница 121: ...gement system Move the computer s mouse or press any key on the keyboard If the setting is not correct use your computer utility program to change the display settings NOTE Your TV supports multiscan...

Страница 122: ...cloth or cushion on a table 2 Attach the stand to the TV set as shown in the picture 3 Use the four screws to tightly fix the stand 1 Place the TV faced down on a soft cloth or cushion on a table 2 R...

Страница 123: ...racket to the wall with wood screws after fitting anchors into the wall bracket Note If the bracket is not firmly fixed to the wall LCD TV can fall off 2 Turn the power off and unplug the power cord f...

Страница 124: ...firmly fixed to the wall LCD TV can fall off 2 Turn the power off and unplug the power cord from the outlet Place the TV faced down on a soft cloth or cushion on a table Loosen two screws on the rear...

Страница 125: ...ge to the product or injury to yourself or others if you elect to perform the wall installation 2 This product is for installing on cement walls The product may not stay in place when installed on pla...

Страница 126: ...short or long loosen all or some of the 4 screws on the wall bracket to adjust the length 2 Check the installation diagram and mark the drill points on the wall Use the 5 0 mm bit to drill holes deepe...

Страница 127: ...ft and right plastic hangers Be careful when installing the product on the bracket as fingers can be caught in the holes Make sure the wall bracket is securely fixed to the wall or the product may not...

Страница 128: ...Fix the product to the wall bracket 2 Hold the product at the top in the center and pull it forward direction of the arrow to adjust the angle See the figure to the right 3 You can adjust the bracket...

Страница 129: ...monitor to the stand pegs The exterior of the set may be different than the picture 1 Note Two or more people should carry the TV Never lay the TV on the floor because of possible damage to the scree...

Страница 130: ...is a device used to physically fix the system when using it in a public place The locking device has to be purchased separately The appearance and locking method may differ from the illustration depen...

Страница 131: ...en the CableCARD is inserted into the slot the TV screen will show a message that CableCARD is inserted and necessary data such as channel information or subscription information will be downloaded fr...

Страница 132: ...BS S VHS Component Video In 10 Vp p 75ohm 10 Vp p 75ohm Audio In 500mVrms 500mVrms Power Supply Input AC 110V 120V 60Hz AC 110V 120V 60Hz Power Consumption Normal 140W 184W Power Saving 3W 3W Dimensio...

Страница 133: ...10 Vp p 75ohm 10 Vp p 75ohm Audio In 500mVrms 500mVrms Power Supply Input AC 110V 120V 60Hz AC 110V 120V 60Hz Power Consumption Normal 285W 330W Power Saving 20W 20W Dimensions W X D X H Unit body 39...

Страница 134: ...350 31 469 70 086 25 175 720 X 400 31 469 70 087 28 322 640 X 480 31 469 59 940 25 175 VESA 640 X 480 35 000 70 000 28 560 640 X 480 37 861 72 809 31 500 640 X 480 37 500 75 000 31 500 800 X 600 37 87...

Отзывы: