background image

Français -

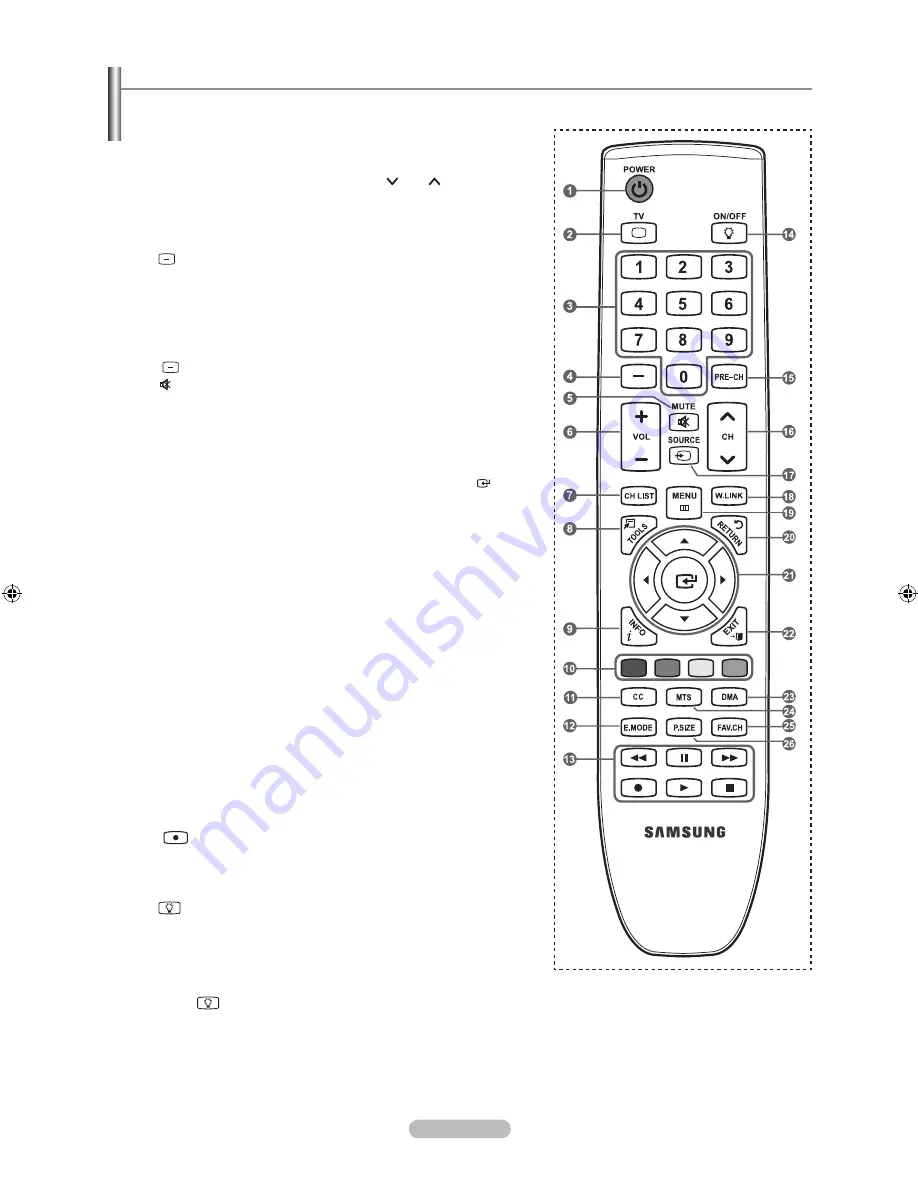
Télécommande

Vous pouvez utiliser la télécommande à une distance maximale du téléviseur d’environ 7 m.

1

  POWER

Permet d’allumer et d’éteindre le 

téléviseur.

2

   TV

Pour sélectionner directement le 

mode TV.

3

  BOUTONS NUMéRIqUES

Permet de changer de chaîne.

4


 Appuyez sur ce bouton pour 

sélectionner des canaux 

supplémentaires (numériques 

et analogiques) diffusées par la 

même station. Par exemple, pour 

sélectionner le canal 


“54-3”, appuyez sur “54”, puis sur 

“ ” et sur “3”. 

5


(MUTE)

Permet de couper le son 

temporairement et de le rétablir.

6

  VOL – / VOL +

Appuyer sur ces touches pour 

augmenter ou diminuer le 

volume.

7

  CH LIST

Afficher la liste des canaux à 

l’écran.

8

  TOOLS

Permettent de sélectionner les 

fonctions fréquemment utilisées.

9

  INFO

Appuyez sur cette touche pour 

afficher de l’information à l’écran.

0

  TOUCHES DE COULEUR

Utiliser ces touches à partir de la 

liste des canaux, WISELINK, etc.

!

  CC

Permet de commander la 

fonction de sous-titrage.

@

  E.MODE

Appuyer sur cette touche pour 

sélectionner l’affichage préréglé 

et les modes sonores pour les 

sports, le cinéma et les jeux.

#


Utiliser ces touches pour les 

modes DMA, WISELINK et 

Anynet

+

.


(

 : Cette télécommande 

peut servir à commander 

l’enregistrement sur des 

enregistreurs Samsung avec la 

fonction Anynet

+

.

$


ON/OFF

Appuyer sur cette touche pour 

rétroéclairer les touches de la 

télécommande. Cette fonction 

est utile durant la nuit ou lorsque 

la pièce est sombre. (L’utilisation 

de la télécommande alors que la 

touche 


ON/OFF

 est réglée 

à On réduit le temps d’utilisation 

des piles.) 

%

  PRE-CH

Permet d’écouter le canal 

précédent.

^

  CH 

 / CH 

Permettent de changer de canal.

&

  SOURCE

Appuyer sur cette touche pour 

afficher et choisir les sources 

vidéo accessibles.

*

  W.LINK (WISELINK)

Cette fonction permet de 

visualiser des photographies 

et d’écouter des fichiers audio 

depuis un appareil externe. 

(Consulter les pages 63 (Photo), 

73 (Musique))

(

  MENU

Affiche le menu à l’écran 

principal.

)

  RETURN

Retourne au menu précédent.

a

   HAUT▲/BAS▼/GAUCHE◄/

DROITE► / ENTER 


Pour sélectionner des options 

de menu et modifier leur valeur.

b

  EXIT

Appuyer sur cette touche pour 

sortir du menu.

c

  DMA (adaptateur pour les 

supports numériques)

Utiliser cette fonction lorsqu’un 

appareil DMA de SAMSUNG est 

branché à une interface HDMI 

ou que le téléviseur est en mode 

DMA. Pour plus d’information 

sur les procédures d’utilisation, 

consulter le guide de l’utilisateur 

du dispositif DMA.

Cette touche est active lorsque 

le mode “(HDMI-CEC)” 

est activé. (Voir la page 82.)

d

  MTS

Pour sélectionner le son stéréo, 

mono ou SAP (Separate Audio 

Program).

e

  FAV.CH

Appuyez sur ce bouton pour 

naviguer entre vos chaînes 

favorites.

f

  P.SIZE

Permet de sélectionner la taille 

d’image.

Une lumière intense peut affecter le bon fonctionnement de la télécommande.

BN68-01669C-Fre.indb   5

2008-07-11   �� 4:57:06

Содержание LN40A630 - 40" LCD TV

Страница 1: ...msung Electronics Canada Inc Customer Service 55 Standish Court Mississauga Ontario L5R 4B2 Canada Samsung Electronique Canada Inc Service à la Clientèle 55 Standish Court Mississauga Ontario L5R 4B2 Canada U S A 1 800 SAMSUNG 726 7864 www samsung com Samsung Electronics America Inc 105 Challenger Road Ridgefield Park NJ 07660 0511 LCD TV user manual imagine the possibilities Thank you for purchas...

Страница 2: ...60 037 6 023 490 5 878 080 and under US Published Patent Application No 2001 44713 A1 This license is limited to private non commercial use by end user consumers for licensed contents No rights are granted for commercial use The license does not cover any product unit other than this product unit and the license does not extend to any unlicensed product unit or process conforming to ISO IEC 11172 ...

Страница 3: ...ng the Speaker 32 Listening to the Sound of the Sub PIP Picture 33 Resetting the Sound Settings to the Factory Defaults 33 Connecting Headphones Sold separately 33 Channel Control Managing Channels 34 Clearing Scrambled Channels Digital 41 Fine Tuning Analog Channels 41 Checking the Digital Signal Strength 42 PC Display Using Your TV as a Computer PC Display 43 Display Modes 43 Setting up the TV w...

Страница 4: ...HDMI DVI connection of your PC to this TV Excellent Picture Quality DNIe technology provides life like clear images SRS TruSurround XT SRS TruSurround XT provides a virtual surround system Accessories Please make sure the following items are included with your LCD TV If any items are missing contact your dealer Remote Control Batteries AAA x 2 BN59 00673A Power Cord 3903 000144 Warranty Card Regis...

Страница 5: ...ilable input sources TV AV1 AV2 S Video Component1 Component2 PC HDMI1 HDMI2 DVI HDMI3 USB In the on screen menu use this button as you would use the ENTER button on the remote control 4 MENU Press to see an on screen menu of your TV s features 5 VOL Press to increase or decrease the volume In the on screen menu use the VOL buttons as you would use the and buttons on the remote control 6 CH Press ...

Страница 6: ...ble connection you must use the HDMI IN 2 jack 5 ANT IN Connects to an antenna or cable TV system 6 WISELINK Connect a USB mass storage device to view photo files and play audio files 7 AV IN 2 Video and audio inputs for external devices such as a camcorder or VCR S VIDEO Connects an S Video signal from a camcorder or VCR 8 HEADPHONE Connects a set of external headphones for private listening 9 PO...

Страница 7: ...o backlight the buttons on the remote This function is convenient for using at night or when the room is dark Using the remote control with the ON OFF light button set to On will reduce the battery usage time PRE CH Tunes to the previous channel CH CH Press to change channels SOURCE Press to display and select the available video sources W LINK WISELINK This function enables you to view and play p...

Страница 8: ...eads that look like the diagram to the right see Antennas with 300 Ω Flat Twin Leads below If your antenna has one lead that looks like the diagram to the right see Antennas with 75 Ω Round Leads If you have two antennas see Separate VHF and UHF Antennas Antennas with 300 Ω Flat Twin Leads If you are using an off air antenna such as a roof antenna or rabbit ears that has 300 Ω twin flat leads foll...

Страница 9: ...IN terminal on your cable box This terminal might be labeled ANT IN VHF IN or simply IN 2 Connect this cable to a two way splitter 3 Connect an RF cable between the OUTPUT terminal on the splitter and the IN terminal on the cable box 4 Connect an RF cable between the ANT OUT terminal on the cable box and the B IN terminal on the RF A B switch 5 Connect another cable between the other OUT terminal ...

Страница 10: ...s to the DVI IN HDMI2 R AUDIO L jacks on the back of the TV If this happens contact the company that provided the DVD player Cable Box Satellite receiver to confirm the HDMI version then request an upgrade HDMI cables that are not 1 3 may cause annoying flicker or no screen display or DVD Player or Cable Box Satellite receiver Set Top Box Rear Panel TV Rear Panel HDMI Cable Not supplied TV Side Pa...

Страница 11: ...e Box Satellite receiver Set Top Box to your TV 1 Connect a Component Cable between the COMPONENT IN 1 or 2 Y PB PR jacks on the TV and the COMPONENT Y PB PR jacks on the DVD Player or Cable Box Satellite receiver Set Top Box 2 Connect Audio Cables between the COMPONENT IN 1 or 2 R AUDIO L jacks on the TV and the AUDIO OUT jacks on the DVD Player or Cable Box Satellite receiver Set Top Box Compone...

Страница 12: ...r Tape to view your VCR tape Each VCR has a different back panel configuration When connecting a VCR match the color of the connection terminal to the cable When connecting to AV IN 1 the color of the AV IN 1 Y VIDEO jack Green does not match the color of the video cable Yellow S Video Connection Your Samsung TV can be connected to an S Video jack on a VCR This connection delivers a better picture...

Страница 13: ... between the AUDIO OUT R AUDIO L jacks on the TV and AUDIO IN R AUDIO L jacks on the Amplifier DVD Home Theater When an audio amplifier is connected to the AUDIO OUT R AUDIO L jacks Decrease the volume of the TV and adjust the volume level with the Amplifier s volume control Each Amplifier DVD Home Theater has a different back panel configuration When connecting an Amplifier DVD Home Theater match...

Страница 14: ...nd Cable antenna signals In Cable mode you can select the correct signal source among STD HRC and IRC by pressing the or button then press the ENTER button If you have Digital cable select the cable system signal source for both Analog and Digital Contact your local cable company to identify the type of cable system that exists in your particular area 5 The TV will begin memorizing all of the avai...

Страница 15: ...ting up options refer to the pages 12 13 The Plug Play feature is only available in the TV mode Changing Channels Using the Channel Buttons 1 Press the CH or CH button to change channels When you press the CH or CH button the TV changes channels in sequence You will see all the channels that the TV has memorized The TV must have memorized at least three channels You will not see channels that were...

Страница 16: ...e or button to select one of the icons Then press the ENTER button to access the icon s sub menu 3 Press the EXIT button to exit The on screen menus disappear from the screen after about one minute Using the Button The button is used to select stations that broadcast a digital signal 1 For example for Channel 7 1 press 7 then then 1 HD indicates the TV is receiving a Digital High Definition signal...

Страница 17: ...channels selecting a broadcast source memorizing the channels automatic and adding or deleting channels Channel Lists Selecting the Video Signal source Before your television can begin memorizing the available channels you must specify the type of signal source that is connected to the TV i e an Air or a Cable system 1 Press the MENU button to display the menu Press the or button to select Channel...

Страница 18: ...area At this point the signal source has been selected 5 The TV begins memorizing all available stations After all the available channels are stored it starts to remove scrambled channels see page 41 The Auto program menu then reappears If you want to stop Auto Programming press the ENTER button The Stop Auto Program message will be displayed Select Yes by pressing the or button then press the ENT...

Страница 19: ...mote control to view an external signal source O To Edit the Input Source Name Name the device connected to the input jacks to make your input source selection easier 1 Press the MENU button to display the menu Press the or button to select Input then press the ENTER button Press the or button to select Edit Name then press the ENTER button 2 Press the or button to select AV1 AV2 S Video Component...

Страница 20: ...f a particular item Press the ENTER button Press the EXIT button to exit When you make changes to Backlight Contrast Brightness Sharpness Color or Tint G R the OSD will be adjusted accordingly In PC mode you can only make changes to Backlight Contrast and Brightness Settings can be adjusted and stored for each external device you have connected to an input of the TV The energy consumed during use ...

Страница 21: ...ction Low Sets the black color depth to low Medium Sets the black color depth to medium High Sets the black color depth to high Setting the Dynamic Contrast You can adjust the screen contrast so that the optimal contrast is provided 6 Press the or button to select Dynamic Contrast then press the ENTER button 7 Press the or button to select Off Low Medium or High Press the ENTER button Off Turns of...

Страница 22: ...ress the or button to decrease or increase the value of a particular item Press the ENTER button In Color you can adjust the RGB values for the selected color To reset the adjusted RGB value select Reset Red Adjusts the red saturation level of the selected color Green Adjusts the green saturation level of the selected color Blue Adjusts the blue saturation level of the selected color Reset Resets ...

Страница 23: ...t Flesh Tone then press the ENTER button 21 Press the or button to decrease or increase the value Press the ENTER button Changing the adjustment value will refresh the adjusted screen Setting the Edge Enhancement You can emphasize object boundaries in the picture 22 Press the or button to select Edge Enhancement then press the ENTER button 23 Press the or button to select Off or On Press the ENTER...

Страница 24: ...or space when watching movies from an external device ie DVD player connected to the HDMI or Component IN jacks 24 Press the or button to select xvYCC then press the ENTER button 25 Press the or button to select Off or On Press the ENTER button xvYCC is available when the picture mode is set to Movie and the external input is set to HDMI or Component mode Detailed Settings Picture Options Picture ...

Страница 25: ...reen sizes as well In general though you should view the TV in 16 9 mode as much as possible 1 Follow the Activating Picture Options instructions numbers 1 and 2 2 Press the or button to select Size then press the ENTER button 3 Press the or button to select the screen format you want Press the ENTER button Press the EXIT button to exit 16 9 Sets the picture to 16 9 wide mode Zoom1 Magnifies the s...

Страница 26: ...justed and stored for each external device you have connected to an input of the TV Input Source Picture Size ATV Video S Video Component 480i 480p 16 9 Zoom1 Zoom2 4 3 DTV 1080i Component 1080i 1080p HDMI 720p 1080i 1080P 16 9 4 3 Wide Fit Just Scan PC 16 9 4 3 Alternately you can press the P SIZE button on the remote control repeatedly to change the picture size 16 9 Zoom1 U Move Zoom2 U Move 16...

Страница 27: ...hite enhancement DNIe is only available in Dynamic mode Setting the HDMI Black Level You can select the black level on the screen to adjust the screen depth 1 Follow the Activating Picture Options instructions numbers 1 and 2 Refer to page 23 2 Press the or button to select HDMI Black Level then press the ENTER button 3 Press the or button to select Normal or Low then press the ENTER button Normal...

Страница 28: ...clearer picture 1 Follow the Activating Picture Options instructions numbers 1 and 2 Refer to page 23 2 Press the or button to select Auto Motion Plus 120Hz then press the ENTER button 3 Press the or button to select Off Low Medium High or Demo then press the ENTER button Off Switches Auto Motion Plus 120Hz off Low Sets Auto Motion Plus 120Hz to minimum Medium Sets Auto Motion Plus 120Hz to medium...

Страница 29: ...HDMI 3 Component1 2 or PC When the resolution is set to 1920 x1080 60Hz and the current input port is either PC or HDMI and PIP is turned on the main picture may not be displayed clearly PIP Settings Main picture Sub picture Component 1 2 HDMI 1 HDMI DVI 2 HDMI 3 PC Analog TV broadcasts only Changing the Size of the PIP Window 3 Press the or button to select Size then press the ENTER button Press ...

Страница 30: ...Easy Setting 1 Press the TOOLS button on the remote control 2 Press the or button to select PIP then press the ENTER button 3 Press the or button to select On 4 Press the or button to select a particular item 5 Press the or button to select the required option 6 Press the EXIT or TOOLS button to exit PIP PIP On Size Position Air Cable Air Channel Air 11 Return Enter Move Air Cable PIP PIP On Size ...

Страница 31: ...al preference 1 Press the MENU button to display the menu Press the or button to select Sound then press the ENTER button 2 Press the or button to select Equalizer then press the ENTER button 3 Press the ENTER button to select Mode Press the or button to select Standard Music Movie Speech or Custom sound setting then press the ENTER button Mode Custom Equalizer SRS TruSurround XT Off Preferred Lan...

Страница 32: ...k system including internal television speakers It is fully compatible with all multichannel formats 1 Press the MENU button to display the menu Press the or button to select Sound then press the ENTER button 2 Press the or button to select SRS TruSurround XT then press the ENTER button 3 Press the or button to select Off or On then press the ENTER button Press the EXIT button to exit TruSurround ...

Страница 33: ...3 Press the or button to select a setting you want then press the ENTER button Press the EXIT button to exit Mono Choose for channels that are broadcasting in mono or if you are having difficulty receiving a stereo signal Stereo Choose for channels that are broadcasting in stereo SAP Choose to listen to the Separate Audio Program which is usually a foreign language translation Multi Track Sound is...

Страница 34: ... digital TV mode Multi Track Sound in analog TV mode Sound Select in PIP mode and Sound Reset in Sound menu The VOL VOL and MUTE buttons do not operate when the Select Speaker is set to External Speaker TV s Internal Speakers Audio Out Optical L R Out to Sound System RF AV S Video Component PC HDMI RF AV S Video Component PC HDMI TV Speaker Speaker Output Speaker Output Speaker Output Sound Output...

Страница 35: ... Mode or Cancel then press the ENTER button Press the EXIT button to exit Reset All All the sound values return to default settings Reset Sound Mode Current sound values return to defalt settings Cancel Select the sound reset options Connecting Headphones Sold separately You can connect a set of headphones to your set if you wish to watch a TV program without disturbing other people in the room Wh...

Страница 36: ...nnel lists Using the Color buttons on the Remote with the Channel List Red Antenna Switches to Air or Cable Green Zoom Enlarges or shrinks a channel number Yellow Select Selects multiple channel lists TOOLS Option Displays the Add or Delete Add to Favorite or Delete from Favorite Timer Viewing Channel Name Edit Select All Deselect All and Auto Program menus A gray colored channel indicates the cha...

Страница 37: ...the same manner A channel must be deleted before it can be added back to the Added Channels list To Add Restore a channel back to the All Channel List follow steps 1 3 above press the or button to select a channel to add the press the TOOLS button Press the ENTER button to select Add Press the CH LIST button on the remote control to bring up the channel lists O Channel Auto Program Clear Scrambled...

Страница 38: ...nnel is deleted from Favorites and the mark also disappears Press the EXIT button to exit You can also Add or Delete a channel from Favorites in the Added Channels menu in the same manner All favorite channels will be shown on Favorite menu Press the CH LIST button on the remote control to bring up the channel lists To select the favorite channels you have set up press the FAV CH button on the rem...

Страница 39: ...edures For information on how to confirm a viewing reservation refer to page 38 Only memorized channels can be reserved You can set the channel month day year hour and minute directly by pressing the number buttons on the remote control Press the CH LIST button on the remote control to bring up the channel lists Digital Program Guide and Viewing Reservation When a digital channel is selected and y...

Страница 40: ... button 6 Press the or button to select OK then press the ENTER button The viewing reservation has been canceled Press the EXIT button to exit Programmed Option Change Info Select to change a viewing reservation Cancel schedules Select to cancel a viewing reservation Information Select to view a viewing reservation Selet All Select all reserved programs Press the CH LIST button on the remote contr...

Страница 41: ...lready entered character Yellow button You can enter a blank space Blue button Press this button to finish renaming a channel 5 When you have finished press the blue button to assign the new name Press the EXIT button to exit The names of digital broadcasting channels are automatically assigned and cannot be labelled Channel Auto Program Clear Scrambled Channel Channel List Fine Tune Signal Streng...

Страница 42: ... or button to select Channel then press the ENTER button Press the or button to select Channel List then press the ENTER button 2 Press the or button to select the channel to be assigned a new name then press the TOOLS button 3 Press the or button to select Auto Program then press the ENTER button For further details on setting up options refer to page 16 2 Air 4 Air 4 2 TV 8 8 Air 13 Air 13 1 TV ...

Страница 43: ...nnel for optimal reception 1 Press the MENU button to display the menu Press the or button to select Channel then press the ENTER button 2 Press the or button to select Fine Tune then press the ENTER button 3 Press the or button to adjust the fine tuning To store the fine tuning setting in the TV s memory press the ENTER button If you do not store the fine tuned channel in memory adjustments are n...

Страница 44: ...tion of available digital channels 1 Press the MENU button to display the menu Press the or button to select Channel then press the ENTER button 2 Press the or button to select Signal Strength then press the ENTER button If the signal strength meter indicates that the signal is weak physically adjust your antenna to increase the signal strength Continue to adjust the antenna until you find the bes...

Страница 45: ...mode the screen is adjusted automatically If the signal from the system doesn t equal the standard signal mode adjust the mode by referring to your videocard user guide otherwise there may be no video For the display modes listed below the screen image has been optimized during manufacturing D Sub Input Mode Resolution Horizontal Frequency kHz Vertical Frequency Hz Pixel Clock Frequency MHz Sync P...

Страница 46: ...ts on your PC and fine tune again After the noise has been reduced re adjust the picture so that it is aligned on the center of the screen Preset Press the SOURCE button to select PC mode 1 Press the MENU button to display the menu Press the or button to select Picture then press the ENTER button 2 Press the or button to select Screen then press the ENTER button 3 Press the or button to select Coa...

Страница 47: ...n Coarse and Fine You can replace all image settings with the factory default values Preset Press the SOURCE button to select PC mode 1 Press the MENU button to display the menu Press the or button to select Picture then press the ENTER button 2 Press the or button to select Screen then press the ENTER button 3 Press the or button to select Image Reset then press the ENTER button Press the EXIT bu...

Страница 48: ...e or button to move to Month Day Year Hour Minute or am pm Set the date and time you want by pressing the or button then press the ENTER button Press the EXIT button to exit The current time will appear every time you press the INFO button You can set the month day year hour and minute directly by pressing the number buttons on the remote control Time Setting Setup Plug Play Language English Time ...

Страница 49: ...r button to select DST Daylight Saving Time then press the ENTER button Press the or button to select Off or On then press the ENTER button Press the EXIT button to exit Depending on the broadcast station and signal the auto time may not be set correctly If this occurs set the time manually The Antenna or cable must be connected in order to set the time automatically Setup Plug Play Language Engli...

Страница 50: ...Press the or button to select Off then press the ENTER button 4 Press the EXIT button to exit Easy Setting 1 Press the TOOLS button on the remote control 2 Press the or button to select Sleep Timer 3 Press the or button to select the minute 4 Press the EXIT or TOOLS button to exit Setup Plug Play Language English Time V Chip Caption External Settings Entertainment Off Energy Saving Off PIP Softwar...

Страница 51: ...aining MP3 files on the USB device Photo Select the folder containing JPEG files on the USB device Repeat Select Once Everyday Mon Fri Mon Sat Sat Sun or Manual When Manual is selected press the button to select the desired day of the week Press the ENTER button over the desired day and the mark will appear Press the EXIT button to exit You can set the hour minute and channel by pressing the numbe...

Страница 52: ...ode U S A Only This product is covered by the following U S patents US4 930 158 US4 930 160 Setting Up Your Personal ID Number PIN 1 Press the MENU button to display the menu Press the or button to select Setup then press the ENTER button 2 Press the or button to select V Chip then press the ENTER button The message Enter PIN will appear Enter your 4 digit PIN number The default PIN number of a ne...

Страница 53: ...essage Enter PIN will appear Enter your 4 digit PIN number 3 The V Chip screen will appear To enable the V Chip feature press the ENTER button so that the V Chip Lock field is On Pressing the or button will alternate between On and Off Press the ENTER button Press the EXIT button to exit Change PIN Enter New PIN Return 0 9 Enter PIN Confirm New PIN V Chip V Chip Lock Off TV Parental Guidelines MPA...

Страница 54: ...gories in the young adult group will be blocked TV G TV PG TV 14 and TV MA The sub ratings D L S V work together similarly See next section 6 How to set the FV D L S and V sub ratings First select one of these TV Ratings TV Y TV Y7 TV G TV PG TV 14 or TV MA See Step 4 and press the button The symbol will be displayed for each sub rating While is selected press the ENTER button to go to a sub ratin...

Страница 55: ...ictions PG Parental guidance suggested PG 13 Parents strongly cautioned R Restricted Children under 17 should be accompanied by an adult NC 17 No children under age 17 X Adults only NR Not rated Allow all Press to unlock all TV ratings Block all Press to lock all TV ratings While a particular category is selected press the ENTER button to activate it The symbol will be displayed Press the ENTER bu...

Страница 56: ...der age 8 C8 Programming generally considered acceptable for children 8 years and over to watch on their own G General programming suitable for all audiences PG Parental Guidance 14 Programming contains themes or content which may not be suitable for viewers under the age of 14 18 Adult programming The V Chip will automatically block any category that is More restrictive For example if you block G...

Страница 57: ...ly considered acceptable for children 8 years and over to watch on their own 13 ans Programming may not be suitable for children under the age of 13 16 ans Programming is not suitable for children under the age of 16 18 ans Programming restricted to adults The V Chip will automatically block any category that is More restrictive For example if you block 8 ans category then 13 ans 16 ans and 18 ans...

Страница 58: ...display to your desired language the Downloadable U S Rating menu will appear in English only The rating will automatically block certain categories that are more restrictive The rating titles For example Humor Level etc and TV ratings For example DH MH H etc may differ depending on the broadcasting station How to Reset the TV after the V Chip Blocks a Channel Emergency Escape If the TV is tuned t...

Страница 59: ...cific frame CC2 The Special Non Synchronous Use Captions This channel carries data that is intended to augment information carried in the program CC3 Secondary Synchronous Caption Service Alternate program related caption data typically second language captions CC4 Special Non Synchronous Use Captions Similar to CC2 Text1 First Text Service This may be various non program related data Text2 Second...

Страница 60: ...option consists of Default Small Standard and Large The default is Standard Font Style This option consists of Default Style0 Style 7 You can change the font you want The default is Style 0 Foreground Color This option consists of Default White Black Red Green Blue Yellow Magenta and Cyan You can change the color of the letter The default is White Background Color This option consists of Default W...

Страница 61: ...e or button to select Off Sports Cinema or Game then press the ENTER button Off Switches the Entertainment function off Sports Provides the optimal picture and sound quality for sports Cinema Provides the optimal picture and sound quality for movie watching You can experience a richer picture and enhanced sound Game Provides the optimal picture and sound quality for games This mode accelerates the...

Страница 62: ...nto the WISELINK port on the side of the TV 2 Press the MENU button to display the menu Press the or button to select Setup then press the ENTER button 3 Press the or button to select Software Upgrade then press the ENTER button 4 Press the ENTER button The message Scanning for USB It may take up to 30 seconds is displayed 5 The message Upgrade version XXXX to version XXXX The system will be reset...

Страница 63: ... playing a melody through the TV 1 Please press the button for more than 5 seconds The Self Diagnostic Test message is displayed 2 Press the or button to select Sound Test then press the ENTER button The Does the problem still exist with this sound test message is displayed 3 Press the or button to select Yes or No Yes It s regarded as TV set defect and the contact information of Samsung Call cent...

Страница 64: ...supports MP3 and JPEG files while a PTP device supports JPEG files only The sequential jpeg format is supported Photo and audio files must be named in English French or Spanish If not the files can not be played Change the file names to English French or Spanish if necessary The higher the resolution of the image the longer it takes to display on the screen The maximum supported JPEG resolution is...

Страница 65: ...o files saved on an USB memory device Photo List 1 Press the W LINK button on the remote control to display the WISELINK menu 2 Press the or button to select Photo then press the ENTER button Photo files are displayed This menu only shows files whose file extension is jpg Files of other formats such as bmp or tiff will not be displayed Press the Play ENTER button to start the Slide Show To move to...

Страница 66: ...w Groups Shows the sorting groups The sorting group including the currently selected photo is highlighted 5 Current Device Shows the currently selected device name Press the Red button to select a device 6 Item Selection Information Shows the number of photos that are selected by pressing the Yellow button 7 Help Items Red Device button Selects a connected device Green Favorites Setting button Cha...

Страница 67: ...of files grouped by Month To move to the previous next group press the REW or FF button 3 Press the TOOLS button Press the or button to select Play Current Group 4 Press ENTER to play the selected group of photo files from the sublist Timeline Sorts photos by time It sorts and shows photos by date It sorts by year and month from the earliest photo 1 Select Timeline as the sorting standard in the P...

Страница 68: ...he or button to select a photo Changing the information of multiple files Press the or button to select the desired photo in the Photo list Then press the yellow button Repeat the above operation to select multiple photos The mark appears to the left of the selected photo 2 Press the TOOLS button 3 Press the or button to select Change Group Info Press the ENTER button 4 Press the or button to sele...

Страница 69: ...oto files from the sublist Changing the Favorites setting 1 Press the or button to select the desired photo in the Photo list Changing the information of multiple files Press the or button to select the desired photo in the Photo list Then press the yellow button Repeat the above operation to select multiple photos The mark appears to the left of the selected photo 2 Press the Green button repeate...

Страница 70: ...annot remove the read only files from the selected ones You cannot recover a deleted photo file Viewing the Photo Information The photo file information including the order of the file in the current directory the name the size the resolution the date modified and the path is displayed 1 Press the or button to select the desired photo in the Photo list 2 Press the TOOLS button 3 Press the or butto...

Страница 71: ...ected files will be used for the Slide Show Playing current group 1 Press the or button to select a sorting standard Monthly Timeline Color Composition Folder Preference 2 Press the or button to select the desired photo in the Photo list To move to the previous next group press the REW or FF button 3 Press the TOOLS button 4 Press the or button to select Play Current Group then press the ENTER but...

Страница 72: ...s the ENTER button Rotate You can rotate images in full screen mode Press the or button to select Rotate then press the ENTER button Press the or button repeatedly to rotate the photo by the desired amount Whenever you press the button it rotates by 270 180 90 and 0 Whenever you press the button it rotates by 90 180 270 and 0 If you have select Zoom the Rotate deactivated The rotated file is not s...

Страница 73: ...lide show speed Press the or button to select Slide Show Speed Press the or button to select the desired option Fast Slow Normal You can select the SlideShow speed only during a slide show You can also change the speed of the Slide Show by pressing the REW or FF key during the Slide Show Background Music If you set Background Music to On the background music will be played when viewing photos one ...

Страница 74: ...sired BGM mood Press the ENTER button BGM mode option Energetic Rhythmical Sad Exciting Calm WISELINK identifies the mood of the music files and groups them accordingly by analyzing the music files on the USB device Picture Mode You can set the Picture mode Refer to page 18 Sound Mode You can set the Sound mode Refer to page 29 Information The photo file information including the order of the file...

Страница 75: ... 3 2005 Pop Better than yesterday G H I J L P S T V 1File s Selected 1 6 4 5 2 3 1 Currently selected music Shows the currently selected music 2 Current Sort Standard Press the or button to change the standard for sorting music files Title Artist Mood Genre Folder Preference 3 View Groups Shows the sorting groups The sorting group including the currently selected music file is highlighted 4 Curren...

Страница 76: ...Press the TOOLS button 4 Press the or button to select Play Current Group 5 Press ENTER to play the selected group of music files from the sublist 5 Item Selection Information Shows the number of music files that are selected by pressing the Yellow button 6 Help Items Red Device button Selects a connected device Green Favorites Setting button Changes the favorites setting for the selected music Pr...

Страница 77: ...music files and groups them accordingly by analyzing the music files on the USB device Mood information extracted from a music file may not always match the Mood option For example a file you think is Energetic may be extracted to the Exciting mood option 4 Press the or button to select the desired option then press the ENTER button The group information of the current file is updated and the file...

Страница 78: ...Press the or button to select Play Current Group 5 Press ENTER to play the selected group of music files from the sublist Changing the Favorites setting 1 Press the or button to select the desired music in the music list Changing the information of multiple files Press the or button to select the desired music in the music list Then press the yellow button Repeat the above operation to select mult...

Страница 79: ... deleted music files Viewing the Information The music file information including the order of the file in the current directory the name the size the date modified and the path is displayed 1 Press the or button to select the desired music in the music list 2 Press the TOOLS button 3 Press the or button to select Information then press the ENTER button The information on the selected file appears...

Страница 80: ... the start of the file 4 To exit WISELINK mode press the W LINK button on the remote control Playing the music group 1 Press the W LINK button on the remote control to display the WISELINK menu 2 Press the or button to select Music then press the ENTER button To move to the previous next group press the REW or FF button 3 Press the or button to select the desired music file 4 Press the TOOLS butto...

Страница 81: ...ated Repeat Mode is On Music Once When all music files in the folder or the selected file are played once Repeat Mode is Off Music Play Pause When pressing the Play Pause ENTER button on the remote control while music is playing Repeating Music Play 1 While a Music file is playing press the TOOLS button 2 Press the or button to select Repeat Mode 3 Press the or button to select On or Off On Plays ...

Страница 82: ...before the screen saver appears Press the or button to select Screen Saver Run Time Press the or button to select 1 min 3 min or 5 min Information Select to viewing the information of the connected device Press the or button to select Information then press the ENTER button Safe Remove You can remove the device safely from the TV Refer to page 72 To exit WISELINK mode press the W LINK button on th...

Страница 83: ...and the HDMI OUT jack of the corresponding Anynet device using an HDMI cable 2 Connect the HDMI IN jack of the home theater and the HDMI OUT jack of the corresponding Anynet device using an HDMI cable Connect the Optical cable between the Digital Audio Out Optical jack on your TV and the Digital Audio Input on the Home Theater When following the connection above the Optical jack only outputs 2 cha...

Страница 84: ... button to select Auto Turn Off then press the ENTER button 2 Press the or button to select Yes then press the ENTER button The Auto Turn Off function is enabled If you select No the Auto Turn Off function is canceled Press the EXIT button to exit The active source on the TV remote must be set to TV to use the Anynet function If you set Auto Turn Off to Yes connected external devices are also turn...

Страница 85: ...corder will appear device_name Operation Shows the play menu of the connected device E g If a DVD recorder is connected the play menu of the DVD recorder will appear Record recorder Starts recording immediately using the recorder This is only available for devices that support the recording function recorder Reserve Recording Enables reserving a recording for the recorder This is only available fo...

Страница 86: ...s the TOOLS button Press the ENTER button to select Anynet HDMI CEC 2 Press the or button to select Receiver Press the or button to select On or Off 3 Press the EXIT button to exit If your receiver supports audio only it may not appear in the device list The receiver will work when you have properly connected the Optical IN jack of the receiver to the Optical Out jack of the TV When the receiver h...

Страница 87: ...menu Press the SOURCE button on the TV remote control and select a device other than Anynet devices Press CH CH LIST PRE CH and FAV CH to change the TV mode Note that the channel button operates only when a tuner embedded Anynet device is not connected The message Connecting to Anynet device appears on the screen You cannot use the remote control when you are configuring Anynet or switching to a v...

Страница 88: ...y terminals Check signal cable message Ensure that the signal cable is firmly connected to the PC source Not Supported Mode message Check the maximum resolution and connected device s Video frequency Compare these values with the data in the Display Modes Digital broadcasting screen problem Please check the digital signal strength and input antenna The image is too light or too dark Adjust the Bri...

Страница 89: ... Image is not centered on the screen Adjust the horizontal and vertical position The screen position must be adjusted on the output source i e STB with a digital signal The picture appears distorted in the corner of the screen If Just Scan is selected with some external devices the picture may appear distorted in the corner of the screen This symptom is caused by the external devices not TV The Re...

Страница 90: ...o not apply excess downward pressure to the upper left of right sides of the TV 2 Fasten two screws at position 1 and then fasten two screws at position 2 Stand the product up and fasten the screws If you fasten the screws with the LCD TV placed down it may lean to one side Disconnecting the Stand 1 Remove four screws from the back of the TV 2 Separate the stand from the TV Two or more people shou...

Страница 91: ...ons 4 Press the ENTER button to save When Position1 is selected the message Current position saved as Position1 is displayed 5 Press the ENTER button The saved Position appears on the left side of the OSD Moving to the remembered position 1 Complete Step 1 of Entering the menu 2 Pressing a Color Red Green Yellow button moves the auto wall mount to the saved position You can move the wall mount to ...

Страница 92: ...imension as they may cause damage to the inside of the TV set For wall mounts that do not comply with the VESA standard screw specifications the length of the screws may differ depending on their specifications Do not use screws that do not comply with the VESA standard screw specifications Do not fasten the screws too strongly this may damage the product or cause the product to fall leading to pe...

Страница 93: ...er to the manual provided with the Kensington Lock for proper use The locking device has to be purchased separately Optional Figure 2 Figure 1 Cable The location of the Kensington Lock may be different depending on its model 1 Insert the locking device into the Kensington slot on the LCD TV Figure 1 and turn it in the locking direction Figure 2 2 Connect the Kensington Lock cable 3 Fix the Kensing...

Страница 94: ...hese additionally 2 Remove the screws from the center back of the TV put the screws into the clamps and then fasten the screws onto the TV again Screws may not be supplied with the product In this case please purchase the screws of the following specifications Screw Specifications For a 17 29 Inch LCD TV M4 X 15 For a 32 40 Inch LCD TV M6 X 15 3 Connect the clamps fixed onto the TV and the clamps ...

Страница 95: ... x 4 1 x 30 7 inches 1269 6 x 10⁶ 2 x 779 2 mm 50 0 x 11 5 x 33 0 inches 1269 6 x 291 2 x 838 7 mm Weight With Stand Without Stand 42 1 lbs 19 1 kg 35 7 lbs 16 2 kg 58 4 lbs 26 5 kg 49 4 lbs 22 4 kg 69 4 lbs 31 5 kg 60 0 lbs 27 2 kg Environmental Considerations Operating Temperature Operating Humidity Storage Temperature Storage Humidity 50 F to 104 F 10 C to 40 C 10 to 80 non condensing 4 F to 11...

Страница 96: ...FRONT VIEW SIDE VIEW 7 9 200 mm 7 9 200 mm REAR VIEW NOTE All drawings are not necessarily to scale Some dimensions are subject to change without prior notice Refer to the dimensions prior to performing installation of your TV Not responsible for typographical or printed errors 2008 Samsung Electronics America Inc ...

Страница 97: ...RONT VIEW SIDE VIEW 23 6 600 mm 15 7 400 mm REAR VIEW NOTE All drawings are not necessarily to scale Some dimensions are subject to change without prior notice Refer to the dimensions prior to performing installation of your TV Not responsible for typographical or printed errors 2008 Samsung Electronics America Inc ...

Страница 98: ...RONT VIEW SIDE VIEW 23 6 600 mm 15 7 400 mm REAR VIEW NOTE All drawings are not necessarily to scale Some dimensions are subject to change without prior notice Refer to the dimensions prior to performing installation of your TV Not responsible for typographical or printed errors 2008 Samsung Electronics America Inc ...

Страница 99: ...ns for copying distribution and modification follow TERMS AND CONDITIONS FOR COPYING DISTRIBUTION AND MODIFICATION 0 This License applies to any program or other work which contains a notice placed by the copyright holder saying it may be distributed under the terms of this General Public License The Program below refers to any such program or work and a work based on the Program means either the ...

Страница 100: ...erwise to copy modify sublicense or distribute the Program is void and will automatically terminate your rights under this License However parties who have received copies or rights from you under this License will not have their licenses terminated so long as such parties remain in full compliance 5 You are not required to accept this License since you have not signed it However nothing else gran...

Страница 101: ...New Programs If you develop a new program and you want it to be of the greatest possible use to the public the best way to achieve this is to make it free software which everyone can redistribute and change under these terms To do so attach the following notices to the program It is safest to attach them to the start of each source file to most effectively convey the exclusion of warranty and each...

Страница 102: ...ems that might be introduced by others Finally software patents pose a constant threat to the existence of any free program We wish to make sure that a company cannot effectively restrict the users of a free program by obtaining a restrictive license from a patent holder Therefore we insist that any patent license obtained for a version of the library must be consistent with the full freedom of us...

Страница 103: ...y other than as an argument passed when the facility is invoked then you must make a good faith effort to ensure that in the event an application does not supply such function or table the facility still operates and performs whatever part of its purpose remains meaningful For example a function in a library to compute square roots has a purpose that is entirely well defined independent of the app...

Страница 104: ...g with the Library A suitable mechanism is one that 1 uses at run time a copy of the library already present on the user s computer system rather than copying library functions into the executable and 2 will operate properly with a modified version of the library if the user installs one as long as the modified version is interface compatible with the version that the work was made with c Accompan...

Страница 105: ...ibution limitation excluding those countries so that distribution is permitted only in or among countries not thus excluded In such case this License incorporates the limitation as if written in the body of this License 13 The Free Software Foundation may publish revised and or new versions of the Lesser General Public License from time to time Such new versions will be similar in spirit to the pr...

Страница 106: ...e GNU Lesser General Public License as published by the Free Software Foundation either version 2 1 of the License or at your option any later version This library is distributed in the hope that it will be useful but WITHOUT ANY WARRANTY without even the implied warranty of MERCHANTABILITY or FITNESS FOR A PARTICULAR PURPOSE See the GNU Lesser General Public License for more details You should ha...

Страница 107: ...This page is intentionally left blank ...

Страница 108: ... ACL Guide de l utilisateur Imaginez les possibilités Merci d avoir acheté un produit Samsung Pour obtenir un service complet veuillez enregistrer votre produit à www samsung com global register Modèle N de série ...

Страница 109: ... 247 5 960 037 6 023 490 5 878 080 et en vertu de la demande de brevet nº 2001 44713 A1 publiée aux États Unis Cette licence permet aux consommateurs d utiliser le contenu sous licence à des fins non commerciales Aucun droit n est accordé à l égard d une utilisation commerciale Cette licence ne couvre aucun autre appareil que celui ci et ne s applique pas aux produits non pourvus d une licence ni ...

Страница 110: ...on de l image ISI secondaire 33 Rétablir les paramètres de son par défaut 33 Connexion du casque Vendu séparément 33 Contrôle des Chaînes Gestion des canaux 34 Suppression des canaux brouillés canaux numériques 41 Syntonisation fine des chaînes analogiques 41 Contrôle de la puissance du signal numérique 42 Affichage PC Utilisation de votre télévision comme un écran PC 43 Modes d affichage 43 Confi...

Страница 111: ... Connexion HDMI DVI entre votre PC et ce téléviseur Excellente qualité d image La technologie DNIe offre des images d une netteté aussi vraie que nature SRS TruSurround XT La technologie SRS TruSurround XT offre une qualité de son ambiophonique Accessoires Vérifiez que les éléments suivants sont inclus avec votre télévision LCD S il manque des éléments contactez votre revendeur Télécommande et deu...

Страница 112: ...V AV1 AV2 S Vidéo Composante1 Composante2 PC HDMI1 HDMI2 DVI HDMI3 USB Dans le menu à l écran utilisez ce bouton de la même manière que le bouton ENTER de la télécommande 4 MENU Appuyez pour voir à l écran le menu des fonctions de votre télévision 5 VOL Appuyez sur ce bouton pour augmenter ou baisser le volume Dans le menu à l écran utilisez les boutons VOL de la même manière que les boutons et de...

Страница 113: ...N 2 doit être utilisée pour un branchement de Câble HDMI DVI 5 ANT IN A connecter à une antenne ou à un téléviseur par Câble 6 WISELINK Brancher une mémoire de grande capacité USB pour voir des fichiers photos et lire des fichiers sonores 7 AV IN 2 Entrée audio et vidéo pour périphériques externes tels qu un caméscope ou un magnétoscope S VIDEO Connectez un signal S Vidéo provenant d un caméscope ...

Страница 114: ...ur cette touche pour rétroéclairer les touches de la télécommande Cette fonction est utile durant la nuit ou lorsque la pièce est sombre L utilisation de la télécommande alors que la touche ON OFF est réglée à On réduit le temps d utilisation des piles PRE CH Permet d écouter le canal précédent CH CH Permettent de changer de canal SOURCE Appuyer sur cette touche pour afficher et choisir les source...

Страница 115: ...e voir Antennes avec Câble bipolaire plat de 300 Ω ci dessous Si votre antenne est dotée d un Câble semblable au schéma de droite reportez vous à la section Antenne équipée de câbles ronds 75 Ω Si vous avez deux antennes voir Antennes VHF et UHF séparées Antennes avec Câble bipolaire plat de 300 Ω Si vous utilisez une antenne hertzienne comme une antenne de toit ou une antenne en oreilles de lapin...

Страница 116: ...Câble branché à la prise ANT IN de votre boîte de jonction Cette prise peut s appeler ANT IN VHF IN ou simplement IN 2 Branchez ce Câble à un séparateur bidirectionnel 3 Branchez un Câble de RF entre une des prises OUTPUT du séparateur et la prise IN de la boîte de jonction 4 Branchez un Câble de RF entre la prise ANT OUT de la boîte de jonction et la prise B IN de l interrupteur RF A B 5 Branchez...

Страница 117: ...DMI IN 2 et les câbles audio aux prises DVI IN HDMI2 R AUDIO L situées à l arrière du téléviseur Dans ce cas contactez la société qui fournit le lecteur DVD décodeur Câble récepteur satellite afin de confirmer votre version HDMI puis demandez une mise à jour Les câbles HDMI qui ne sont pas de version 1 3 peuvent provoquer des nuisances à l écran ou une absence d image ou Lecteur DVD ou décodeur Câ...

Страница 118: ...satellite boîtier décodeur à votre téléviseur 1 Branchez un Câble composant entre les prises COMPONENT IN 1 ou 2 Y PB PR du téléviseur et les prises COMPONENT Y PB PR du lecteur DVD ou du décodeur Câble récepteur satellite boîtier décodeur 2 Branchez les câbles audio entre les prises COMPONENT IN 1 ou 2 R AUDIO L du téléviseur et les prises AUDIO OUT du lecteur DVD ou du décodeur Câble récepteur s...

Страница 119: ...guration arrière de chaque magnétoscope est différente suivant les appareils Lorsque vous connectez un magnétoscope faites correspondre les couleurs de la borne et du Câble La couleur de la prise d entrée AV IN 1 Y VIDÉO vert ne correspond pas à la couleur du Câble vidéo jaune Connexion S Vidéo Le téléviseur Samsung peut être branché à la prise S Vidéo d un magnétoscope Ce raccordement offre une m...

Страница 120: ...ur et les prises AUDIO IN R AUDIO L de l amplificateur home cinéma DVD Lorsqu un amplificateur audio est connecté aux bornes AUDIO OUT R AUDIO L Baissez le gain volume du téléviseur et réglez le volume à l aide de la commande de volume de l amplificateur Pannear arrière de la télévision Amplificateur Home cinéma DVD Câble Audio non fourni La configuration arrière de chaque amplificateur home ciném...

Страница 121: ...ne de type Air Câble Signal d antenne de type Câble Auto Signaux d antenne de type Air et Câble En mode Câble vous pouvez sélectionner la source de signal qui vous convient parmi STD HRC et IRC en appuyant sur le bouton ou puis appuyez sur le bouton ENTER Si le Câble est numérique sélectionner la source de signal pour une diffusion analogique et numérique Contactez votre télédistributeur local pou...

Страница 122: ...t 13 La fonction Prêt à l emploi n est accessible qu en mode TV Changement des canal Utilisation des boutons de canal 1 Appuyez sur le bouton CH ou CH pour changer de canal Quand vous appuyez sur le bouton CH ou CH la télévision change de canal de façon séquentielle Vous pourrez voir toutes les canal que la télévision a mémorisées La télévision doit avoir mémorisé au moins trois canal Vous ne pour...

Страница 123: ... MUTE 1 Appuyez sur bouton MUTE et le son est coupé s affiche à l écran 2 Pour désactiver le mode Mute appuyez de nouveau sur le bouton MUTE ou simplement sur les boutons VOL ou VOL Visualisation de l affichage L affichage identifie la canal en cours et l état de certains paramètres audio et vidéo 1 Appuyez sur le bouton INFO de la télécommande La télévision affiche la canal le type de son et l ét...

Страница 124: ... source de transmission mémorisation automatique des canaux et ajout ou suppression Liste des canaux de canaux Sélection de la source du signal vidéo Avant que votre télévision ne puisse commencer à mémoriser les canal disponibles vous devez spécifier le type de la source de signal reliée à la télévision c est à dire soit une antenne soit le Câble 1 Appuyez sur le bouton MENU pour afficher le menu...

Страница 125: ...re région communiquez avec votre câblodistributeur La sélection de la source de diffusion est maintenant terminée 5 Le téléviseur commence alors à mémoriser tous les canaux disponibles Une fois tous les canaux mémorisés le téléviseur commence à éliminer les canaux brouillés voir la page 41 Puis le menu Prog auto s affiche Pour arrêter la programmation automatique appuyer sur ENTER Le message Arrêt...

Страница 126: ... bouton SOURCE de la télécommande pour afficher une source de signal externe O Pour éditer le nom de la source Nommer le périphérique connecté aux entrées pour vous faciliter la sélection 1 Appuyez sur le bouton MENU pour afficher le menu Appuyez sur les bouton ou pour sélectionner Entrée puis appuyez sur le bouton ENTER Appuyez sur les bouton ou pour sélectionner Entrer le nom puis appuyez sur le...

Страница 127: ... la valeur d un élément particulier Appuyez sur le bouton ENTER Appuyez sur le bouton EXIT pour quitter Après la modification des paramètres Contre jour Contraste Luminosité Netteté Couleur et Teinte V R l image est ajustée en conséquence En mode PC il est possible de modifier uniquement les fonctions Contre jour Contraste et Luminosité Les réglages peuvent être définis et mémorisés pour chacun de...

Страница 128: ...sur le bouton ENTER Off Désactive la fonction de réglage du noir Basse Utilise une profondeur de noir faible Moyen Utilise une profondeur de noir moyenne Haute Utilise une profondeur de noir élevée Réglage du contraste dynamique Vous pouvez régler l écran de façon à obtenir un contraste optimal 6 Appuyez sur les bouton ou pour sélectionner Contraste dynam puis appuyez sur le bouton ENTER 7 Appuyez...

Страница 129: ...a couleur Appuyez sur le bouton ENTER 16 Appuyer sur la touche ou pour augmenter ou réduire la valeur d un élément particulier Appuyez sur le bouton ENTER Dans le paramètre Couleur il est possible de régler les valeurs RVB pour la couleur choisie Pour rétablir la valeur RVB ajustée sélectionner Régler Rouge règle le niveau de saturation du rouge de la couleur choisie Vert règle le niveau de satura...

Страница 130: ...z sur le bouton ENTER 21 Appuyer sur la touche ou pour diminuer ou augmenter la valeur Appuyez sur le bouton ENTER La modification de la valeur de réglage permet de rafraîchir l écran réglé Réglage de l amélioration des bords de l image Vous pouvez accentuer le bord des objets sur l image 22 Appuyez sur les bouton ou pour sélectionner Améliorat bords puis appuyez sur le bouton ENTER 23 Appuyez sur...

Страница 131: ...ouleur durant l écoute de films provenant d un appareil externe c à d un lecteur DVD branché aux prises HDMI ou Composante IN 24 Appuyez sur les bouton ou pour sélectionner xvYCC puis appuyez sur le bouton ENTER 25 Appuyez sur les bouton ou pour sélectionner Off ou On Appuyez sur le bouton ENTER xvYCC est disponible lorsque le mode d image est réglé sur Film et que la source d entrée externe est r...

Страница 132: ...e peut également disposer de ses propres tailles d écran Toutefois il est conseillé d utiliser le mode 16 9 autant que possible 1 Suivre les instructions 1 et 2 de Activation des options d image 2 Appuyez sur les bouton ou pour sélectionner Format puis appuyez sur le bouton ENTER 3 Appuyez sur les bouton ou pour sélectionner le format d écran souhaité Appuyez sur le bouton ENTER Appuyez sur le bou...

Страница 133: ...tre définis et mémorisés pour chacun des appareils externes branchés à une entrée sur le téléviseur Source de l entrée Format de l image ATV Video S Vidéo Composante 480i 480p 16 9 Zoom1 Zoom2 4 3 DTV 1080i Composante 1080i 1080p HDMI 720p 1080i 1080P 16 9 4 3 Format large Numér seul PC 16 9 4 3 Vous pouvez également appuyer plusieurs fois sur le bouton P SIZE de la télécommande pour modifier la t...

Страница 134: ...on des détails du contraste et de l amélioration des blancs DNIe n est disponible qu en mode Dynamique Réglage du niveau de noir HDMI Il est possible de sélectionner le niveau de noir de l écran afin d ajuster la profondeur de l écran 1 Suivre les instructions 1 et 2 de Activation des options d image Consulter la page 23 2 Appuyez sur les boutons ou pour sélectionner Nv nr HDMI puis appuyez sur le...

Страница 135: ...d Réglage du Motion Plus 120Hz aut Retire la traînée des scènes rapides comportant beaucoup de mouvements afin de rendre l image plus claire 1 Suivre les instructions 1 et 2 de Activation des options d image Consulter la page 23 2 Appuyez sur les boutons ou pour sélectionner Motion Plus 120Hz aut puis appuyez sur le bouton ENTER 3 Appuyez sur les boutons ou pour sélectionner Off Basse Moyen Haute ...

Страница 136: ...ipale provient d un appareil externe branché à HDMI 1 HDMI DVI 2 HDMI 3 Composante1 2 en mode PC L image principale pourrait ne pas être claire lorsque la résolution est réglée à 1920x1080 60Hz que le port d entrée courant est PC ou HDMI et que la fonction ISI est activée Paramètres ISI Image principale Image secondaire Composante1 2 HDMI 1 HDMI DVI 2 HDMI 3 PC Pour les émissions télévisuelles ana...

Страница 137: ...IT pour quitter Réglage facile 1 Appuyer sur la touche TOOLS de la télécommande 2 Appuyer sur la touche ou pour sélectionner ISI puis sur ENTER 3 Appuyer sur la touche ou pour choisir On 4 Appuyer sur la touche ou pour choisir un élément particulier 5 Appuyer sur la touche ou pour sélectionner l option désirée 6 Appuyer sur la touche EXIT ou TOOLS pour quitter ISI ISI On Format Position Air Câble ...

Страница 138: ...io selon ses préférences personnelles 1 Appuyez sur le bouton MENU pour afficher le menu Appuyez sur les bouton ou pour sélectionner Son puis appuyez sur le bouton ENTER 2 Appuyez sur les bouton ou pour sélectionner Égaliseur puis appuyez sur le bouton ENTER 3 Appuyez sur les boutons ENTER pour sélectionner Mode Appuyer sur la touche ou pour sélectionner Standard Musique Film Parole ou Personnel p...

Страница 139: ...s haut parleurs internes d un téléviseur Elle est entièrement compatible avec tous les formats multicanaux 1 Appuyez sur le bouton MENU pour afficher le menu Appuyez sur les bouton ou pour sélectionner Son puis appuyez sur le bouton ENTER 2 Appuyez sur les bouton ou pour sélectionner SRS TruSurround XT puis appuyez sur le bouton ENTER 3 Appuyez sur les bouton ou pour sélectionner Off ou On puis ap...

Страница 140: ...our choisir le réglage souhaité puis sur ENTER Appuyez sur le bouton EXIT pour quitter Mono choisir ce réglage pour les canaux diffusés en monophonie ou si la réception d un signal stéréo s avère difficile Stéréo choisir ce réglage pour les canaux diffusés en stéréophonie SAP choisir ce réglage pour écouter une émission diffusée en mode SAP Separate Audio Program habituellement un doublage en lang...

Страница 141: ...e numérique Son multi piste en mode analogique Sélect son en mode ISI et Réinitialisation du son dans le menu Son Les touches VOL VOL et MUTE ne fonctionnent pas lorsque Sélect le haut parleur est réglé à Haut p externe Internal Haut parleur Sortie audio optique sortie G D vers la chaîne audio HF AV S Vidéo Composante PC HDMI HF AV S Vidéo Composante PC HDMI Haut parleur TV Sortie de haut parleur ...

Страница 142: ...ur le bouton EXIT pour quitter Réinitial tout Toutes les valeurs relatives au son sont redevenues les réglages par défaut Réinitial mode son Les valeurs actuelles relatives au son redeviennent les réglages par défaut Effacer Choisir les options de rétablissement du son Connexion du casque Vendu séparément Il suffit de brancher un casque d écoute au téléviseur pour écouter une émission sans dérange...

Страница 143: ...mande pour afficher les listes de canaux À l aide des touches de couleurs sur la télécommande avec la liste des canaux Rouge Antenne Permet de passer au mode air ou Câble Verte Zoom Agrandit ou rapetisse un numéro de canal Jaune Choisir Sélectionne plusieurs listes de canaux TOOLS Option Affiche les menus Ajouter ou Supprimer Ajouter aux favoris ou Effacer des favoris Écoute par minuterie Modifier...

Страница 144: ...anal au menu Canaux ajoutés de la même façon Le canal doit être supprimé avant de pouvoir l ajouter à nouveau dans la liste Canaux ajoutés Pour ajouter rétablir à nouveau un canal dans la liste des canaux ajoutés il faut suivre les étapes 1 à 3 ci dessus appuyez sur la touche ou pour choisir un canal à ajouter puis appuyez sur la touche TOOLS Appuyer sur la touche ENTER pour choisir Ajouter Appuye...

Страница 145: ... la liste des Favoris et le symbole disparaît Appuyer sur la touche EXIT pour quitter le menu Il est également possible d ajouter ou de supprimer un canal dans la liste des favoris à l aide du menu Canaux ajoutés de la même façon Tous les canaux favoris sont affichés dans le menu Favoris Appuyer sur la touche CH LIST de la télécommande pour afficher les listes de canaux Pour sélectionner les chaîn...

Страница 146: ...u Favorite de la même façon Pour des renseignements sur la confirmation d une réservation d émission consulter la page 38 Seuls les canaux mémorisés peuvent être réservés Il est possible de régler directement le canal le mois le jour l année l heure et les minutes à l aide des touches numériques de la télécommande Appuyer sur la touche CH LIST de la télécommande pour afficher les listes de canaux ...

Страница 147: ... Appuyez sur la touche ou pour choisir OK puis sur ENTER La réservation d émission est annulée Appuyer sur la touche EXIT pour quitter le menu Option programmée Information modification Sélectionner pour modifier une réservation d émission Annuler les schedules Sélectionner pour annuler une réservation d émission Information Sélectionner pour afficher une réservation d émission Choisir tout Sélect...

Страница 148: ...ouche verte Il est possible de supprimer un caractère déjà saisi Touche jaune Il est possible de saisir une espace Touche bleue Appuyer sur cette touche une fois le canal renommé 5 Lorsque terminé appuyer sur la touche bleue pour assigner le nouveau nom Appuyer sur la touche EXIT pour quitter le menu Les noms des canaux numériques sont automatiquement assignés et ne peuvent être identifiés Chaîne ...

Страница 149: ...er sur la touche ou pour choisir Chaîne puis sur ENTER Appuyer sur la touche ou pour choisir Liste des canaux puis sur ENTER 2 Appuyer sur la touche ou pour sélectionner le canal à renommer suivie de la touche TOOLS 3 Appuyer sur la touche ou pour sélectionner Prog auto puis sur ENTER Pour en savoir plus sur la configuration des options consulter la page 16 2 Air 4 Air 4 2 TV 8 8 Air 13 Air 13 1 T...

Страница 150: ...ception d une chaîne 1 Appuyez sur le bouton MENU pour afficher le menu Appuyez sur les bouton ou pour sélectionner Chaîne puis appuyez sur le bouton ENTER 2 Appuyez sur les bouton ou pour sélectionner Syn Précise puis appuyez sur le bouton ENTER 3 Utilisez les bouton ou pour régler la syntonisation fine Pour mémoriser les réglages de syntonisation fine appuyez sur le bouton ENTER Si vous ne conse...

Страница 151: ...réception des chaînes numériques disponibles 1 Appuyez sur le bouton MENU pour afficher le menu Appuyez sur les bouton ou pour sélectionner Chaîne puis appuyez sur le bouton ENTER 2 Appuyez sur les bouton ou pour sélectionner Puissance signal puis appuyez sur le bouton ENTER Si l indicateur de puissance indique que le signal numérique est faible déplacez votre antenne de manière à augmenter la pui...

Страница 152: ...tez la boîte de dialogue Affichage PC Modes d affichage Si le signal du système équivaut au mode de signal standard l écran se règle automatiquement Si le signal du système ne correspond pas au mode de signal standard réglez le mode en vous reportant le cas échéant au manuel d utilisation de la carte vidéo Pour les modes d affichage figurant ci dessous l image de l écran a été optimisée lors de la...

Страница 153: ...fréquence pour une syntonisation plus fine Une fois le bruit réduit réajustez l image pour la centrer sur l écran Préréglage Appuyer sur la touche SOURCE pour sélectionner PC 1 Appuyez sur le bouton MENU pour afficher le menu Appuyez sur les bouton ou pour sélectionner Image puis appuyez sur le bouton ENTER 2 Appuyez sur les bouton ou pour sélectionner Écran puis appuyez sur le bouton ENTER 3 Appu...

Страница 154: ...n rapide et fin Vous pouvez remplacer tous les paramètres d image par les valeurs par défaut Préréglage Appuyer sur la touche SOURCE pour sélectionner PC 1 Appuyez sur le bouton MENU pour afficher le menu Appuyez sur les bouton ou pour sélectionner Image puis appuyez sur le bouton ENTER 2 Appuyez sur les bouton ou pour sélectionner Écran puis appuyez sur le bouton ENTER 3 Appuyez sur les bouton ou...

Страница 155: ...outon ENTER 5 Appuyez sur les bouton ou pour nav iguer entre les paramètres Mois Jour Année Heure Minute ou am pm Définissez la date et l heure souhaitées en utilisant les bouton ou puis appuyez sur ENTER Appuyez sur le bouton EXIT pour quitter L heure s affiche chaque fois que vous appuyez sur le bouton INFO Vous pouvez régler directement le mois le jour les heures et les minutes en appuyant sur ...

Страница 156: ... pour sélectionner H d été puis sur ENTER Appuyez sur les bouton ou pour sélectionner Off ou On puis appuyez sur le bouton ENTER Appuyez sur le bouton EXIT pour quitter En fonction de la station émettrice et du signal il est possible que la fonction de réglage automatique de l heure ne fonctionne pas correctement Dans un tel cas réglez l horloge manuelle ment L antenne ou le Câble doit être branch...

Страница 157: ... touche ou pour sélectionner Off suivie de la touche ENTER 4 Appuyez sur le bouton EXIT pour quitter Réglage facile 1 Appuyer sur la touche TOOLS de la télécommande 2 Appuyer sur la touche ou pour choisir Mise en veille 3 Appuyer sur la touche ou pour sélectionner les minutes 4 Appuyer sur la touche EXIT ou TOOLS pour quitter Configuration Prêt à l emploi Langue Français Heure V Chip Sous titres R...

Страница 158: ...e canal désiré Musique sélectionne le dossier du dispositif USB contenant des fichiers MP3 Photos sélectionne le dossier du dispositif USB contenant des fichiers JPEG Répéter Choisir Une fois Tous les jours Lundi vendredi Lundi samedi Sam à dim ou Manuel Lorsque Manuel est choisi appuyer sur la touche pour choisir le jour approprié de la semaine Appuyer sur la touche ENTER sur le jour voulu et la ...

Страница 159: ...ferte en mode HDMI Composante ou PC États Unis seulement Ce produit est protégé par les brevets des États Unis suivants US4 930 158 US4 930 160 Réglage de votre numéro d identification personnel NIP 1 Appuyez sur le bouton MENU pour afficher le menu Appuyez sur les bouton ou pour sélectionner Configuration puis appuyez sur le bouton ENTER 2 Appuyez sur les bouton ou pour sélectionner V Chip puis a...

Страница 160: ... sur le bouton ENTER Le message Entrez NIP s affiche Saisissez votre code NIP à 4 chiffres 3 L écran V Chip apparaît Pour activer la fonction puce V appuyez sur le bouton ENTER pour régler le Blocage V Chip sur On Appuyer plusieurs fois sur les bouton ou alterne entre les modes On et Off Appuyez sur le bouton ENTER Appuyez sur le bouton EXIT pour quitter Changer NIP Nouveau NIP Retour 0 9 Entrez N...

Страница 161: ...z la catégorie TV G toutes les catégories dans le groupe jeunes adultes seront alors bloquées TV G TV PG TV 14 et TV MA Les évaluations secondaires D L S V fonctionnent de la même façon voir section suivante 6 Comment régler les évaluations secondaires FV D L S et V Pour commencer sélectionnez l une des catégories TV Y TV Y7 TV G TV PG TV 14 ou TV MA voir étape 4 et appuyez sur le bouton Un symbol...

Страница 162: ...e nouveau les boutons ou pour parcourir les catégories MPAA G Tout public aucune restriction PG Accord parental souhaité PG 13 Parents vivement mis en garde R Les enfants de moins de 17ans doivent être accompag nés d un adulte NC 17 Aucun enfant de moins de 17 ans X Adultes uniquement NR Non évalué Perm tout déverrouille tous les réglages du téléviseur Bloq tout verrouille tous les réglages du tél...

Страница 163: ...destinées aux enfants de moins de 8 ans C8 Émissions convenant généralement aux enfants de 8 ans et plus sans surveillance G Émissions grand public convenant à tous les auditoires PG Émissions à surveillance parentale 14 Émissions dont la teneur peut ne pas convenir en tout ou en partie aux personnes de moins de 14 ans 18 Émissions pour adultes La fonction V Chip bloque automatiquement toutes les ...

Страница 164: ...ges du téléviseur G Général 8 ans Émissions non recommandées pour les jeunes enfants 13 ans Émissions pouvant ne pas convenir aux enfants de moins de 13 ans 16 ans Émissions ne convenant pas aux enfants de moins de 16 ans 18 ans Émissions réservées aux adultes La fonction V Chip bloque automatiquement toutes les catégories qui sont plus restrictives Par exemple si la classification 8 ans est bloqu...

Страница 165: ...geable change en données téléchargées Même si vous réglez l affichage à l écran dans la langue souhaitée le menu Catég américaine téléchargeable s affiche en anglais seulement La classification bloque automatiquement certaines catégories plus restrictives Les catégories par exemple violence etc et les niveaux de classification par exemple DH MH H etc peuvent différer selon la station de radiodiffu...

Страница 166: ...age spécifique CC2 Sous titres spéciaux non synchronisés Ce canal contient les données destinées à augmenter les fournies par le programme CC3 Sous titres secondaires synchronisés Données de sous titres alternatives associées au programme Il s agit généralement de la langue secondaire CC4 Sous titres spéciaux non synchronisés Similaire à CC2 Texte1 Premier service de texte Il peut s agir de donnée...

Страница 167: ...rmat Cette option peut prendre les valeurs suivantes Par défaut Petit Standard et Grand La valeur par défaut est Standard Style des polices Cette option peut prendre les valeurs suivantes Par défaut Style0 Style 7 Vous pouvez modifier la police La valeur par défaut est Style 0 Couleur avant plan Cette option peut prendre les valeurs suivantes Par défaut Blanc Noir Rouge Vert Bleu Jaune Magenta et ...

Страница 168: ... bouton ou pour sélectionner Divertissement puis appuyez sur le bouton ENTER 3 Appuyez sur les bouton ou pour sélectionner Off Sports Cinéma ou Jeu puis appuyez sur le bouton ENTER Off désactive la fonction Divertissement Sports offre une image et un son d une qualité optimale pour les sports Cinéma offre une image et un son d une qualité optimale pour les films L image et le son sont plus riches ...

Страница 169: ...n MENU pour afficher le menu Appuyez sur les bouton ou pour sélectionner Configuration puis appuyez sur le bouton ENTER 3 Appuyez sur les bouton ou pour sélectionner Mise à niveau du logiciel puis appuyez sur le bouton ENTER 4 Appuyez sur le bouton ENTER L affichage du message Recherche du dispositif USB par balayage Cela peut prendre jusqu à 30 secondes 5 L affichage du message Mettre à niveau la...

Страница 170: ... la touche durant plus de 5 secondes Le message Test d autodiagnostic s affiche 2 Appuyez sur la touche ou pour sélectionner Test de son puis sur ENTER Le message Le problème persiste t il encore au moment du test du volume s affiche 3 Appuyez sur la touche ou pour sélectionner Oui ou Non Oui Il s agit probablement d une défectuosité du téléviseur Les coordonnées du centre d appel Samsung s affich...

Страница 171: ...dispositif PTP ne prend en charge que les fichiers JPEG Le format de fichier séquentiel jpeg est pris en charge Les fichiers de photos et de son doivent porter des noms en anglais français ou espagnol Dans le cas contraire il est impossible de les lire Remplacer les noms des fichiers par des noms en anglais français ou espagnol si nécessaire Plus la résolution de l image est élevée plus son affich...

Страница 172: ... la touche W LINKde la télécommande pour afficher le menu WISELINK 2 Appuyer sur la touche ou pour sélectionner Photo puis sur ENTER Les fichiers de photos sont affichés Ce menu ne présente que les fichiers dont l extension est jpg Les fichiers d autres formats comme bmp ou tiff ne seront pas affichés Appuyer sur la touche Lecture ENTER pour lancer le diaporama Pour aller au groupe précédent ou su...

Страница 173: ... de tri Le groupe de tri comprenant la photo actuellement sélectionnée est mis en surbrillance 5 Appareil courant Affiche le nom de l appareil présentement choisi Appuyer sur la touche rouge pour sélectionner un appareil 6 Information sur la sélection d éléments Affiche le nombre de photos sélectionnées en appuyant sur la touche jaune 7 Éléments d aide Touche Appareil rouge Sélectionne un appareil...

Страница 174: ...sélectionner à partir de la sous liste des fichiers regroupés par mois Pour aller au groupe précédent ou suivant appuyer sur la touche REW ou FF 3 Appuyer sur la touche TOOLS Appuyer sur la touche ou pour sélectionner Lire groupe cour 4 Appuyer sur la touche ENTER pour lire le groupe de fichiers photos sélectionnés dans la sous liste P date Trie les photos par date Les photos sont classées et affi...

Страница 175: ...e de fichiers photos sélectionnés dans la sous liste Modification de l information sur la composition 1 Sélectionner P comp comme norme de tri pour la liste de photos puis appuyer sur la touche ou pour sélectionner une photo Modification de l information de plusieurs fichiers Appuyer sur la touche ou pour sélectionner la photo désirée dans la liste de photos Puis appuyer sur la touche jaune Répéte...

Страница 176: ... ou pour sélectionner Lire groupe cour 4 Appuyer sur la touche ENTER pour lire le groupe de fichiers photos sélectionnés dans la sous liste Modification des réglages favoris 1 Appuyer sur la touche ou pour sélectionner la photo désirée dans la liste de photos Modification de l information de plusieurs fichiers Appuyer sur la touche ou pour sélectionner la photo désirée dans la liste de photos Puis...

Страница 177: ...er le mode WISELINK appuyer sur la touche W LINK de la télécommande Il est impossible de retirer les fichiers en mémoire morte des fichiers sélectionnés Il est impossible de récupérer un fichier photo supprimé Visualisation de l information photo L information sur le fichier photo y compris l ordre des fichiers dans le répertoire courant le nom la taille la résolution la date de modification et le...

Страница 178: ...ture ENTER Les fichiers sélectionnés seront utilisés pour le diaporama Lecture groupe cour 1 Appuyer sur la touche ou pour sélectionner une norme de tri P mois P date Couleur Composition Dossier P préf 2 Appuyer sur la touche ou pour sélectionner la photo désirée dans la liste de photos Pour aller au groupe précédent ou suivant appuyer sur la touche REW ou FF 3 Appuyer sur la touche TOOLS 4 Appuye...

Страница 179: ...uis sur ENTER Rotation Il est possible de faire tourner les images en mode Plein écran Appuyer sur la touche ou pour sélectionner Rotation puis sur ENTER Appuyer à plusieurs reprises sur la touche ou pour faire tourner la photo à la position voulue Chaque fois que l on appuie sur la touche la photo tourne de 270 180 90 et 0 Chaque fois que l on appuie sur la touche la photo tourne de 270 180 90 et...

Страница 180: ...ne photo agrandie à l aide du zoom Vitesse du diaporama Il est possible de choisir la vitesse du diaporama Appuyer sur la touche ou pour sélectionner Vitesse du diaporama Appuyer sur la touche ou pour sélectionner l option désirée Rapide Lent Normal La vitesse du diaporama ne peut être réglée qu au cours de la présentation Il est possible de modifier la vitesse du diaporama en appuyant sur la touc...

Страница 181: ... ambiance désirée Appuyer sur la touche ENTER Options du mode de musique de fond Énergique Rythmé Triste Stimulant Calme WISELINK détermine l ambiance des fichiers musicaux et les regroupe en conséquence en analysant les fichiers musicaux se trouvant sur le dispositif USB Image Mode Il est possible de régler le mode image Consulter la page 18 Son Mode Il est possible de régler le mode sonore Consu...

Страница 182: ...herine Album 3 2005 Pop Better than yesterday G H I J L P S T V 1File s Selected 1 6 4 5 2 3 1 Musique actuellement sélectionnée Affiche la musique présentement choisie 2 Norme de tri actuelle Appuyer sur la touche ou pour changer la norme de tri des fichiers musicaux Titre P artis Ambiance Genre Dossier P préf 3 Visualiser les groupes Affiche les groupes de tri Le groupe de tri comprenant le fich...

Страница 183: ...upe précédent ou suivant appuyer sur la touche REW ou FF 3 Appuyer sur la touche TOOLS 4 Appuyer sur la touche ou pour sélectionner Lire groupe cour 5 Appuyer sur la touche ENTER pour lire le groupe de fichiers musicaux sélectionnés dans la sous liste 5 Information sur la sélection d éléments Affiche le nombre de fichiers musicaux sélectionnés à l aide de la touche jaune 6 Éléments d aide Touche A...

Страница 184: ... touche TOOLS 3 Appuyer sur la touche ou pour sélectionner Mod info groupe Appuyer sur la touche ENTER WISELINK détermine l ambiance des fichiers musicaux et les regroupe en conséquence en analysant les fichiers musicaux se trouvant sur le dispositif USB L information Ambiance provenant d un fichier musical ne correspond pas toujours à l option Ambiance Par exemple un fichier que l on considère Én...

Страница 185: ...r au groupe précédent ou suivant appuyer sur la touche REW ou FF 3 Appuyer sur la touche TOOLS 4 Appuyer sur la touche ou pour sélectionner Lire groupe cour 5 Appuyer sur la touche ENTER pour lire le groupe de fichiers musicaux sélectionnés dans la sous liste Modification des réglages favoris 1 Appuyer sur la touche ou pour sélectionner le fichier musical désiré dans la liste de fichiers musicaux ...

Страница 186: ...mpossible de retirer les fichiers en mémoire morte des fichiers sélectionnés Il est impossible de récupérer les fichiers musicaux supprimés Visualisation de l information L information sur le fichier photo y compris l ordre des fichiers dans le répertoire courant le nom la taille la date de modification et le chemin est affichée 1 Appuyer sur la touche ou pour sélectionner le fichier musical désir...

Страница 187: ... sous la forme 00 00 00 si ladite durée ne figure pas au début du fichier 4 Pour quitter le mode WISELINK appuyer sur la touche W LINK de la télécommande Lecture du groupe musical 1 Appuyer sur la touche W LINK de la télécommande pour afficher le menu WISELINK 2 Appuyer sur la touche ou pour sélectionner Music puis sur ENTER Pour aller au groupe précédent ou suivant appuyer sur la touche REW ou FF...

Страница 188: ...tionné Mode de répétition est réglé à On Musique Une fois Lit une fois tous les fichiers musicaux dans le dossier ou du fichier sélectionné Mode de répétition est réglé à Off Musique Lecture Pause Appuyer sur la touche Lecture Pause ENTER de la télécommande pendant que la musique est en cours de lecture Reprise de la lecture de la musique 1 Pendant la lecture d un fichier musical appuyer sur la to...

Страница 189: ...r le temps d attente avant que l économiseur d écran ne soit lancé Appuyer sur la touche ou pour choisir Tps fct écran veille Appuyer sur la touche ou pour choisir 1 min 3 min ou 5 min Information Sélectionner cette option pour visualiser l information sur l appareil branché Appuyer sur la touche ou pour sélectionner Information puis sur ENTER Supp sécurité Il est possible de retirer le dispositif...

Страница 190: ...t à l aide du câble HDMI 2 Raccorder la prise d entrée HDMI IN du cinéma maison et la prise de sortie HDMI OUT de l appareil Anynet correspondant à l aide du câble HDMI Connectez le câble optique entre la prise Sortie audio numérique Optique de votre téléviseur et l entrée Audio numérique de votre système home cinéma En suivant les instructions de connexion ci avant la prise optique alimente uniqu...

Страница 191: ...TER 2 Appuyer sur la touche ou pour sélectionner Oui suivie de la touche ENTER La fonction Arrêt automatique est activée Si Non est sélectionné la fonction Arrêt automatique est désactivée Appuyer sur la touche EXIT pour quitter le menu La source active de la télécommande du téléviseur doit être réglée à TV afin que l on puisse utiliser la fonction Anynet Si Arrêt automatique est Oui les appareils...

Страница 192: ...onctionnement nom_ appareil Affiche le menu d écoute de l appareil branché Par exemple si un enregistreur DVD est branché le menu d écoute de celui ci s affiche Enregistrer enregistreur Lance aussitôt l enregistrement sur l enregistreur Disponible seulement pour les appareils avec fonction d enregistrement enregistreur Réserver l enregistrement Permet de réserver un enregistrement pour l enregistr...

Страница 193: ...our sélectionner Anynet HDMI CEC 2 Appuyer sur la touche ou pour sélectionner Récepteur Appuyez sur la touche ou pour sélectionner On ou Off 3 Appuyer sur la touche EXIT pour quitter le menu Si votre récepteur ne prend en charge que le son il peut ne pas figurer dans la liste des appareils Le récepteur fonctionnera lorsque la prise d entrée optique sera reliée à la prise de sortie optique du télév...

Страница 194: ...nu Anynet Appuyer sur la touche SOURCE de la télécommande du téléviseur pour sélectionner un appareil autre que les appareils Anynet Appuyer sur CH CH LIST PRE CH et FAV CH pour changer de mode au téléviseur Remarque le bouton des canaux ne fonctionne que si aucun appareil à syntoniseur intégré Anynet n est branché Le message Connexion à l appareil Anynet s affiche à l écran La télécommande ne peu...

Страница 195: ...ornes de la batterie Message Vérifier signal câble Assurez vous que le câble d interface est solidement branché aux sources PC Message Mode non disponible Vérifier la résolution maximale et la fréquence vidéo de l appareil raccordé Comparez ces valeurs aux données des modes Problème d écran en diffusion numérique Vérifiez la puissance du signal numérique et l entrée de l antenne L image est trop c...

Страница 196: ...fraîchissement maxi 60 Hz 1920 x 1080 L image n est pas centrée sur l écran Réglez la position horizontale et verticale Ne réglez pas la position de l écran en Signal Numérique L image semble déformée dans un angle de l écran Si la fonction Numérisation seulement est sélectionnée avec certains appareils externes l image peut sembler déformée dans un angle de l écran Ce dommage est causé par les ap...

Страница 197: ...n excessive sur les côtés supérieurs droit et gauche du téléviseur 2 Resserrer les deux vis à la position 1 puis resserrer les deux 2 vis à la position 2 Placer l appareil à la verticale puis resserrer les vis Si l on resserre les vis lorsque le téléviseur est en position horizontale il pourrait pencher vers un côté Démonter la base 1 Retirez les 4 vis à l arrière de la télévision 2 Séparer le sup...

Страница 198: ...puyez sur ENTER pour sauvegarder Lorsque la position 1 est sélectionnée le message Position en cours sauvegardée comme Position 1 s affiche 5 Appuyez sur la touche ENTER La position sauvegardée s affiche à gauche de l écran Réglage à la position mémorisée 1 Effectuez l étape 1 de la fonction Pour entrer dans le menu 2 En appuyant sur une touche de couleur rouge verte jaune le support mural à régla...

Страница 199: ...ent endommager l intérieur du téléviseur En ce qui a trait aux supports muraux qui ne sont pas conformes aux spécifications de vis standard VESA la longueur des vis peut différer selon leurs spécifications N utilisez pas de vis non conformes aux spécifications de vis standard VESA Ne serrez pas trop les vis cela pourrait endommager le produit ou en provoquer la chute et causer des blessures Samsun...

Страница 200: ...e l illustration en fonction du fabricant Reportez vous au manuel fourni avec le verrouillage Kensington pour une utilisation correcte Optionnel Figure 2 Figure 1 Câble L emplacement du Verrou Kensington peut varier en fonction du modèle 1 Insérez le dispositif de verrouillage dans la fente Kensington de la télévision LCD Figure 1 et tournez le dans le sens de verrouillage Figure 2 2 Branchez le c...

Страница 201: ...2 Retirer les vis à l arrière du téléviseur au centre passer les vis dans les pièces de retenue puis reposer les vis sur le téléviseur Il se peut que le produit soit dépourvu de vis Le cas échéant il faut acheter les types de vis suivants Spécifications des vis Pour un téléviseur ACL de 17 à 29 po M4 X 15 Pour un téléviseur ACL de 32 à 40 po M6 X 15 3 Relier les pièces de retenue du téléviseur à c...

Страница 202: ... x 779 2 mm 50 0 x 11 5 x 33 0 pouces 1269 6 x 291 2 x 838 7 mm Poids Avec support Sans support 42 1 lbs 19 1 kg 35 7 lbs 16 2 kg 58 4 lbs 26 5 kg 49 4 lbs 22 4 kg 69 4 lbs 31 5 kg 60 0 lbs 27 2 kg Considérations environnementales Température de fonctionnement Humidité au cours du fonctionnement Température de stockage Humidité du stockage 50 F to 104 F 10 C to 40 C 10 to 80 sans condensation 4 F ...

Страница 203: ... 7 9 200 mm 7 9 200 mm VUE ARRIERE REMARQUE Les dessins ne sont pas nécessairement tous à l échelle Certaines dimensions sont susceptibles de changer sans préavis Consultez les dimensions avant d installer votre téléviseur Aucune responsabilité ne saurait être acceptée en cas d erreur typographique ou d impression 2008 Samsung Electronics America Inc ...

Страница 204: ... 23 6 600 mm 15 7 400 mm VUE ARRIERE REMARQUE Les dessins ne sont pas nécessairement tous à l échelle Certaines dimensions sont susceptibles de changer sans préavis Consultez les dimensions avant d installer votre téléviseur Aucune responsabilité ne saurait être acceptée en cas d erreur typographique ou d impression 2008 Samsung Electronics America Inc ...

Страница 205: ... 23 6 600 mm 15 7 400 mm VUE ARRIERE REMARQUE Les dessins ne sont pas nécessairement tous à l échelle Certaines dimensions sont susceptibles de changer sans préavis Consultez les dimensions avant d installer votre téléviseur Aucune responsabilité ne saurait être acceptée en cas d erreur typographique ou d impression 2008 Samsung Electronics America Inc ...

Отзывы: