background image

English-

Turning the TV On and Off

Press the 

POWER

 button on the remote control.  

You can also use the 

POWER

 button on the TV.

2

With the power on, press the 

MENU

 button. 

The main menu appears on the screen.  

The menu’s left side has icons: Picture, Sound, 

Channel, Setup, Input.
Press the ▲ or ▼ button to select one of the icons.  

Then press the 

ENTER   

button to access the 

icon’s sub-menu. Press the 

EXIT

 button to exit.

The on-screen menus disappear from the 

screen after about one minute.

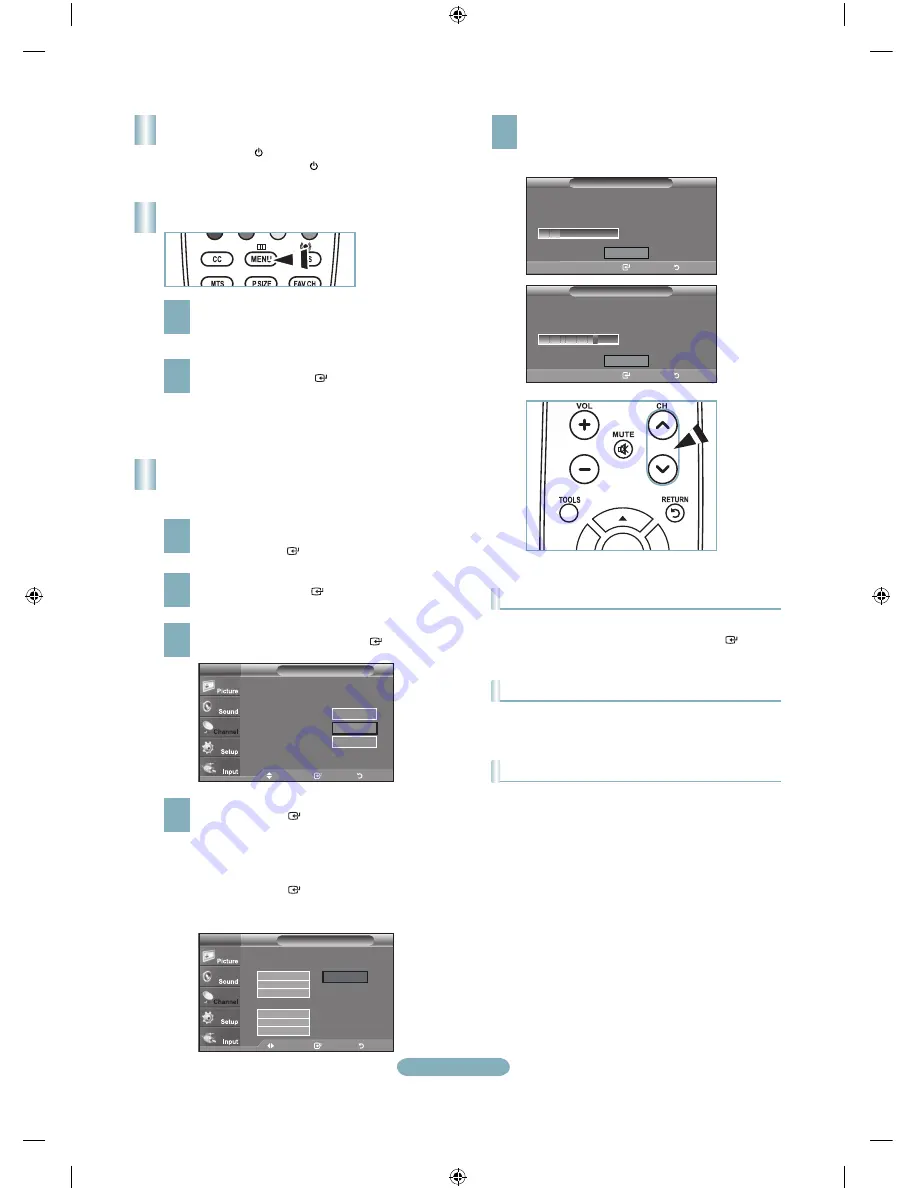
Storing Channels in Memory 

(Automatic Method)

Press the 

MENU

 button to display the menu. 

Press the ▲ or ▼ button to select “Channel”, then 

press the 

ENTER 

 button.

2

Press the ▲ or ▼ button to select “Auto Program”, 

then press the 

ENTER 

 button.

3

Press the ▲ or ▼ button to select the antenna  

connection, then press the 

ENTER 

 button.

4

When selecting the Cable TV system: 

Press the 

ENTER 

 button to start the auto 

program.
Press the ◄ or ► button, then press the ▲ or ▼ to 

select the correct analog signal cable system source 

among “STD”, “HRC”, and “IRC”.  

Press the 

ENTER 

 button. 

If you have Digital cable TV, select the cable system 

signal source for both Analog and Digital.

Viewing the Menus

The TV begins memorizing all available stations.

After all the available channels are stored, it start to 

remove scrambled channels. 

Press the 

EXIT

 button to exit.

 To Stop the Auto Program Function 

Press the 

MENU

 button while the Auto Program function is 

being executed. You can also press the 

ENTER 

 button 

to stop the setup.

 Checking to see if Channels were Stored in Memory

Press the 

CH

 button. Only the channels stored in memory 

will be selected (in order).

 Selecting the antennas

• 

Air

: “Air” antenna signal. 

• 

Cable

: “Cable” antenna signal.

• 

Auto

: “Air” and “Cable” antenna signals.

Move  


Enter 

Return

Selects the antenna to execute the Auto 

Program function.

Auto Program

Move  


Enter 

Return

TV

Start

Air
Cable
Auto

Start
Start

Move  


Enter 

Return

Selects a cable signal type for your location.

Auto Program

Move  


Enter 

Return

TV

Analog

Start

STD

HRC

IRC

Digital

STD

HRC

IRC

Auto Program

Plug & Play


Enter 

Return

Auto Program

Auto Program in Progress.
DTV Cable : -- 

  Cable : 

Cable   24

    % 

Stop

Auto Program

Plug & Play


Enter 

Return

Auto Program

Removing scrambled channel.

DTV Cable 

    0  %   

Stop

BN68-01516B-00Eng-0220.indd   8

2008-02-20   �� 8:00:13

Содержание LN26A330J1D

Страница 1: ...m global register LN26A330J1D LN32A330J1D LN37A330J1D LN40A330J1D Rear Panel Side Panel Jacks 1 AUDIO OUT 2 DIGITAL AUDIO OUT OPTICAL 3 PC IN PC AUDIO 4 HDMI IN 1 2 3 DVI IN HDMI2 R AUDIO L 5 ANT IN 6...

Страница 2: ...8 UP DOWN LEFT RIGHT ENTER Use to select on screen menu items and change menu values 9 INFO Press to display information on the TV screen 0 COLOR BUTTONS Use these buttons in the Channel list etc CC...

Страница 3: ...ence between HDMI and DVI is that the HDMI device is smaller in size and has the HDCP High Bandwidth Digital Copy Protection coding feature installed Connect an HDMI Cable between the HDMI IN 1 or 2 j...

Страница 4: ...and audio connections For example if connecting a Component video cable to COMPONENT IN 1 connect the audio cable to COMPONENT IN 1 also Each DVD Player or Cable Box Satellite receiver Set Top Box ha...

Страница 5: ...1 Y VIDEO jack Green does not match the color of the video cable Yellow TV Rear Panel 3 RF Cable Not supplied 5 Audio Cable Not supplied VCR Rear Panel 4 Video Cable Not supplied 5 Connect the cable o...

Страница 6: ...r receiver When the source is a digital component such as a DVD and is connected to the TV via HDMI only 2 channel sound will be heard from the Home Theater receiver If you want to hear 5 1 channel au...

Страница 7: ...ing a PC match the color of the connection terminal to the cable When using an HDMI DVI cable connection you must use the HDMI IN 2 jack Using the D Sub Cable 1 Connect an HDMI DVI cable between the H...

Страница 8: ...ou have Digital cable TV select the cable system signal source for both Analog and Digital Viewing the Menus 5 The TV begins memorizing all available stations After all the available channels are stor...

Страница 9: ...Selects the picture for high definition in a bright room Standard Selects the picture for the optimum display in a normal environment Movie Selects the picture for viewing movies in a dark room 3 Pres...

Страница 10: ...et Use this button to choose an input source that you would like to watch Available signal sources TV AV Component1 Component2 PC HDMI1 HDMI2 You can choose only those external devices that are connec...

Страница 11: ...you re receiving is High Definition HD HD channels sometimes broadcast Standard Definition SD programming which can cause black bars Set your cable satellite box to stretch or widescreen mode to elimi...

Страница 12: ...Panneau arri re Prises du panneau lat ral 1 AUDIO OUT 2 DIGITAL AUDIO OUT OPTICAL 3 PC IN PC AUDIO 4 HDMI IN 1 2 3 DVI IN HDMI2 R AUDIO L 5 ANT IN 6 POWER INPUT 7 SERVICE 8 COMPONENT IN 1 2 AV IN 1 9...

Страница 13: ...iliser pour s lectionner les l ments du menu l cran et modifier les valeurs du menu 9 INFO Appuyez sur cette touche pour afficher de l information l cran 0 TOUCHES DE COULEUR Utiliser ces touches part...

Страница 14: ...re les interfaces HDMI et DVI r side dans le fait que la HDMI est de plus petites dimensions qu elle est dot e du composant de codage HDCP protection contre la copie num rique large bande passante Bra...

Страница 15: ...si un C ble vid o Composante est branch la prise d entr e COMPONENT IN 1 le C ble audio doit tre branch la prise d entr e COMPONENT IN 1 galement La configuration du panneau arri re de chaque lecteur...

Страница 16: ...ndre les couleurs de la borne et du c ble La couleur de la prise d entr e AV IN 1 Y VID O vert ne correspond pas la cou leur du C ble vid o jaune Pannear arri re de la t l vision 3 C ble RF non fourni...

Страница 17: ...viseur met des signaux num riques air il transmet le son en 5 1 canaux au r cepteur de la cha ne de cin ma maison Lorsque la source est un composant num rique comme un lecteur DVD et que ce dernier e...

Страница 18: ...reils Lorsque vous connectez un PC faites correspondre les couleurs de la borne et du c ble La prise d entr e HDMI IN 2 doit tre utilis e pour un branchement de c ble HDMI DVI Utilisation d un c ble s...

Страница 19: ...ER Si le C ble est num rique s lectionner la source de signal pour une diffusion analogique et num rique Visualisation des menus 5 Le t l viseur commence alors m moriser tous les canaux disponibles Un...

Страница 20: ...tre jour Contraste Luminosit Nettet Couleur ou Teinte puis appuyez sur le bouton ENTER Mode Image Dynamique choisit l image pour la haute d finition dans une pi ce claire Standard choisit la meilleure...

Страница 21: ...l viseur Cette touche permet de choisir la source d entr e d sir e Sources de signal accessibles TV AV Composante1 Composante2 PC HDMI1 HDMI2 Vous pouvez s lectionner uniquement les appareils externes...

Страница 22: ...r ception est en haute d finition HD Les stations des canaux haute d finition mettent parfois en signaux d finition standard SD ce qui peut causer la formation de barres noires R glez votre c blos le...

Страница 23: ...Cette page est laiss e intentionnellement en blanc BN68 01516B 00Fre 0220 indd 12 2008 02 20 7 58 25...

Страница 24: ...e Consommateurs Samsung Country Customer Care Center Web Site Address CANADA 1 800 SAMSUNG 726 7864 www samsung com ca Samsung Electronics Canada Inc Customer Service 55 Standish Court Mississauga Ont...

Отзывы: