background image

English - 1

CONTENTS

License

TruSurround HD

, SRS and 

 Symbol are trademarks of SRS Labs, Inc.

TruSurround HD

 technology is incorporated under license from SRS Labs, Inc.

Manufactured under license from Dolby Laboratories. Dolby and the double-D symbol are trademarks 

of Dolby Laboratories.

Symbol

N

O

T

Note

One-Touch Button

TOOLS Button

GENERAL INFORMATION

List of Features .....................................................................2

Accessories ..........................................................................2

Viewing the Control Panel ....................................................3

Viewing the Connection Panel ..............................................4

Remote Control ....................................................................6

Installing Batteries in the Remote Control ............................6

CONNECTIONS

Connecting VHF and UHF Antennas ....................................7

Connecting Cable TV ...........................................................7

Connecting a DVD / Blu-ray player / Cable Box / Satellite receiver 

(Set-Top Box) via HDMI .............................................................8

Connecting a DVD / Blu-ray player / Cable Box / Satellite 

receiver (Set-Top Box) via DVI .............................................9

Connecting a DVD / Blu-ray player / Cable Box / Satellite receiver (Set-Top 

Box) via Component cables ......................................................................9

Connecting a VCR ..............................................................10

Connecting a Digital Audio System ....................................10

Connecting a Camcorder....................................................11

Connecting a PC ................................................................12

OPERATION

Viewing the menus .............................................................13

Plug & Play Feature............................................................14

CHANNEL CONTROL

Configuring the Channel Menu

 ...........................................15

Managing Channels............................................................15

PICTURE CONTROL

Configuring the Picture Menu

 .............................................17

Using Your TV as a Computer (PC) Display .......................19

Setting up the TV with your PC ..........................................20

SOUND CONTROL

Configuring the Sound Menu

 ..............................................21

SETUP

Configuring the Setup Menu

 ...............................................22

INPUT / SUPPORT

Configuring the Input Menu

 ................................................26

Configuring the Support Menu

............................................26

APPENDIx

Troubleshooting ..................................................................28

Installing the Stand .............................................................31

Disconnecting the Stand.....................................................31

Wall Mount Kit Specifications (VESA)

 ................................32

Using the Anti-Theft Kensington Lock ................................32

Securing the Installation Space ..........................................33

Securing the TV to a Wall or Cabinet .................................33

Specifications

 .....................................................................34

Dimensions .........................................................................35

Eng
lish

[Canada]BN68-01975U-00L02.indb   1

2009-07-28   ¿ÀÈÄ 2:43:59

Содержание LN22B350

Страница 1: ... Samsung Electronics Canada Inc Customer Service 55 Standish Court Mississauga Ontario L5R 4B2 Canada Samsung Electronique Canada Inc Service à la Clientèle 55 Standish Court Mississauga Ontario L5R 4B2 Canada U S A 1 800 SAMSUNG 726 7864 www samsung com us Samsung Electronics America Inc 105 Challenger Road Ridgefield Park NJ 07660 0511 LCD TV user manual imagine the possibilities Thank you for p...

Страница 2: ...ghts of certain third parties This license is limited to private non commercial use by end user consumers for licensed contents No rights are granted for commercial use The license does not cover any product unit other than this product unit and the license does not extend to any unlicensed product unit or process conforming to ISO IEC 11172 3 or ISO IEC 13818 3 used or sold in combination with th...

Страница 3: ...e receiver Set Top Box via DVI 9 Connecting a DVD Blu ray player Cable Box Satellite receiver Set Top Box via Component cables 9 Connecting a VCR 10 Connecting a Digital Audio System 10 Connecting a Camcorder 11 Connecting a PC 12 Operation Viewing the menus 13 Plug Play Feature 14 Channel Control Configuring the Channel Menu 15 Managing Channels 15 Picture Control Configuring the Picture Menu 17 ...

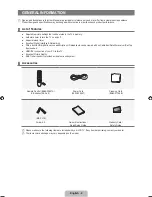
Страница 4: ...etworking With a built in HD digital tuner non subscription HD broadcasts can be viewed with no Cable Box Satellite receiver Set Top Box needed HDMI DVI connection of your PC to this TV Excellent Picture Quality SRS TruSurround HD provides a virtual surround system Accessories Remote Control BN59 00857A Batteries AAA x 2 Power Cord 3903 000467 Cleaning Cloth BN63 01798B Screw X 2 Owner s Instructi...

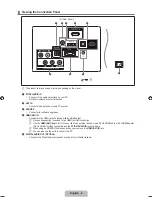
Страница 5: ... as you use the ENTERE button on the remote control 3 y Press to increase or decrease the volume In the on screen menu use the y buttons as you would use the and buttons on the remote control 4 P POWER Press to turn the TV on and off 5 POWER INDICATOR Blinks and turns off when the power is on and lights up in stand by mode 6 z Press to change channels In the on screen menu use the z buttons as you...

Страница 6: ... a device with an HDMI output No sound connection is needed for an HDMI to HDMI connection Use the HDMI DVI IN jack for DVI connection to an external device Use a DVI to HDMI cable or DVI HDMI adapter DVI to HDMI for video connection and the PC DVI AUDIO IN jacks for audio When using an HDMI DVI cable connection you must use the HDMI DVI IN jack You can also use the ports to connect to a PC 5 DIGI...

Страница 7: ...one volume and TV volume are adjusted separately 8 PC IN Connects to the video output jacks on your PC 9 COMPONENT IN AV IN Connects Component video audio The COMPONENT IN jack is also used as the AV IN jack Connect the video cable to the COMPONENT IN Y VIDEO jack and the audio cable to the COMPONENT IN R AUDIO L jacks 0 KENSINGTON LOCK The Kensington Lock optional is a device used to physically f...

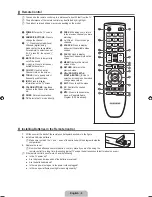
Страница 8: ...ress to display and select the available video sources FAV CH Used to display Favourites Channel Lists on the screen MENU Displays the main on screen menu RETURN Returns to the previous menu UP DOWN LEFT RIGHT ENTERE Use to select on screen menu items and change menu values EXIT Press to exit the menu CC Controls the caption decoder a MTS Press to choose stereo mono or Separate Audio Program SAP b...

Страница 9: ...parate VHF and UHF Antennas If you have two separate antennas for your TV one VHF and one UHF you must combine the two antenna signals before connecting the antennas to the TV This procedure requires an optional combiner adaptor available at most electronics shops 1 Connect both antenna leads to the combiner 2 Plug the combiner into the ANT IN terminal on the bottom of the rear panel Connecting Ca...

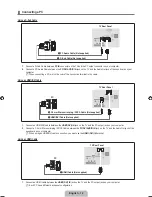
Страница 10: ...eiver Set Top Box via HDMI This connection can only be made if there is an HDMI Output connector on the external device 1 Connect an HDMI Cable between the HDMI DVI IN jack on the TV and the HDMI jack on the DVD Blu ray player or Cable Box Satellite receiver Set Top Box What is HDMI HDMI High Definition Multimedia Interface is an interface that enables the transmission of digital audio and video s...

Страница 11: ...x Satellite receiver Set Top Box to your TV 1 Connect a Component Cable between the COMPONENT IN Y PB PR jacks on the TV and the COMPONENT Y PB PR jacks on the DVD Blu ray player Cable Box Satellite receiver Set Top Box 2 Connect Audio Cables between the COMPONENT IN R AUDIO L jacks on the TV and the AUDIO OUT jacks on the DVD Blu ray player Cable Box Satellite receiver Set Top Box Component video...

Страница 12: ...tal Audio System is connected to the DIGITAL AUDIO OUT OPTICAL jack Decrease the volume of the TV and adjust the volume level with the system s volume control 5 1CH audio is possible when the TV is connected to an external device supporting 5 1CH Each Digital Audio System has a different back panel configuration When the Home Theater receiver is set to On you can hear sound output from the TV s Op...

Страница 13: ... the TV and the AUDIO OUT jacks on the camcorder Each Camcorder has a different back panel configuration When connecting a Camcorder match the color of the connection terminal to the cable Using an HDMI Cable 1 Connect a HDMI Cable between the HDMI DVI IN jack on the TV and the HDMI OUT jack on the camcorder N N TV Rear Panel 1 Video Cable Not supplied 2 Audio Cable Not supplied Camcorder TV Rear ...

Страница 14: ...the PC output jack on your computer 2 Connect a 3 5 mm Stereo miniplug 2RCA Cable between the PC DVI AUDIO IN jack on the TV and the Audio Out jack of the sound card on your computer When using an HDMI DVI cable connection you must use the HDMI DVI IN terminal Using an HDMI Cable 1 Connect an HDMI cable between the HDMI DVI IN jack on the TV and the PC output jack on your computer Each PC has a di...

Страница 15: ...ct the currently selected item Confirm the setting RETURN R Return to the previous menu EXIT e Exit the on screen menu Example Setting the TV s Brightness in the Picture Menu Adjusting the Brightness to 80 1 Press the MENU button to display the menu 2 Press the ENTERE button to select Picture 3 Press the or button to select Brightness 4 Press the ENTERE button 5 Press the or button until the Brigh...

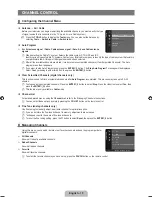
Страница 16: ... both Analog and Digital Contact your local cable company to identify the type of cable system that exists in your particular area 5 Press the ENTERE button to select Start The TV will begin memorizing all of the available channels To stop the search before it has finished press the ENTERE button with Stop selected After all the available channels are stored it starts to remove scrambled channels ...

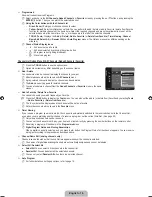
Страница 17: ...annels after Auto Program is completed This process may take up to 20 30 minutes To stop searching scrambled channels Press the ENTERE button to select Stop Press the button to select Yes then press the ENTERE button This function is only available in Cable mode Channel List For detailed procedures on using the Channel List refer to the Managing Channels instructions You can select these options b...

Страница 18: ...avorite You can set channels you watch frequently as Favorite Press the TOOLS button to display the Tools menu You can also set the add to or delete from Favorites by selecting Tools Add to Favorite or Delete from Favorite The symbol will be displayed and the channel will be set as a favorite All favorite channels will be shown in the Favorite menu Timer Viewing If you reserve a program you want t...

Страница 19: ...the picture Color Adjusts color saturation of the picture Tint G R Adjusts the color tint of the picture When you make changes to Backlight Contrast Brightness Sharpness Color or Tint G R the OSD will be adjusted accordingly In PC mode you can only make changes to Backlight Contrast and Brightness Settings can be adjusted and stored for each external device you have connected to an input of the TV...

Страница 20: ...nges to the Color Tone and Size from among the items in Picture Options Color Tone Cool Normal Warm1 Warm2 Warm1 or Warm2 is only activated when the picture mode is Movie Settings can be adjusted and stored for each external device you have connected to an input of the TV Size Occasionally you may want to change the size of the image on your screen Your TV comes with six screen size options each d...

Страница 21: ... an external device is connected to the TV via HDMI The HDMI Black Level function may not be compatible with all external devices Film Mode Off Auto The TV can be set to automatically sense and process film signals from all sources and adjust the picture for optimum quality Film Mode is supported in TV Video Component 480i 1080i and HDMI 480i 1080i Picture Reset Reset Picture Mode Cancel Resets al...

Страница 22: ...SOURCE button to select PC mode Auto Adjustment Use the Auto Adjust function to have the TV set automatically adjust the video signals it receives The function also automatically fine tunes the settings and adjusts the frequency values and positions Press the TOOLS button to display the Tools menu You can also set the Auto Adjustment by selecting Tools Auto Adjustment This function does not work i...

Страница 23: ...the Preferred Language by pressing the MTS button on the remote control Preferred Language is available only in Digital TV mode You can only select the language from among the actual languages being broadcast Multi Track Sound MTS analog channels only Press the MTS button on the remote control repeatedly to select Mono Stereo or SAP Mono Choose for channels that are broadcasting in mono or if you ...

Страница 24: ...press the INFO button If you disconnect the power cord you have to set the clock again Clock Mode You can set up the current time manually or automatically Auto Set the current time automatically using the time from a digital broadcast Manual Set the current time to a manually specified time Depending on the broadcast station and signal the auto time may not be set correctly If this occurs set the...

Страница 25: ...tion after setting the equalizer resets the equalizer settings to the factory defaults Game Mode is not available in regular TV and PC mode If the picture is poor when external device is connected to TV check if Game Mode is On Set Game Mode to Off and connect external devices V Chip The V Chip feature automatically locks out programs that are deemed inappropriate for children The user must enter ...

Страница 26: ... information is automatically downloaded while watching DTV channels It may take several seconds The Downloadable U S rating menu is available for use after information is downloaded from the broadcasting station However depending on the information from the broadcasting station it may not be available for use Parental restriction levels differ depending on the broadcasting station The default men...

Страница 27: ...e Yellow Magenta and Cyan You can change the background color of the caption The default is Black Foreground Opacity This option consists of Default Transparent Translucent Solid and Flashing You can change the opacity of the letter Background Opacity This option consists of Default Transparent Translucent Solid and Flashing You can change the background opacity of the caption Return to Default Th...

Страница 28: ...al equipment Please check your connections If the problem still persists refer to the external device s user manual Sound Test If you think you have a sound problem please perform the sound test You can check the sound by playing a built in melody sound through the TV Does the problem still exist with this sound test appears on the screen If you hear no sound from the TV s speakers before performi...

Страница 29: ...turn off and turn on automatically after completing the firmware upgrade Please check the firmware version after the upgrades are complete When software is upgraded video and audio settings you have made will return to their default factory settings We recommend you write down your settings so that you can easily reset them after the upgrade HD Connection Guide This menu presents the connection me...

Страница 30: ... Setup menu Try picture reset to view the default picture setting Go to MENU Picture Picture Reset Dotted line on the edge of screen If picture size is set to Screen Fit change to 16 9 Change cable satellite box resolution Picture is black and white with AV Composite input only Connect video cable Yellow to Green jack of component input 1 of the TV Picture freezes or is distorted when changing cha...

Страница 31: ... correct source by pressing the SOURCE button on the remote control Reboot the connected device by reconnecting the device s power cable RF Cable Antenna Connection Cannot receive all channels Make sure coaxial cable is connected securely Please try Auto Program to add available channels to the channel list Go to MENU Channel Auto program then select Auto and make sure correct Cable TV signal type...

Страница 32: ...the external device Plastic smell from TV This smell is normal and will dissipate over time TV Signal Strength is unavailable in the Self Diagnostic Test menu This function is only available with digital channels with an Antenna RF Coax connection Air or Cable TV is tilted to right or left side Remove the stand base from TV and reassemble Can not assemble stand base Make sure TV is placed on flat ...

Страница 33: ...able Align the TV bottom along the table edge 2 Fasten screws at bottom of the stand Stand the product up and fasten the screws If you fasten the screws with the LCD TV placed down it may lean to one side Disconnecting the Stand 1 Place the front of the TV onto a soft cloth or cushion on a table Align the TV bottom along the table edge 2 Remove screws at bottom of the stand N ...

Страница 34: ...e product installation instructions Our 57 and 63 models do not comply with VESA Specifications Therefore you should use our dedicated wall mount kit for this model Do not exceed 15 degrees tilt when mounting this TV Product Family inches VESA Spec A B Standard Screw Quantity LCD TV 19 22 100 x 100 M4 4 23 29 200 x 100 30 40 200 x 200 M6 46 55 400 x 400 M8 57 70 800 x 400 80 1400 x 800 PDP TV 42 5...

Страница 35: ...d Safety Flyer For added stability install the anti fall device for safety purposes as follows To avoid the TV from falling 1 Put the screws into the clamps and firmly fasten them onto the wall Confirm that the screws have been firmly installed onto the wall You may need additional material such as an anchor depending on the type of wall Since the necessary clamps screws and string are not supplie...

Страница 36: ...2 5x 424 8 mm Weight Without Stand With Stand 8 4 Ibs 3 8 kg 8 8 Ibs 4 0 kg Environmental Considerations Operating Temperature Operating Humidity Storage Temperature Storage Humidity 50 F to 104 F 10 C to 40 C 10 to 80 non condensing 4 F to 113 F 20 C to 45 C 5 to 95 non condensing Stand Swivel Left Right 0 Design and specifications are subject to change without prior notice This device is a Class...

Страница 37: ...rawings are not necessarily to scale Some dimensions are subject to change without prior notice Refer to the dimensions prior to performing installation of your TV Not responsible for typographical or printed errors 2009 Samsung Electronics America Inc 15 3 16 7 12 2 18 9 10 6 8 0 3 5 21 9 3 0 75 0 mm 3 0 75 0 mm ...

Страница 38: ...EUR ACL Guide de l utilisateur Imaginez les possibilités Merci d avoir acheté un produit Samsung Pour obtenir un service complet veuillez enregistrer votre produit à www samsung com register Modèle N de série ...

Страница 39: ...nce permet aux consommateurs d utiliser le contenu sous licence à des fins non commerciales Aucun droit n est accordé à l égard d une utilisation commerciale Cette licence ne couvre aucun autre appareil que celui ci et ne s applique pas aux produits non pourvus d une licence ni à tout processus conforme à la norme ISO IEC 11172 3 ou ISO IEC 13818 3 utilisé ou vendu de pair avec ce produit La licen...

Страница 40: ...9 Branchement d un lecteur DVD Blu ray câblosélecteur ou r écepteur satellite boîtier décodeur via les câbles de composantes 9 Connexion d un magnétoscope 10 Connexion d une chaîne audio numérique 10 Connexion d un caméscope 11 Connexion d un PC 12 Fonctionnement Présentation des menus 13 Fonction Prêt à l emploi 14 Commande des canaux Configuration du menu des canaux 15 Gestion des canaux 15 Comm...

Страница 41: ...réseau exceptionnelle Grâce au syntoniseur numérique HD intégré l écoute d émissions HD sans abonnement ne nécessite pas de câblosélecteur ni de récepteur satellite Connexion HDMI DVI entre votre PC et ce téléviseur Excellente qualité d image La technologie SRS TruSurround HD offre un son ambiophonique Accessoires Télécommande BN59 00857A et piles AAA x 2 Cordon d alimentation 3903 000467 Chiffon ...

Страница 42: ...z sur cette touche pour augmenter ou réduire le volume Dans le menu à l écran utilliser les touches y de la même manière que les touches et de la télécommande 4 P ALIMENTATION Appuyez sur cette touche pour mettre le téléviseur sous tension et hors tension 5 VOYANT D ALIMENTATION Clignote puis s arrête lorsque le téléviseur est allumé S allume en mode de veille 6 z Appuyez sur cette touche pour cha...

Страница 43: ...nexion audio n est nécessaire entre deux appareils HDMI Utilisez la prise HDMI DVI IN pour le branchement DVI vers un appareil externe Utilisez un câble DVI vers HDMI ou un adaptateur DVI HDMI DVI vers HDMI pour la connexion vidéo et les prises PC DVI AUDIO IN pour la sortie audio Il faut utiliser la prise d entrée HDMI DVI IN dans le cas d un branchement au câble HDMI DVI Vous pouvez également br...

Страница 44: ... fort volume peut altérer votre audition Les haut parleurs n émettent aucun son lorsqu un casque d écoute est branché au téléviseur Le volume des écouteurs et du téléviseur se règle différemment 8 PC IN À connecter aux prises de sortie audio et vidéo de votre PC 0 KENSINGTON LOCK Le verrou Kensington en option est un dispositif servant à immobiliser un appareil dans un endroit public Si vous souha...

Страница 45: ...canal SOURCE Appuyez sur cette touche pour afficher et choisir les sources vidéo disponibles FAV CH Sert à afficher la liste des canaux à l écran MENU Affiche le menu à l écran principal RETURN Permet de retourner au menu précédent HAUT BAS GAUCHE DROIT ENTERE Sert à sélectionner des articles de menus affichés et à modifier les valeurs des menus EXIT Appuyez sur cette touche pour quitter un menu C...

Страница 46: ...VHF et UHF séparées Si vous disposez de deux antennes séparées pour votre téléviseur une VHF et une UHF vous devez combiner leurs signaux avant de les brancher au téléviseur Cette procédure exige un multiplexeur adaptateur disponible dans la plupart des magasins d électronique 1 Branchez les deux câbles des antennes au multiplexeur 2 Branchez le multiplexeur à la prise ANT IN située au bas du pann...

Страница 47: ...externe dispose d un connecteur de sortie HDMI 1 Branchez un câble HDMI entre la prise HDMI DVI IN du téléviseur et la prise HDMI du lecteur DVD Blu ray câblosélecteur ou récepteur satellite boîtier décodeur Qu est ce que le mode HDMI HDMI ou High Definition Multimedia Interface est une interface permettant la transmission de signaux numériques audio et vidéo à l aide d un seul câble La différence...

Страница 48: ...eur satellite boîtier décodeur à votre téléviseur 1 Branchez un câble de composant entre les prises COMPONENT IN Y PB PR du téléviseur et les prises COMPONENT Y PB PR du lecteur DVD Blu ray câblosélecteur ou récepteur satellite boîtier décodeur 2 Branchez les câbles audio entre la prise COMPONENT IN R AUDIO L du téléviseur et le lecteur DVD Blu ray câblosélecteur ou récepteur satellite boîtier déc...

Страница 49: ... OUT OPTICAL baissez le volume du téléviseur puis réglez le volume à l aide de la commande de volume de la chaîne La diffusion audio en 5 1 canaux est possible lorsque le téléviseur est raccordé à un appareil externe doté de cette fonction audio La configuration du panneau arrière de chaque système audio numérique diffère Lorsque le récepteur de la chaîne de cinéma maison est réglé à Arrêt vous po...

Страница 50: ...u caméscope La configuration arrière de chaque caméscope est différente suivant les appareils Lorsque vous branchez un caméscope assurez vous que la couleur de la prise correspond à celle du câble Utilisation d un câble HDMI 1 Connectez un câble HDMI entre la prise HDMI DVI IN du téléviseur et la prise de sortie HDMI OUT du caméscope N N Panneau arrière du téléviseur 1 Câble vidéo non fourni 2 Câb...

Страница 51: ...ise de sortie PC de l ordinateur 2 Branchez un câble mini prise stéréo 3 5 mm 2RCA entre la prise PC DVI AUDIO IN du téléviseur et la prise de sortie audio de la carte son de l ordinateur Il faut utiliser la prise d entrée HDMI DVI IN dans le cas d une connexion HDMI DVI Utilisation d un câble HDMI 1 Connectez un câble HDMI entre la prise HDMI DVI IN du téléviseur et la prise de sortie PC de l ord...

Страница 52: ...isir un élément Sélectionner l élément en surbrillance Confirme le réglage RETURN R Permet de retourner au menu précédent EXIT e Quitte le menu de l écran Exemple Réglage de la luminosité du téléviseur dans le menu Image Réglage de la luminosité à 80 1 Appuyez sur la touche MENU pour afficher le menu 2 Appuyez sur ENTERE pour sélectionner Image 3 Appuyez sur la touche ou pour sélectionner Luminosi...

Страница 53: ...électionnez la source de signal pour une diffusion analogique et numérique Communiquez avec votre câblodistributeur local pour déteminer le type de système de câble de votre région 5 Appuyez sur ENTERE pour sélectionner l option Démarrer La mémorisation des canaux disponibles commence Pour arrêter la recherche avant la fin Appuyez sur ENTERE lorsque l option Arrêt est sélectionnée Une fois tous le...

Страница 54: ...o terminée Cette procédure peut prendre de 20 à 30 minutes Pour arrêter la recherche des canaux brouillés appuyez sur ENTERE pour sélectionner Arrêt Appuyez sur la touche pour répondre Oui puis sur ENTERE Cette fonction n est accessible qu en mode Câble Liste des canaux Pour connaître les procédures détaillées relatives à l utilisation de Liste des canaux consultez les instructions sous la rubriqu...

Страница 55: ...r comme favoris les canaux que vous regardez fréquemment Appuyez sur la touche TOOLS pour afficher le menu Outils Il est également possible d ajouter ou de supprimer des canaux dans la liste des favoris en sélectionnant Outils Ajouter aux favoris ou Effacer des favoris Le symbole s affiche et le canal est défini comme canal favori Tous les canaux favoris sont affichés dans le menu Favori Êcoute pa...

Страница 56: ... du bord de l image Couleur Règle la saturation des couleurs de l image Teinte V R Règle la teinte de couleur de l image Lorsque vous apportez des modifications aux options Contre jour Contraste Luminosité Netteté Couleur ou Teinte V R l image s ajuste en conséquence En mode PC il est possible de modifier uniquement les fonctions Contre jour Contraste et Luminosité Les réglages peuvent être défini...

Страница 57: ... modifier uniquement les options Nuance coul et Format à partir des éléments de Options d image Nuance coul Froide Normal Chaude1 Chaude2 Chaude1 ou Chaude2 ne s activent qu en mode Cinéma Les réglages peuvent être définis et mémorisés pour chacun des appareils externes branchés à une entrée du téléviseur Format Il est possible de modifier la taille de l image à l écran Six tailles d écran différe...

Страница 58: ... Il se peut que la fonction Nv nr HDMI ne soit pas compatible avec tous les appareils externes Mode Film Off Auto Il est possible de régler le téléviseur afin qu il détecte et traite automatiquement les signaux de film provenant de toutes les sources et règle l image pour obtenir une définition optimale Mode Film est accessibles en modes TV Vidéo Composante 480i 1080i et HDMI 480i 1080i Réinitiali...

Страница 59: ...ge Appuyez sur la touche SOURCE pour sélectionner le mode PC Réglage Auto Utilisez la fonction Auto Adjust afin que le téléviseur règle automatiquement les signaux vidéo qu il reçoit Cette fonction règle également automatiquement les paramètres les fréquences et les positions Appuyez sur la touche TOOLS pour afficher le menu Outils Il est également possible de procéder au réglage automatique en ch...

Страница 60: ...ter une émission dans une langue autre que la Preferred Language en appuyant sur le bouton MTS de la télécommande Langue privilégiée n est disponible qu en mode numérique Seule une langue faisant partie des langues diffusées peut être sélectionnée Son multi piste canaux analogiques seulement Appuyez sur la touche MTS de la télécommande pour sélectionner Mono Stéréo ou SAP Mono Choisissez ce réglag...

Страница 61: ...hez le cordon d alimentation vous devez régler l horloge de nouveau Mode horloge Vous pouvez régler l heure manuellement ou automatiquement Auto Permet de régler l heure automatiquement en utilisant l heure du signal de diffusion numérique Manuel Permet de régler l heure manuellement selon une heure particulière En fonction de la station de diffusion et du signal il est possible que la fonction de...

Страница 62: ...le ramène aux valeurs par défaut Mode Jeu n est pas disponible en mode TV et PC standard Si la qualité de l image est mauvaise lorsqu un dispositif externe est branché au téléviseur vérifier si le Mode Jeu est activé Définissez le mode Jeu sur Désactivé et connectez des périphériques externes V Chip La fonction V Chip exclut automatiquement les programmes qui sont considérés comme inappropriés pou...

Страница 63: ...trôle parental est téléchargée automatiquement lorsqu on regarde des canaux numériques Cela peut prendre plusieurs secondes Le menu Catég américaine téléchargeable est disponible pour utilisation après téléchargement de l information à partir de la station de radiodiffusion Toutefois selon l information provenant de la station il est possible qu on ne puisse pas l utiliser Les niveaux de contrôle ...

Страница 64: ... Vert Bleu Jaune Magenta et Cyan Vous pouvez modifier la couleur de l arrière plan des sous titres La couleur par défaut est Noir Opacité avant plan Cette option comprend Par défaut Transparent Translucent Opaque et Clignotant Vous pouvez modifier l opacité des caractères Opacité arrière plan Cette option vous permet de choisir entre Par défaut Transparent Translucide Opaque et Clignotant Vous pou...

Страница 65: ...es connexions Si le problème persiste consultez le guide d utilisation de l appareil externe Essai de son Si vous croyez qu il y a un problème de son effectuez un essai de son Pour vérifier le son vous pouvez faire jouer dans le téléviseur une mélodie préenregistrée Le message Cet essai de son permet il de résoudre le problème apparaît à l écran Si les haut parleurs du téléviseur n émettent aucun ...

Страница 66: ...quement une fois la mise à niveau terminée Veuillez vérifier la version du micrologiciel une fois que la mise à niveau est terminée Au moment de la mise à niveau du micrologiciel les réglages vidéo et audio que vous avez effectués seront remplacés par les réglages par défaut définis en usine Nous vous recommandons de prendre en note vos réglages afin de pouvoir les rétablir facilement après la mis...

Страница 67: ...ez de réinitialiser l image pour voir le réglage d image par défaut Allez à MENU Image Réinitialisation de l image Ligne pointillée sur le bord de l écran Si la taille de l image est réglée à Plein écran passez à 16 9 Modifiez la résolution du câblosélecteur ou récepteur satellite L image est en noir et blanc avec une entrée AV composite seulement Branchez le câble vidéo jaune à la prise verte de ...

Страница 68: ...l branché est sous tension Assurez vous de choisir la source appropriée du téléviseur en appuyant sur la touche SOURCE de la télécommande Réinitialisez l appareil connecté en branchant à nouveau son cordon d alimentation Connexion RF câble antenne Impossible d avoir tous les canaux Assurez vous que le câble coaxial est bien branché Essayez l option Prog auto pour ajouter les canaux disponibles à l...

Страница 69: ...I ou composantes Sous titres doit être activée sur l appareil externe Odeur de plastique provenant du téléviseur Cette odeur est normale et disparaîtra avec le temps L option Puissance signal du téléviseur n est pas disponible dans le menu d essai d autodiagnostic Cette option n est offerte qu avec les canaux numériques et une antenne RF câble coaxial Air ou Câble Le téléviseur est incliné du côté...

Страница 70: ...a table 2 Serrez les vis sur la partie inférieure du support Placer l appareil à la verticale puis resserrer les vis Si l on resserre les vis lorsque le téléviseur est en position horizontale il pourrait pencher d un côté Réglage de l angle du téléviseur 1 Placez la partie avant du téléviseur sur un coussin ou un chiffon doux sur la table Aligner le bas du téléviseur sur le bord de la table 2 Reti...

Страница 71: ...teur ne suit pas les instructions d installation du produit Nos modèles de 57 po et 63 po ne sont pas conformes aux spécifications VESA Par conséquent vous devez utiliser notre ensemble de fixation conçu pour ces modèles Au montage l inclinaison du téléviseur ne doit pas dépasser 15 degrés Type de produits pouces Spéc VESA A B Vis standard Quantité TV ACL 19 22 100 x 100 M4 4 23 29 200 x 100 30 40...

Страница 72: ...s les mesures de sécurité indiquées dans la brochure Pour une stabilité accrue installez un dispositif anti chute tel qu indiqué ci dessous Pour empêcher que le téléviseur ne tombe 1 Poser les vis dans les pièces de retenue et les visser fermement dans le mur S assurer que les vis sont bien vissées au mur Il pourrait s avérer nécessaire d utiliser des douilles d ancrage selon le type de mur Comme ...

Страница 73: ...8 4 Ibs 3 8 kg 8 8 Ibs 4 0 kg Facteurs environnementaux Température de fonctionnement Niveau d humidité durant le fonctionnement Température pour l entreposage Niveau d humidité pour l entreposage 50 F à 104 F 10 C à 40 C 10 à 80 sans condensation 4 F à 113 F 20 C à 45 C 5 à 95 sans condensation Support pivotant gauche droite 0 Le design et les spécifications peuvent changer sans préavis Cet appar...

Страница 74: ...drawings are not necessarily to scale Some dimensions are subject to change without prior notice Refer to the dimensions prior to performing installation of your TV Not responsible for typographical or printed errors 2009 Samsung Electronics America Inc 15 3 16 7 12 2 18 9 10 6 8 0 3 5 21 9 3 0 75 0 mm 3 0 75 0 mm ...

Отзывы: