background image

Содержание LN-T1953H

Страница 1: ...nstructions Register your product at www samsung com global register Record your Model and Serial number here for future reference Model __________ Serial No ____________ LN T1953H LN T1954H TFT LCD T...

Страница 2: ...rights reserved Precauciones al mostrar en la pantalla una imagen fija La imagen fija puede causar da os permanentes en la pantalla del televisor No deje una imagen fija en la pantalla LCD durante m s...

Страница 3: ...rack Analog 25 Automatic Volume Control 25 Selecting the Internal Mute 26 Listening to the Sound of the Sub PIP Picture 26 Resetting the Sound Settings to the Factory Defaults 27 Connecting Headphones...

Страница 4: ...03216B Right BN63 03217B Cleaning Cloth BN63 01798A The items color and shape may vary depending on the model General Information List of Features Adjustable picture settings that can be stored in th...

Страница 5: ...ls In the on screen menu use the CH buttons as RX ZRXOG XVH WKH DQG EXWRQV RQ WKH UHPRWH control 5 POWER Press to turn the TV on and off POWER INDICATOR Blinks and turns off when the power is on and l...

Страница 6: ...xternal device You should use the DVI to HDMI cable or DVI HDMI adapter DVI to HDMI for video connection and the DVI IN R AUDIO L terminal for audio HDMI DVI IN terminal does not support PC No sound c...

Страница 7: ...io Program SAP broadcast AUTO PROG Press to automatically store selected TV Cable channels ADD DEL Use to store and delete channels to from memory SOURCE Press to display all of the available video so...

Страница 8: ...r antenna has a set of leads that look like the diagram to the right see Antennas with 300 ODW 7ZLQ HDGV EHORZ II RXU DQWHQQD KDV RQH OHDG WKDW ORRNV OLNH GLDJUDP WR WKH ULJKW VHH QWHQQDV ZLWK 5RXQG L...

Страница 9: ...box This terminal might be labeled ANT IN VHF IN or simply IN 5 Connect another cable between the other OUT terminal on the splitter and the A IN terminal on the RF A B switch 6 Connect the last RF ca...

Страница 10: ...wing a VCR or Camcorder Tape to view your VCR tape Each VCR has a different back panel configuration When connecting a VCR match the color of the connection terminal to the cable TV Rear Panel RF Cabl...

Страница 11: ...ctions For example if connecting the video cable to COMPONENT IN connect the audio cable to COMPONENT IN also Each DVD Player STB has a different back panel configuration When connecting a DVD player...

Страница 12: ...tion you must use the HDMI DVI IN terminal TV Rear Panel DVD Player Set Top Box Audio Cable Not supplied 2 DVI to HDMI Cable Not supplied 1 Digital Audio System TV Rear Panel Optical Cable Not supplie...

Страница 13: ...etween PC IN PC connector on the TV and the PC output connector on your computer 2 Connect a PC Audio Cable between PC IN AUDIO jack on the TV and the Audio Out jack of the sound card on your computer...

Страница 14: ...to ANT 1 AIR select Air and if it is connected to ANT 2 CABLE select Cable If both ANT 1 AIR and ANT 2 CABLE are connected select the Air Cable In Cable mode you can select the correct signal source a...

Страница 15: ...are located is displayed 8 3UHVV WKH RU EXWWRQV WR KLJKOLJKW WKH WLPH RQH IRU RXU ORFDO DUHD Press the ENTER button If you have received a digital signal the time will be set automatically If not see...

Страница 16: ...word will appear in the lower left corner of the screen 2 To turn mute off press the MUTE button again or simply press the VOL or VOL buttons Viewing the Display 1 Press the INFO button on the remote...

Страница 17: ...from the screen after about one minute Memorizing the Channels Your TV can memorize and store all of the available channels for both off air Air and Cable channels After the available channels are me...

Страница 18: ...WKH RU EXWWRQV WR VHOHFW XWR 3URJUDP WKHQ SUHVV WKH ENTER button 3 3UHVV WKH RU EXWWRQV WR VHOHFW WKH DQWHQQD FRQQHFWLRQ WKHQ SUHVV WKH ENTER button Air Air antenna signal Cable Cable antenna signal A...

Страница 19: ...nput Source Name Name the device connected to the input jacks to make your input source selection easier 1 Press the MENU button to display the menu 3UHVV WKH RU EXWWRQV WR VHOHFW QSXW WKHQ SUHVV WKH...

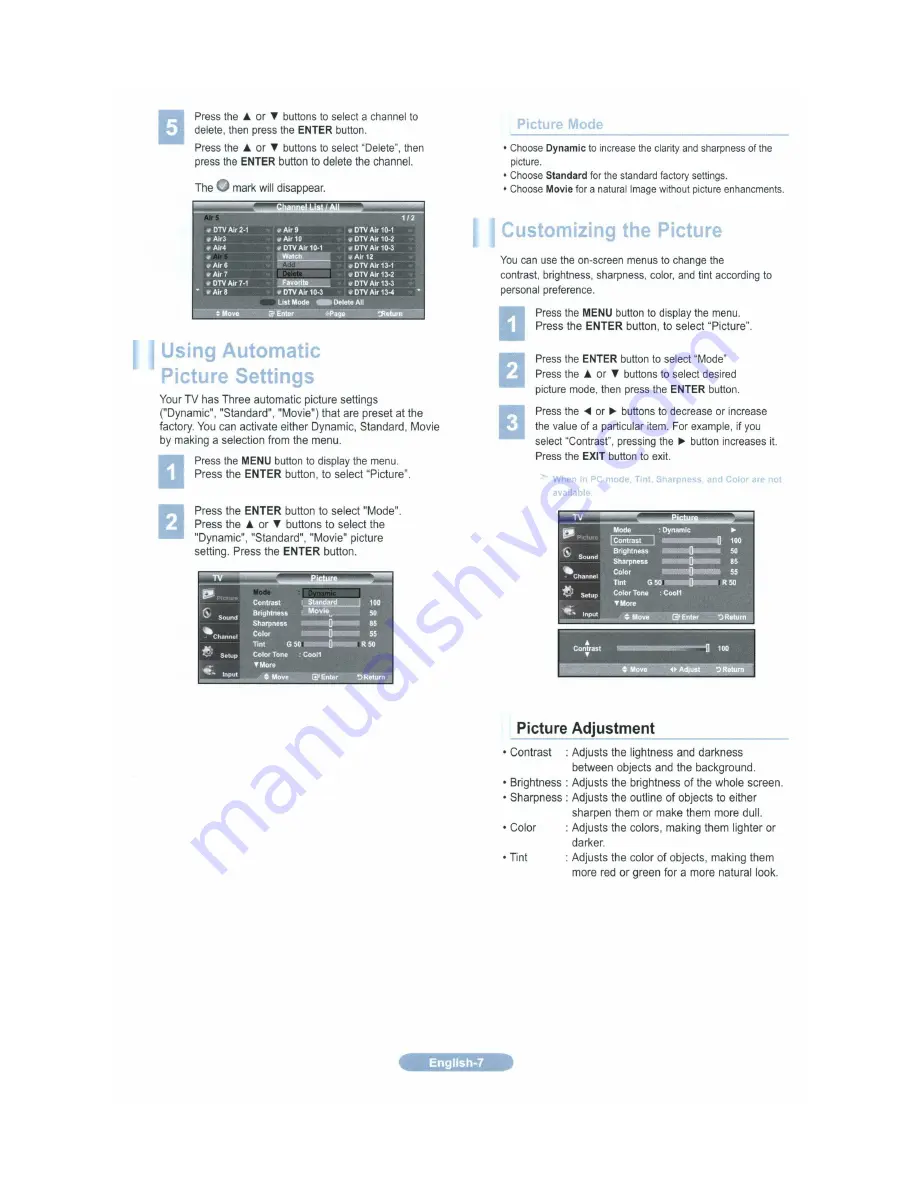
Страница 20: ...KDUSQHVV Color or Tint G R then press the ENTER button 4 3UHVV WKH RU EXWWRQV WR GHFUHDVH RU LQFUHDVH WKH YDOXH RI D SDUWLFXODU LWHP RU H DPSOH LI RX VHOHFW RQWUDVW SUHVVLQJ WKH EXWWRQ LQFUHDVHV LW Pr...

Страница 21: ...WKHQ SUHVV WKH ENTER button 3UHVV WKH RU EXWWRQ WR VHOHFW 2 RU DQFHO WKHQ SUHVV WKH ENTER button Press the EXIT button to exit Each mode can be reset Freezing the Picture 1 Press the STILL button to...

Страница 22: ...you can press the P SIZE button on the remote control repeatedly to change the picture size If you watch a still image or the 4 3 mode for a long time over 2 hours an image may be burned onto the scr...

Страница 23: ...the MENU button to display the menu 3UHVV WKH RU EXWWRQV WR VHOHFW 6HWXS WKHQ SUHVV WKH ENTER button 3UHVV WKH RU EXWWRQV WR VHOHFW 3 3 WKHQ SUHVV WKH ENTER button 2 Press the ENTER button again 3UHV...

Страница 24: ...Press the MENU button to display the menu 3UHVV WKH RU EXWWRQV WR VHOHFW 6HWXS WKHQ SUHVV WKH ENTER button 2 3UHVV WKH RU EXWWRQV WR VHOHFW 0 ODFN HYHO WKHQ press the ENTER button 3 3UHVV WKH RU EXWWR...

Страница 25: ...WWRQV WR LQFUHDVH RU GHFUHDVH WKH OHYHO RI WKH SDUWLFXODU IUHTXHQF Press the ENTER button Press the EXIT button to exit L R Sound Balance Adjustment To adjust the sound balance of the L R speakers Ban...

Страница 26: ...speakers It is fully compatible with all multichannel formats 1 Press the MENU button to display the menu 3UHVV WKH RU EXWWRQV WR VHOHFW 6RXQG WKHQ SUHVV WKH ENTER button 2 3UHVV WKH RU EXWWRQV WR VHO...

Страница 27: ...WR VHW XWR 9ROXPH 2Q RU 2II WKHQ SUHVV WKH ENTER button Press the EXIT button to exit Reduces the differences in volume level among broadcasters 1 Press the MENU button to display the menu 3UHVV WKH R...

Страница 28: ...except Multi track Options cannot be adjusted The VOL VOL and MUTE buttons do not operate when the Internal Mute is set to On Sound output from the TV speakers is muted TV s Internal Speakers Audio O...

Страница 29: ...mbol are trademarks of Dolby Laboratories A melody sound can be set to come on when the TV is powered On or Off 1 Press the MENU button to display the menu 3UHVV WKH RU EXWWRQV WR VHOHFW 6HWXS WKHQ SU...

Страница 30: ...the screen Antenna Cable Auto Program Clear Scrambled Channel Channel List Name Fine Tune Signal Strength LNA On Channel TV Move Enter Return Clear Scrambled Channel Stop Removing scrambled channel D...

Страница 31: ...Air 8 Air 9 Air 10 DTV Air 10 1 DTV Air 10 2 DTV Air 10 3 DTV Air 10 1 DTV Air 10 2 DTV Air 10 3 DTV Air 10 1 DTV Air 10 2 DTV Air 10 3 Air 12 DTV Air 13 1 DTV Air 13 2 DTV Air 13 3 DTV Air 13 4 Air 5...

Страница 32: ...Air 12 DTV Air 13 1 DTV Air 13 2 DTV Air 13 3 DTV Air 13 4 List Mode Delete All Air 5 1 2 Watch Add Delete Favorite To set up Your Favorite Channels 1 Press the MENU button to display the menu 3UHVV W...

Страница 33: ...DQQHO LVW WKHQ SUHVV WKH ENTER button 3 3UHVV WKH RU EXWWRQV WR VHOHFW HIDXOW LVW 0RGH WKH LVW RX ZDQW WR appear when you press CH LIST then press the ENTER button 3UHVV WKH RU EXWWRQV WR VHOHFW OO GG...

Страница 34: ...9 blank 3UHVV WKH EXWWRQ WR VZLWFK WR WKH QH W ILHOG ZKLFK ZLOO EH VHOHFWHG 6HOHFW D VHFRQG OHWWHU RU GLJLW E SUHVVLQJ WKH RU EXWWRQV DV DERYH Repeat the process to select the last three digits When...

Страница 35: ...adjustments are not saved 4 7R UHVHW WKH ILQH WXQLQJ VHWWLQJ SUHVV WKH EXWWRQ WR VHOHFW 5HVHW then press the ENTER button Press the EXIT button to exit will appear next to the name of fine tuned chan...

Страница 36: ...just click OK and exit the dialog box Display Modes If the signal from the system equals the standard signal mode the screen is adjusted automatically If the signal from the system doesn t equal the...

Страница 37: ...ENTER button to select Image Lock 3 3UHVV WKH RU EXWWRQV WR VHOHFW RDUVH RU LQH WKHQ SUHVV WKH ENTER button 3UHVV WKH RU EXWWRQV WR DGMXVW WKH VFUHHQ TXDOLW Vertical stripes may appear or the picture...

Страница 38: ...Q SUHVV WKH ENTER button Change to the PC mode first 2 3UHVV WKH RU EXWWRQV WR VHOHFW PDJH 5HVHW WKHQ SUHVV WKH ENTER button Press the EXIT button to exit PC Image Lock Position Auto Adjustment Image...

Страница 39: ...ck the time while watching the TV Just press the INFO button Option 1 Setting the Clock Manually 1 Press the MENU button to display the menu Press the RU buttons to select Setup then press the ENTER b...

Страница 40: ...Clock Automatically 1 Press the MENU button to display the menu Press the RU buttons to select Setup then press the ENTER button Press the RU buttons to select Time then press the ENTER button 2 Pres...

Страница 41: ...ime Clock Sleep Timer Off Timer 1 Inactivated Timer 2 Inactivated Timer 3 Inactivated TV 1 1 2005 12 30 am Move Enter Return Timer 1 On Timer 12 00 am Inactivate Off Timer 12 00 am Inactivate Repeat O...

Страница 42: ...kes slightly The mark appears on the screen which means that Game Mode is on with the selected source If Game Mode is On Setup Mode is automatically changed to Custom and users cannot change the mode...

Страница 43: ...0RGH WKHQ SUHVV WKH ENTER button 3UHVV WKH RU EXWWRQV WR VHOHFW VXEPHQX HIDXOW a RU 7H W a7H W you want the press the ENTER button Press the EXIT button to exit The default is CC1 CC1 The Primary Syn...

Страница 44: ...y not be available depending on the broadcast 6 3UHVV WKH RU EXWWRQV WR VHOHFW 6L H WKHQ SUHVV WKH ENTER button 3UHVV WKH RU EXWWRQV WR VHOHFW WKH GHVLUHG DSWLRQ RSWLRQ WKHQ SUHVV WKH ENTER button 3UH...

Страница 45: ...tton 3 3UHVV WKH RU EXWWRQV WR VHOHFW 2Q WKHQ SUHVV WKH ENTER button Press the EXIT button to exit The predetermined value of the function help is On Setting the Function Help Displays help on the men...

Страница 46: ...DQJH 3 1 WKHQ SUHVV WKH ENTER button The Change PIN screen will appear Choose any 4 digits for your PIN and enter them As soon as the 4 digits are entered the Confirm new PIN screen appears Re enter t...

Страница 47: ...NTER button The message Enter PIN will appear Enter your 4 digit PIN number 3 The V Chip screen will appear To enable the V Chip feature press the ENTER button so that the V Chip Lock ILHOG LV 2Q 3UHV...

Страница 48: ...xually Suggestive Dialog L Adult Language S Sexual situation V Violence The V Chip will automatically block certain categories that are more restrictive For example if you block TV Y category then TV...

Страница 49: ...RU buttons to select V Chip then press the ENTER button The message Enter PIN will appear Enter your 4 digit PIN number 3 The V Chip screen will appear Press the RU buttons to select MPAA Rating then...

Страница 50: ...hip then press the ENTER button The message Enter PIN will appear Enter your 4 digit PIN number 3 The V Chip screen will appear Press the RU buttons to select Canadian English then press the ENTER but...

Страница 51: ...Press the RU buttons to select V Chip then press the ENTER button The message Enter PIN will appear Enter your 4 digit PIN number 3 The V Chip screen will appear Press the RU buttons to select Canadi...

Страница 52: ...le watching DTV channels It may take several seconds The Downloadable U S Rating menu is available for use after information is downloaded from the broadcasting station However depending on the inform...

Страница 53: ...creen noise Press the EXIT button to exit Digital Noise Reduction 1 Insert a USB drive containing the firmware upgrade into the SERVICE prot on the back of the TV 2 Press the MENU button to display th...

Страница 54: ...ransmission window Check the battery terminals Check signal cable message Ensure that the signal cable is firmly connected to the PC source Not Supported Mode message Check the maximum resolution and...

Страница 55: ...ultiscan display functions within the following frequency domain Horizontal frequency kHz 30 60 Vertical frequency Hz 60 75 PC Maximum refresh rate at 60 Hz 1360 x 768 Image is not centered on the scr...

Страница 56: ...the stand into the hole at the bottom of the TV 3 Insert screw into the hole indicated and tighten Disconnecting the Stand 2 3 4 1 Place the TV face down on a soft cloth or cushion on a table 2 Remove...

Страница 57: ...the instruction in the Wall Mount items Contact a technician for installing the wall bracket Samsung Electronics is not responsible for any damage to the product or injury to yourself or others if you...

Страница 58: ...e 2 Figure 1 Cable Optional The place of the Kensington Lock may be different depending on its model 6SHFL FDWLRQV Model Name LN T1953H LN T1954H Screen Size Diagonal 19 inch Power Consumption 55 W PC...

Страница 59: ...This page is intentionally left blank...

Страница 60: ...Servicio de Atenci n al Cliente Country Customer Care Center Web Site Address CANADA 1 800 SAMSUNG 7267864 www samsung com ca Samsung Electronics Canada Inc Customer Service 55 Standish Court Mississa...

Страница 61: ......

Страница 62: ......

Страница 63: ......

Страница 64: ......

Страница 65: ......

Страница 66: ......

Страница 67: ......

Страница 68: ......

Страница 69: ......

Страница 70: ......

Страница 71: ......

Страница 72: ......

Страница 73: ......

Страница 74: ......

Страница 75: ......

Страница 76: ......

Страница 77: ......

Страница 78: ......

Страница 79: ......

Страница 80: ......

Страница 81: ......

Страница 82: ......

Страница 83: ......

Страница 84: ......

Страница 85: ......

Страница 86: ......

Страница 87: ......

Страница 88: ......

Страница 89: ......

Отзывы: