


14
English
Basic Features
Economical Solutions
¦
ECO Solution
■
Energy Saving (Off / Low / Medium / High / Picture
Off / Auto)
t
: Adjust the brightness of the TV
in order to reduce power consumption. If you select
Picture Off
, the screen is turned off, but the sound
remains on. Press any button except volume button to
turn on the screen.
ECO Sensor (Off / On)
■
: To enhance your power
savings; the picture settings will automatically adapt to
the light in the room.
If
✎
you adjust the
Backlight
, the
Eco Sensor
will
be set to
Off
.
Min Backlight
: When
ECO sensor
is
On
, the minimum
screen brightness can be adjusted manually.
If
✎
Eco Sensor
is
On
, the display brightness
may change (become slightly darker or brighter)
depending on the surrounding light intensity.
No Signal Power Off (Off / 15 min / 30 min / 60 min)
■
:
Activates the Stand-by mode, in the case of “No Signal”
or “Check Signal Cable” status for a certain period of
time defined by the user.
Disabled when the PC is in power saving mode.
✎
Changing the Picture Options
¦
Advanced Settings
(available in
Standard / Movie
mode)
You can adjust the detailed setting for the screen including
colour and contrast.
In PC mode, you can only make changes to
✎
Dynamic
Contrast, Gamma
and
White Balance
.
Black Tone (Off / Dark / Darker / Darkest)
■
: Select the
black level to adjust the screen depth.
Dynamic Contrast (Off / Low / Medium / High)
■
: Adjust
the screen contrast.
Shadow Detail (-2~+2)
■
: Increase the brightness of dark
images.
Disabled under PC mode.
✎
Gamma
■
: Adjust the primary colour intensity.
Expert Pattern (Off / Pattern 1 / Pattern 2)
■
: By
running the
Expert Pattern
function, the picture can be
calibrated without a generator or filter. If the OSD menu
disappears or a menu other than the
Picture
menu is
opened, the calibration is saved and the
Expert Pattern
window disappears.
While the
✎
Expert Pattern
is running, sound is not
output.
Only enabled in DTV, Component and HDMI
✎
modes.
Disabled for channels that support
✎
MHEG
if
Digital Text
is Enable.
■
RGB Only Mode (Off / Red / Green / Blue)
: You can
adjust
Colour
or
Tint
of
Red, Green
or
Blue
for the
picture from an external device (DVD player, home
theatre, etc.).
Colour Space (Auto / Native / Custom)
■
: Adjust the
range of colours available to create the image. To adjust
Colour
,
Red
,
Green
,
Blue
and
Reset
, set
Colour
Space
to
Custom
.
White Balance
■
: Adjust the colour temperature for a
more natural picture.
R-Offset / G-Offset / B-Offset
: Adjust each colour’s
(red, green, blue) darkness.
R-Gain/G-Gain/B-Gain
: Adjust each colour’s
(red, green, blue) brightness.
Reset
: Resets the
White Balance
to it’s default settings.
10p White Balance (Off / On)
■
: Controls the white
balance in 10 point interval by adjusting the red, green,
and blue brightness.
Available when the picture mode is set to
✎
Movie
and when the external input is set to all input.
Some external devices may not support this
✎
function.
Interval
: Select interval to adjust.
Red
: Adjust the red level.
Green
: Adjust the green level.
Blue
: Adjust the blue level.
Reset
: Resets the 10p White Balance to its default
settings.
Flesh Tone
■
: Emphasize pink “
Flesh Tone
.”
Edge Enhancement (Off / On)
■
: Emphasize object
boundaries.
xvYCC (Off / On)
■
: Setting the
xvYCC
mode on
increases detail and colour space when watching movies
from an external device (e.g. DVD player) connected to
the HDMI or Component IN jacks.
Available when the picture mode is set to
✎
Movie
and when the external input is set to HDMI or
Component.
Some external devices may not support this
✎
function.
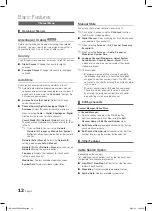
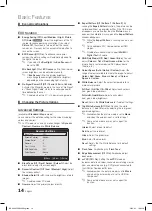
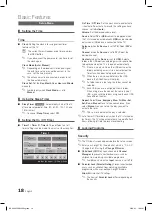
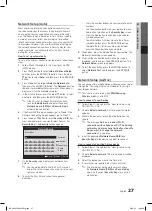
Advanced Settings
Black Tone
: Off
►
Dynamic Contrast
: Medium
Shadow Detail
: 0
Gamma
: 0
Expert Pattern
: Off
RGB Only Mode
: Off
Colour Space
: Native
▼
U
Move
E
Enter
R
Return
BN68-02558W-00Eng.indb 14
2010-6-1 16:00:19


