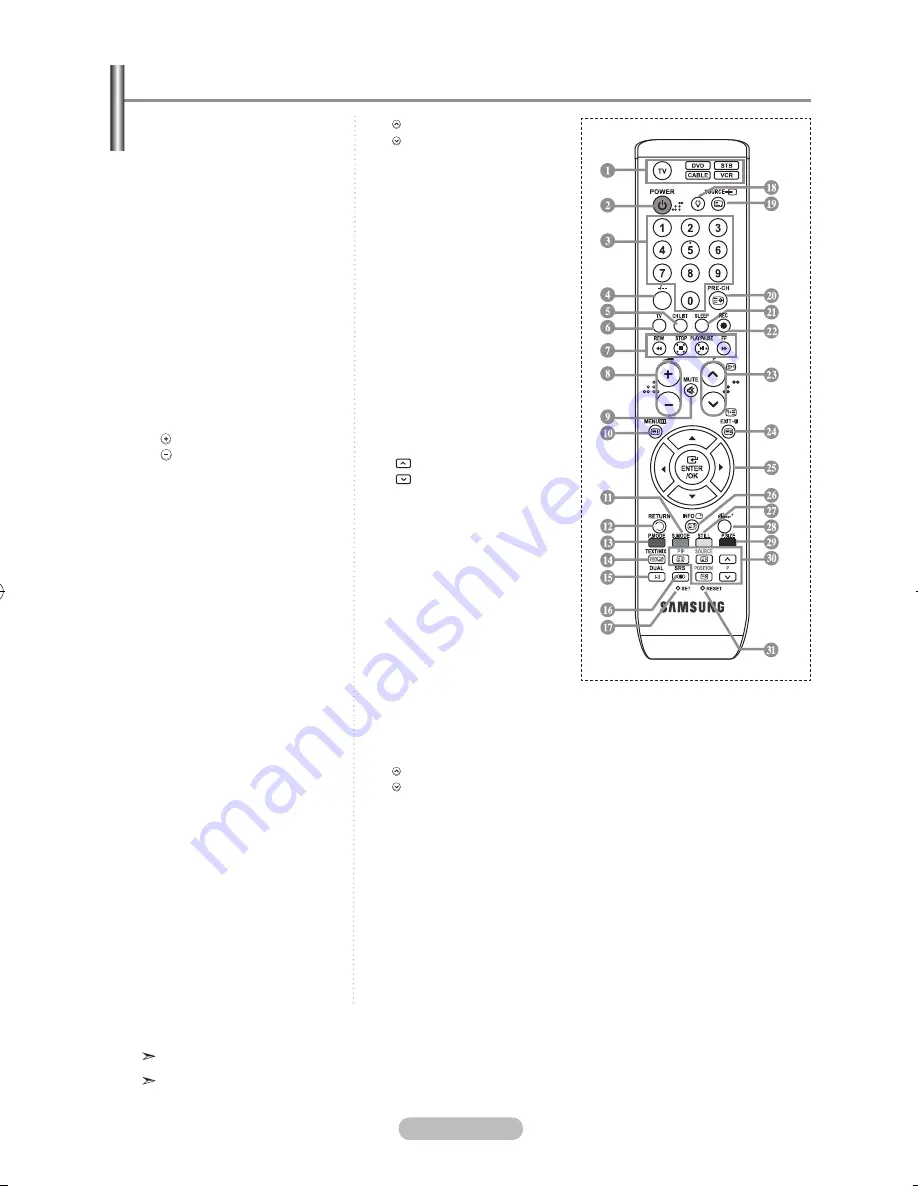
background image

english - 

Selects a target device to be  

  controlled by the Samsung  

  remote control (TV, DVD,  


STB, CABLE, VCR) 

  (Refer to page 34~36)

Television Standby button 

Number buttons for direct  

  channel access

One/Two-digit channel  

  selection

It display "Channel List"  

  on the screen.

Selects the TV mode directly

VCR/DVD Functions 

  Rewind, Stop, Play/Pause,  

  Fast/Forward

 Volume increase 


 Volume decrease 

Temporary sound switch-off

Menu display and  

  change confirmation

!

 Sound mode selection

@


Returns to the previous 

  menu

Picture effect selection

Sound effect selection

SRS TS XT selection 

Adjusts 5 separate devices 

  - TV, DVD, STB, CABLE, or  

  VCR.

When pressing this button, a  

  number of buttons on the  

  remote control (e.g. Selects  

  a target device, volume,  

   channel buttons) light up 

for a few seconds and then 

turn off to save power. This 

function is to conveniently 

use the remote control at 

night or when dark

.

Available source selection

Previous channel

Automatic Power-off

b

  Records for Live  

( function only) 

(Refer to page 40)

P : Next channel 

  P : Previous channel

Exit the OSD

Control the cursor in the  

  menu

Use to see information on  

  the current broadcast

Picture freeze  


Runs the Anynet view  

  functions and sets up Anynet  

  devices. 

Picture size selection

PIP:Picture-In-Picture On/Off 

  SOURCE: Input source  

  selection 

  POSITION: PIP position  

  selection


P

  : 

Next channel 

  P


Previous channel

When your remote does not  

  work, change the batteries  

  and press the "RESET"  

  button for 2-3 seconds  

  before use.

Teletext Functions

Exit from the teletext display

Teletext index

Alternately select Teletext,  

  Double, or Mix.

Teletext mode selection  

  (LIST/FLOF)

)


Teletext sub page

P : Teletext next page 

  P : Teletext previous page

d


Teletext cancel

f


Teletext reveal

!#gi 
 

Fastext topic selection

j


PIP:Teletext Hold

j


SOURCE: Teletext Store

j


POSITION: Teletext size  

  selection

  The performance of the remote control may be affected by bright light. 
  This is a special remote control for the visually impaired, and has Braille points on the Power,    


Channel, STOP, PLAY/PAUSE and Volume buttons.

Viewing the Remote Control

BN68-01166E-Eng-0307.indd   6

2007-03-07   �� 11:42:00

Содержание LE32R82B

Страница 1: ...gister Record your Model and Serial number here for future reference Model _______________ Serial No _______________ BN68 01166E 01 Contact SAMSUNG WORLD WIDE If you have any questions or comments rel...

Страница 2: ...ARNINGS Image retention commonly known as screen burn in can occur on most types of television if the same image is displayed continuously The most common causes of image retention are logos that rema...

Страница 3: ...Mute 24 Listening to the Sound of the Sub Picture 24 Resetting the Sound Settings to the Factory Defaults 25 Setting the Time Setting and Displaying the Current Time 25 Setting the Sleep Timer 26 Swit...

Страница 4: ...the screen size of 37 inch and above Installing the Stand Registration Cards Not available in all locations The stand and stand screw may not be included depending on the model Wall mount items sold s...

Страница 5: ...channels In the on screen menu use the buttons as you use the 5 and 6 buttons on the remote control Without the Remote Control you can turn on the TV by using the Channel buttons 5 Power Press to tur...

Страница 6: ...definition digital video data and multiple channels of digital audio 5 1 channels The HDMI DVI terminal supports DVI connection to an extended device with the appropriate cable not supplied The diffe...

Страница 7: ...ERVICE Service connection for qualified service engineer Auto Wall Mount Refer to page 39 9 Connecting Component Devices DTV DVD Connect component video cables optional to component connector PR PB Y...

Страница 8: ...atic Power off b Records for Live Anynet function only Refer to page 40 c P Next channel P Previous channel d Exit the OSD e Control the cursor in the menu f Use to see information on the current broa...

Страница 9: ...ront of the set 2 Press the button on the front of the set You also can press the POWER button or the TV button on the remote control to turn the TV on The programme that you were watching last is res...

Страница 10: ...ected Press the ENTER OK button Please check that the antenna cable is connected correctly 5 Select the appropriate country by pressing the or button Press the ENTER OK button to confirm your choice 6...

Страница 11: ...hannel then press the ENTER OK button 2 Press the ENTER OK button to select Country 3 Select the appropriate country by pressing the or button Press the ENTER OK button to confirm your choice 4 Press...

Страница 12: ...5 Press the or button to select Colour System then press the ENTER OK button 6 Select the colour standard required by pressing the or button then press the ENTER OK button 7 Press the or button to sel...

Страница 13: ...e control can release the Child Lock setting so keep the remote control away from children 1 Press the MENU button to display the menu Press the or button to select Channel then press the ENTER OK but...

Страница 14: ...channel information is broadcast These names can be changed allowing you to assign new names 1 Press the MENU button to display the menu Press the or button to select Channel then press the ENTER OK b...

Страница 15: ...ur viewing requirements 1 Press the MENU button to display the menu Press the ENTER OK button to select Picture 2 Press the ENTER OK button again to select Mode 3 Press the or button to select the des...

Страница 16: ...ghtness 50 Sharpness 75 Colour 55 Tint G50 R50 Colour Tone Cool1 Detailed Settings Backlight 10 sMore TV Move Enter Return Changing the Colour Tone You can select the most comfortable colour tone to y...

Страница 17: ...he screen brightness by adjusting the LCD backlight brightness 0 10 Activating Backlight 1 To select the desired picture effect follow the Changing the Picture Standard instructions number 1 to 3 On p...

Страница 18: ...adjust the color temperature for more natural picture colors R Offset G Offset B Offset R Gain G Gain B Gain Changing the adjustment value will refresh the adjusted screen Select the required option...

Страница 19: ...ect Size then press the ENTER OK button 3 Select the required option by pressing the or button Press the ENTER OK button 4 Press the EXIT button to exit Auto Wide function is available only in TV Ext...

Страница 20: ...ress the STILL button to freeze a moving picture into a still one Press again to cancel Freezing the Current Picture Resetting the Picture Settings to the Factory Defaults You can return to the factor...

Страница 21: ...and Standard mode DNIe Off Demo On This TV includes the DNIe function so as to provide a high visual quality If you set DNIe to on you can view the screen with the DNIe feature activated If you set t...

Страница 22: ...ect the position of the sub picture by pressing the or button and then press the ENTER OK button 7 Press the or button to select Programme and then press the ENTER OK button You can select the channel...

Страница 23: ...r Return Normal Low You can select the type of the special sound effect to be used when watching a given broadcast 1 Press the MENU button to display the menu Press the or button to select Sound then...

Страница 24: ...ying 5 1 multichannel content over two speakers TruSurround delivers a compelling virtual surround sound experience through any two speaker playback system including internal television speakers It is...

Страница 25: ...se options simply by pressing the DUAL button on remote control If the stereo signal is weak and an automatic switching occurs then switch to the Mono Adjusting the Volume Automatically Each broadcast...

Страница 26: ...ume Off Internal Mute Off Sound Select Main Reset Move Enter Return TV TV During the PIP features activation you can listen to the sound of the sub picture 1 Press the MENU button to display the menu...

Страница 27: ...the ENTER OK button 2 Press the or button to select Time then press the ENTER OK button 3 Press the ENTER OK button to select Clock Set 4 5 Press the EXIT button to exit If you disconnect the power co...

Страница 28: ...he same method as above Yes No Press the or button Repeat Select a Once Everyday Mon Fri Mon Sat Sat Sun Press the or button Volume Adjust a 0 100 Press the or button Programme Adjust a Programme Pres...

Страница 29: ...nd Sound Mode changes to Custom automatically The user cannot change these to other modes Sound Mode in the Sound menu is deactivated Adjust the sound using the equalizer The Reset Sound function is a...

Страница 30: ...s the or button to select Blue Screen or Melody Press the ENTER OK button 3 When you are satisfied with your setting press the ENTER OK button Blue Screen Off On Melody Off Low Medium High 4 Press the...

Страница 31: ...andby Mode On Watching Mode On On by pressing the or button Press the ENTER OK button 4 Press the EXIT button to exit Setting the Light Effect Mode Custom Equalizer SRS TS XT Off Auto Volume Off Inter...

Страница 32: ...when they are connected to your set 3 Select the required device by pressing the or button Press the ENTER OK button Press the SOURCE button on the remote control to toggel between all the available s...

Страница 33: ...elevision programme times News bulletins and Weather forecasts Sports results Subtitles for the hard of hearing The teletext pages are organized according to six categories Part A B C D E F Contents S...

Страница 34: ...enu mode If both languages are different select the same language with the Text language on the Setup menu Displaying the Teletext Information Selecting a Specific Teletext Page Press the number butto...

Страница 35: ...des and control whichever piece of equipment you choose The remote control might not be compatible with all DVD Players VCRs Cable boxes and Set Top Boxes Setting Up the Remote to Operate Your VCR CAB...

Страница 36: ...021 026 037 062 MARTA 006 MEI 021 MEMOREX 006 021 024 025 MGA 034 MIDLAND 005 MINOLTA 019 041 075 MITSUBISHI 019 034 041 046 Brand Code MONTGOMERY WARD 020 MTC 002 025 MULTITECH 002 005 025 038 NEC 00...

Страница 37: ...18 STB DVD COMBO 019 DVD Receiver 020 AV Receiver 021 DVD Brand Code ANAM 030 AUDIOVOX 075 AUDIOLOGIC 085 ANABA 072 APEX DIGITAL 070 071 074 086 083 084 088 111 112 AIWA 114 BROKSONIC 062 BLAUPUNKT 07...

Страница 38: ...te STB HDD COMBO Standard 009 SET TOP BOX Brand Code ALPHASTAR 023 ANAM 043 CHANNEL MASTER 018 034 CROSSDIGITAL 019 CHAPARRAL 035 DIRECT TV 015 016 017 019 022 045 060 061 062 065 066 067 068 DAEWOO 0...

Страница 39: ...and Composite modes are supported SOG is not supported Display Modes Both screen position and size will vary depending on the type of PC monitor and its resolution The resolutions in the table are re...

Страница 40: ...select Position then press the ENTER OK button 3 Press the or button to adjusting the Vertical Position Press the or button to adjust the Horizontal Position Press the ENTER OK button 4 Press the EXIT...

Страница 41: ...te Control Buttons For installation refer to the Installation Manual provided For product installation and the installation and moving of the wall mount make sure to consult a specialized installation...

Страница 42: ...able To connect to Home Theater 1 Connect the HDMI 1 HDMI 2 or HDMI 3 jack on the TV and the HDMI OUT jack of the corresponding Anynet device using the HDMI cable 2 Connect the HDMI IN jack of the hom...

Страница 43: ...press the ENTER OK button It is switched to the selected device 4 If you cannot find a device you want press the or button to select Searching Connections then press the ENTER OK button The meassage...

Страница 44: ...built in Tuner After switching to the device when you are watching a TV program CH button Audio Device When Receiver is activated VOL button MUTE button Anyview2 When watching TV Play Pause The Anynet...

Страница 45: ...n or restart your TV Check if the Anynet Function of Anynet device is set on I want to start Anynet Check if the Anynet device is properly connected to the TV and check if the Anynet HDMI CEC is set t...

Страница 46: ...move it further away Plug your set into a different mains socket Check the direction location and connections of your aerial This interference is often due to the use of an indoor aerial Replace the r...

Страница 47: ...to 45 C 4 F to 113 F 5 to 95 non condensing LE37R8 37 inch 170 W 1360 x 768 60 Hz 10 W x 2 1013 x 93 x 602 mm 1013 x 300 x 652 mm 21 kg 10 C to 40 C 50 F to 104 F 10 to 80 non condensing 20 C to 45 C...

Страница 48: ...for long periods of time unplug it from the wall outlet and disconnect the antenna or cable system This will prevent damage to the set due to lightning and power line surges Before connecting the AC p...

Страница 49: ...y United Kingdom This Samsung product is warranted for a period of twelve 12 months from the original date of purchase against defective materials and workmanship In the event that warranty service is...

Страница 50: ...This page is intentionally left blank...

Страница 51: ...human health from uncontrolled waste disposal please separate this from other types of wastes and recycle it responsibly to promote the sustainable reuse of material resources Household users should...

Отзывы: