background image

22

English

Advanced Features

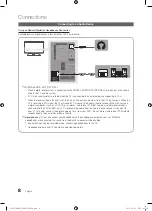
Connecting to a PC

Using an HDMI/DVI Cable / a D-sub Cable

AUDIO OUT

DVI OUT

AUDIO OUT

PC OUT

Display Modes (D-Sub and HDMI/DVI Input)

Optimal resolution is 1920 X 1080 @ 60 Hz.

Mode

Resolution

Horizontal Frequency 

(KHz)

Vertical Frequency 

(Hz)

Pixel Clock Frequency

(MHz)

Sync Polarity 

(H / V)

IBM

640 x 350
720 x 400

31.469
31.469 

70.086
70.087 

25.175
28.322

+/-
-/+

MAC

640 x 480
832 x 624

1152 x 870

35.000
49.726
68.681 

66.667
74.551
75.062 

30.240
57.284

100.000 

-/-
-/-
-/-

VESA CVT

720 x 576

1152 x 864
1280 x 720
1280 x 960 

35.910
53.783
56.456
75.231 

59.950
59.959
74.777
74.857 

32.750
81.750
95.750

130.000

-/+
-/+
-/+
-/+

VESA DMT

640 x 480
640 x 480
640 x 480
800 x 600
800 x 600
800 x 600

1024 x 768
1024 x 768
1024 x 768
1152 x 864

1280 x 1024
1280 x 1024

1280 x 720
1280 x 800
1280 x 800
1280 x 960
1360 x 768
1440 x 900
1440 x 900

1680 x 1050

31.469 
37.861 
37.500 
37.879 
48.077 
46.875 
48.363 
56.476 
60.023 
67.500 
63.981 
79.976 
45.000
49.702 
62.795 
60.000 
47.712 
55.935 
70.635 
65.290 

59.940
72.809
75.000
60.317
72.188
75.000
60.004
70.069
75.029 
75.000
60.020
75.025
60.000
59.810
74.934
60.000
60.015
59.887
74.984
59.954

25.175 
31.500 
31.500 
40.000 
50.000 
49.500 
65.000 
75.000 
78.750 

108.000 
108.000 
135.000 

74.250
83.500 

106.500 
108.000 

85.500 

106.500 
136.750 
146.250 

-/-
-/-
-/-

+/+
+/+
+/+

-/-
-/-

+/+
+/+
+/+
+/+
+/+

-/+ 
-/+ 

+/+
+/+

-/+ 
-/+
-/+ 

VESA GTF

1280 x 720 

1280 x 1024

52.500 
74.620 

70.000
70.000

89.040

128.943 

-/+ 

-/-

VESA DMT / DTV CEA

1920 x 1080p

67.500 

60.000

148.500 

+/+

NOTE


x

 For HDMI/DVI cable connection, you must use the 

HDMI IN 1(DVI)

 jack.


x

The interlace mode is not supported.


x

The set might operate abnormally if a non-standard video format is selected.


x

Separate and Composite modes are supported. SOG(Sync On Green) is not supported.

[LC530]BN68-02542D-00Eng.indb   22

2010-03-05   오전 1:21:07

Содержание LE32C530

Страница 1: ... samsung com ie U K 0845 SAMSUNG 7267864 www samsung com uk 2010 Samsung Electronics Co Ltd All rights reserved BN68 02542D 00 LCD TV user manual imagine the possibilities Thank you for purchasing this Samsung product To receive more complete service please register your product at www samsung com register Model______________Serial No ______________ LC530 BN68 02542D 00Eng indb 1 2010 03 05 오전 1 2...

Страница 2: ...ower the brightness or contrast settings to decrease the intensity of the picture Extended viewing of movies and programs in aspect ratios that are different from the aspect ratio of the TV may cause image retention Always endeavour to avoid black borders top or bottom by using the zoom function This will help eliminate the black borders and fit the picture to the entire area of the screen Using a...

Страница 3: ...4 Picture Menu 16 Sound Menu 18 Setup Menu 20 Support Menu Advanced Features 22 22 Connecting to a PC 23 Media Play 29 Anynet Other Information 32 32 Analogue Channel Teletext Feature 33 Installing the Wall Mount 34 Anti theft Kensington Lock 34 Securing the TV to the wall 35 Troubleshooting 38 Specifications 39 Index Warning Important Safety Instructions Wiring the Mains Power Supply Plug UK Only...

Страница 4: ...all the available input sources In the on screen menu use this button as you would use the ENTERE button on the remote control MENU Displays an on screen menu the OSD on screen display of your TV s features Y Adjusts the volume In the OSD use the Y buttons as you would use the and buttons on the remote control z Changes the channels In the OSD use the z buttons as you would use the and buttons on ...

Страница 5: ...ts on the screen P 12 Displays the EPG Electronic Programme Guide P 10 Displays information on the TV screen Exits the menu Have direct access to channels Adjusts the volume Alternately selects Teletext Double or Mix Opens the OSD Displays Media Play USB P 23 Quickly select frequently used functions Returns to the previous menu Selects the on screen menu items and changes the values seen on the me...

Страница 6: ... the or button then press the ENTERE button Select the appropriate country 4 Selecting an antenna Press the or button then press the ENTERE button Select Air or Cable 5 Selecting a channel Press the or button then press the ENTERE button Select the channel source to memorise When setting the antenna source to Cable a step appears allowing you to assign numerical values channel frequencies to the c...

Страница 7: ...connecting an HDMI cable check the HDMI version of the external device If the version is older than 1 3 contact the provider of the corresponding device to confirm the HDMI version and request an upgrade x x It is recommended you purchase an HDMI certified cable Otherwise the screen may appear blank or a connection error may occur Using a Component up to 1080p or Audio Video 480i only and Scart Ca...

Страница 8: ...nd to the home theatre receiver When the source is a digital component such as a DVD Blu ray player cable box STB Set Top Box satellite receiver and is connected to the TV via HDMI only 2 CH audio will be heard from the home theatre receiver If you want to hear 5 1 CH audio connect the digital audio out jack from your DVD Blu ray player cable box STB satellite receiver directly to an amplifier or ...

Страница 9: ...CARD some channels will display the message Scrambled Signal y y The pairing information containing a telephone number the CI or CI CARD ID the Host ID and other information will be displayed in about 2 3 minutes If an error message is displayed please contact your service provider y y When the configuration of channel information has finished the message Updating Completed is displayed indicating...

Страница 10: ...xt guide shows daily TV programme information for each channel according to the broadcasting time y y Scroll to view information for a desired programme while watching the current channel y y Scroll to view information for other channels If you want to move to the currently selected channel press the ENTERE button Planning Your Viewing Guide The EPG Electronic Programme Guide information is provid...

Страница 11: ... the Channel Manager x x Red Antenna Toggle among Air or Cable x x B Green Zoom Enlarges or shrinks a channel number x x Yellow Select Select desired channels and press the Yellow button to set all the selected channels at the same time The c mark appears to the left of the selected channels x x Blue Sort Change the list ordered by channel name or channel number x x k Page Move to next or previous...

Страница 12: ...lecting Cable Digital Analogue or Digital Provide a value to scan for cable channels Search Mode Full Network Quick Scans for all channels with active broadcast stations and stores them in the TV If you select Quick you can set up the Network Network ID Frequency Modulation and Symbol Rate manually by pressing the button on the remote control Network Auto Manual Select Auto if you want the TV to a...

Страница 13: ... and viewed NOTE x x This function is available only when the Child Lock is set to On x x The PIN input screen appears Enter your 4 digit PIN the default of which is 0 0 0 0 Change the PIN using the Change PIN option Timer Viewing You can set a desired channel to be displayed automatically at the reserved time Set the current time first to use this function When a digital channel is selected press...

Страница 14: ... be set to Off Min Backlight When Eco sensor is On the minimum screen brightness can be adjusted manually If Eco Sensor is On the display brightness may change become slightly darker or brighter depending on the surrounding light intensity No Signal Power Off Off 15 min 30 min 60 min To avoid unnecessary energy consumption set how long you want the TV to remain on if it s not receiving a signal Di...

Страница 15: ...rmal broadcasting Do not watch in 4 3 format for a long time Traces of borders displayed on the left right and centre of the screen may cause image retention screen burn which are not covered by the warranty Screen Fit Displays the full image without any cut off when HDMI 720p 1080i 1080p or Component 1080i 1080p signals are inputted NOTE x x Depending on the input source the picture size options ...

Страница 16: ...Fine Removes or reduces picture noise If the noise is not removed by Fine tuning alone then adjust the frequency as best as possible Coarse and Fine tune again After the noise has been reduced readjust the picture so that it is aligned to the centre of screen Position Adjust the PC screen position with direction button Image Reset Resets the image to default settings Using Your TV as a Computer PC...

Страница 17: ...cription not available in all locations digital channels only This function handles the Audio Stream for the AD Audio Description which is sent along with the Main audio from the broadcaster Audio Description Off On Turn the audio description function on or off Volume Adjust the audio description volume Auto Volume Off Normal Night To equalize the volume level on each channel set to Normal Night T...

Страница 18: ... Dual f Dual g Dual f NICAM Stereo Mono Mono Automatic change Stereo Mono Stereo Dual Mono Dual f Dual g Dual f If the stereo signal is weak and an automatic switching occurs then switch to the mono Only activated in stereo sound signal Only available when the Input source is set to TV Setup Menu Setting the Time Time Clock Setting the clock is for using various timer features of the TV O O The cu...

Страница 19: ...n Channel Manager to prevent unauthorized users such as children from watching unsuitable programme Available only when the Input source is set to TV Parental Lock depending on the country Prevent unauthorized users such as children from watching unsuitable programme with a user defined 4 digit PIN code If selected channel is locked the symbol will be displayed Allow All Unlock All TV ratings Not ...

Страница 20: ...irection of the arrow 3 Insert the CAM with the CI or CI CARD into the common interface slot in the direction of the arrow so that it aligns parallel with the slot 4 Check if you can see a picture on a scrambled signal channel Picture In Picture PIP PIP t You can watch the TV tuner and one external video source simultaneously PIP Picture in Picture does not function in the same mode NOTE x x For P...

Страница 21: ...et them after the upgrade By Channel Upgrade the software using the broadcasting signal If the function is selected during the software transmission period software will be automatically searched and downloaded The time required to download the software is determined by the signal status Standby Mode Upgrade A manual upgrade will be automatically performed at selected time Since the power of the u...

Страница 22: ...80 x 800 1280 x 800 1280 x 960 1360 x 768 1440 x 900 1440 x 900 1680 x 1050 31 469 37 861 37 500 37 879 48 077 46 875 48 363 56 476 60 023 67 500 63 981 79 976 45 000 49 702 62 795 60 000 47 712 55 935 70 635 65 290 59 940 72 809 75 000 60 317 72 188 75 000 60 004 70 069 75 029 75 000 60 020 75 025 60 000 59 810 74 934 60 000 60 015 59 887 74 984 59 954 25 175 31 500 31 500 40 000 50 000 49 500 65...

Страница 23: ...oaded from a non free site cannot be played Digital Rights Management DRM is a technology that supports the creation of content the distribution and management of the content in an integrated and comprehensive way including the protection of the rights and interests of the content providers the prevention of the illegal copying of contents as well as managing billings and settlements x If more tha...

Страница 24: ...D sub or txt string based Jan 10 2010 Jan 10 2010 Jan 10 2010 Jan 10 2010 Jan 10 2010 Jan 10 2010 Jan 10 2010 Jan 10 2010 Jan 10 2010 Jan 10 2010 Movie 01 avi 1 1 Movie 01 avi SUM Movie 03 avi Movie 05 avi Movie 07 avi Movie 09 avi Movie 02 avi Movie 04 avi Movie 06 avi Movie 08 avi Movie 10 avi Select Sorting T Tools Information You can ascertain the selected file name and the number of files and...

Страница 25: ...920x1080 24 25 30 30 AC3 MPEG LPCM AAC MPEG2 1920x1080 24 25 30 30 H 264 1920x1080 6 30 25 ts tp trp TS MPEG2 1920x1080 24 25 30 30 AC3 AAC MP3 DD HE AAC H 264 1920x1080 6 30 25 VC1 1920x1080 6 30 25 Other Restrictions NOTE x x If there are problems with the contents of a codec the codec will not be supported x x If the information for a Container is incorrect and the file is in error the Containe...

Страница 26: ...ce If the sound is strange when playing MP3 files adjust the Equalizer in the Sound menu An over modulated MP3 file may cause a sound problem Photos Viewing a Photo or Slide Show 1 Press the or button to select Photos then press the ENTERE button in the Media Play menu 2 Press the button to select the desired file in the file list 3 Press the ENTERE button or Play button While a photo list is disp...

Страница 27: ...older Title It sorts and displays the file title in Symbol Number Alphabet Special order Preference It sorts and displays the file by preference You can change the file preference in the file list section using the Green button Latest Date It sorts and shows files by latest date Earliest Date It sorts and shows files by earliest date Artist It sorts the music file by artist in alphabetical Album I...

Страница 28: ...w Zoom You can zoom into images in full screen mode Rotate You can rotate images in full screen mode Information You can see detailed information about the played file Settings Using the Setup Menu Cont movie play help Resume Play On Off Select to display the help pop up message for continuous movie playback Get the DivX VOD registration code Shows the registration code authorized for the TV If yo...

Страница 29: ...our TV and the Digital Audio Input on the Home Theatre x x When following the connection above the Optical jack only outputs 2 channel audio You will only hear sound from the Home Theatre s Front Left and Right speakers and the subwoofer If you want to hear 5 1 channel audio connect the DIGITAL AUDIO OUT OPTICAL jack on the DVD Satellite Box i e Anynet Device 1 or 2 directly to the Amplifier or Ho...

Страница 30: ... it may turn off Switching between Anynet Devices 1 Anynet devices connected to the TV are listed If you cannot find a device you want press the Red button to refresh the list 2 Select a device and press the ENTERE button You can switch to the selected device Only when you set Anynet HDMI CEC to On in the Application menu the Device List menu appears x x Switching to the selected device may take u...

Страница 31: ...y Initial setup etc When connecting or removing the HDMI cable please make sure to search devices again or turn your TV off and on again Check if the Anynet Function of Anynet device is set on I want to start Anynet Check if the Anynet device is properly connected to the TV and check if the Anynet HDMI CEC is set to On in the Anynet Setup menu Press the TOOLS button to display the Anynet menu and ...

Страница 32: ...re colour coded and can be selected by pressing the coloured buttons Press the colour corresponding to the topic of your choice A new colour coded page is displayed Items can be selected in the same way To display the previous or next page press the corresponding coloured button 6 0 mode Selects the Teletext mode LIST FLOF If pressed during LIST mode switches the mode to List save mode In List sav...

Страница 33: ...sary for assembly are provided x x Do not use screws that do not comply with the VESA standard screw specifications x x Do not use screws that are longer than the standard dimension or do not comply with the VESA standard screw specifications Screws that are too long may cause damage to the inside of the TV set x x For wall mounts that do not comply with the VESA standard screw specifications the ...

Страница 34: ... fall device as follows To Avoid the TV from Falling 1 Put the screws into the clamps and firmly fasten them onto the wall Confirm that the screws have been firmly installed onto the wall You may need additional material such as an anchor depending on the type of wall Since the necessary clamps screws and string are not supplied please purchase these additionally 2 Remove the screws from the back ...

Страница 35: ...p 14 Adjust Energy Saving option in the TV menu go to MENU Picture Eco Solution Energy Saving p 14 Try resetting the picture to view the default picture settings go to MENU Picture Picture Reset p 16 There is a dotted line on the edge of the screen If the picture size is set to Screen Fit change it to 16 9 p 15 Change cable set top box resolution The picture is black and white If you are using an ...

Страница 36: ... distortion especially with fast moving pictures such as sports and action movies A low signal can cause picture distortion This is not a TV issue PC Connection A Mode Not Supported message appears Set your PC s output resolution and frequency so they matche the resolutions supported by the TV p 22 PC is always shown on the source list even if a PC is not connected This is normal PC is always show...

Страница 37: ...ilst your watching TV There are recurrent picture sound issues Check and change the signal source A reaction may occur between the rubber cushion pads on the base stand and the top finish of some furniture To prevent this use felt pads on any surface of the TV that comes in direct contact with furniture This TFT LCD panel uses a panel consisting of sub pixels which require sophisticated technology...

Страница 38: ... 576i 480p 480i Audio 2Ch Linear PCM 32 44 1 48kHz 16 20 24bits Analogue audio input HDMI IN1 only PC input HDMI IN1 only Stand Swivel Left Right 20 20 Model Name LE32C530 LE37C530 LE40C530 LE46C530 Screen Size Diagonal 32 inches 37 inches 40 inches 46 inches Sound Output 10W x 2 Dimensions WxDxH Body With stand 783 X 76 X 498 mm 783 X 220 X 536 mm 902 X 77 X 562 mm 902 X 240 X 614 mm 970 X 79 X 6...

Страница 39: ... 8 Home Theatre 8 29 I Installation Space 2 L Language 19 Licence 37 Lock 13 M Media Play 23 Melody 20 Menu Transparency 20 Music 26 N Navigate 10 O Optimal resolution 22 P Photos 26 Picture Size 15 PIP Picture in Picture 20 Plug Play 6 Power Indicator 4 R Receiver 31 Recording 30 Remote Control 5 Repeat Mode 28 RGB Only Mode 14 Rotate 28 S Select All 13 Self Diagnosis 20 Sharpness 14 Signal Infor...

Страница 40: ...nd adaptors and the point where they exit from the appliance y y To protect this apparatus from a lightning storm or when it is left unattended and unused for long periods of time unplug it from the wall outlet and disconnect the antenna or cable system This will prevent damage to the set due to lightning and power line surges y y Before connecting the AC power cord to the DC adaptor outlet make s...

Страница 41: ...ed Kingdom This Samsung product is warranted for a period of twelve 12 months from the original date of purchase against defective materials and workmanship In the event that warranty service is required you should return the product to the retailer from whom it was purchased However Samsung Authorised Dealers and Authorised Service Centres in other EC Countries will comply with the warranty on th...

Отзывы: