background image

English - 2

Resetting the Sound Settings to the Factory Defaults

If "Game Mode" is On, the Reset Sound function is activated 

(Refer to page 2). Selecting the Reset function after setting 

the equalizer resets the equalizer setting to the factory 

defaults.
1.

  Press the 

MENu

 button to display the menu.  


Press the ▲ or ▼


button to select "Sound", then press the  


ENTER/OK

 button.

2.

  Press the ▲ or ▼ button to select "Reset", then press the  


ENTER/OK

 button.

.

  Press the 

ExIT

 button to exit.

  You can select this option when the "Game Mode" is set to "On".

You can set the TV’s clock so that the current time is  

displayed when you press the INFO button. You must also set 

the time if you wish to use the automatic On/Off timers.
1.

  Press the 

MENu

 button to display the menu.  


Press the ▲ or ▼ button to select "Setup", then press the  


ENTER/OK

 button.

2.

  Press the ▲ or ▼ button to select "Time", then press the  


ENTER/OK

 button.

.

  Press the 

ENTER/OK

 button to select "Clock Set".

.


.

  Press the 

ExIT

 button to exit.

  If you disconnect the power cord, you have to set the clock again. 

  You can also set "Year", "Month", "Day", "Hour" and "Minute" by pressing the number buttons on the  


remote control.

Setting and Displaying the Current Time
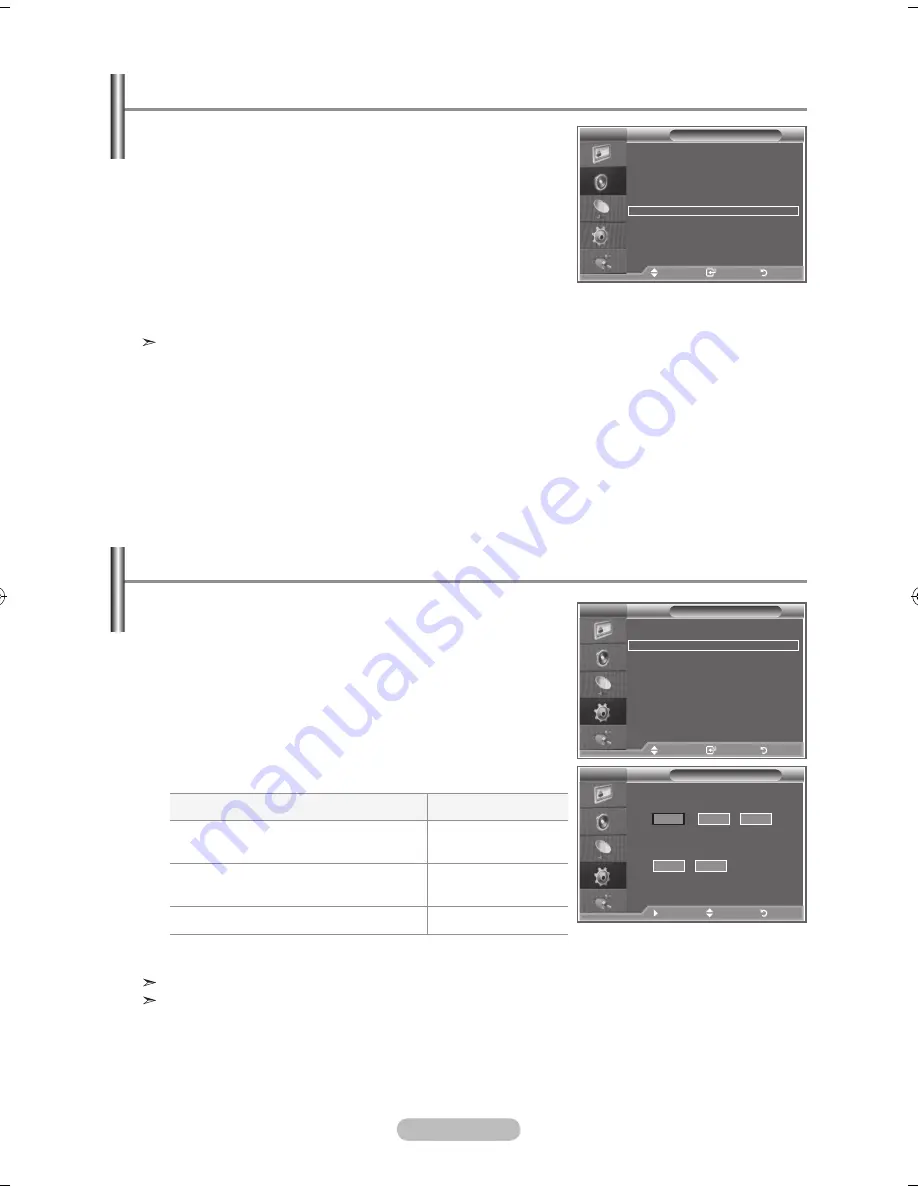
Sound

Mode 

:  Custom 


Equalizer 


SRS TS xT 

:  Off 


Auto Volume 

:  Off 


Internal Mute 

:  Off 


Sound Select 

:  Main 

 

Reset 


Move    

Enter 

Return

Mode 

: Custom   

Equalizer 


SRS TS xT 

: Off 


Auto Volume 

: Off 


Internal Mute 

: Off 


Reset 

Move 

Enter 

 Return

TV

Setup

Plug & Play 


language 

: English 

Time 


Game Mode 

: Off 

Blue Screen 

: Off 

Melody 

: Medium 

PC 


home Theatre PC 

: Off 


Energy Saving 

: Off 

hDMI Black level  : low 

PIP 


Move    

Enter 

Return

TV

Clock Set

Month

01

Day

q

01

200

Year

00

hour

00

Minute


Move    

Adjust 

Return

TV

To...

Press the...

Move to "Month", "Day", "Year",  

"Hour "or "Minute"

◄ or ► button.

Set the  "Month", "Day", "Year",  

"Hour "or "Minute"

▲ or ▼ button.

Confirm the setting

ENTER/OK

 button.

BN68-01182K-X0Eng-0726.indd   26

2007-08-14   �� 1:58:21

Содержание LE22S86BD

Страница 1: ...cord your Model and Serial number here for future reference Model _______________ Serial No _______________ BN68 01182K 00 Contact SAMSUNG WORLDWIDE If you have any questions or comments relating to S...

Страница 2: ...ARNINGS Image retention commonly known as screen burn in can occur on most types of television if the same image is displayed continuously The most common causes of image retention are logos that rema...

Страница 3: ...cture 17 Changing the Picture Size 18 Freezing the Current Picture 19 Selecting the Screen Mode 19 Resetting the Picture Settings to the Factory Defaults 19 Digital NR Active Colour DNIe 20 Viewing th...

Страница 4: ...g the Digital Text 41 Selecting the Time Zone Spain only 41 Viewing Product Information 41 Checking the Signal Information 42 Upgrading the Software 42 Viewing Common Interface 43 Selecting the CI Com...

Страница 5: ...locations The stand and stand screw may not be included depending on the model Wall mount items sold separately allow you to mount the TV on the wall For detailed information on installing the wall m...

Страница 6: ...olume In the on screen menu use the buttons as you use the and buttons on the remote control 4 Press to change channels In the on screen menu use the buttons as you use the and buttons on the remote c...

Страница 7: ...on to an extended device with the appropriate cable not supplied The difference between HDMI and DVI is that the HDMI device is smaller in size has the HDCP High Bandwidth Digital Copy Protection codi...

Страница 8: ...CR DVD or Camcorder Connect RCA audio cables to R AUDIO L on the rear of your set and the other ends to corre sponding audio out connectors on the A V device Headphone may be connected to the headphon...

Страница 9: ...r of buttons on the remote control e g Selects a target device volume channel buttons light up for a few seconds and then turn off to save power This function is to conveniently use the remote control...

Страница 10: ...of the set 2 Press the button on the front of the set You also can press the POWER button or the TV DTV button on the remote control to turn the TV on The programme that you were watching last is res...

Страница 11: ...ton to select Yes or No then press the ENTER OK button This function is supported for all countries except for the following 6 countries the United Kingdom Austria France Germany Italy and Spain 7 The...

Страница 12: ...or button to select Channel then press the ENTER OK button 2 Press the ENTER OK button to select Country 3 Select the appropriate country by pressing the or button Press the ENTER OK button to confir...

Страница 13: ...5 Press the or button to select Colour System then press the ENTER OK button 6 Select the colour standard required by pressing the or button then press the ENTER OK button 7 Press the or button to sel...

Страница 14: ...remote control can release the Child Lock setting so keep the remote control away from children 1 Press the MENU button to display the menu Press the or button to select Channel then press the ENTER...

Страница 15: ...adcast These names can be changed allowing you to assign new names 1 Press the MENU button to display the menu Press the or button to select Channel then press the ENTER OK button 2 Press the or butto...

Страница 16: ...ton 4 Press the or button to adjust the fine tuning Press the ENTER OK button 5 Press the EXIT button to exit Fine tuned channels that have been saved are marked with an asterisk on the right hand sid...

Страница 17: ...or a more natural look Your set has several settings which allow you to control picture quality 1 To select the desired picture effect follow the Changing the Picture Standard instructions number 1 to...

Страница 18: ...ting Backlight 1 To select the desired picture effect follow the Changing the Picture Standard instructions number 1 to 3 On page 15 2 Press the or button to select Backlight then press the ENTER OK b...

Страница 19: ...temperature for more natural picture colours R Offset G Offset B Offset R Gain G Gain B Gain Changing the adjustment value will refresh the adjusted screen Select the required option by pressing the...

Страница 20: ...he or ENTER OK button Changing the Picture Size You can select these options by simply pressing the P SIZE button on the remote control Size Auto Wide Wide 16 9 Wide Zoom Zoom 4 3 Just Scan Move Enter...

Страница 21: ...select the desired picture effect follow the Changing the Picture Standard instructions number 1 to 3 on page 15 2 Press the or button to select Reset then press the ENTER OK button 3 Press the or but...

Страница 22: ...stronger and clearer for a more vivid on screen picture This function is not available in PC mode This function is not available in Movie and Standard mode DNIe Off Demo On This TV includes the DNIe f...

Страница 23: ...the or button and then press the ENTER OK button 6 Press the or button to select Programme and then press the ENTER OK button You can select the channel that you want to view through sub picture by pr...

Страница 24: ...Off Melody Medium PC Home Theatre PC Off Energy Saving Off HDMI Black Level Low PIP Move Enter Return Normal Low You can select the type of the special sound effect to be used when watching a given b...

Страница 25: ...ying 5 1 multichannel content over two speakers TruSurround delivers a compelling virtual surround sound experience through any two speaker playback system including internal television speakers It is...

Страница 26: ...ol If the stereo signal is weak and an automatic switching occurs then switch to the Mono This function is only activated in stereo sound signal It is deactivated in mono sound signal Adjusting the Vo...

Страница 27: ...e Off Internal Mute Off Sound Select Reset Off On Move Enter Return TV TV During the PIP features activation you can listen to the sound of the sub picture 1 Press the MENU button to display the menu...

Страница 28: ...e ENTER OK button 2 Press the or button to select Time then press the ENTER OK button 3 Press the ENTER OK button to select Clock Set 4 5 Press the EXIT button to exit If you disconnect the power cord...

Страница 29: ...the or button Programme Adjust a Programme Press the or button When finished press the RETURN button to return The current time will appear every time you press the INFO button You can set the hour m...

Страница 30: ...omatically The user cannot change these to other modes Sound Mode in the Sound menu is deactivated Adjust the sound using the equalizer The Reset Sound function is activated Selecting the Reset functi...

Страница 31: ...ove Enter Return TV Setup Plug Play Language English Time Game Mode Off Blue Screen Off Melody Off PC Home Theatre PC Off Energy Saving Off HDMI Black Level Low PIP Move Enter Return Off Low Medium Hi...

Страница 32: ...re activated only when they are connected to your set 3 Select the required device by pressing the or button Press the ENTER OK button Press the SOURCE button on the remote control to toggle between a...

Страница 33: ...Reset Move Enter Return Guide Now Next Guide Full Guide Scheduled List Default Guide Full Guide Move Enter Return Channel Country Others Auto Store Manual Store Edit Favourite Channels Channel List M...

Страница 34: ...signal status is poor the No Service found Check the aerial connection message is displayed Updating the Channel List Manually You can specify the channel for a fast channel search 1 Press the D MENU...

Страница 35: ...he DTV menu 2 Press the or button to select Channel then press the ENTER OK button 3 Press the or button to select Edit Favourite Channels then press the ENTER OK button 4 Press the red button in the...

Страница 36: ...umbers are exchanged The favorite channels are automatically sorted in ascending order of channel numbers 7 Press the EXIT button to exit Preview 1 In the Edit Favourite Channels menu select the chann...

Страница 37: ...t corner while changing the channel The channel number and name are displayed if the channel is one of the all channels and a icon if the channel is one of the favourite channels 8 Press the blue butt...

Страница 38: ...grammes refer to the next page View programme information Select a programme of your choice by pressing the button Press the INFO button when the programme of your choice is highlighted Toggle between...

Страница 39: ...ave Save the adjusted schedule Cancel Cancel the adjusted schedule Add Programme Add a new schedule Edit Re adjust the selected schedule Delete Delete the selected schedule You can preset the default...

Страница 40: ...by the channel list update All channels are displayed in the all channel mode Favourites favourite channels is the list of channels that has been set in the Edit Favourite Channels menu refer to page...

Страница 41: ...tup then press the ENTER OK button 3 Press the or button to select Change PIN then press the ENTER OK button The Enter PIN is displayed 4 Enter your current 4 digit PIN code by using the numeric butto...

Страница 42: ...ring function Normal automatically activates even though Hard of hearing mode is selected Setting the Subtitle Mode Move Enter Return Setup Menu Transparency Medium Change PIN Parental Lock Subtitle O...

Страница 43: ...Enter Return Disable Enable Select the time zone where locate 1 Press the D MENU button 2 Press the or button to select Setup then press the ENTER OK button 3 Press the or button to select Time Zone...

Страница 44: ...ress the or button to select Software Information Manual Upgrade or Satandby Mode upgrade Press the ENTER OK button Software Information Press the ENTER OK button then the current software version is...

Страница 45: ...ystem then press the ENTER OK button 4 Press the or button to select Common Interface then press the ENTER OK button 5 Press the ENTER OK button to display the information for your application 6 Press...

Страница 46: ...a reset is performed only when serious problems are experienced Return Selecting the Preferred Language Subtitle Audio or Teletext You can change the default value for subtitle audio teletext language...

Страница 47: ...text Language or Secondary Teletext Language then press the ENTER OK button The options of the selected menu are displayed Press the or button to select required option English German Italian Swedish...

Страница 48: ...LIST mode it switches into the List save mode In the List save mode you can save teletext page into list using the store button 6 sub page Used to display the available sub page 7 page up Used to dis...

Страница 49: ...sure you enter three digits of the code even if the first digit is a 0 If more than one code is listed try the first one 5 Press the POWER button on the remote control Your VCR should turn on if your...

Страница 50: ...021 026 037 062 MARTA 006 MEI 021 MEMOREX 006 021 024 025 MGA 034 MIDLAND 005 MINOLTA 019 041 075 MITSUBISHI 019 034 041 046 Brand Code MONTGOMERY WARD 020 MTC 002 025 MULTITECH 002 005 025 038 NEC 00...

Страница 51: ...18 STB DVD COMBO 019 DVD Receiver 020 AV Receiver 021 DVD Brand Code ANAM 030 AUDIOVOX 075 AUDIOLOGIC 085 ANABA 072 APEX DIGITAL 070 071 074 086 083 084 088 111 112 AIWA 114 BROKSONIC 062 BLAUPUNKT 07...

Страница 52: ...IGITAL 019 CHAPARRAL 035 DIRECT TV 015 016 017 019 022 045 060 061 062 065 066 067 068 DAEWOO 074 DISH NETWORK SYSTEM 069 070 DISHPRO 069 DRAKE 018 024 032 DX ANTENNA 027 ECHOSTAR 025 069 070 071 EXPR...

Страница 53: ...G is not supported Display Modes Both screen position and size will vary depending on the type of PC monitor and its resolution The resolutions in the table are recommended All resolutions between the...

Страница 54: ...uctions number 1 to 3 2 Press the or button to select Position then press the ENTER OK button 3 Press the or button to adjusting the Vertical Position Press the or button to adjust the Horizontal Posi...

Страница 55: ...Off or On Press the ENTER OK button 4 Press the EXIT button to exit This function is available only in PC mode Setting the Home Theatre PC Mode Custom Equalizer SRS TS XT Off Auto Volume Off Internal...

Страница 56: ...een is black and power indicator light blinks steadily On your computer check Power Signal Cable The TV is using its power management system Move the computer s mouse or press any key on the keyboard...

Страница 57: ...m Weight With stand 7 5 kg Environmental Considerations Operating Temperature Operating Humidity Storage Temperature Storage Humidity 10 C to 40 C 50 F to 104 F 10 to 80 non condensing 20 C to 45 C 4...

Страница 58: ...To avoid electric shock never touch the inside of this apparatus Only a qualified technician should open this apparatus Make sure to plug the power cord in until it is firmly inserted When removing t...

Страница 59: ...nited Kingdom This Samsung product is warranted for a period of twelve 12 months from the original date of purchase against defective materials and workmanship In the event that warranty service is re...

Страница 60: ...r human health from uncontrolled waste disposal please separate this from other types of wastes and recycle it responsibly to promote the sustainable reuse of material resources Household users should...

Страница 61: ...This page is intentionally left blank...

Отзывы: