background image

English

O

ther I

nf

orma

tion

Using Your TV as a Computer (PC) Display

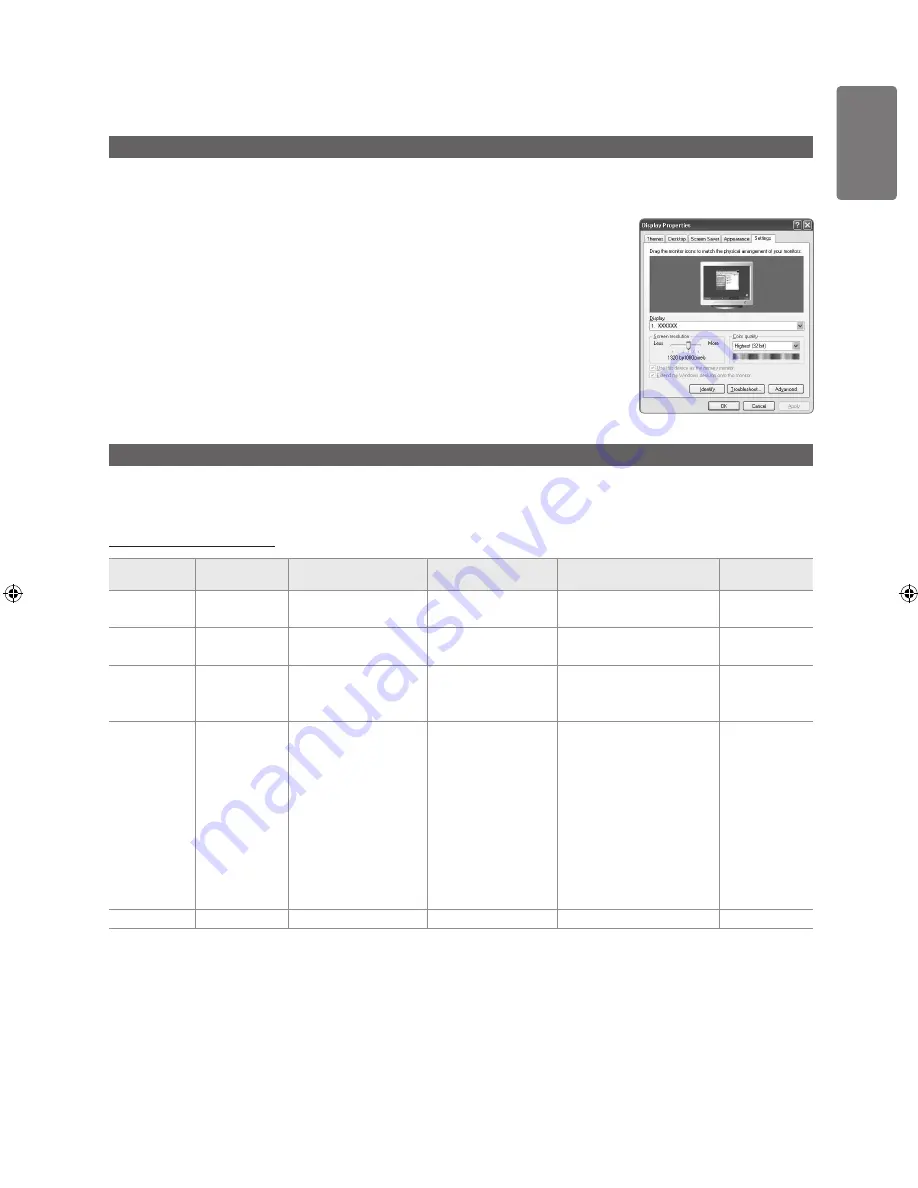
Setting Up Your PC Software (Based on Windows XP)

The Windows display-settings for a typical computer are shown below. The actual screens on your PC will probably be different, depending 

upon your particular version of Windows and your particular video card. However, even if your actual screens look different, the same basic 

set-up information will apply in almost all cases. (If not, contact your computer manufacturer or Samsung Dealer.)

1

  First, click on ‘Control Panel’ on the Windows start menu.   


2

  When the control panel window appears, click on ‘Appearance and Themes’ and a display 

dialog-box will appear.   


3

  When the control panel window appears, click on ‘Display’ and a display dialogbox will 

appear.

4

  Navigate to the ‘Settings’ tab on the display dialog-box.

The correct size setting (resolution) - Optimum: 1360 X 768 pixels.

If a vertical-frequency option exists on your display settings dialog box, the correct value 

is ‘60’ or ‘60 Hz’. Otherwise, just click ‘OK’ and exit the dialog box.

Display Modes

If the signal from the system equals the standard signal mode, the screen is adjusted automatically. If the signal from the system doesn’t 

equal the standard signal mode, adjust the mode by referring to your videocard user guide; otherwise there may be no video. For the display 

modes listed on the next page, the screen image has been optimized during manufacturing.

D-Sub and HDMI/DVI Input

Mode

Resolution

Horizontal Frequency 

(KHz)

Vertical Frequency 

(Hz)

Pixel Clock Frequency 

(MHz)

Sync Polarity 

(H / V)

IBM

640 x 350

31.469

70.086

25.175

+/-

720 x 400

31.469

70.087

28.322

-/+

MAC

640 x 480

35.000

66.667

30.240

-/-

832 x 624

49.726

74.551

57.284

-/-

VESA CVT

720 x 576

35.910

59.950

32.750

-/+

1280 x 720

44.772

59.855

74.500

-/+

1280 x 720

56.456

74.777

95.750

-/+

VESA DMT

640 x 480

31.469

59.940

25.175

-/-

640 x 480

37.500

75.000

31.500

-/-

640 x 480

37.861

72.809

31.500

-/-

800 x 600

37.879

60.317

40.000

+/+

800 x 600

46.875

75.000

49.500

+/+

800 x 600

48.077

72.188

50.000

+/+

1024 x 768

48.363

60.004

65.000

-/-

1024 x 768

56.476

70.069

75.000

-/-

1024 x 768

60.023

75.029

78.750

+/+

1360 x 768

47.712

60.015

85.500

+/+

VESA GTF

1280 x 720

52.500

70.000

89.040

-/+

When using an HDMI / DVI cable connection, you must use the 

HDMI (DVI)

 jack.

The interlace mode is not supported.

The set might operate abnormally if a non-standard video format is selected.

Separate and Composite modes are supported. SOG is not supported.

BN68-01980J-Eng.indd   37

2009-04-06   �� 4:34:12

Содержание LE19B450

Страница 1: ...ntry Customer Care Centre Web Site EIRE 0818 717 100 www samsung com ie U K 0845 SAMSUNG 7267864 www samsung com uk LCD TV user manual imagine the possibilities Thank you for purchasing this Samsung product To receive more complete service please register your product at www samsung com register Model Serial No BN68 01980J Eng Cover indd 1 2009 04 06 4 33 40 ...

Страница 2: ...black borders top or bottom by using the zoom function This will help eliminate the black borders and fit the picture to the entire area of the screen Using a video game console may cause image retention and is not recommended When using a PC input avoid displaying still images for long durations and reduce the brightness or contrast settings to decrease the intensity of the picture IMPORTANT Imag...

Страница 3: ...s Inc TruSurround HD technology is incorporated under license from SRS Labs Inc Manufactured under license from Dolby Laboratories Dolby and the double D symbol are trademarks of Dolby Laboratories Symbol Note One Touch Button TOOL Button Press 2009 Samsung Electronics Co Ltd All rights reserved ...

Страница 4: ... Cable Search Option 20 Now Next Guide Full Guide Default Guide 21 Channel List 22 Channel Mode Fine Tune 23 Picture Menu 23 Mode Backlight Contrast Brightness Sharpness Colour Tint G R Advanced Settings 24 Picture Options 25 Picture Reset 26 Auto Adjustment Screen 27 Sound Menu 27 Mode Equalizer SRS TruSurround HD Audio Language Audio Format Audio Description Auto Volume Speaker Select 28 Sound R...

Страница 5: ... only When you adjust the stand press the button on the back of the stand 1 Figure 1 shows the adjustment angle 2 14 when you use the LCD on its stand Excessive tilting can turn the LCD TV over which may cause damage 2 Figure 2 shows the adjustment angle 14 80 when you convert the LCD from stand based use to wall mount 3 Figure 3 shows the adjustment angle 0 10 when you mount the LCD TV to a wall ...

Страница 6: ...ith the holes in the stand bottom and secure it with the four screws that come with the arm type base wall mount hanger or other bases not supplied Using the Decoration Covers 19inch model only 1 When installing the TV on the wall without using the stand insert decoration covers into the holes as described in the picture 1 2 After inserting the decoration covers fasten them with 4 screws as descri...

Страница 7: ...technician for assistance when installing the wall mounted bracket Samsung Electronics is not responsible for any damage to the product or injury to yourself or others if you elect to install the TV on your own Do not install your Wall Mount Kit while your TV is turned on It may result in personal injury due to electric shock Remove the stand and cover the bottom hole with a cap and fasten with tw...

Страница 8: ...e figure are kept When using a stand or wall mount use parts provided by Samsung Electronics only If you use parts provided by another manufacturer it may result in a problem with the product or an injury due to the product falling If you use parts provided by another manufacturer it may result in a problem with the product or fire due to an increase in the internal temperature of the product due ...

Страница 9: ...se purchase these additionally 2 Remove the screws from the centre back of the TV put the screws into the clamps and then fasten the screws onto the TV again Screws may not be supplied with the product In this case please purchase the screws of the following specifications Screw Specifications For a 17 29 Inch LCD TV M4 X 15 For a 32 40 Inch LCD TV M6 X 15 3 Connect the clamps fixed onto the TV an...

Страница 10: ...ailable input sources In the on screen menu use this button as you would use the ENTERE button on the remote control Press to see an on screen menu of your TV s features Press to increase or decrease the volume In the on screen menu use the Y buttons as you would use the and buttons on the remote control Press to turn the TV on and off Press to change channels In the on screen menu use the Z butto...

Страница 11: ...e TV system 6 COMMON INTERFACE Slot When not inserting CI CARD in some channels Scrambled Signal is displayed on the screen The pairing information containing a telephone number CI CARD ID Host ID and other information will be displayed in about 2 3 minutes If an error message is displayed please contact your service provider When the channel information configuration has finished the message Upda...

Страница 12: ...and connect the DTV or DVD to component connector PR PB Y on your set The PR PB and Y connectors on your component devices DTV or DVD are sometimes labeled Y B Y and R Y or Y Cb and Cr Connect RCA audio cables optional to R AUDIO L on the rear of your set and the other ends to corresponding audio out connectors on the DTV or DVD 0 EXT Connector Input Output Video Audio L R RGB Video Audio L R EXT ...

Страница 13: ... Analog Audio connection Amplifier DVD Home Theater Using a Audio Cable AUDIO IN OPTICAL Digital AUDIO Analog Best Normal HD connection Using a D Sub Cable Using an HDMI Cable HDMI OUT Using a D Sub Cable Using a D Sub Cable PC OUT AUDIO OUT HD connection Using a D Sub Cable Using an HDMI DVI Cable DVI OUT AUDIO OUT ...

Страница 14: ...e diagram inside the compartment 3 Replace the cover Remove the batteries and store them in a cool dry place if you won t be using the remote control for a long time If the remote control doesn t work check the following Is the TV power on Are the plus and minus ends of the batteries reversed Are the batteries drained Is there a power outage or is the power cord unplugged Is there a special fluore...

Страница 15: ...were watching Press to temporarily cut off the sound p 33 Press to display and select the available video sources p 32 Press to change channels Press to switch to your favourites channels p 21 Displays the main on screen menu p 18 Returns to the previous menu Press to exit the menu p 18 Displays the Digital subtitle p 30 Displays the Electronic Programme Guide EPG p 20 Teletext Functions p 35 0 Te...

Страница 16: ... information refer to Channel Auto Store Digital Analogue Digital and Analogue channels Digital Digital channels Analogue Analogue channels The channel search will start and end automatically After all the available channels are stored the message Set the Clock Mode is displayed 7 Press the ENTERE button Press the or button to select Auto then press the ENTERE button If you select Manual Set curre...

Страница 17: ...umber use the Change PIN function Viewing the Display The display identifies the current channel and the status of certain audio video settings 1 Press the INFO button on the remote control The TV will display the channel the type of sound and the status of certain picture and sound settings Press the INFO button once more or wait approximately 10 seconds and the display disappears automatically P...

Страница 18: ...el Menu Channel Option Description Country The PIN number input screen appears Enter your 4 digit PIN number Analogue Channel You can change the country for analogue channels Digital Channel You can change the country for digital channels Auto Store You can scan for the frequency ranges available to you and availability depends on your country Automatically allocated programme numbers may not corr...

Страница 19: ... can also select the channel number directly by pressing the number 0 9 buttons If there is abnormal sound or no sound reselect the sound standard required Search When you do not know the channel numbers Press the or button to start the search The tuner scans the frequency range until the first channel or the channel that you selected is received on the screen Store When you store the channel and ...

Страница 20: ...r choice is highlighted The programme title is on the upper part of the screen centre Please click on INFO button for the detailed information Channel Number Running Time Status Bar Parental Level Video Quality Information HD SD Sound Modes Subtitle or Teletext languages of Subtitle or Teletext and brief summary of the highlighted programme are included on the detailed information will be appeared...

Страница 21: ... All favourite channels will be shown on Favourites menu Timer Viewing If you reserve a programme you want to watch the channel is automatically switched to the reserved channel in the Channel List even when you are watching another channel To reserve a programme set the current time first Refer to page 29 You can set the channel day month year hour and minute directly by pressing the number butto...

Страница 22: ...Deselect All You can deselect all the selected channels Auto Store For detailed procedures on setting up options refer to pages 18 19 Channel List Option Menu in Programmed You can view modify or delete a reservation Press the TOOLS button to use the option menu Change Info Select to change a viewing reservation Cancel Schedules Select to cancel a viewing reservation Information Select to view a v...

Страница 23: ...artoonish Tint G R Changes the picture hue from reddish to a greenish appearance Advanced Settings Samsung s new TVs allow you to make even more precise picture settings than previous models Black Tone Off Dark Darker Darkest Increases the picture s shadow detail by lightening the black level ie changing the gamma at low levels This is most commonly used for watching movies with dark scenes to kee...

Страница 24: ...of flesh tones Increasing the value creates a more reddish picture Decreasing the value creates a more greenish picture Edge Enhancement Increases or decreases the emphasis at object edges Picture Options Colour Tone Selects a preset white balance or colour temperature setting to provide either a reddish or bluish hue dependant upon your personal preference Cool Selects a white balance or colour t...

Страница 25: ...e picture size you want to see the 4 3 WSS Wide Screen Service image or nothing Each individual European country requires different picture size so this function is intended for users to select it 16 9 Sets the picture to 16 9 wide mode Wide Zoom Magnify the size of the picture more than 4 3 Zoom Magnify the size of the picture vertically on screen 4 3 Sets the picture to 4 3 normal mode Digital N...

Страница 26: ...une again After the noise has been reduced readjust the picture so that it is aligned on the centre of screen PC Position Adjust the PC s screen positioning if it does not fit the TV screen Press the or button to adjusting the Vertical Position Press the or button to adjust the Horizontal Position Image Reset You can replace all image settings with the factory default values Preset Press the SOURC...

Страница 27: ...elected The Audio Format appears according to the broadcasting signal Audio Description digital channels only This is an auxiliary audio function that provides an additional audio track for visually challenged persons This function handles the Audio Stream for the AD Audio Description when it is sent along with the Main audio from the broadcaster Users can turn the Audio Description On or Off and ...

Страница 28: ...displayed on the screen Audio Type Dual 1 2 Default A2 Stereo Mono MONO Automatic change Stereo STEREO MONO Dual DUAL 1 DUAL 2 DUAL 1 NICAM Stereo Mono MONO Automatic change Stereo MONO STEREO Dual MONO DUAL 1 DUAL 2 DUAL 1 If the stereo signal is weak and an automatic switching occurs then switch to the mono This function is only activated in stereo sound signal It is deactivated in mono sound si...

Страница 29: ...ou ve chosen set to Activate Off Time Set the hour minute and activate inactivate To activate timer with the setting you ve chosen set to Activate Volume Set the desired volume level Antenna Select Air or Cable Channel Select the desired channel Repeat Select Once Everyday Mon Fri Mon Sat Sat Sun or Manual When Manual is selected press the button to select the desired day of the week Press the ENT...

Страница 30: ... country Before the setup screen appears the PIN number input screen appears Enter your 4 digit PIN number The default PIN number of a new TV set is 0 0 0 0 You can change the PIN by selecting Change PIN from the menu When the parental ratings are set the symbol is displayed Allow All Press to unlock all TV ratings Block All Press to lock all TV ratings Subtitle You can activate and deactivate the...

Страница 31: ... as multimedia data MHEG is user runtime interaction technology and is being applied to various fields including VOD Video On Demand ITV Interactive TV EC Electronic Commerce tele education tele conferencing digital libraries and network games Melody A melody sound can be set to come on when the TV is powered On or Off The Melody does not play When no sound is output from the TV because the MUTE b...

Страница 32: ...e not connected will be sorted to the bottom TOOLS Tools Displays the Edit Name and Information menus Edit Name Name the device connected to the input jacks to make your input source selection easier VCR DVD Cable STB Satellite STB PVR STB AV Receiver Game Camcorder PC DVI PC DVI TV IPTV Bluray HD DVD DMA When connecting an HDMI DVI cable to the HDMI DVI port you should set the HDMI DVI mode to DV...

Страница 33: ...of the normal Television signal It will automatically detect these signals and display the software upgrade banner You are given the option to install the upgrade By USB Insert a USB drive containing the firmware upgrade downloaded from samsung com into the TV Please be careful to not disconnect the power or remove the USB drive while upgrades are being applied The TV will turn off and turn on aut...

Страница 34: ...rovides the optimal quality for the HD TV Refer to this information when connecting external devices to the TV Contact Samsung View this information when your TV does not work properly or when you want to upgrade the software You can view the information regarding the call centre product and software file download method ...

Страница 35: ...s for example To display normal screen press it again 6 Colour buttons red green yellow blue If the FASTEXT system is used by a broadcasting company the different topics covered on a Teletext page are colour coded and can be selected by pressing the coloured buttons Press one of them corresponding to the required The page is displayed with other coloured information that can be selected in the sam...

Страница 36: ...ering the page number Selecting a title in a list Selecting a coloured heading FASTEXT system Teletext level supported by the TV is version 2 5 which is capable of displaying additional graphics or text Depending upon the transmission blank side panels can occur when displaying Teletext In these cases additional graphics or text is not transmitted Older TV s which do not support version 2 5 are no...

Страница 37: ...rd signal mode the screen is adjusted automatically If the signal from the system doesn t equal the standard signal mode adjust the mode by referring to your videocard user guide otherwise there may be no video For the display modes listed on the next page the screen image has been optimized during manufacturing D Sub and HDMI DVI Input Mode Resolution Horizontal Frequency KHz Vertical Frequency H...

Страница 38: ...e control malfunctions Replace the remote control batteries Clean the upper edge of the remote control transmission window Check the battery terminals Check signal cable message is displayed Check that the signal cable is firmly connected to the PC or video sources Check that the PC or video sources are turned on On PC mode Not Supported Mode message is displayed Check the maximum resolution and t...

Страница 39: ...327 477 x 180 x 362 558 x 75 x 384 558 x 216 x 426 Weight With Stand 5 kg 7 kg Environmental Considerations Operating Temperature Operating Humidity Storage Temperature Storage Humidity 10 C to 40 C 50 F to 104 F 10 to 80 non condensing 20 C to 45 C 4 F to 113 F 5 to 95 non condensing Stand Swivel Left Right 0 Design and specifications are subject to change without prior notice This device is a Cl...

Страница 40: ...particular attention to cords at plug end adaptors and the point where they exit from the appliance To protect this apparatus from a lightning storm or when it is left unattended and unused for long periods of time unplug it from the wall outlet and disconnect the antenna or cable system This will prevent damage to the set due to lightning and power line surges Before connecting the AC power cord ...

Страница 41: ...D YELLOW Warranty Card United Kingdom This Samsung product is warranted for a period of twelve 12 months from the original date of purchase against defective materials and workmanship In the event that warranty service is required you should return the product to the retailer from whom it was purchased However Samsung Authorised Dealers and Authorised Service Centres in other EC Countries will com...

Страница 42: ...en en op een verantwoorde manier recyclen zodat het duurzame hergebruik van materiaalbronnen wordt bevorderd Huishoudelijke gebruikers moeten contact opnemen met de winkel waar ze dit product hebben gekocht of met de gemeente waar ze wonen om te vernemen waar en hoe ze deze artikelen milieuvriendelijk kunnen laten recyclen Zakelijke gebruikers moeten contact opnemen met hun leverancier en de algem...

Страница 43: ...tulee ottaa yhteyttä tavarantoimittajaan ja selvittää hankintasopimuksen ehdot Tuotetta tai sen lisävarusteita ei saa hävittää muun kaupallisen jätteen seassa Suomi A termék hulladékba helyezésének módszere WEEE Elektromos és elektronikus berendezések hulladékai Ez a jelzés a terméken tartozékain vagy dokumentációján arra utal hogy hasznos élettartama végén a terméket és elektronikus tartozékait p...

Страница 44: ...ktovať svojho dodávateľa a preveriť si podmienky kúpnej zmluvy Tento výrobok a ani jeho elektronické príslušenstvo by nemali byť likvidované spolu s ostatným priemyselným odpadom Slovensky Cum se elimină corect acest produs Deşeuri de echipamente electrice şi electronice Aplicabil în ţările Uniunii Europene şi în alte ţări cu sisteme de colectare selectivă Acest simbol de pe produs accesorii şi do...

Страница 45: ...õrvaldamisega seotud võimaliku kahju tekitamist keskkonnale või inimeste tervisele ning edendada materiaalsete vahendite säästvat taaskasutust eraldage need esemed muudest jäätmetest ja suunake need vastutustundlikult taasringlusse Kodukasutajad saavad teavet nende esemete keskkonnaohutu ringlussevõtu kohta kas toote müüjalt või keskkonnaametist Firmad peaksid võtma ühendust tarnijaga ning kontrol...

Страница 46: ... marchio riportato sulla batteria o sulla sua documentazione o confezione indica che le batterie di questo prodotto non devono essere smaltite con altri rifiuti domestici al termine del ciclo di vita Dove raffigurati i simboli chimici Hg Cd o Pb indicano che la batteria contiene mercurio cadmio o piombo in quantità superiori ai livelli di riferimento della direttiva UE 2006 66 Se le batterie non v...

Страница 47: ...orok nem megfelelő kezelése esetén ezek az anyagok veszélyt jelenthetnek az egészségre vagy a környezetre A természeti erőforrások megóvása és az anyagok újrafelhasználásának ösztönzése érdekében kérjük különítse el az akkumulátorokat a többi hulladéktól és vigye vissza a helyi ingyenes akkumulátorleadó helyre Magyar Sposób poprawnego usuwania baterii w które wyposażony jest niniejszy produkt Doty...

Страница 48: ...rii materialelor vă rugăm să separaţi bateriile de celelalte tipuri de deşeuri şi să le reciclaţi prin intermediul sistemului gratuit de returnare a bateriilor la nivel local Română Šī izstrādājuma bateriju pareiza utilizācija Piemērojama Eiropas Savienībā un citās Eiropas valstīs ar atsevišķām bateriju nodošanas sistēmām Šis marķējums uz baterijas rokasgrāmatā vai uz iepakojuma norāda ka šī izstr...

Отзывы: