


11
English
03
Basic Featur
es
How to Navigate Menu
Before using the TV, follow the steps below to learn how to
navigate the menu and select and adjust different functions.
1
ENTER
E
/ Direction button: Move the cursor and
select an item. Confirm the setting.
2
RETURN
button: Returns to the previous menu.
3
MENU
button: Displays the main on-screen menu.
4
EXIT
button: Exits the on-screen menu.
How to Operate the OSD (On Screen Display)
The access step may differ depending on the selected menu.
1
MENU
m
The main menu options appears on
the screen:
Picture, Sound, Channel, Setup,
Input, Application, Support
.
2
▲
/
▼
Select an icon with the
▲
or
▼
button.
3
ENTER
E
Press
ENTER
E
to access the
sub-menu.
4
▲
/
▼
Select the desired submenu with
the
▲
or
▼
button.
5
◄
/
►
Adjust the value of an item with the
◄
or
►
button. The adjustment in
the OSD may differ depending on
the selected menu.
6
ENTER
E
Press
ENTER
E
to complete the
configuration.
7
EXIT
e
Press
EXIT
.
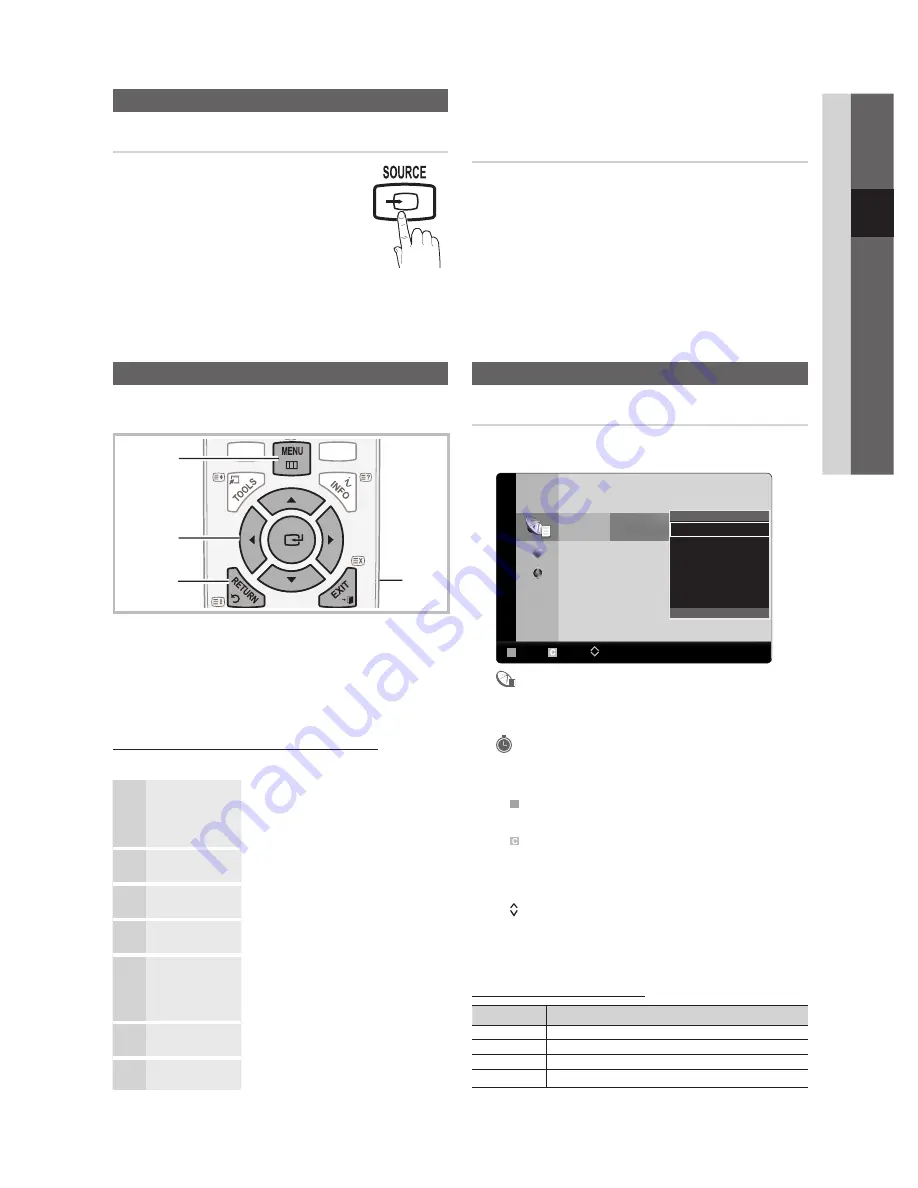
Channel Menu
Channel Manager
Delete or set favourites channels. Select a channel in the
Channels
,
My Channels
or
Scheduled
screen.
Channels
c
6 C --
c
7
*
C --
8
*
C --
9
C --
10 C --
12 C --
13 C --
B
Zoom
Select Page
T
Tools
All
Edit My Channels
Lock
Timer Viewing
Edit Channel Name
Sort
Delete
▼
■
Channels
: Shows the channel list according to
channel type.
*
■
My Channels
: Shows the group of the channel.
■
Scheduled
: Shows all the currently reserved
programmes.
Using the colour buttons with the
✎
Channel Manager
B
x
Green (
Zoom
): Enlarges or shrinks a channel
number.
x
Yellow (
Select
): Select desired channels and press
the Yellow button to set all the selected channels at
the same time. The
c
mark appears to the left of
the selected channels.
x
(
Page
): Move to next or previous page.
T
x
(
Tools
): Displays the
Channel Manager
option
menu. (The Options menus may differ depending on
the situation.)
Channel Status Display Icons
Icons
Operations
c
A channel selected.
*
A channel set as a Favourite.
\
A locked channel.
)
A reserved programme.
Basic Features
Changing the Input Source
Source List
Use to select TV or other external input
sources such as DVD / Blu-ray players /
Cable Box / Satellite receivers (Set-Top Box)
connected to the TV.
22” : TV, AV1, AV2, Component , PC,
■
HDMI/DVI, USB
26”/32” : TV, AV1, AV2, Component1,
■
Component2, PC, HDMI1/DVI, HDMI2, HDMI3, USB
In the
✎
Source List
, connected inputs will be
highlighted.
Edit Name
VCR / DVD / Cable STB / Satellite STB / PVR STB /
■
AV Receiver / Game / Camcorder / PC / DVI PC / DVI
Devices / TV / IPTV / Blu-ray / HD DVD / DMA
: Name
the device connected to the input jacks to make your
input source selection easier.
When connecting an HDMI/DVI cable to the
✎
HDMI IN
1(DVI)
or
HDMI (DVI) IN
port, you should set to
DVI
PC
or
DVI
Devices
mode under
Edit Name.
P
POWER
MEDIA.P
SLEEP
E.SAVING
DUAL
I-II
4
MEDIA.P
A
B
C
D
HDMI
P.MODE
S.MODE
SLEEP
DUAL
E.SAVING
3
1
2
BN68-02927A_Eng.indd 11
2010-04-06 �� 7:17:04