background image

ŝ

35

Ş

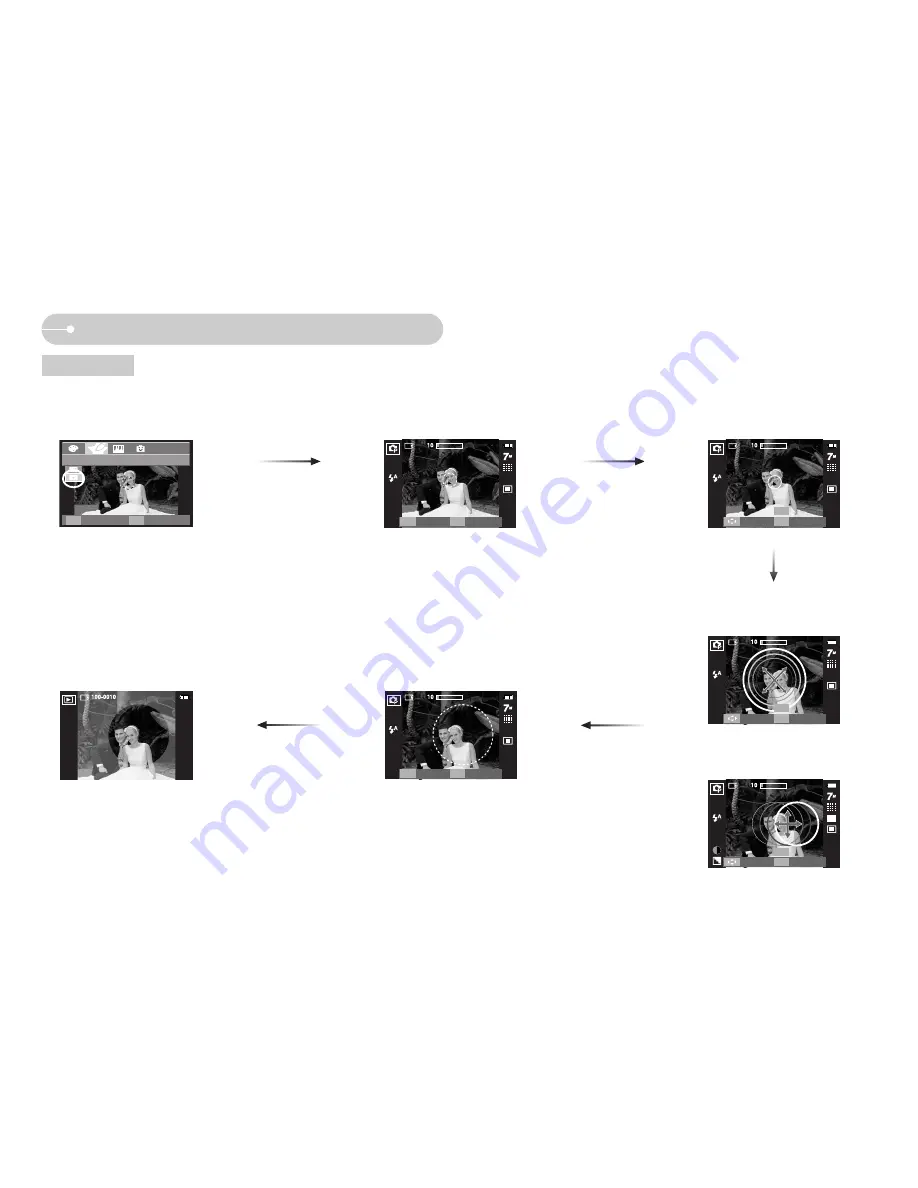
E (Effect) button : Special Colour

Colour mask

ƈ

With this menu, you can select a part you want to highlight. The rest of the image will be black and white.

ƃ

Press the E button in an available recording mode. (p.33)

Press the OK button and the Mask
mark will be displayed on the LCD
monitor.

Press the Shutter button and the
mask added image is taken.

Zoom W / T button :
Changing the Mask size

ƊƌȜȞ

button : 

Moving the mask

[Final image]

Press the Fn button. You can
change the size and location of the
mask. 

Pressing the Fn button.

COLOR MASK

Back

Set

E

OK

Capture

Edit

SH

Fn

Move

Size

T/W

SH

Capture

Move

Size

T/W

SH

Capture

Move

Size

T/W

SH

Capture

[Mask added image]

Capture

Edit

SH

Fn

Содержание i170

Страница 1: ...sung camera This manual will guide you through using the camera including capturing images downloading images and using the application software Please read this manual carefully before using your new camera User Manual ENGLISH ...

Страница 2: ...s on the memory card due to the use of a card reader Ҭ Microsoft Windows and Windows logo are registered trademarks of Microsoft Corporation incorporated in the United States and or other countries Ҭ is a trademark of SRS Labs Inc WOW HD technology is incorporated under license from SRS Labs Inc Ҭ All brand and product names appearing in this manual are registered trademarks Ҭ The contents and ill...

Страница 3: ... use do not cover the camera or Charger This may cause heat to build up and distort the camera body or cause a fire Always use the camera and its accessories in a well ventilated area DANGER indicates an imminently hazardous situation which if not avoided will result in death or serious injury ƈ Do not attempt to modify this camera in any way To do so may result in fire injury electric shock or se...

Страница 4: ...D monitor ƈ Credit cards may be demagnetized if left near case Avoid leaving magnetic strip cards near the case READY ƃSystem chart ōōōōōōōōō5 ƃIdentification of featuresōōōōō6 ƈSelf timer lamp ōōōōōōōō8 ƈCamera Status Lamp ōōōōō8 ƃConnecting to a Power Sourceōō9 ƈHow to charge the rechargeable battery SLB 0837 ōōōōōō10 ƃInserting the memory card ōōō11 ƃInstructions on how to use the memory card ō...

Страница 5: ...ōōōōōōōō79 ƈFile nameōōōōōōōōōō79 ƈLANGUAGE ōōōōōōōō79 ƈSetting up the Date Time Date type ōōōōōōōōōōōō79 ƈImprinting the recording dateōō80 ƈLCD brightness ōōōōōōō80 ƈAuto Focus lampōōōōōōō80 ƈStart up imageōōōōōōōō80 ƃSetup menu 2 ōōōōōōōō81 ƈQuick view ōōōōōōōōō81 ƈAuto power offōōōōōōōō81 ƈLCD saveōōōōōōōōōō81 ƈSelecting Video out typeōōōō82 ƈPassword setup ōōōōōōō83 ƈFormatting a memory ōōōōō...

Страница 6: ...contact your nearest Samsung dealer or Samsung service centre User manual Product warranty Camera case SD memory card MMC see p 12 DPOF compatible printer see p 71 AC adapter SAC 45 USB cable SUC C2 Rechargeable battery SLB 0837 PictBridge compatible printer see p 74 Computer External monitor see p 82 Included items Camera strap Software CD see p 101 102 Earphones AV cable ...

Страница 7: ...ŝ6Ş Identification of features Front Top Face Recognition FR Lock button Shutter button Power button Speaker Self timer AF lamp Microphone Lens Flash ...

Страница 8: ...ŝ7Ş Back Identification of features 9 button touch pad Smart button Camera strap Zoom W Thumbnail Zoom T Digital zoom Volume button Camera status lamp LCD monitor Earphones jack ...

Страница 9: ... Memory card slot When the USB cable is attached to a computer After taking a picture Power on Transmitting Data with a PC When the USB cable is attached to a printer When the printer is printing When the AF activates Icon Status Description For the first 8 seconds the lamp blinks at 1 second intervals For the final 2 seconds the lamp blinks quickly at 0 25 second intervals For the 2 seconds the l...

Страница 10: ...s turning on It may generate a loud noise INFORMATION Approx 150 MIN Charging time When the camera is turned off ƈ Number of images and battery life Using the SLB 0837 ſ These figures are measured under Samsung s standard conditions and shooting conditions and may vary depending on the user s methods Conditions Still image Approx 90 MIN Approx 180 shots Approx 80 MIN Using the fully charged batter...

Страница 11: ...B port of the PC doesn t meet the Power output standard 5V 500mA the camera may not be charged CAUTION ƈ How to charge the rechargeable battery SLB 0837 Charging LED Connecting to a Power Source ƈ You can charge the rechargeable battery SLB 0837 by using the SAC 45 KIT which consists of the AC adapter SAC 45 and the USB cable SUC C2 When the SAC 45 and SUC C2 are combined they can be used as an AC...

Страница 12: ...serted correctly ƃ If you charge the battery with the camera power on the battery can t charge fully Turn the camera off while charging the battery CAUTION Connecting to a Power Source Inserting the memory card ƈ Insert the battery as shown If the camera does not turn on after you have inserted battery please check whether the battery is inserted with the correct polarity When the battery chamber ...

Страница 13: ... memory card is being inserted or removed ƃ Repeated use of the memory card will eventually reduce the memory card s performance Should this be the case you will need to purchase a new memory card Wear and tear on the memory card is not covered by the Samsung warranty ƃ The memory card is an electronic precision device Do not bend drop or subject the memory card to any heavy impact ƃ Do not store ...

Страница 14: ... Wide Movie clip Still Image ƃ Don t remove the memory card when the camera status lamp is blinking as this may cause damage to data in the memory card INFORMATION ƈ The camera can use SD Memory Cards and MMC Multi Media Cards SD Secure Digital memory card Write protect switch Label Card pins The SD memory card has a write protect switch that prevents image files from being deleted or formatted By...

Страница 15: ...the cursor to the Date Time main menu if the cursor is at the first item of the date and time setup In all other instances the cursor will be shifted to the left of its current position Ɗƌ button changes the value of each item ƃ Setting up the language 1 Select the LANGUAGE menu by pressing the Ɗƌ button and press the Ȟ button 2 Select the desired sub menu by pressing the Ɗƌ button and press the O...

Страница 16: ... 00 PM Date Time p 79 Camera shake warning p 21 Auto Focus Frame p 42 Voice memo p 43 ڹ Optical Digital Zoom bar Digital Zoom rate p 23 ں 10 Number of available shots remaining p 13 00 00 00 Available recording time Movie clip Voice recording p 13 ڻ Card inserted indicator p 12 ڼ Recording mode p 16 ڽ Colour Effect p 34 ھ Face Recognition p 20 ڿ Flash p 26 ۀ Self timer p 28 ہ Macro p 25 ۂ Contrast...

Страница 17: ...e camera Press the M button and a menu show aside will display Select a desired mode by using the Smart button ƈ Mode icons Selecting modes AUTO PROGRAM MOVIE ASR PMP MP3 TEXT VIEWER SCENE SHOOTING MULTIMEDIA Mode NIGHT PORTRAIT CHILDREN LANDSCAPE CLOSE UP TEXT SUNSET DAWN BACK LIGHT FIRE WORKS BEACH SNOW SELF SHOT FOOD CAFE ...

Страница 18: ...ternal memory If the memory card is inserted an image will be stored on the memory card 3 Close the battery chamber cover 4 Press the power button to turn on the camera If the date time that is displayed on the LCD monitor is incorrect reset the date time before taking a picture 5 Select the Auto mode by pressing the Mode button p 16 29 6 Point the camera towards the subject and compose the image ...

Страница 19: ...ured may be blurred 5 Avoid moving the camera while the Capturing message is displayed to achieve a better result 6 As the ASR uses the camera s digital processor images taken using the ASR may take a little longer for the camera to process ASR mode ƈ Pausing while recording a movie clip Successive Recording This camera allows you to temporarily stop during unwanted scenes while recording a movie ...

Страница 20: ...tter speed value shown on the LCD monitor may be different with the real shutter speed INFORMATION Wise Shot SCENE mode ſ The scene modes are listed below Nightscene Use this for shooting still images at night or in other dark conditions Portrait To take a picture of a person Children To take a picture of fast moving objects for example children Landscape To take pictures of distant scenery Close ...

Страница 21: ... Cafe mode 1 Press the FR Face Recognition button in the selectable modes The FR icon will be displayed on the screen left top side ƃ This function can detect up to 9 persons ƃ When the camera recognises many people at the same time it will focus on the nearest person ƃ When Face detection begins the Digital Zoom cannot operate ƃ When Face detection begins the Effect mode cannot operate ƃ When the...

Страница 22: ...ere is strong reflected light or when the background is very bright When the subject matter has only horizontal lines or the subject is very narrow such as a stick or flagpole When the surroundings are dark Things to watch out for when taking pictures Focus lock ƈ To focus on a subject not positioned in the centre of the picture use the focus lock function ƃ Using the Focus Lock 1 Ensure the subje...

Страница 23: ...ording a movie clip Press the shutter button once and the movie clip is recorded for as long as the available recording time in the memory allows If you wish to stop recording press the shutter button again ƃ In STILL IMAGE mode Pressing the shutter button down halfway activates the autofocus and checks the condition of the flash Pressing the shutter button down fully takes and stores the image If...

Страница 24: ...zoom ZOOM W T button ƃ This camera has a 3X optical zoom and a 5X digital zoom function Using both will offer a total zoom ratio of 15X ƃ TELE Zoom Optical zoom TELE Pressing the ZOOM T button This will zoom into the subject i e the subject will appear nearer Digital zoom TELE When the maximum 3X optical zoom is selected pressing the ZOOM T button activates the digital zoom software Releasing ZOOM...

Страница 25: ...nd press the zoom T button again ƃ The digital zoom can t be activated in the Nightscene Children Text Close up Fireworks Self Shot Food Café scene modes the Movie clip mode the ASR Wise shot mode and the High light Photo Frame Composite effect ƃ Take care not to touch the lens as this may cause a camera malfunction INFORMATION Info Up Ɗ Ɗ button ƈ While the menu is showing the Up button operates ...

Страница 26: ...ng you can use the MACRO DOWN button to take macro pictures The distance ranges are shown below Press the Macro button until the desired macro mode indicator displays on the LCD monitor Mode Focus Type Super macro Auto macro Normal Mode Focus Type Super macro Macro Normal Mode Focus Type Super macro Auto macro Normal Focus range Focus range Focus range W 80 Infinity T 80 Infinity W 80 Infinity T 8...

Страница 27: ...de 2 Press the Flash button until the desired flash mode indicator displays on the LCD monitor 3 A flash mode indicator will be displayed on the LCD monitor Use the correct flash to suit the environment ƃ Flash range Unit m WIDE TELE WIDE TELE WIDE TELE Macro Normal Auto macro ISO AUTO ſ When the Super Macro is selected flash is fixed as the Flash Off mode 0 8 3 3 0 8 2 5 0 3 0 8 0 4 0 8 0 3 3 3 0...

Страница 28: ...heric dust INFORMATION Icon Flash mode Description ƃ Flash mode indicator If the subject or background is dark the camera flash will operate automatically If a subject or background is dark the camera flash will work automatically and will reduce the red eye effect by using the red eye reduction function The flash fires regardless of the available light The intensity of the flash will be automatic...

Страница 29: ...imer will work ƃ When you select 2SEC self timer with flash the delay 2 seconds can be extended according to the flash charging status ƃ If you operate the Power button and Self timer button during the self timer operation the self timer function is cancelled ƃ Use a tripod to prevent camera shake INFORMATION ƃ Selecting the self timer 1 Press the SELF TIMER button until the desired mode indicator...

Страница 30: ...EV is fixed to 0 0EV ſ Depending on the recording mode the selectable sub menus can be varied ƈ Image Size You can select the image size appropriate for your application ƃ The higher the resolution the lower the number of shots available because high resolution images require more memory INFORMATION STILL IMAGE mode Image Size 3072x2304 2592x1944 2048x1536 1024x768 3072x2048 3072x1782 2560x1440 12...

Страница 31: ... less than 3 pictures are available in the memory the AEB shooting is not available ſ It is best to use a tripod for the AEB shooting as the time to save each image file is longer and blurring caused by camera shake may occur ſ The voice memo can t be added on the images taken with the Continuous AEB and Wise Shot menu ƈ Continuous shot You can select continuous shot and AEB Auto Exposure Bracketi...

Страница 32: ...hter pictures Multi Exposure will be calculated based on an average of the available light in the image area However the calculation will be biased towards the centre of the image area This is suitable for general use Spot Only the rectangular area in the centre of the LCD monitor will be metered for light This is suitable when the subject in the centre is exposed correctly regardless of the back ...

Страница 33: ...d white balance will be remain effective until it is overwritten ٌ White paper Auto WB The camera automatically selects the appropriate white balance settings depending on the prevailing lighting conditions Daylight For taking images outside Cloudy For taking images under a cloudy and overcast sky Fluorescent_H For shooting under daylight fluorescent types of three way fluorescent lighting Fluores...

Страница 34: ...f you change the exposure value the exposure indicator will be displayed on the bottom of the LCD monitor A negative exposure compensation value reduces the exposure Note that a positive exposure compensation value increases the exposure and the LCD monitor will appear white or you may not get good pictures Fn button ƃ Long Time shutter This camera automatically adjusts the shutter speed and apert...

Страница 35: ...a gradient of yellowish brown colours Captured images will be stored in a red tone Captured images will be stored in a green tone Captured images will be stored in a blue tone Save the image in negative mode Captured image will be saved in set RGB tone Press the shutter button to capture an image ƈ By using the cameraŖ s digital processor it is possible to add special effects to your images ƃPress...

Страница 36: ... the Mask mark will be displayed on the LCD monitor Press the Shutter button and the mask added image is taken Zoom W T button Changing the Mask size ƊƌȜȞ button Moving the mask Final image Press the Fn button You can change the size and location of the mask Pressing the Fn button COLOR MASK Back Set E OK Capture Edit SH Fn Move Size T W SH Capture Move Size T W SH Capture Move Size T W SH Capture...

Страница 37: ... direction Low saturation The colur will be tender Final Image Select Saturation menu and a bar for changing the saturation will be displayed Press the Shutter button to take a picture Change the saturation by pressing the ȜȞ button Press the OK button and the saturation of image will be changed IMAGE ADJUST Move Exit E Saturation Move Set OK Bar for changing the saturation Saturation Move Set OK ...

Страница 38: ...ove Exit E Range Set OK Range 1 Range 2 Range 3 Range 4 High Light Range Set OK High Light Range Set OK High Light Range Set OK High Light Range Set OK Capture Edit SH Fn ƃ Moving and changing the focus frame You can change the focus frame after selecting a Range menu Pressing the ƊƌȜȞ button Pressing the Fn button Pressing the Fn button The range is activated The colour of focus frame turns white...

Страница 39: ...e E button in an available recording mode p 33 ſ Selecting 2 composite shots After taking the last image press the OK button to save the image ƃ You can use the flash self timer macro focus and the Zoom W T button during the composite shooting ƃ If you press the Play mode Menu E button or Mode button during the composite shots each camera working mode is executed The images captured before will be...

Страница 40: ... shot a cursor to select a frame will display Press the Ɗƌ ȜȞ button to select the frame 2 Press the Fn button and an image will be deleted Composite frame will be activated 3 Press the Shutter button You can take other images again by using the Ɗƌ ȜȞ button and Fn button 4 Press the OK button again to save the captured image Before taking the 3rd shot Capture Delete SH Fn Moving backward to the 2...

Страница 41: ...g mode p 33 Select a desired sub menu by pressing the ȜȞ button and press the OK button The selected photo frame will display Press the shutter button to take a picture ſ When the Photo Frame image is displayed on the LCD monitor some part of the image may not be visible but this will be corrected when displayed on the computer Pressing the Fn button Pressing the OK button FUN Move Exit E Fun Phot...

Страница 42: ...ifting the cursor to the sub menu or for confirming data Pressing the MENU button Menu off Menu on RECORDING Sharpness Normal Normal Center AF Off Contrast Auto Focus Voice Memo Voice Record Using the LCD monitor to adjust the camera settings ƈ You can use the menu on the LCD monitor to set up recording functions ƈ The items indicated by are default settings ſ Menus are subject to change without p...

Страница 43: ... sharp This is suitable for printing The edges of the image are emphasized The edges will appear sharp but noise may occur in the recorded image Vivid Vivid Normal ƈ You can select your preferred Auto Focus type according to the shooting condition Center AF The rectangular area in the center of the LCD monitor will be focused Multi AF This camera selects a AF point from the 5 AF points ſ When the ...

Страница 44: ...cus Voice Memo Voice Record OK Stop SH Voice Recording ƈ A voice can be recorded for as long as the available recording time Min 2 sec Max 10 hour allows Press the shutter button to record a voice Press the shutter button once and voice is recorded for as long as the available recording time max 10 hour allows The recording time will be displayed on the LCD monitor Voice will still be recorded if ...

Страница 45: ...ice recording is cancelled INFORMATION Recording the movie clip without voice ƈ You can record the movie without voice Select Voice Mute menu in the Movie clip mode icon will display on the LCD monitor Press the Shutter button and a movie will record for as long as the memory capacity allows without voice Pausing the voice recording Stop REC SH Mic Off menu Movie clip mode RECORDING Voice Mute Off...

Страница 46: ...image stored on the memory is displayed on the LCD monitor ƃ Playing back a still image 1 Select the PLAY mode by pressing the play mode button ƃ Playing back a movie clip 1 Select the recorded movie clip that you want to play back by using the ȜȞ button 2 Press the play pause button to play back a movie clip file To pause a movie clip file while playing it back press the play pause button again P...

Страница 47: ...cel Yes The extracted frames are saved as a new file name ƃ When a voice is playing back you can use the earphones ƃ If you don t specify the ending point of the movie clip the trimming confirmation window will display at the point of the last frame INFORMATION ŝ46Ş ƈ Movie clip capture function capture still images from the movie clip ƃ How to capture the movie clip 1 Press the Play Pause button ...

Страница 48: ...oice file while it is playing press the Ȝ button To fast forward the voice file press the Ȟ button To stop playback of the voice memo press the Menu OK button When a voice is playing back you can use the earphones Play ƃ Playing back a voice memo 1 Select a still image that has the voice memo 2 Press the play pause button to play back the voice memo To pause the voice memo while playing it back pr...

Страница 49: ...s shooting information about the displayed image No Description Icon Page 1 Battery p 11 2 Folder name File name 100 0010 p 79 3 Memory card indicator p 12 4 Playback mode p 45 5 Voice Memo p 43 6 Protect p 71 7 DPOF p 71 8 Recording date 2007 02 01 9 Image size 3072x2304 256x192 p 29 10 Flash On Off p 26 11 Shutter speed 16 1 2000 p 33 12 Aperture value F3 5 F8 0 p 33 13 ISO 80 1000 p 31 ISO AV T...

Страница 50: ...ing the Thumbnail button Pressing the enlargement button ƃ Image enlargement 1 Select an image that you want to enlarge and press the enlargement button 2 Different parts of the image can be viewed by pressing the ƊƌȜȞ button 3 Pressing the thumbnail button will zoom back to the original full sized image You can tell whether the image displayed is an enlarged view by checking the image enlargement...

Страница 51: ...mage that you want to enlarge and press the enlargement button 2 Different parts of the image can be viewed by pressing the ƊƌȜȞ button 3 Press the MENU button and a message will be displayed as shown alongside 4 Select a desired sub menu by pressing the Ɗƌ button and press the OK button No The trimming menu will disappear Yes The trimmed image will save as a new file name and display on the LCD m...

Страница 52: ...g Ȝ button While the menu is showing the LEFT button operates as a direction button While the menu is not showing press the LEFT button to select the previous image Ȟ button While the menu is showing the RIGHT button operates as a direction button While the menu is not showing press the RIGHT button to select the next image MENU button When you press the MENU button the play mode menu will be disp...

Страница 53: ...size of pictures taken Select Start image MP3 Skin to save an image to be the start up image MP3 Skin 1 Press the play mode button and press the E button 2 Press the ȜȞ button and select the RESIZE menu tab 3 Select a desired sub menu by pressing the Ɗƌ button and press the OK button ƃ Image Resize Types ƃ User Selectable Special Effect E button Resize 2592x1944 2048x1536 1024x768 User Image MP3 S...

Страница 54: ... resized image will not be stored Special Effect E button Rotating an image ƈ You can rotate the stored images by various degrees Once the playback of the rotated picture is finished it will switch back to the original state 1 Press the play mode button and press the E button 2 Press the ȜȞ button and select the ROTATE menu tab 3 Select a desired sub menu by pressing the Ɗƌ button Right 90 Rotate ...

Страница 55: ...s possible to add special effects to your images by using this button 1 Press the play mode button and press the E button 2 Select menu tab by pressing the ȜȞ button Still image ƈ Custom colour You can change the R Red G Green and B Blue values of the image Ɗƌ button Selects R G B ȜȞ button Change the values ƃ With this menu you can change the colour information of the image excluding Red Blue Gre...

Страница 56: ...ting part will display Press the OK button and you can set the size and location of the part Press the OK button twice and the colour mask image will be saved as a new file name W T button Changing size of part Final image Colour mask ƊƌȜȞ button Changing the location SPECIAL COLOR Move Exit E Color Mask Back Set E OK Move Size T W OK Set Move Size T W Set Move Size T W Set OK OK ...

Страница 57: ...ayed 2 Change the contrast by pressing the ȜȞ button 3 Press the OK button and the image will be saved as a new file name 1 Press the play back button and press the E button 2 Select menu tab by pressing the ȜȞ button ƃ Red eye Removal Red eye effect can be removed from the captured image 1 Select by pressing the Ɗƌ button and Processing message will dbe displayed 2 The red eye will be removed Pre...

Страница 58: ... can input texts by pressing the ƌ button p 64 Press the OK button twice Change the location of the text box by pressing the ȜȞ button Move Set OK Balloon Text Set OK Balloon Text Set OK Set Back E OK Select a location of text box by pressing the ƊƌȜȞ button and press the OK button Press the ȜȞ button to select type of text box Select an image by pressing the ƊƌȜȞ button and press the OK button Se...

Страница 59: ... selecting desired images press the OK button to save the image as a new file name Pressing the Fn button Search Delete OK Fn Search Delete OK Fn Insert texts p 64 Press the ƌ button and a window for inserting texts will display ƃ Inserting texts on the text box You can insert texts on the text box Balloon Text Set OK d d abc def ghi jkl mno pqr stu vwx yz Move Set OK Camera Input Message 00 52 By...

Страница 60: ...ange menu 1 Select a focus frame by pressing the ȜȞ button and press the OK button 2 Move the location of the frame by pressing the ƊƌȜȞ button 3 Press the OK button and the file is saved as a new file name FUN Move Exit E High Light Range Set OK Range 1 Range 2 Range 3 Range 4 High Light Range Set OK High Light Range Set OK High Light Range Set OK High Light Range Set OK Pressing ƊƌȜȞ button Pres...

Страница 61: ...ted INFORMATION Composite image FUN Move Exit E Composite Composite Set OK Move Set OK ſ Selecting 2 composite shots Change the location of second image by pressing the ƊƌȜȞ button and press the OK button to save the image Pressing the ƊƌȜȞ button Pressing the OK button Changing the position 7 7 Set Back OK E Pressing the OK button Move Set OK Move Set OK Search Delete OK Fn Selecting the second i...

Страница 62: ...rame like borders to a still image you want to capture ƈ Date Time information will not be printed on the stored image taken with Photo Frame menu Photo Frame Select a desired sub menu by pressing the OK button and press the ƊƌȜȞ button Press the E button and the frame will be canceled Pressing the Fn button Moving backward to the 2nd image Before selecting the 3rd image Search Delete OK Fn Search...

Страница 63: ...ess the OK button Select a location of sticker by pressing the ƊƌȜȞ button ſ You can add additional stickers by pressing the Fn button Press the OK button to store the image Special Effect E button FUN Press the OK button and the image is saved FUN Move Exit E Sticker Sticker Set OK Move Add Save Fn OK Move Add Save Fn OK ...

Страница 64: ... image Press the the FR button and ƌ OK button Texts inserted before will be displayed Input texts p 64 You can change the texts by using the Fn button You can change the colour of texts by using the OK button Color Save OK FUN Move Exit E camera camera Edit Set Fn OK camera Input Message camera d Kor ABC abc Cn Symbol Num Delete OK Cancel Input Message 06 88 Byte d d abc def ghi jkl mno pqr stu v...

Страница 65: ... be displayed You can select Korean English Capital letter Small letter Number and symbols by pressing the FR button ſ Though the character selection menu is displayed some characters can t be selected in accordance with the sales region ſ Available characters ͿΙ Ώ ΚΆ ΐΛΑ ΓΕ ΜΔ ΖΘΗ ΝΟΡΣ ΥΩΪή ί αΞ A B C D E F G H I J K L M N O P Q R S T U V W X Y Z a b c d e f g h i j k l m n o p q r s t u v w x y ...

Страница 66: ... 71 p 73 Copy To Card p 75 Menu tab Main menu Sub menu Secondary menu Page One Pic All Pics Auto Postcard Card 4X6 L 2L Letter A4 A3 Images Size ƈ This menu is available while the camera is connected to a PictBridge supporting printer direct connection to the camera sold separately with a USB cable p 75 Menu tab Main menu Sub menu Secondary menu Page Show Start Play Repeat Play Interval 1 3 5 10se...

Страница 67: ...ternal monitor 1 Press the Play mode button and press the Menu button 2 Select a desired menu tab by pressing the ȜȞ button 3 Select a desired sub menu by pressing the Ɗƌ button ƃ Start the slide show The slide show can start only in the Show menu Slide Show Setting up the play back function using the LCD monitor p 75 p 75 p 75 p 75 p 75 p 76 Menu tab Main menu Sub menu Secondary menu Page Auto Fu...

Страница 68: ...ted album All Myself Family Friend Event Secret The selected album is played back Off Normal display Effect1 Image moves from the top left Effect2 Image is displayed slowly from the centre outwards Effect3 Image is displayed slowly Mix The image slides irregularly Press the OK button and the setting will be saved Slide Show SLIDE SHOW Show Start 1 sec 3 sec 5 sec 10 sec Select Album Interval Effec...

Страница 69: ...utton Selecting images T button Images you want can be selected one at a time Moving Folder E button Selecting Album MENU button Press the OK button and the selected images are added in the selected album An icon as shown will be displayed Moving folder Ɗƌ button Changing image ȜȞ button Adding images in the Personal album Adding images in the Family album Adding images in the Friends album Adding...

Страница 70: ...wrong password is inserted Wrong Password message will be displayed 3 Press the OK button and a window for inserting new password will be displayed 4 Insert a new password and press the OK button W Wide button Cancel the inserting numbers T Tele button Cancel the password setup and Password menu on the Setup2 will be displayed 5 Insert the new password again 6 Press the OK button and the password ...

Страница 71: ... i e not on the memory card and it will not be deleted even if you delete all files on the memory card ƃ Deleting images 1 Select a desired sub menu by pressing the Ɗƌ button and press the OK button Select Selection window for an image to delete is displayed ƊƌȜȞ button Select an image Zoom T Button Select the image for deletion V mark OK Button Press the OK Button to display the confirmation mess...

Страница 72: ...tected from the delete function but will NOT be protected from the format function DPOF ƈ DPOF Digital Print Order Format allows you to embed printing information on your memory card s MISC folder Select the pictures to be printed and how many prints to make ƈ The DPOF indicator will display on the LCD monitor when an image that has DPOF information plays back Images can then be printed on DPOF pr...

Страница 73: ...ber of prints Cancel Cancel the print setup 3 Press the OK button to confirm the setting If an image carries DPOF instructions the DPOF indicator will show DPOF Index ƈ Images except for movie clips and voice file are printed as index type 1 Select the Index menu by pressing the Ɗƌ button and press the Ȟ button 2 Select a desired sub menu by pressing the Ɗƌ button If No is selected Cancel the inde...

Страница 74: ...sing the Ɗƌ button and press the OK button No Cancels Copy to Card Yes All images movie clips and voice recording files saved in the internal memory are copied to the memory card after the Processing message is displayed After copying has been completed the screen will return to play mode ƃ When this menu is selected without inserting a memory card you can select the Copy To Card menu but the menu...

Страница 75: ...by pressing Ɗƌ button and press the OK button ſ If the USB menu is set to the Computer you cannot connect a Pictbridge compatible printer to the camera through USB cable with Connecting Computer message In this case remove the cable and do the step 1 2 again ƈ Easy printing When you connect the camera to printer in the Play back mode you can print a picture easily Pressing the printer button Curre...

Страница 76: ...Print and File Name Print menus for printed pictures Menu Date Function Sub menu ſ Some menu options are not supported on all printers If not supported the menus are still displayed in the LCD but are not selectable Set the number of pictures to be printed on a sheet of paper Set the quality of the printing paper Set the quality of the picture to be printed Set whether to print the date Set whethe...

Страница 77: ...inter manufacturer For your printer s default setting refer to the user s guide that came with your printer Sound menu ƈ In this mode you can set up sound settings You can use the setup menu in all camera modes except Voice Recording mode The items indicated by are default settings Mode Menu Sub Menu Available Mode Page Off Low Medium High Off Sound 1 Sound 2 Sound 3 Off Sound 1 Sound 2 Sound 3 Of...

Страница 78: ... that is activated whenever the camera is turned on ƃ Start up sound Off Sound 1 Sound 2 Sound 3 If the start up image is set to Off the start up sound will not activate even though you may have set these to on Shutter sound ƈ You can select the shutter sound ƃ Shutter sound Off Sound 1 Sound 2 Sound 3 SOUND Medium Off Low High Start Sound Shutter Sound Volume Beep Sound OK AF Sound SOUND Sound 1 ...

Страница 79: ...TALIANO PORTUGUÊS DUTCH DANSK SVENSKA SUOMI BAHASA POLSKI Magyar Menu tab Main menu Page Quick View Off 0 5 1 3 sec p 81 Power Off 1 3 5 10 min p 81 LCD Save Off On p 81 Video Out NTSC PAL p 82 Set Password p 83 Format No Yes p 83 Reset No Yes p 83 ſ Menus are subject to change without prior notice ƈ In this mode you can set up basic settings You can use the setup menu in all camera modes except V...

Страница 80: ... ƍ ƍ 999SSCAM Maximum numbers of files in a folder are 9999 The files used with the memory card conform to the DCF Design rule for Camera File systems format If you change the image file name the image may not play back File name ƈ This function allows the user to select the file naming format LANGUAGE ƈ There is a choice of languages that can be displayed on the LCD monitor Even if the battery is...

Страница 81: ... is applied only to still images except for the images taken in photo frame effect mode ſ Depending on the manufacturer and print mode the date printed on an image may not be printed correctly Start up image ƈ You can select the image that is first displayed on the LCD monitor whenever the camera is turned on ƃ Start up image Off LOGO User Image Use a saved image for the start up image with the Us...

Страница 82: ... that the automatic power off function will not operate if the camera is in the PMP MP3 Text Viewer mode PC Printer mode slide show playing back a voice recording and playing back a movie clip LCD save ƈ If you set the LCD save to On and the camera isn t operated during the specified time the LCD monitor will be turned off automatically ƃ LCD save sub menu Off The LCD monitor will not be turned of...

Страница 83: ... the menu functions are the same as those indicated on the LCD monitor When the camera is connected to an external monitor the button sound may not sound When you connect the A V cable in a recording mode the camera mode is changed to the Playback mode automatically and an image will be displayed Setup menu 2 Selecting Video out type ƈ The Movie output signal from the camera can be NTSC or PAL You...

Страница 84: ...is camera can t recognise or one that has been taken from another camera Always format the memory card using this camera If you insert a memory card that has been formatted using other cameras memory card readers or PCs you will get a Card Error message Setup menu 2 Initialisation ƈ All camera menu and function settings will be restored to their default values However values for DATE TIME LANGUAGE...

Страница 85: ...55 Including 2 Byte language like Korean Chinese etc characters the file name doesn t appear on the play list MP3 Mode MP3 PMP Mode PMP TEXT VIEWER mode TEXT ƈ To use MP3 PMP and TEXT VIEWER functions MP3 PMP multimedia files and TEXT files must be saved in the internal memory or memory card of this camera 1 Save the desired files on your PC 2 Connect the camera to your PC with the USB cable and t...

Страница 86: ...EXT VIEWER Mode StartingtheMP3 PMP TEXTVIEWERmode ƈ Insert the memory card that holds MP3 PMP and TEXT files As this camera has a 10MB internal memory you can save the files on the internal memory too 1 Select a desired Multi media mode p 16 86 2 A menu will display as shown Resume memorizes the latest stopped frame MP3 mode plays back from the beginning of the file PMP mode plays back from the la...

Страница 87: ... A VBR file varies the amount of output data in each time segment based on the complexity of the input the data in that segment When the VBR encoded files are played back the LCD will display as shown The VBR icon will display instead of the Bit rate icon ƃ For about 2 seconds of the start and end frames of the PMP file no camera button except the Power button can be operated ƃ When an MP3 file do...

Страница 88: ...isplays information about the MP3 multimedia and Text file MP3 mode Play Pause Control button p 88 Volume p 88 MP3 mode Title of file PMP mode Playing time Who bent my camera Battery p 11 Lock p 89 Mute p 88 PMP mode Battery p 11 Lock p 89 Mute p 88 Play Pause Seeking button p 88 Bit rate p 86 Playback mode p 91 Status bar Time line Caption p 108 Equalizer p 89 Title of file Search speed p 88 Volu...

Страница 89: ... can search a desired frame of the file during play back by pressing the ȜȞ button ƈ TEXT VIEWER mode When the text list menu is displayed select a text file by pressing the Ɗƌ button When the text is displayed press the Ɗƌ button and previous next page of the file will be displayed ƈ This deletes files stored on the memory 1 Select a desired file to delete on the browsing menu and press the Delet...

Страница 90: ...g menu 1 While a multimedia file is playing back press the Playlist button 2 A playlist that is currently playing will be highlighted 3 Move the cursor to a desired list by pressing the Control button Pressing the OK button the selected file is played back Pressing the Playlist button the selection will be cancelled Using the camera buttons to adjust the camera ƈ The user can select appropriate so...

Страница 91: ...fault 1 Default 2 User Skin 1 User Skin 2 Show Play Play Repeat Play p 92 2 sec 3 sec 5 sec Delete All No Yes p 92 Resume Off On p 91 30 sec 1 min 3 min 5 min 10 min 5 sec On Off Delete All No Yes p 92 Sub menu Play Mode MP3 Skin Show Interval Seeking Player Display p 91 p 92 p 92 p 93 TEXT VIEWER Menu tab Main menu Page Resume Off On p 91 Off 0 8 sec 1 1 sec 1 4 sec p 93 1 7 sec 2 0 sec MP3 BGM O...

Страница 92: ...u can set various repeat and shuffle options This function is adopted only in the selected folder Play All plays a single track once Repeat One plays a single track repeatedly Repeat All plays all tracks in the folder repeatedly Random randomly plays all tracks in the folder once Ramdom Repeat randomly plays all tracks in the folder repeatedly Play mode ƈ You can set the skin of MP3 player Default...

Страница 93: ...leted In the MP3 mode only MP3 files are deleted In the PMP mode only multimedia files are deleted In the TEXT VIEWER mode TEXT files are deleted Delete all No cancels Delete files Yes A confirmation window will display Select Yes and press the OK button All files will be deleted Setting up the playback function using the LCD monitor ſ When the playing back is complete the slide show will stop ſ T...

Страница 94: ...perate any buttons for about 10 seconds INFORMATION ƈ You can set the play back function display on the LCD 5 sec If there is no operation during 5 seconds Menu bar will disappear On Menu bar will appear on the LCD monitor Off Menu bar will not appear on the LCD monitor ſ To see the caption insert the caption file smi by using the Digimax Converter p 108 ſ If a multimedia file has a caption the ca...

Страница 95: ...r Environments where there is high magnetism or excessive vibration Areas with high explosives or highly flammable materials ƈ Do not leave this camera in places subject to dust chemicals like naphthalene and mothball high temperature and high humidity Keep this camera in a hermetically sealed box with silica gel when not planning to use it for a long period ƈ Sand can be particularly troublesome ...

Страница 96: ...id can be used Clean the camera body with a soft cloth Do not allow this camera to come into contact with solvent materials such as benzol insecticide thinners etc This may damage the body shell of the camera and also affect its performance Rough handling can damage the LCD monitor Take care to avoid damage and keep the camera in its protective carry case at all times when not in use ƈ Do not atte...

Страница 97: ... ҮViolation of DCF format ƍ Copy the images to a PC and format the memory Warning indicator ƈ There are several warnings that may appear on the LCD display Card Error ϛMemory card error ƍ Turn off the camera power and turn it on again ƍ Insert the memory card again ƍ Insert the memory card and format the memory card p 83 Card Locked ϛThe memory card is locked ƍ SD memory card Slide the write prote...

Страница 98: ...out setting an appropriate macro mode ƍ Select an appropriate macro mode to take a clear image ϛTaking a picture beyond the flash range ƍ Take a picture within the flash range ϛThe lens is smudged or dirty ƍ Clean the lens The flash does not fire ϛFlash off mode has been selected ƍ Dis engage flash off mode ϛThe camera mode canŖ t use the flash ƍ Refer to the FLASH instruction p 26 Incorrect date ...

Страница 99: ...el Approx 7 4 Mega Pixels Lens Focal Length f 6 3 18 9mm 35mm equivalent 38 114mm NV lens F No F 3 5 F 4 5 Digital Zoom ϛStill Image mode 1 0X 5 0X ϛPlay mode 1 0X 12 0X depends on image size LCD Monitor 3 0 wide color TFT LCD 230 000 dots Focusing Type TTL auto focus Multi AF Center AF Face Recognition AF Range Shutter Speed 1 1 2 000 sec Night 16 1 2 000 sec Exposure Control Program AE Metering ...

Страница 100: ...Effect WB selectable ŋMovie Editing Embedded Pause during recording Still Image Capture Time Trimming ſ To record the movie a memory card must be inserted Storage Media ŋInternal memory About 10MB ŋExternal memory SD MMC MMC HSMMC Min 32MB Max 2GB guaranteed Internal memory capacity is subject to change without prior notice File Format Still Image JPEG DCF EXIF 2 2 DPOF 1 1 PictBridge 1 0 Movie Cl...

Страница 101: ...ipping after one file played Auto reload function Remember last played frame Support Full Screen in Converting S W Subtitle Support SMI file Using Digimax Converter S W ſ Specifications are subject to change without prior notice ſ All trademarks are the property of their respective owners File TXT extension name up to 99999 pages File format Window ANSI Windows 98 or later Unicode Unicode Big Endi...

Страница 102: ...ard reader After installing the driver and connecting this camera to the PC you can find Removable Disk SAMSUNG in Windows Explorer or My Computer A USB Storage Driver is provided only for Windows A USB Driver for MAC is not included with the Application CD You can use the camera with Mac OS 10 1 10 4 ƈ ƈ XviD codec This makes movie clips MPEG 4 recorded with this camera play back on a PC To play ...

Страница 103: ...ttp www samsungcamera com English http www samsungcamera co kr Korean ƃ Be sure to check the system requirements before installing the driver ƃ You should allow 5 10 seconds for running the automatic setup program If the frame does not show run the Windows Explorer and select Installer exe in the CD ROM Drive root directory ƃ PDF documents of user manual are included in the Software CD ROM supplie...

Страница 104: ...ŝ103Ş Setting up the application software 4 To play back the movie clip recorded with this camera on the computer install the XviD codec 3 Install the software by instructions on the monitor ...

Страница 105: ...n image viewer program will open If the download window of Digmax Master opens after starting Digimax Master the camera driver was setup successfully Setting up the application software Computer Printer OK Confirm ſ If you selected Printer in Step 2 when you connect the camera to your printer the Connecting Printer message will display and the connection will not be established In this case discon...

Страница 106: ...k and print them or use a photo editing software to edit them 1 Connect the camera to your PC with the USB cable 2 On your computer s desktop display select My Computer and double click Removable Disk SAMSUNG ƍ DCIM ƍ 100SSCAM 3 Select an image and press the right mouse button 4 A pop up menu will open Click the Cut or Copy menu Cut cuts a selected file Copy copies files 5 Click a folder where you...

Страница 107: ...dware window will open Select the USB Mass Storage Device and click the Stop button 4 The Stop a Hardware device window will open Select the USB Mass Storage Device and click the OK button 5 A Safe to Remove Hardware window will open Click the OK button Double Click ƃ We recommend that you should copy the images to the PC to view them Opening images directly from the removable disk may be subject ...

Страница 108: ...mmand ƃ If a movie clip can t play back on the Mac OS refer to the following table INFORMATION Setting up the USB Driver for MAC Using the USB Driver for MAC ƈ To uninstall the USB driver refer to the process shown below 1 Connect the camera to your PC and turn them on 2 Check whether the Removable Disk is on the My Computer 3 Remove the Samsung Digital Camera on the Device manager 4 Disconnect th...

Страница 109: ...lled or installed incorrectly In this case find a compatible codec and install it If you do not find any compatible codecs install a multi codec INFORMATION ƈ Multimedia Movie Video clip etc files can be converted into movie clips that can be played back on this camera This software is only compatible with Windows ſ Refer to the Help menu in Digimax Converter for further information 3 If you want ...

Страница 110: ...file to a removable disk is time consuming It may take a long time The duration depends on the file size ƃ Do not use the PMP mode while driving It may create a traffic hazard ƃ A file that does not support fast search on the Windows Media Player can t select converting range and divide file size INFORMATION Digimax Converter Digimax Master ƈ You can download view edit and save your images and mov...

Страница 111: ...e folder location of the selected image ڿ Image display window Images in the selected folder are displayed ſ Refer to the Help menu in Digimax Master for further information 4 Select a destination and make a new folder in which to save downloaded images and folders Folder names can be made in order of date and images will be downloaded Folder name will be made as you want and images will be downlo...

Страница 112: ...imax Master ƃ Movie edit You can get the still image movie clip narration music files together in a movie clip Movie clip edit functions are listed below ڹ Edit menu You can select the following menus Add Media You can add other media elements to a movie Edit Clip You can change the brightness contrast colour and saturation Effects You can insert an effect Set Text You can insert texts Narrate You...

Страница 113: ... only the camera s USB cable is connected to the computer Case 6 When I open the Device Manager by clicking Start ƍ Settings ƍ Control Panel ƍ Performance and Maintenance ƍ System ƍ Hardware ƍ Device Manager there are şUnknown DevicesŠ şOther DevicesŠ entries with a yellow question mark beside them or devices with an exclamation mark beside them ƍ Double click on the entry with the question or exc...

Страница 114: ... and the codec for playing back the movie clip will be installed ſ When the CPU is Intel Processor run the movie with the MPlayer ƃ When the DirectX 9 0 or later is not installed ƍ Install the DirectX 9 0 or later 1 Insert the CD provided with the camera 2 Run the windows explorer and select the CD ROM drive USB Driver DirectX 9 0 folder and click the DXESETUP exe file The DirectX will be installe...

Страница 115: ...o radio communications However there is no guarantee that interference will not occur in a particular installation If this equipment does cause harmful interference to radio or television reception which can be determined by turning the equipment off and on the user is encouraged to try to correct the interference by one or more of the following measures Reorient or relocate the receiving antenna ...

Страница 116: ...ŝ115Ş MEMO MEMO ...

Страница 117: ...ŝ116Ş MEMO MEMO ...

Страница 118: ...samsungphoto fr SAMSUNGOPTO ELECTRONICSGMBH AMKRONBERGERHANG6 D 65824SCHWALBACH TS GERMANY TEL 49 0 6196665303 FAX 49 0 6196665366 www samsungcamera de TIANJINSAMSUNGOPTO ELECTRONICSCO LTD No 9zhanghengStreet Micro Electronic IndustrialParkJingangRoadTianjinChina POSTCODE 300385 TEL 86 22 2761 4599 FAX 86 22 2769 7558 www samsungcamera com cn SAMSUNGOPTO ELECTRONICSUKLIMITED SAMSUNGHOUSE1000HILLSW...

Отзывы: