background image

ES-7

ES-6

ES-7

ES-6

Configuración de la cámara

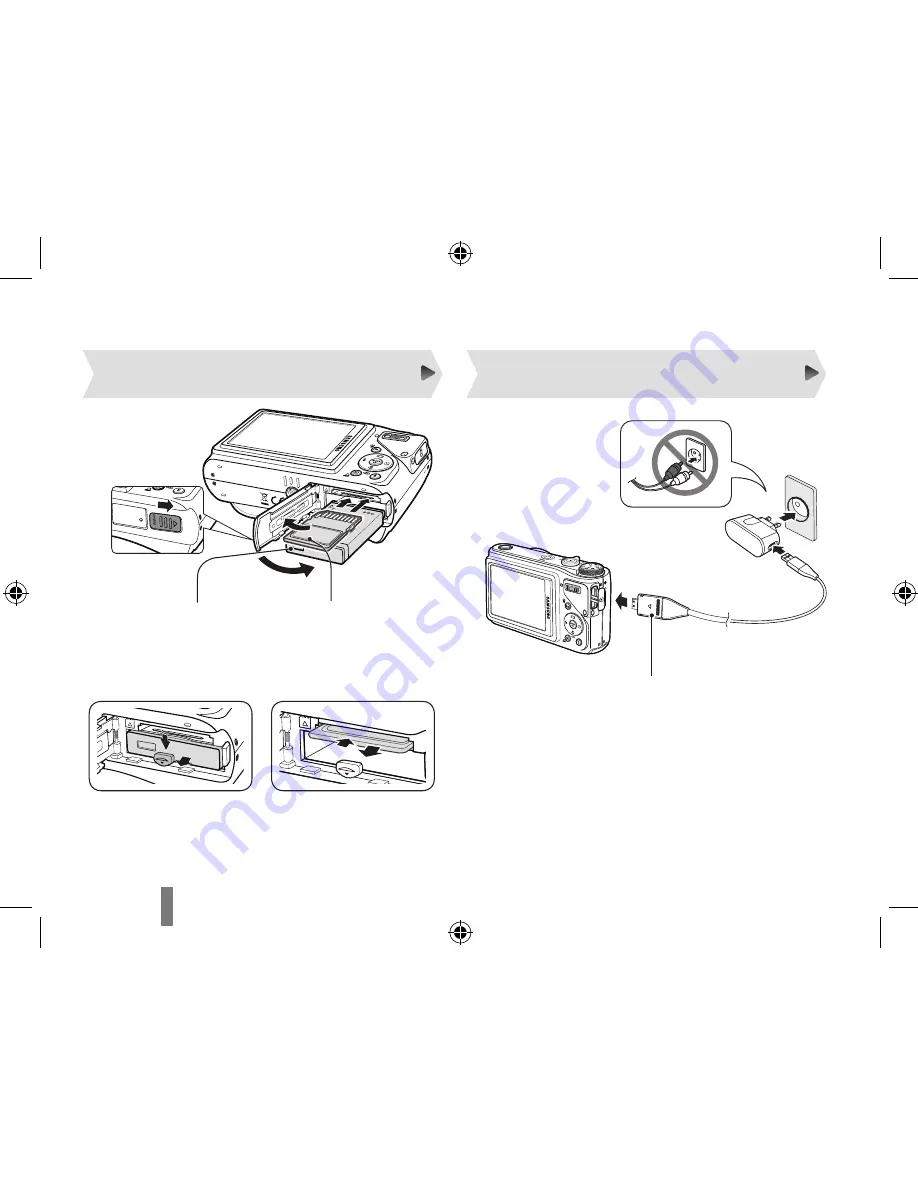
Insertar la batería y la tarjeta de 

memoria

Cargar la batería

Luz indicadora

Rojo

: cargándose

Verde

: completamente cargada

Ejerza una leve presión hasta 
que la tarjeta se desprenda 
de la cámara y, luego, retírela 
de la ranura.

  Quitar la batería

  Quitar la tarjeta de memoria

3

  Con los contactos de 

color dorado hacia arriba 

2

  Con el logotipo 

de Samsung 
hacia arriba

1

 4

Содержание HZ10W - Digital Camera - Compact

Страница 1: ...nd correct use Quick Start Manual HZ10W For more information refer to the User Manual included on the supplied CD ROM ENG SPA Please refer to the warranty that came with your product or visit our webs...

Страница 2: ...ay cause choking or serious injury if swallowed Moving parts and accessories may present physical dangers as well Prevent damage to subjects eyesight Do not use the flash in close proximity closer tha...

Страница 3: ...on Prevent memory cards from making contact with liquids dirt or foreign substances If dirty wipe the memory card clean with a soft cloth before inserting in your camera Handle and dispose of batterie...

Страница 4: ...n 9 Zoom W Lever Thumbnail 10 Zoom T Lever Digital zoom Camera layout 1 3 2 4 5 6 7 8 10 9 11 Camera status lamp 12 LCD monitor 13 Command Lever 14 Fn Delete button 15 5 function button 16 Play mode P...

Страница 5: ...ble AD39 00167A Rechargeable battery 4302 001221 Strap Silver AD63 02602A Black AD63 02603A Software CD ROM User manual included AD46 00223A A V cable AD39 00146A Quick Start Manual AD68 03951A Option...

Страница 6: ...mera and then pull it out of the slot Removing the battery Removing the memroy card Indicator light Red Charging Green Fully charged 3 With the gold coloured contacts facing up 2 With the Samsung logo...

Страница 7: ...ange the number or select another date format and press o 1 In Shooting mode press f 2 Use the navigation buttons to scroll to an option or menu To move left or right press F or t To move up or down p...

Страница 8: ...gn your subject in the frame 3 Press Shutter Press M to pause or resume 4 Press Shutter again to stop the recording Note Number of photos by resolution for 1 GB SD Resolution Super fine Fine Normal 36...

Страница 9: ...scroll through files Press and hold to view files quickly Viewing videos 1 Press P 2 Press M 3 Use the following buttons to control playback F Scan backward M Pause or resume playback t Scan forward...

Страница 10: ...drive and follow the onscreen instructions 2 Connect the camera to the PC with the USB cable 3 Turn on the camera 4 On your PC select My Computer Removable Disk DCIM 100SSCAM 5 Select the files you wa...

Страница 11: ...ed Auto 1 8 1 1 500 sec Program 1 1 1 500 sec Manual 16 1 1 500 sec Nightscene 8 1 1 500 sec Firework 4 sec Storage Internal memory approx 30 MB External memory Optional SD card up to 4 GB guaranteed...

Страница 12: ...m s peque as y como consecuencia se asfixien o sufran graves lesiones Los accesorios y las piezas m viles tambi n pueden causar da os f sicos Evite da ar la vista del sujeto No utilice el flash si est...

Страница 13: ...memoria entren en contacto con l quidos suciedad o sustancias extra as Si la tarjeta de memoria se ensucia l mpiela con un pa o suave antes de insertarla en la c mara Utilice y deseche las bater as y...

Страница 14: ...endido 9 Palanca W de zoom Miniatura 10 Palanca T de zoom zoom digital 1 3 2 4 5 6 7 8 10 9 11 L mpara de estado de la c mara 12 Monitor LCD 13 Palanca de comando 14 Bot n Fn Delete 15 Bot n de 5 func...

Страница 15: ...er a recargable 4302 001221 Correa Plateado AD63 02602A Negro AD63 02603A CD ROM del software incluye el manual del usuario AD46 00223A Cable A V AD39 00146A Manual de inicio r pido AD68 03951A Acceso...

Страница 16: ...indicadora Rojo carg ndose Verde completamente cargada Ejerza una leve presi n hasta que la tarjeta se desprenda de la c mara y luego ret rela de la ranura Quitar la bater a Quitar la tarjeta de memo...

Страница 17: ...cambiar el n mero o seleccionar otro formato de fecha y pulse o DISPLAY Language Date Time ENGLISH 2009 01 01 Move Change 1 En el modo de disparo pulse f 2 Utilice los botones de navegaci n para despl...

Страница 18: ...ta v 2 Alinee el sujeto en el marco 3 Pulse Obturador Pulse M para pausar o reanudar 4 Pulse Obturador nuevamente para detener la grabaci n Nota Cantidad de fotograf as por resoluci n para SD de 1GB R...

Страница 19: ...ver los archivos r pidamente Ver v deos 1 Pulse P 2 Pulse M 3 Utilice los siguientes botones para controlar la reproducci n F Permite retroceder M Permite pausar o reanudar la reproducci n t Permite a...

Страница 20: ...ga clic 1 Inserte el CD de instalaci n en la unidad de CD ROM y siga las instrucciones que aparezcan en la pantalla 2 Conecte la c mara a su PC con el cable USB 3 Encienda la c mara 4 En el ordenador...

Страница 21: ...r Auto 1 8 1 1 500 s Programa 1 1 1 500 s Manual 16 1 1 500 s Nocturno 8 1 1 500 s Fuegos Artif 4 s Almacenamiento Memoria interna aprox 30 MB Memoria externa opcional tarjeta SD hasta 4 GB garantizad...

Страница 22: ......

Отзывы: