background image

DEU - 30

Wenn die Aktualisierung 

fehlschlägt

1. 

Schalten Sie die Soundbar aus, trennen Sie 
das Speichergerät mit den Update-Dateien 
und verbinden Sie es anschließend erneut 
mit dem USB-Anschluss der Soundbar.

2. 

Ziehen Sie das Stromkabel der Soundbar ab, 
schließen Sie es erneut an und schalten Sie 
dann die Soundbar ein.

HINWEISE


Das Aktualisieren der Firmware funktioniert 
gegebenenfalls nicht richtig, wenn von der 
Soundbar unterstützte Audiodateien auf dem 
Speichergerät gespeichert sind.


Unterbrechen Sie während des 
Aktualisierungsprozesses nicht die 
Stromversorgung und entfernen Sie nicht den 
USB-Speicher. Wenn die Aktualisierung der 
Firmware abgeschlossen ist, wird das 
Hauptgerät automatisch ausgeschaltet.


Wenn die Aktualisierung abgeschlossen ist, 
wird die Benutzereinrichtung der Soundbar 
initialisiert. Wir empfehlen Ihnen, Ihre 
persönlichen Einstellungen schriftlich zu 
notieren, damit Sie sie nach dem Update 
leicht wiederherstellen können. 


Wenn das Software-Update fehlschlägt, 
prüfen Sie, ob der USB-Speicher defekt ist.


– Benutzer von Mac OS sollten als USB-Format 

MS-DOS (FAT) verwenden.


Abhängig vom Hersteller des Speichergeräts 
ist eine Aktualisierung über USB 
gegebenenfalls nicht verfügbar.

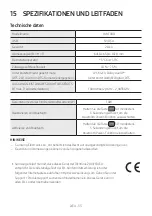
Содержание HW-T400

Страница 1: ...HW T400 FULL MANUAL Imagine the possibilities Thank you for purchasing this Samsung product To receive more complete service please register your product at www samsung com register ...

Страница 2: ... This symbol indicates that the rated voltage marked with the symbol is AC voltage DC voltage This symbol indicates that the rated voltage marked with the symbol is DC voltage Caution Consult instructions for use This symbol instructs the user to consult the user manual for further safety related information WARNING To reduce the risk of fire or electric shock do not expose this appliance to rain ...

Страница 3: ... the unit malfunctions Your product is not intended for industrial use It is for personal use only Condensation may occur if your product has been stored in cold temperatures If transporting the unit during the winter wait approximately 2 hours until the unit has reached room temperature before using 5 The battery used with this product contains chemicals that are harmful to the environment Do not...

Страница 4: ...djusting the Soundbar volume with a TV remote control 12 04 ConnectingtheSoundbar 13 Connecting Electrical Power 13 05 ConnectingtoaTV 14 Connecting using an Optical Cable 14 Connecting a TV or Bluetooth Device via Bluetooth 16 Connecting a Soundbar to a mobile device via NFC function 17 06 ConnectinganExternalDevice 20 Connecting using an Optical Cable 20 Connecting using an Analogue Audio AUX Ca...

Страница 5: ... 26 Installation Precautions 26 Wall mount Components 26 10 SoftwareUpdate 29 Update Procedure 29 When update fails 30 11 Troubleshooting 31 12 Licence 32 13 OpenSourceLicenceNotice 32 14 ImportantNotesAboutService 32 15 SpecificationsandGuide 33 Specifications 33 ...

Страница 6: ... consumption refer to the label attached to the product Label Bottom of the Soundbar Main Unit To purchase additional components or optional cables contact a Samsung Service Centre or Samsung Customer Care The appearance of the accessories may differ slightly from the illustrations above Insertingbattery AAA intotheRemoteControl Match the polarity of the battery to the symbols on the battery compa...

Страница 7: ...tSideoftheSoundbar NFC LED indicator The LED Indicator flashes glows or changes colour depending on the Soundbar s current mode or status The colour of the LED indicator and the number of lights indicate the active mode as described below W White LED B Blue LED R Red LED G Green LED Mode Remotecontrol Button LEDindicator D IN W Bluetooth B Connected status B Slow Blinking Disconnected status Bluet...

Страница 8: ... Connect to the Analogue output of an external device D IN Connect to the digital optical output of an external device USB Connect a USB device here to play music files on the USB device through the Soundbar When you plug in the AC cord the power button will begin working in 4 to 6 seconds When you turn on this unit there will be a 4 to 5 second delay before it produces sound If you want to enjoy ...

Страница 9: ...h this button up or down to adjust the bass volume within a 6 to 6 range Press to enter the AUX mode Press the button to select the previous music file Press the button to play pause a music file Press the button to select the next music file Press to select the desired sound effect by choosing SURROUND or STANDARD Push this button up or down to adjust the volume The playback mode of the USB stora...

Страница 10: ...ode press and hold the button for 5 seconds LEDindicator W W G Blinking AutoPowerDownOn W W R Blinking AutoPowerDownOff Initialise Standby Press the button for 5 seconds in the standby power off station to trigger the system initial function This operation will not clear Bluetooth paired history LEDindicator W W W W R BlinkingX2 TV remote control On Off Standby For detailed information about TV re...

Страница 11: ...e power on station to trigger the Bluetooth Power On Off function LEDindicator B W G Blinking BluetoothPowerOn B W R Blinking BluetoothPowerOff Auto Power Link On Off For detailed information about Auto Power Link On Off function please see Auto Power Link on page 15 ...

Страница 12: ...holding the BASS button repeatedly To have your TV s remote adjust the Soundbar s volume follow Steps 1 through 3 below 2 If you want to turn off this function completely follow Steps 1 and 2 Mode RemotecontrolButton LEDindicator 1 Turnoff AllLED sOff 2 Off mode 5 Sec W W W W Blinking 3 AllTV mode 5 Sec W W W W Blinking 4 SamsungTV mode Default mode 5 Sec W W W W Blinking Each time you press the B...

Страница 13: ... information about the required electrical power and power consumption refer to the label attached to the product Label Bottom of the Soundbar Main Unit AUX IN POWER DIGITAL AUDIO IN OPTICAL USB 5V 0 5A POWER PowerCord ElectricalOutlet BottomoftheSoundbarMainUnit ...

Страница 14: ... TV menu to adjust the sound field and various settings as well as the volume and mute ConnectingusinganOpticalCable Step1 ConnectanOpticalCable USB 5V 0 5A AUX IN DIGITAL AUDIO IN OPTICAL OPTICAL OUT OpticalCable notsupplied BottomoftheSoundbar NOTE When the audio in a broadcast is encoded in Dolby Digital and the Digital Output Audio Format on your TV is set to PCM we recommend that you change t...

Страница 15: ...cted to the TV by an Optical Cable not supplied Press and hold the button on the remote control for more than 5 seconds to toggle this function Auto Power Link is set to ON by default Depending on the connected device Auto Power Link may not function This function is only available in the D IN mode Mode RemotecontrolButton LEDindicator OFF 5 Sec W W R Blinking ON 5 Sec W W G Blinking ...

Страница 16: ...oothdevice OR Bluetoothmenu NOTE You cannot connect more than one TV or Bluetooth device at a time Step3 ChecktheSoundbar sstatus The blue LED should not be blinking once the Bluetooth connection is complete B IftheTVordevicefailstoconnect If a previously connected Soundbar listing appears in the device list of your TV or Bluetooth device delete it e g AV SamsungSoundbarT400T Series Then repeat st...

Страница 17: ...nnect is turned OFF To turn TV Connect back on press and hold the button for 5 seconds with the Soundbar in BluetoothReady mode TV Connect is set to ON by default Mode RemotecontrolButton LEDindicator TVConnect OFF 5 Sec B W W R Blinking TVConnect ON 5 Sec B W W G Blinking ConnectingaSoundbartoamobiledeviceviaNFCfunction Step1 PlaceyourmobiledeviceintheNFCdetectionareaontopoftheSoundbar Bluetoothd...

Страница 18: ...es that generate electromagnetic waves must be kept away from the Soundbar main unit e g microwaves wireless LAN devices etc The Soundbar supports SBC data 44 1kHz 48kHz Connect only to a Bluetooth device that supports the A2DP AV function You cannot connect the Soundbar to a Bluetooth device that supports only the HF Hands Free function Once you have paired the Soundbar to a Bluetooth device sele...

Страница 19: ... transmitting system of the Bluetooth device or the Soundbar It is subject to electrical variation from obstructions caused by a wall corner or office partition It is exposed to electrical interference from same frequency band devices including medical equipment microwave ovens and wireless LANs Pair the Soundbar with the Bluetooth device while they are close together The further the distance betw...

Страница 20: ...to play the external device s sound through the Soundbar ConnectingusinganOpticalCable Step1 ConnectusinganOpticalCable AUX IN DIGITAL AUDIO IN OPTICAL OPTICAL OUT BottomoftheSoundbar OpticalCable notsupplied BD DVDplayer Set topbox Gameconsole Step2 ChangetheSoundbar smodetoD IN RightSideoftheSoundbar OR W ...

Страница 21: ...usinganAnalogueAudio AUX Cable AUX IN DIGITAL AUDIO IN OPTICAL AUDIO R L AUX IN DIGITAL AUDIO IN OPTICAL AUDIO R L BottomoftheSoundbar Audio AUX Cable notsupplied BD DVDplayer Set topbox Gameconsole Step2 ChangetheSoundbar smodetoAUX RightSideoftheSoundbar OR W W ...

Страница 22: ...1 ConnectaUSBDrive USB 5V 0 5A BottomoftheSoundbar NOTE The Soundbar automatically turns off Auto Power Off if you do not connect a USB device to the Soundbar within 18 minutes Step2 ChangetheSoundbar smodetoUSB RightSideoftheSoundbar OR W W W ...

Страница 23: ...Repeat Allsongs See the table below for details Mode RemotecontrolButton LEDindicator Repeat Off W W W Repeat 1song W W W Blinking Repeat Allsongs W W W Blinking RepeatplayatRandom When the Soundbar is in USB mode once you press the button the USB mode changes how it plays tracks to Repeat Random See the table below for details Mode RemotecontrolButton LEDindicator Repeat Random W W W Blinking ...

Страница 24: ...bps wma Wave_Format_MSAudio1 16kHz 48kHz 56kbps 128kbps Wave_Format_MSAudio2 16kHz 48kHz 56kbps 128kbps aac AAC 16kHz 96kHz 48kbps 320kbps AAC LC 16kHz 96kHz 128kbps 192kbps 5 1ch 320kbps HE AAC 24kHz 96kHz 48kbps 64kbps 5 1ch 160kbps wav 16kHz 48kHz up to 3000kbps flac FLAC 1 1 0 FLAC 1 2 1 16kHz 96kHz up to 3000kbps If there are too many folders and files stored on the USB device it may take the...

Страница 25: ...ICAL USB 5V 0 5A RightSideoftheSoundbar 5 Sec BlinkingX2 With the Soundbar on press the Volume buttons on the body at the same time for at least 5 seconds CAUTION All the settings of the Soundbar are initialised Be sure to perform this only when initialization is required ...

Страница 26: ...he support screws into wall studs Purchase wall mounting screws according to the type and thickness of the wall you want to mount the Soundbar on Diameter M4 Length 40 mm or longer recommended Connect cables from the unit to external devices before you install the Soundbar on the wall Make sure the unit is turned off and unplugged before you install it Otherwise it may cause an electric shock Wall...

Страница 27: ...se a pencil to mark the holes positions 2 6 mm 50 mm A B C D IMPORTANTNOTE The installation method shown here is for CONCRETE walls Installation methods will vary depending on the wall type For installation on dry wall we strongly recommend you drill screw support holes into the underlying wood studs 3 A B C D 10 5mm ...

Страница 28: ...t into the back of the Soundbar CAUTION Press the Soundbar down with sufficient force to fix it to the wall If the Soundbar is not firmly fixed to the wall it could be accidently detached resulting in personal injury Do not bump into or strike the Soundbar especially from the bottom The impact could detach the Soundbar from the wall resulting in personal injury ...

Страница 29: ...your computer Important Make sure there are no music files on the USB thumb drive This may cause the firmware update to fail 2 Go to the Samsung website at samsung com select Enter Model Number and enter the model of your Soundbar Select manuals and downloads and download the latest software file 3 Save the downloaded software to a USB stick and select Extract Here to unzip the folder 4 Turn off t...

Страница 30: ...Do not disconnect the power or remove the USB device while updates are being applied The main unit will turn off automatically after completing the firmware update After the update is completed the user setup in the Soundbar is initialised so you can reset your settings We recommend you write down your settings so that you can easily reset them after the update If the software update fails check i...

Страница 31: ...ain SounddropoutsoccurinBluetoothmode See the Bluetooth connection sections on pages 16 18 In Bluetooth connection mode the Bluetooth connection will be lost if the distance between the Soundbar and the Bluetooth device exceeds 10 m Soundisnotproduced IstheMutefunctionon Press the VOL button to cancel the function Isthevolumesettominimum Adjust the Volume Theremotecontroldoesnotwork Isthebatterydr...

Страница 32: ...tronics Co Ltd is under license Other trademarks and trade names are those of their respective owners 13 OPENSOURCE LICENCENOTICE To send inquiries and requests regarding open sources contact Samsung via Email oss request samsung com 14 IMPORTANT NOTESABOUT SERVICE Figures and illustrations in this User Manual are provided for reference only and may differ from actual product appearance An adminis...

Страница 33: ... Bluetooth Press and hold the button for more than 5seconds to turn off Bluetooth Power function Enabling Bluetooth Press and hold the button for more than 5seconds to turn on Bluetooth Power function NOTES Samsung Electronics Co Ltd reserves the right to change the specifications without notice Weight and dimensions are approximate Hereby Samsung declares that this equipment is in compliance with...

Страница 34: ...es or literature indicates that the product and its electronic accessories e g charger headset USB cable should not be disposed of with other household waste at the end of their working life To prevent possible harm to the environment or human health from uncontrolled waste disposal please separate these items from other types of waste and recycle them responsibly to promote the sustainable reuse ...

Страница 35: ... es sich bei der mit diesem Symbol gekennzeichneten Nennspannung um eine Wechselspannung handelt Gleichspannung Dieses Symbol zeigt an dass es sich bei der mit diesem Symbol gekennzeichneten Nennspannung um eine Gleichspannung handelt Achtung Gebrauchsanweisung beachten Dieses Symbol weist den Benutzer an weitere sicherheitsrelevante Informationen der Gebrauchsanweisung zu entnehmen WARNUNG Setzen...

Страница 36: ... gewerblichen Einsatz vorgesehen Verwenden Sie dieses Produkt nur für den privaten Bereich Wenn Ihr Produkt oder die CD bei kalten Temperaturen aufbewahrt wurden kann Kondensation auftreten Wenn Sie das Gerät bei kaltenTemperaturen transportiert haben warten Sie mit der Inbetriebnahme circa 2 Stunden bis das Gerät Raumtemperatur erreicht hat 5 Die in diesem Produkt verwendeten Batterien enthalten ...

Страница 37: ...bedienung 12 04 AnschliessenderSoundbar 13 Stromanschluss 13 05 Anschlussaneinfernsehgerät 14 Verbindung mit einem optischen Kabel 14 Via Bluetooth eine Verbindung zu einem Fernseher oder einem Bluetooth Gerät herstellen 16 Verbinden einer Soundbar mit einem Mobilgerät per NFC Funktion 17 06 VerbindungMitEinemExternenGerat Herstellen 20 Verbindung mit einem optischen Kabel 20 Verbindung mit einem ...

Страница 38: ...allation 26 Komponenten für die Anbringung an der Wand 26 10 Softwareaktualisierung 29 Updateverfahren 29 Wenn die Aktualisierung fehlschlägt 30 11 Fehlerbehebung 31 12 Lizenz 32 13 BekanntmachungzuOpenSourceLizenzen 32 14 WichtigeHinweisezumKundendienst 32 15 SpezifikationenundLeitfaden 33 Technische daten 33 ...

Страница 39: ...g und zum Stromverbrauch finden Sie auf dem Etikett am Gerät Etikett Unterseite des Soundbar Hauptgeräts Wenden Sie sich für den Kauf zusätzlicher Komponenten oder optionaler Kabel an ein Servicezentrum oder den Kundendienst von Samsung Das Aussehen des Zubehörs kann etwas von den Abbildungen oben abweichen EinlegenderBatterie AAA indieFernbedienung Passen Sie die Polarität der Batterie an die Sym...

Страница 40: ... RechteSeitederSoundbar NFC LED Anzeige Die LED Anzeige blinkt leuchtet oder ändert die Farbe je nach dem aktuellem Modus oder Status der Soundbar Die Farbe der LED Anzeige und die Anzahl der Leuchten zeigen den aktiven Modus wie unten beschrieben an W Weiße LED B Blaue LED R Rote LED G Grüne LED Modus Fernbedienungstaste LED Anzeige D IN W Bluetooth B Verbundener Status B LangsamesBlinken Getrenn...

Страница 41: ...en digitalen optischen Ausgang eines externen Geräts anschließen USB Hier ein USB Gerät anschließen um Musikdateien auf dem USB Gerät über die Soundbar wiederzugeben Nach dem Anschluss des Netzkabels muss 4 bis 6 Sekunden gewartet werden bis der Netzschalter bedient werden kann Wenn Sie dieses Gerät einschalten vergeht eine Verzögerungszeit von 4 bis 5 Sekunden bevor eine Tonausgabe erfolgt Wenn S...

Страница 42: ...rke in einem Bereich von 6 bis 6 einzustellen Drücken Sie hier um den AUX Modus aufzurufen Drücken Sie die Taste um die vorherige Musikdatei auszuwählen Drücken Sie die Taste um eine Musikdatei wiederzugeben vorübergehend anzuhalten Drücken Sie die Taste um die nächste Musikdatei auszuwählen Drücken Sie hier um durch Wahl von SURROUND oder STANDARD den gewünschten Toneffekt einzustellen Drücken Si...

Страница 43: ...uschalten drücken und halten Sie die Taste für 5 Sekunden gedrückt LED Anzeige W W G Blinkt AutoPowerDownEin W W R Blinkt AutoPowerDownAus Initialisieren Standby Drücken Sie die Taste für 5 Sekunden im Standby bzw bei ausgeschaltetem Strom um die System Startfunktion auszulösen Dieser Vorgang wird nicht den Verlauf der Bluetooth Kopplungen löschen LED Anzeige W W W W R BlinkenX2 TV Fernbedienung E...

Страница 44: ...ingeschaltetem Strom um die Bluetooth Power Ein Aus Funktion auszulösen LED Anzeige B W G Blinkt BluetoothPowerEin B W R Blinkt BluetoothPowerAus Auto Power Link Ein Aus Weitere Informationen zur Funktion Auto Power Link Ein Aus finden Sie unter Auto Power Link auf Seite 15 ...

Страница 45: ...holt drücken und gedrückt halten Um die Lautstärke der Soundbar über die Fernbedienung Ihres Fernsehers einstellen zu lassen folgen Sie den unten stehenden Schritten 1 bis 3 2 Falls sie diese Funktion vollständig ausschalten wollen folgen Sie den Schritten 1 und 2 Modus Fernbedienungstaste LED Anzeige 1 Ausschalten AlleLEDsausgeschaltet 2 Aus Modus 5 Sec W W W W Blinkt 3 AlleTV Modus 5 Sec W W W W...

Страница 46: ...Informationen zur benötigten Stromversorgung und zum Stromverbrauch finden Sie auf dem Etikett am Gerät Etikett Unterseite des Soundbar Hauptgeräts AUX IN POWER DIGITAL AUDIO IN OPTICAL USB 5V 0 5A POWER Stromkabel Steckdose UnterseitedesSoundbar Hauptgeräts ...

Страница 47: ...erwenden um das Klangfeld und verschiedene Einstellungen sowie die Lautstärke und die Stummschaltung anzupassen VerbindungmiteinemoptischenKabel Schritt1 VerbindenSieeinoptischesKabel USB 5V 0 5A AUX IN DIGITAL AUDIO IN OPTICAL OPTICAL OUT OptischesKabel nichtmitgeliefert UnterseitederSoundbar HINWEIS Wenn Rundfunksignale Dolby Digital sind und die Einstellung für Digitales Ausgangsaudioformat auf...

Страница 48: ...es Kabel nicht mitgeliefert mit dem Fernsehgerät verbunden ist Halten Sie die Taste auf der Fernbedienung länger als 5 Sekunden gedrückt um diese Funktion umzuschalten Auto Power Link ist automatisch auf EIN eingestellt Je nach dem angeschlossen Gerät könnte Auto Power Link nicht funktionieren Diese Funktion ist nur im Modus D IN verfügbar Modus Fernbedienungstaste LED Anzeige AUS 5 Sec W W R Blin...

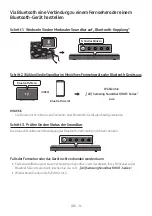
Страница 49: ...t ODER Bluetooth Menü HINWEIS Sie können nicht mehr als ein Fernseher oder Bluetooth Gerät gleichzeitig verbinden Schritt3 PrüfenSiedenStatusderSoundbar Die blaue LED sollte nach Beendigung der Bluetooth Verbindung nicht mehr blinken B FallsderFernseheroderdasGerätnichtverbundenwerdenkann Falls eine Auflistung der zuvor verbundenen Soundbar in der Geräteliste Ihres Fernsehers oder Bluetooth Geräts...

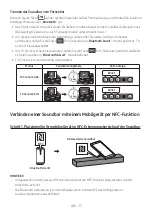
Страница 50: ...ist ausgeschaltet Um TV Connect erneut einzuschalten halten Sie die Taste für 5 Sekunden gedrückt während sich die Soundbar im Bluetoothbereit Modus befindet TV Connect ist standardmäßig eingeschaltet Modus Fernbedienungstaste LED Anzeige TVConnect AUS 5 Sec B W W R Blinkt TVConnect EIN 5 Sec B W W G Blinkt VerbindeneinerSoundbarmiteinemMobilgerätperNFC Funktion Schritt1 PlatzierenSieIhrmobilesGer...

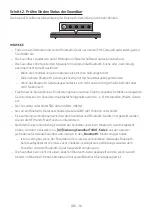
Страница 51: ... Geräte müssen vom Soundbar Hauptgerät ferngehalten werden z B Mikrowellen WLAN Geräte etc Der Soundbar unterstützt SBC data 44 1kHz 48kHz Nur an ein Bluetooth Gerät anschließen das die A2DP AV Funktion unterstützt Es kann keine Verbindungen zwischen dem Soundbar und Bluetooth Geräten hergestellt werden die nur die HF Hands Free Funktion unterstützen Nachdem Sie eine Verbindung zwischen der Soundb...

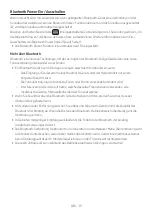
Страница 52: ... Geräts oder der Haupteinheit mit einem Körperteil berührt wird Die Funkübertragung durch Wände Ecken oder Bürotrennwände behindert wird Interferenzen mit Geräten auftreten welche dasselbe Frequenzband verwenden wie medizinische Geräte Mikrowellenherde oder Funknetzwerke Wenn Sie Soundbar über das Bluetooth Gerät betreiben möchten stellen Sie sicher dass der Abstand kurz gehalten wird Mit zunehmen...

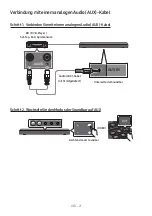
Страница 53: ... des externen Geräts über die Soundbar wiederzugeben VerbindungmiteinemoptischenKabel Schritt1 VerbindenSiemiteinemoptischenKabel AUX IN DIGITAL AUDIO IN OPTICAL OPTICAL OUT UnterseitederSoundbar OptischesKabel nichtmitgeliefert BD DVD Player Set Top Box Spielkonsole Schritt2 WechselnSiedenModusderSoundbaraufD IN RechteSeitederSoundbar ODER W ...

Страница 54: ...analogenAudio AUX Kabel AUX IN DIGITAL AUDIO IN OPTICAL AUDIO R L AUX IN DIGITAL AUDIO IN OPTICAL AUDIO R L UnterseitederSoundbar Audio AUX Kabel nichtmitgeliefert BD DVD Player Set Top Box Spielkonsole Schritt2 WechselnSiedenModusderSoundbaraufAUX RechteSeitederSoundbar ODER W W ...

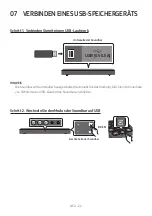
Страница 55: ...ufwerk USB 5V 0 5A UnterseitederSoundbar HINWEIS Die Soundbar wird automatisch ausgeschaltet Automatische Abschaltung falls Sie nicht innerhalb von 18 Minuten ein USB Gerät an die Soundbar anschließen Schritt2 WechselnSiedenModusderSoundbaraufUSB RechteSeitederSoundbar ODER W W W ...

Страница 56: ...ails finden Sie in der nachstehenden Tabelle Modus Fernbedienungstaste LED Anzeige Wiederholen Aus W W W Wiederholen 1Titel W W W Blinkt Wiederholen AlleTitel W W W Blinkt ZufälligeWiederholungderWiedergabe Wenn sich die Soundbar im USB Modus befindet ändert der USB Modus beim Drücken der Taste die Art der Wiedegabe der Tracks auf Wiederholen Zufallswiedergabe Details finden Sie in der nachstehend...

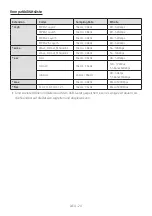
Страница 57: ...Audio1 16kHz 48kHz 56 128kbps Wave_Format_MSAudio2 16kHz 48kHz 56 128kbps aac AAC 16kHz 96kHz 48 320kbps AAC LC 16kHz 96kHz 128 192kbps 5 1 Kanal 320kbps HE AAC 24kHz 96kHz 48 64kbps 5 1 Kanal 160kbps wav 16kHz 48kHz Bis zu 3000kbps flac FLAC 1 1 0 FLAC 1 2 1 16kHz 96kHz Bis zu 3000kbps Sind zu viele Ordner und Dateien auf dem USB Gerät gespeichert kann es einige Zeit dauern bis die Soundbar auf d...

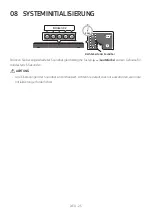
Страница 58: ...echteSeitederSoundbar 5 Sec BlinkenX2 Drücken Sie bei eingeschalteter Soundbar gleichzeitig die Tasten Lautstärke an dem Gehäuse für mindestens 5 Sekunden ACHTUNG Alle Einstellungen der Soundbar sind initialisiert Achten Sie darauf dies nur auszuführen wenn die Initialisierung erforderlich ist ...

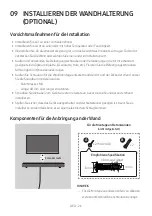
Страница 59: ...falls möglich mit Wandverankerungen Kaufen Sie Schrauben für die Wandmontage entsprechend der Art und der Dicke der Wand an der Sie die Soundbar montieren wollen Durchmesser M4 Länge 40 mm oder länger empfohlen Schließen Sie die Kabel vom Gerät an externe Geräte an bevor sie die Soundbar an der Wand installieren Stellen Sie sicher dass das Gerät ausgeschaltet und der Netzstecker gezogen ist bevor ...

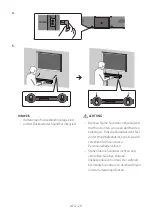
Страница 60: ...n Sie einen Bleistift um die Positionen der Löcher zu markieren 2 6 mm 50 mm A B C D WICHTIGERHINWEIS Die hier gezeigte Anbringungsmethode gilt für Wände aus BETON Anbringungsmethoden unterscheiden sich je nach Wandart Zum Montieren an einer Trockenwand empfehlen wir dringend eine Schraubenstütze in die darunterliegenden Holzständer hineinzubohren 3 A B C D 10 5 mm ...

Страница 61: ...ntegriert ACHTUNG Drücken Sie die Soundbar mit genügend Kraft nach unten um sie an der Wand zu befestigen Falls die Soundbar nicht fest an der Wand befestigt ist könnte sie sich versehentlich lösen und zu Personenschäden führen Stoßen Sie die Soundbar nicht an und vermeiden Sie einen Aufprall insbesondere von unten Der Aufprall könnte die Soundbar von der Wand lösen und zu Verletzungen führen ...

Страница 62: ...h keine Musikdateien auf dem USB Stick befinden Dies kann dazu führen dass das Firmware Update fehlschlägt 2 Gehen Sie auf die Samsung Website unter samsung com wählen Sie Modellnummer eingeben und geben Sie das Modell Ihrer Soundbar ein Wählen Sie Handbücher und Downloads und laden Sie die neueste Softwaredatei herunter 3 Speichern Sie die heruntergeladene Software auf einem USB Speicher und wähl...

Страница 63: ... Sie während des Aktualisierungsprozesses nicht die Stromversorgung und entfernen Sie nicht den USB Speicher Wenn die Aktualisierung der Firmware abgeschlossen ist wird das Hauptgerät automatisch ausgeschaltet Wenn die Aktualisierung abgeschlossen ist wird die Benutzereinrichtung der Soundbar initialisiert Wir empfehlen Ihnen Ihre persönlichen Einstellungen schriftlich zu notieren damit Sie sie na...

Страница 64: ... ImBluetooth ModuskommteszuTonaussetzern Siehe die Abschnitte zur Bluetooth Verbindung auf Seite 16 18 Im Bluetooth Verbindungsmodus geht die Bluetooth Verbindung verloren wenn der Abstand zwischen der Soundbar und dem Bluetooth Gerät 10 m überschreitet EswirdkeinTonwiedergegeben IstdieStummschaltfunktionaktiviert Drücken Sie die Taste VOL um die Funktion zu deaktivieren IstdieLautstärkeaufdasMini...

Страница 65: ... names are those of their respective owners 13 BEKANNTMACHUNG ZUOPENSOURCE LIZENZEN Wenn Sie Fragen bezüglich des Themas Open Source haben wenden Sie sich bitte per E Mail unter der Adresse an Samsung oss request samsung com 14 WICHTIGE HINWEISEZUM KUNDENDIENST Die Abbildungen in dieser Anleitung dienen nur als Referenz und können sich vom aktuellen Produkt unterscheiden Es kann eine Gebühr erhobe...

Страница 66: ...ooth Halten Sie die Taste für mindestens 5 Sekunden gedrückt um die Bluetooth Power Funktion auszuschalten Aktivieren von Bluetooth Halten Sie die Taste für mindestens 5 Sekunden gedrückt um die Bluetooth Power Funktion einzuschalten HINWEISE Samsung Electronics Co Ltd behält sich das Recht auf unangekündigte Änderungen vor Gewicht und Abmessungen können von den Angaben abweichen Samsung erklärt h...

Страница 67: ...er dazugehörigen Dokumentation gibt an dass das Produkt und Zubehörteile z B Ladegerät Kopfhörer USB Kabel nach ihrer Lebensdauer nicht zusammen mit dem normalen Haushaltsmüll entsorgt werden dürfen Entsorgen Sie dieses Gerät und Zubehörteile bitte getrennt von anderen Abfällen um der Umwelt bzw der menschlichen Gesundheit nicht durch unkontrollierte Müllbeseitigung zu schaden Helfen Sie mit das A...

Страница 68: ...dique que la tension nominale indiquée par le symbole est une tension CA Tension CC ce symbole indique que la tension nominale indiquée par le symbole est une tension CC Mise en garde Consulter le mode d emploi ce symbole avertit l utilisateur qu il doit consulter le manuel d utilisation pour en savoir plus sur les informations relatives à la sécurité AVERTISSEMENT Afin de diminuer les risques d i...

Страница 69: ...onctionnement Votre produit n est pas prévu pour un usage industriel Ce produit ne peut être utilisé qu à des fins personnelles Une condensation peut se former si le produit ou un disque a été stocké à basse température Si vous devez transporter l ensemble pendant l hiver attendez environ 2 heures que l appareil ait atteint la température de la pièce avant de l utiliser 5 Les piles utilisées dans ...

Страница 70: ...e télécommande de téléviseur 12 04 ConnexiondelaSoundbar 13 Connexion de l alimentation électrique 13 05 ConnexionàunTéléviseur 14 Connexion à l aide d un câble optique 14 Connexion d un téléviseur ou appareil Bluetooth via Bluetooth 16 Connexion d une Soundbar à un appareil mobile via la fonction NFC 17 06 ConnexionàunAppareilExterne 20 Connexion à l aide d un câble Optique 20 Connexion à l aide ...

Страница 71: ...cautions d installation 26 Composants de fixation au mur 26 10 MiseàjourduLogiciel 29 Procédure de mise à jour 29 Si la mise à jour échoue 30 11 Dépannage 31 12 Licence 32 13 AvisdeLicenceLibre 32 14 RemarqueImportanteàProposduService 32 15 SpécificationsetGuide 33 Spécifications 33 ...

Страница 72: ...n électriques reportez vous à l étiquette collée sur le produit Étiquette Bas de l Unité Principale Soundbar Pour acheter des composants supplémentaires ou des câbles optionnels contactez un Centre de service Samsung ou le Service client de Samsung L aspect des accessoires peut légèrement différer des illustrations ci dessus Insertiondelapile AAA danslatélécommande Faites correspondre la polarité ...

Страница 73: ...oitdelaSoundbar NFC Indicateur àLED L indicateur à LED clignote s allume ou change de couleur selon le mode actuel ou l état de la Soundbar La couleur de l indicateur à LED et le nombre de voyants indiquent le mode actif tel que décrit ci dessous W LED blanche B LED bleue R LED rouge G LED verte Mode Touchede télécommande IndicateuràLED D IN W Bluetooth B État connecté B Clignotementlent État déco...

Страница 74: ...e d un appareil externe D IN Permet de connecter la sortie numérique optique d un appareil externe USB Connectez un périphérique USB pour lire des fichiers musicaux sur le périphérique USB via la Soundbar Lorsque vous branchez le cordon CA la touche Marche Arrêt fonctionne pendant 4 à 6 secondes Lorsque vous mettez l unité sous tension il faut compter 4 ou 5 secondes de retard avant le déclencheme...

Страница 75: ...our régler le volume des graves dans une plage de 6 à 6 Appuyez pour entrer en mode AUX Appuyez sur la touche pour sélectionner le fichier musical précédent Appuyez sur la touche pour lire mettre en pause un fichier musical Appuyez sur la touche pour sélectionner le fichier musical suivant Appuyez pour sélectionner l effet sonore désiré en choisissant SURROUND ou STANDARD Appuyez sur cette touche ...

Страница 76: ...LED W W G Clignotement ActivationdeAutoPowerDown W W R Clignotement DésactivationdeAutoPowerDown Initialiser Veille Appuyez sur la touche pendant 5 secondes dans la modalité de mise hors tension en veille pour déclencher la fonction initiale de système Cette opération n effacera pas l historique du jumelage Bluetooth IndicateuràLED W W W W R ClignotementX2 Activation désactivation de la télécomman...

Страница 77: ...activation désactivation de Bluetooth Power IndicateuràLED B W G Clignotement ActivationdeBluetoothPower B W R Clignotement DésactivationdeBluetoothPower Activation désactivation de Auto Power Link Pour des informations détaillées sur la fonction d activation désactivation de Auto Power Link veuillez vous reporter à la section Auto Power Link à la page 15 ...

Страница 78: ... appuyant et maintenant enfoncée la touche BASS plusieurs fois Pour que la télécommande de votre téléviseur ajuste le volume de la Soundbar suivez les étapes 1 à 3 ci dessous 2 Si vous voulez désactiver cette fonction complètement suivez les étapes 1 et 2 Mode Touchedetélécommande IndicateuràLED 1 Éteindre TouteslesLEDsontéteintes 2 Mode Éteint 5 Sec W W W W Clignotement 3 Mode Tousles téléviseurs...

Страница 79: ...l alimentation et la consommation électriques requises reportez vous à l étiquette collée sur le produit Étiquette Partie inférieure de l unité principale Soundbar AUX IN POWER DIGITAL AUDIO IN OPTICAL USB 5V 0 5A POWER Cordond alimentation Prisedecourant Partieinférieuredel unitéprincipaleSoundbar ...

Страница 80: ... permet également d utiliser le menu du téléviseur pour ajuster le champ sonore et de nombreux réglages ainsi que le volume et la coupure du son Connexionàl aided uncâbleoptique Étape1 Connecteruncâbleoptique USB 5V 0 5A AUX IN DIGITAL AUDIO IN OPTICAL OPTICAL OUT Câbleoptique nonfourni PartieinférieuredelaSoundbar REMARQUE Lorsque les signaux de diffusion sont Dolby Digital et le réglage Format a...

Страница 81: ...n câble optique non fourni Appuyez sur la touche de la télécommande pendant plus de 5 secondes pour basculer cette fonction Par défaut la fonction Auto Power Link est réglée sur ACTIVÉ Selon l appareil connecté il se peut que Auto Power Link ne fonctionne pas Cette fonction est disponible uniquement en mode D IN Mode Touchedetélécommande IndicateuràLED ÉTEINT 5 Sec W W R Clignotement ACTIVÉ 5 Sec ...

Страница 82: ...nuBluetooth REMARQUE Vous ne pouvez pas connecter plusieurs téléviseurs ou appareils Bluetooth en même temps Étape3 Vérifierl étatdelaSoundbar La LED bleue ne doit pas clignoter une fois la connexion Bluetooth terminée B Silaconnexiondutéléviseuroudel appareiléchoue Si une liste de Soundbars précédemment connectées apparaît dans la liste des appareils de votre téléviseur ou appareil Bluetooth supp...

Страница 83: ...ion Connexion au téléviseur appuyez et maintenez enfoncée la touche pendant 5 secondes avec la Soundbar en mode Lecturerépétée Par défaut Connexion au téléviseur est réglé sur ACTIVÉ Mode Touchedetélécommande IndicateuràLED Connexionau téléviseur ÉTEINT 5 Sec B W W R Clignotement Connexionau téléviseur ACTIVÉ 5 Sec B W W G Clignotement Connexiond uneSoundbaràunappareilmobilevialafonctionNFC Étape1...

Страница 84: ...cipale Soundbar par ex des micro ondes des appareils LAN sans fil etc Le Soundbar prend en charge les données SBC 44 1 kHz 48 kHz Effectuez uniquement la connexion à un périphérique Bluetooth qui prend en charge la fonction A2DP AV Vous ne pouvez pas connecter le Soundbar à un périphérique Bluetooth qui prend en charge uniquement la fonction HF Hands Free Lorsque vous avez apparié la barre audio à...

Страница 85: ...système de réception transmission du périphérique Bluetooth ou du système Soundbar Il est soumis à des variations électriques provenant d obstructions provoquées par un mur un coin ou des cloisonnements de bureaux Il est exposé à des interférences électriques provenant d appareils utilisant la même bande de fréquences exemple équipements médicaux fours à micro ondes et réseaux LAN sans fil Associe...

Страница 86: ... le son de l appareil externe via la Soundbar Connexionàl aided uncâbleOptique Étape1 Connecteràl aided uncâbleoptique AUX IN DIGITAL AUDIO IN OPTICAL OPTICAL OUT PartieinférieuredelaSoundbar Câbleoptique nonfourni LecteurBD DVD Boîtier décodeur Consoledejeu Étape2 ChangerlemodedelaSoundbaràD IN CôtédroitdelaSoundbar OU W ...

Страница 87: ...d uncâbleaudioanalogique AUX AUX IN DIGITAL AUDIO IN OPTICAL AUDIO R L AUX IN DIGITAL AUDIO IN OPTICAL AUDIO R L PartieinférieuredelaSoundbar Câble AUX audio nonfourni LecteurBD DVD Boîtier décodeur Consoledejeu Étape2 ChangerlemodedelaSoundbaràAUX CôtédroitdelaSoundbar OU W W ...

Страница 88: ...terunecléUSB USB 5V 0 5A PartieinférieuredelaSoundbar REMARQUE La Soundbar s éteint automatiquement Arrêt automatique si vous ne connectez pas de périphérique USB à la Soundbar dans les 18 minutes Étape2 ChangerlemodedelaSoundbaràUSB CôtédroitdelaSoundbar OU W W W ...

Страница 89: ...au ci dessous pour plus de détails Mode Touchedetélécommande IndicateuràLED Répétition Désactivé W W W Répétition un morceau W W W Clignotement Répétition Tousles morceaux W W W Clignotement Lecturerépétéealéatoire Lorsque la Soundbar est en mode USB une fois que vous appuyez sur la touche le mode USB commute la lecture des pistes sur Répétition Aléatoire Consultez le tableau ci dessous pour plus ...

Страница 90: ...Format_MSAudio1 16 48 kHz 56 128 kbps Wave_Format_MSAudio2 16 48 kHz 56 128 kbps aac AAC 16 96 kHz 48 320 kbps AAC LC 16 96 kHz 128 192 kbps 5 1 canaux 320 kbps HE AAC 24 96 kHz 48 64 kbps 5 1 canaux 160 kbps wav 16 48 kHz jusqu à 3000 kbps flac FLAC 1 1 0 FLAC 1 2 1 16 96 kHz jusqu à 3000 kbps Si votre périphérique USB contient trop de dossiers et de fichiers la Soundbar mettra peut être du temps...

Страница 91: ...ôtédroitdelaSoundbar 5 Sec ClignotementX2 Avec la Soundbar activée appuyez sur les touches Volume sur le boîtier en même temps pendant au moins 5 secondes ATTENTION Tous les réglages de la Soundbar sont initialisés Veillez à n effectuer cette opération que lorsque l initialisation est nécessaire ...

Страница 92: ...e fixez les vis portantes dans les poteaux Achetez les vis de support mural selon le type et l épaisseur du mur sur lequel vous souhaitez monter la Soundbar Diamètre M4 Longueur 40 mm ou plus recommandés Connectez les câbles depuis l unité aux appareils externes avant d installer la Soundbar sur le mur Assurez vous que l unité est éteinte et débranchée avant de l installer Sinon cela pourrait prov...

Страница 93: ... marquer les positions des trous 2 6 mm 50 mm A B C D REMARQUEIMPORTANTE La méthode d installation illustrée ici est destinée aux murs EN BÉTON Les méthodes d installation varieront selon le type de mur Pour l installation sur cloison sèche nous recommandons vivement de percer des trous de soutien de vis dans les montants en bois sous jacents 3 A B C D 10 5 mm ...

Страница 94: ... la Soundbar ATTENTION Appuyez sur la Soundbar avec suffisamment de force pour la fixer au mur Si la Soundbar n est pas solidement fixée au mur elle pourrait se détacher accidentellement et entraîner des blessures corporelles Ne heurtez pas et ne donnez pas de coups à la Soundbar en particulier par le bas L impact pourrait détacher la Soundbar du mur et entraîner des blessures corporelles ...

Страница 95: ...nt Assurez vous qu il n y a pas de fichiers musicaux sur la clé USB Cela peut entraîner l échec de la mise à jour du micrologiciel 2 Rendez vous sur le site Web Samsung sur samsung com sélectionnez Entrer le numéro de modèle et entrez le modèle de votre Soundbar Sélectionnez les manuels et les téléchargements et téléchargez le dernier fichier du logiciel 3 Sauvegardez le logiciel téléchargé sur un...

Страница 96: ...areil et ne retirez pas le périphérique USB lorsque les mises à jour sont en train d être appliquées L unité principale s éteindra automatiquement après avoir terminé la mise à jour du micrologiciel Lorsque la mise à jour est terminée la configuration de l utilisateur de la Soundbar est réinitialisée Nous vous recommandons d écrire vos paramètres pour pouvoir les rétablir après la mise à jour Si l...

Страница 97: ...torsionssonoressefontentendreenmodeBluetooth Consultez les sections sur la connexion Bluetooth aux pages 16 18 En mode de connexion Bluetooth la connexion Bluetooth sera perdue si la distance entre la Soundbar et l appareil Bluetooth dépasse 10 m Aucunsonn estproduit Lafonctiondecoupuredusonest elleactivée Appuyez sur la touche VOL pour annuler cette fonction Levolumeest ilrégléàsonminimum Réglez ...

Страница 98: ...13 AVISDELICENCE LIBRE Pour toute requête et demande concernant les sources ouvertes contactez Samsung via e mail à l adresse oss request samsung com 14 REMARQUE IMPORTANTEÀ PROPOSDU SERVICE Les figures et les illustrations du présent Manuel d utilisation sont fournies à titre de référence uniquement et peuvent différer de l apparence du produit réel Des frais supplémentaires pourront vous être fa...

Страница 99: ...t maintenez enfoncée la touche pendant plus de 5 secondes pour désactiver la fonction Bluetooth Power Activation du Bluetooth Appuyez et maintenez enfoncée la touche pendant plus de 5 secondes pour activer la fonction Bluetooth Power REMARQUES Samsung Electronics Co Ltd se réserve le droit de modifier les caractéristiques sans préavis Le poids et les dimensions sont approximatifs Samsung déclare p...

Страница 100: ...oduit ses accessoires ou sa documentation indique que ni le produit ni ses accessoires électroniques usagés chargeur casque audio câble USB etc ne peuvent être jetés avec les autres déchets ménagers La mise au rebut incontrôlée des déchets présentant des risques environnementaux et de santé publique veuillez séparer vos produits et accessoires usagés des autres déchets Vous favoriserez ainsi le re...

Страница 101: ...te dotata di messa a terra Tensione CA Questo simbolo indica che la tensione contrassegnata con questo simbolo è di tipo CA Tensione CC Questo simbolo indica che la tensione contrassegnata con questo simbolo è di tipo CC Attenzione consultare le Istruzioni per l uso Questo simbolo indica all utente la necessità di consultare il manuale dell utente per ottenere ulteriori informazioni sulla sicurezz...

Страница 102: ... di alimentazione dalla presa di corrente Il prodotto non è destinato all uso industriale Questo prodotto è destinato esclusivamente all uso personale Se il prodotto o il disco vengono conservati a basse temperature potrebbe formarsi della condensa Trasportando l unità in inverno attendere circa 2 ore prima di utilizzarla in modo che ritorni a temperatura ambiente 5 Le batterie utilizzate con ques...

Страница 103: ... telecomando di una TV 12 04 CollegamentodellaSoundbar 13 Collegamento alla rete elettrica 13 05 CollegamentoaunaTV 14 Collegamento tramite un cavo ottico 14 Connessione di una TV o di un dispositivo Bluetooth tramite Bluetooth 16 Connessione di una Soundbar a un dispositivo mobile tramite la funzione NFC 17 06 Collegamentodiundispositivoesterno 20 Collegamento tramite un cavo ottico 20 Collegamen...

Страница 104: ...one 26 Componenti per il montaggio a parete 26 10 Aggiornamentodelsoftware 29 Procedura per l aggiornamento 29 In caso di esito negativo dell aggiornamento 30 11 Risoluzionedeiproblemi 31 12 Licenza 32 13 Avvisodilicenzaopensource 32 14 Notaimportantesulservizio 32 15 Specificheeguida 33 Specifiche 33 ...

Страница 105: ...consumo di energia vedere l etichetta applicata al prodotto Etichetta Fondo dell Unità Principale della Soundbar Per acquistare componenti aggiuntivi o cavi opzionali contattare un Centro servizi Samsung o l Assistenza clienti Samsung L aspetto degli accessori può variare leggermente dalle illustrazioni riportate sopra Inserimentodellabatteria AAA neltelecomando Far corrispondere la polarità della...

Страница 106: ...e LatodestrodellaSoundbar NFC Indicatore aLED L indicatore LED lampeggia rimane acceso o cambia colore a seconda del modo o dello stato correnti della Soundbar Il colore dell indicatore LED e il numero di luci indicano il modo attivo secondo il seguente schema W LED bianco B LED blu R LED rosso G LED verde Modo Tastodel telecomando IndicatoreaLED D IN W Bluetooth B Stato connesso B Lampeggiamentol...

Страница 107: ...llegare all uscita analogica di un dispositivo esterno D IN Collegare all uscita digitale ottica di un dispositivo esterno USB Collegare qui un dispositivo USB per riprodurre file musicali sul dispositivo USB attraverso la Soundbar Quando si inserisce il cavo CA il tasto di accensione diventa operativo in 4 6 secondi Quando si accende l unità vi è un ritardo di 4 5 secondi prima che venga riprodot...

Страница 108: ... volume dei bassi nell intervallo tra 6 e 6 Premere per accedere al modo AUX Premere il tasto per selezionare il file musicale precedente Premere il tasto per avviare sospendere la riproduzione di un file musicale Premere il tasto per selezionare il file musicale successivo Premere per selezionare l effetto sonoro desiderato scegliendo tra SURROUND e STANDARD Premere questo tasto verso l alto o ve...

Страница 109: ...er 5 secondi IndicatoreaLED W W G Lampeggiamento AccensioneAutoPowerDown W W R Lampeggiamento SpegnimentoAutoPowerDown Inizializzazione Standby Premere il tasto per 5 secondi nello stato di standby spegnimento per avviare la funzione iniziale del sistema Questa operazione non cancellerà la cronologia di associazione Bluetooth IndicatoreaLED W W W W R LampeggiamentoX2 Accensione Spegnimento telecom...

Страница 110: ...tivare disattivare la funzione Bluetooth Power IndicatoreaLED B W G Lampeggiamento AccensioneBluetoothPower B W R Lampeggiamento SpegnimentoBluetoothPower Accensione Spegnimento Auto Power Link Per informazioni dettagliate sulla funzione Accensione Spegnimento Auto Power Link vedere Auto Power Link a pagina 15 ...

Страница 111: ...nzione tenendo premuto ripetutamente il tasto BASS Per fare in modo che il telecomando della propria TV regoli il volume della Soundbar seguire i Passaggi da 1 a 3 riportati sotto 2 Se si desidera disattivare completamente questa funzione seguire i Passaggi 1 e 2 Modo Tastodeltelecomando IndicatoreaLED 1 Spegnimento TuttiiLEDspenti 2 Modo Nonattiva 5 Sec W W W W Lampeggiamento 3 Modo TutteleTV 5 S...

Страница 112: ...zioni sulla potenza elettrica assorbita e sul consumo di energia vedere l etichetta applicata al prodotto Etichetta Fondo dell unità principale della Soundbar AUX IN POWER DIGITAL AUDIO IN OPTICAL USB 5V 0 5A POWER Cavodialimentazione Presaelettrica Fondodell unitàprincipaledellaSoundbar ...

Страница 113: ...l menu della TV per regolare il campo sonoro e diverse impostazioni oltre al volume e alla funzione di muto Collegamentotramiteuncavoottico Passaggio1 Collegareuncavoottico USB 5V 0 5A AUX IN DIGITAL AUDIO IN OPTICAL OPTICAL OUT Cavoottico nonfornitoindotazione FondodellaSoundbar NOTA Quando i segnali di radiodiffusione sono di tipo Dolby Digital e nella TV il Formato audio dell uscita digitale è ...

Страница 114: ...ottico non fornito in dotazione Tenere premuto il tasto sul telecomando per più di 5 secondi per attivare disattivare questa funzione Per impostazione predefinita Auto Power Link è impostato su Attiva Auto Power Link potrebbe non funzionare a seconda del dispositivo connesso Questa funzione è disponibile solamente nel modo D IN Modo Tastodeltelecomando IndicatoreaLED Nonattiva 5 Sec W W R Lampeggi...

Страница 115: ...etooth OPPURE MenuBluetooth NOTA Non è possibile connettere più di una TV o di un dispositivo Bluetooth alla volta Passaggio3 VerificarelostatodellaSoundbar Il LED blu non dovrebbe lampeggiare una volta completata la connessione Bluetooth B IncasodimancataconnessionedellaTVodeldispositivo Se nell elenco dispositivi della TV o del dispositivo Bluetooth figura la voce di una Soundbar connessa in pre...

Страница 116: ...tenere premuto il tasto per 5 secondi con la Soundbar nel modo Bluetoothpronto Per impostazione predefinita Connessione TV è impostato su Attiva Modo Tastodeltelecomando IndicatoreaLED ConnessioneTV Nonattiva 5 Sec B W W R Lampeggiamento ConnessioneTV Attiva 5 Sec B W W G Lampeggiamento ConnessionediunaSoundbaraundispositivomobiletramitela funzioneNFC Passaggio1 Posizionareildispositivomobilenell ...

Страница 117: ... generano onde elettromagnetiche come ad esempio forni a microonde LAN wireless e così via devono essere tenuti lontano dall unità principale della Soundbar Il Soundbar supporta i dati SBC 44 1kHz 48kHz Effettuare il collegamento esclusivamente a un dispositivo Bluetooth che supporti la funzione A2DP AV Non è possibile collegare il Soundbar a un dispositivo Bluetooth che supporta soltanto la funzi...

Страница 118: ... ricezione di trasmissione del dispositivo Bluetooth o dell Soundbar È soggetto a variazioni elettriche dovute a interferenze derivanti da riflessioni dei segnali su pareti spigoli o tramezzature d ufficio È esposto a interferenze elettriche derivanti da dispositivi della stessa banda di frequenza incluse apparecchiature mediche forni a microonde e LAN wireless Collegare l Soundbar al dispositivo ...

Страница 119: ...e l audio del dispositivo esterno tramite la Soundbar Collegamentotramiteuncavoottico Passaggio1 Collegaretramiteuncavoottico AUX IN DIGITAL AUDIO IN OPTICAL OPTICAL OUT FondodellaSoundbar Cavoottico nonfornitoindotazione LettoreBD DVD Decoder Consolepervideogiochi Passaggio2 CambiareilmododellaSoundbarpassandoaD IN LatodestrodellaSoundbar OPPURE W ...

Страница 120: ...udioanalogico AUX AUX IN DIGITAL AUDIO IN OPTICAL AUDIO R L AUX IN DIGITAL AUDIO IN OPTICAL AUDIO R L FondodellaSoundbar Cavoaudio AUX nonfornitoindotazione LettoreBD DVD Decoder Consolepervideogiochi Passaggio2 CambiareilmododellaSoundbarpassandoaAUX LatodestrodellaSoundbar OPPURE W W ...

Страница 121: ...egareun unitàUSB USB 5V 0 5A FondodellaSoundbar NOTA La Soundbar si spegne automaticamente Spegnimento automatico se non si collega un dispositivo USB alla Soundbar entro 18 minuti Passaggio2 CambiareilmododellaSoundbarpassandoaUSB LatodestrodellaSoundbar OPPURE W W W ...

Страница 122: ...teriori dettagli vedere la tabella seguente Modo Tastodeltelecomando IndicatoreaLED Ripeti Nonattiva W W W Ripeti 1canzone W W W Lampeggiamento Ripeti Tuttelecanzoni W W W Lampeggiamento Riproduzioneripetutacasuale Quando la Soundbar è in modalità USB ogni volta che si preme il pulsante la modalità USB cambia il modo in cui riproduce le tracce in Ripeti Casuale Per ulteriori dettagli vedere la tab...

Страница 123: ...ave_Format_MSAudio1 16kHz 48kHz 56 128 kbps Wave_Format_MSAudio2 16kHz 48kHz 56 128 kbps aac AAC 16kHz 96kHz 48 320 kbps AAC LC 16kHz 96kHz 128 192 kbps 5 1 canali 320 kbps HE AAC 24kHz 96kHz 48 64 kbps 5 1 canali 160 kbps wav 16kHz 48kHz fino a 3000 kbps flac FLAC 1 1 0 FLAC 1 2 1 16kHz 96kHz fino a 3000 kbps Se nel dispositivo USB sono presenti troppi file e cartelle la Soundbar potrebbe impiega...

Страница 124: ... 5A LatodestrodellaSoundbar 5 Sec LampeggiamentoX2 Quando la Soundbar è accesa premere contemporaneamente i pulsanti Volume sul corpo per almeno 5 secondi ATTENZIONE Tutte le impostazioni della Soundbar sono inizializzate Eseguire questa operazione solo quando l inizializzazione è necessaria ...

Страница 125: ...i supporto ai montanti della parete Acquistare viti per il montaggio a parete a seconda della tipologia e dello spessore del muro su cui si intende montare la Soundbar Diametro M4 Lunghezza si consiglia 40 mm o maggiore Collegare i cavi dall unità ai dispositivi esterni prima di installare la Soundbar sulla parete Assicurarsi che l unità sia spenta e scollegata dalla rete elettrica prima di instal...

Страница 126: ...egnare le posizioni dei fori 2 6 mm 50 mm A B C D NOTAIMPORTANTE Il metodo di installazione illustrato si riferisce alle pareti in CALCESTRUZZO I metodi di installazione variano a seconda del tipo di parete Per l installazione su parete a secco si raccomanda caldamente di eseguire dei fori di supporto per le viti nei montanti di legno sottostanti 3 A B C D 10 5 mm ...

Страница 127: ...l retro della Soundbar ATTENZIONE Premere la Soundbar verso il basso con forza sufficiente a fissarla alla parete Se la Soundbar non è saldamente fissata alla parete potrebbe staccarsi accidentalmente provocando lesioni a persone Non urtare né colpire la Soundbar specialmente dal basso A causa dell impatto la Soundbar potrebbe staccarsi dalla parete e provocare lesioni a persone ...

Страница 128: ...USB del computer Importante assicurarsi che la chiavetta USB non contenga file musicali In caso contrario l aggiornamento del firmwall potrebbe non riuscire 2 Visitare il sito Samsung su samsung com selezionare Enter Model Number quindi fornire il modello della Soundbar Selezionare la sezione relativa a manuali e download quindi scaricare il file di software più recente 3 Salvare il software scari...

Страница 129: ...are l alimentazione o rimuovere il dispositivo USB durante l applicazione degli aggiornamenti L unità principale si spegnerà automaticamente dopo il completamento dell aggiornamento del firmware Dopo il completamento dell aggiornamento verrà avviata l impostazione utente sulla Soundbar Consigliamo di prendere nota delle impostazioni così da poterle ripristinare al termine dell aggiornamento Se l a...

Страница 130: ...ollegarla Siverificanointerruzionidell audionelmodoBluetooth Consultare le sezioni relative alla connessione Bluetooth alle pagine 16 e 18 Nel modo di connessione Bluetooth la connessione Bluetooth viene persa se la distanza tra la Soundbar e il dispositivo Bluetooth supera i 10 m Nonvieneriprodottol audio LafunzioneMutoèattiva Premere il tasto VOL per annullare la funzione Ilvolumeèimpostatoalmin...

Страница 131: ...3 AVVISODI LICENZAOPEN SOURCE Per inviare richieste e domande sulle open source contattare Samsung tramite e mail oss request samsung com 14 NOTA IMPORTANTESUL SERVIZIO Le figure e le illustrazioni del presente manuale utente sono fornite soltanto come riferimento Possono differire rispetto all aspetto effettivo del prodotto È possibile che vengano addebitate delle spese amministrative nei seguent...

Страница 132: ...ivazione del Bluetooth Tenere premuto il tasto per più di 5 secondi per disattivare la funzione Bluetooth Power Attivazione del Bluetooth Tenere premuto il tasto per più di 5 secondi per attivare la funzione Bluetooth Power NOTE Samsung Electronics Co Ltd si riserva il diritto di modificare le specifiche senza preavviso Peso e dimensioni sono approssimativi Samsung dichiara che questa apparecchiat...

Страница 133: ...devono essere smaltiti con altri rifiuti al termine del ciclo di vita Per evitare eventuali danni all ambiente o alla salute causati dallo smaltimento dei rifiuti non corretto si invita l utente a separare il prodotto e i suddetti accessori da altri tipi di rifiuti conferendoli ai soggetti autorizzati secondo le normative locali Gli utenti domestici in alternativa alla gestione autonoma di cui sop...

Страница 134: ...726 7864 www samsung com hu support AUSTRIA 08007267864 0800 SAMSUNG www samsung com at support SWITZERLAND 0800726786 www samsung com ch support German www samsung com ch_fr support French Area Contact Centre Web Site CZECH 800 SAMSUNG 800 726786 www samsung com cz support SLOVAKIA 0800 SAMSUNG 0800 726786 www samsung com sk support CROATIA 072726786 www samsung com hr support BOSNIA 055233999 ww...

Отзывы: