


FRA - 16
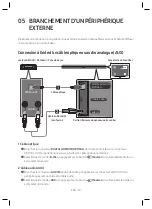
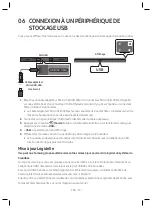
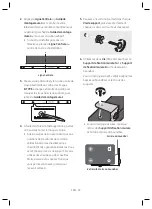
07 BRANCHEMENT D’UN APPAREIL MOBILE
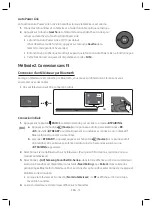
Connexion par Bluetooth
Lorsqu’un appareil mobile est connecté par Bluetooth, vous pouvez profiter du son stéréo sans vous
encombrer avec des câbles.
•
Vous ne pouvez pas connecter plusieurs périphériques Bluetooth simultanément.
SOUN
D
MOD
E
PAIR
OU
Périphérique Bluetooth
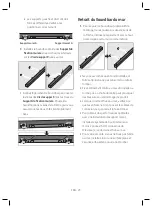
Connexion initiale
1.
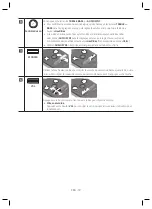
Appuyez sur le bouton
PAIR
de la télécommande pour accéder au mode «
BT PAIRING
».
(OU)
a.
Appuyez sur le bouton
(Source)
sur le panneau à droite puis sélectionnez «
BT
».
«
BT
» devient «
BT READY
» automatiquement en quelques secondes si aucun dispositif
Bluetooth n’est connecté au Soundbar.
b.
Lorsque «
BT READY
» apparaît, appuyez sur le bouton
(Source)
sur le panneau droit
du Soundbar et maintenez-le enfoncé pendant plus de 5 secondes jusqu’à ce que
«
BT PAIRING
» apparaisse.
2.
Sur votre appareil, sélectionnez «
[AV] Samsung Soundbar R4-Series
» dans la liste qui apparaît.
•
Lorsqu’un Soundbar est connecté au périphérique Bluetooth, [
Nom du périphérique Bluetooth
]
→ «
BT
» apparaît sur l’écran situé à l’avant.
3.
Lisez des morceaux depuis le périphérique, connecté par Bluetooth, via le Soundbar.
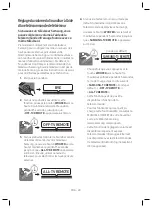
En cas d’échec de la connexion du périphérique
•
Si l’entrée correspondant au Soundbar précédemment connecté (par ex., «
[AV] Samsung Soundbar
R4-Series
» figure dans la liste, supprimez-la.
•
Répétez ensuite les étapes 1 et 2.
REMARQUE
•
Une fois que vous avez connecté le Soundbar à votre appareil mobile la première fois, utilisez le
mode «
BT READY
» pour la reconnexion. Voir la page
13 pour plus de détails.
Pour plus d’informations sur les connexions Bluetooth, reportez-vous à la section
«Connexion d’un téléviseur par Bluetooth» aux pages
Содержание HW-R47M
Страница 1: ...HW R47M USER MANUAL...
Страница 35: ...HW R47M MANUEL D UTILISATEUR...


