background image

ENG - 31

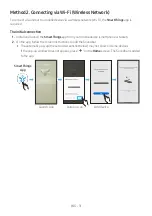
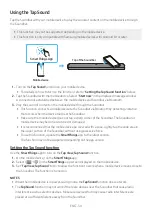
Method 2. Connecting via Wi-Fi (Wireless Network)

To connect a Soundbar to a mobile device via a wireless network (Wi-Fi), the 

SmartThings

 app is 

required.

The initial connection

1. 

Install and launch the 

SmartThings

 app from your mobile device (smartphone or tablet).

2. 

On the app, follow the screen instructions to add the Soundbar.


The automatic pop-up (the second screenshot below) may not show on some devices. 
If the pop-up window does not appear, press “ 


” on the 

Home

 screen. The Soundbar is added 

to the app.

Launch App

Add device

Auto pop-up

SmartThings 

App

Содержание HW-Q950T

Страница 1: ...HW Q950T FULL MANUAL Imagine the possibilities Thank you for purchasing this Samsung product To receive more complete service please register your product at www samsung com register...

Страница 2: ...Instructions for use This symbol instructs the user to consult the user manual for further safety related information WARNING To reduce the risk of fire or electric shock do not expose this appliance...

Страница 3: ...nd receiver Connecting the equipment to an outlet that is on a different circuit than the radio or TV Consulting the dealer or an experienced radio TV technician for help FCCRadiationExposureStatement...

Страница 4: ...ith the power requirements listed on the identification sticker located on the bottom of your product Install your product horizontally on a suitable base furniture with enough space around it for ven...

Страница 5: ...ontain Towels and cleaning clothes may leave lint or dirt on the product Do not use a nail or other tools to scratch the dirt off It may damage the fabric To remove oil or liquid stains use a clean wh...

Страница 6: ...trol 15 04 ConnectingtheSoundbar 16 Connecting the power and units 16 Recommended Speaker Layout 17 Manually connecting the Subwoofer or Surround Speakers 18 LED Indicator Lights on the Rear of Subwoo...

Страница 7: ...ingtheWallMount 35 Installation Precautions 35 Wallmount Components 35 Installing the Surround Speakers on a Wall 37 10 InstallingtheSoundbaraboveaTVStand 38 Component 38 11 SoftwareUpdate 39 Auto Upd...

Страница 8: ...4 Bracket WallMount AH61 04119A Rubber Foot BN67 00398L For more information about the power supply and power consumption refer to the label attached to the product Label Bottom of the Soundbar Main...

Страница 9: ...th the button pressed to enable voice recognition Display Displays the product s status and current mode D IN HDMI Wi Fi BT MicOn Off Button Press the button to turn the microphone on or off Volume Bu...

Страница 10: ...DIGITAL AUDIO IN OPTICAL HDMI TO TV eARC ARC HDMI 2 HDMI 1 ID SET WOOFER REAR POWER ID SET NETWORK SERVICE ID SET WOOFER REAR DIGITAL AUDIO IN OPTICAL HDMI TO TV eARC ARC HDMI 2 HDMI 1 POWER Connect...

Страница 11: ...to position HowtoUsetheRemoteControl VOL WOOFER SOUNDBAR SOUND MODE PAIR Power VOL WOOFER SOUND MODE PAIR Turns the Soundbar on and off AutoPowerDownFunction The unit turns off automatically in the fo...

Страница 12: ...tch the Soundbar to Bluetooth pairing mode Press the button and wait for the BT PAIRING screen to connect to a new Bluetooth device Play Pause VOL WOOFER SOUND MODE PAIR You can also play or pause mus...

Страница 13: ...udio from the Soundbar are not synchronized select SYNC in Sound Control and then set the audio delay between 0 300 milliseconds by using the Up Down buttons SYNC is only supported for some functions...

Страница 14: ...9 1 4 ch 5 1 ch 9 1 4 ch 7 1 ch 9 1 4 ch 7 1 4 ch 9 1 4 ch ADAPTIVE SOUND 2 0 ch 9 1 4 ch 5 1 ch 9 1 4 ch 7 1 ch 9 1 4 ch 7 1 4 ch 9 1 4 ch For input sources Dolby Atmos and DTS X the effect modes th...

Страница 15: ...Off the Soundbar 2 Push up and hold the WOOFER button for 5 seconds Each time you push the WOOFER button up and hold it for 5 seconds the mode switches in the following order SAMSUNG TVREMOTE Default...

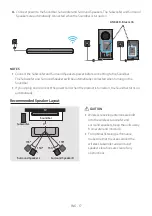
Страница 16: ...attached to the product Label Bottom of the Soundbar Main Unit 1 Connect the Power cord to the Subwoofer POWER RearofSubwoofer PowerCord 2 Connect the power cord to the Left and Right Surround Speaker...

Страница 17: ...nnected when turning on the Soundbar If you unplug and reconnect the power cord when the product is turned on the Soundbar turns on automatically RecommendedSpeakerLayout 150 150 135 135 0 Subwoofer S...

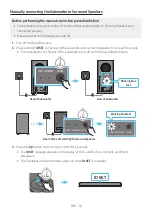
Страница 18: ...of the subwoofer and surround speakers for at least 5 seconds The red indicator on the rear of the subwoofer turns off and the blue indicator blinks 5 Sec RearofSubwoofer RearofSubwoofer Blinkingblue...

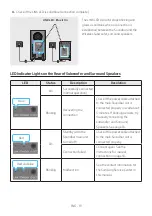
Страница 19: ...peration Blinking Recovering the connection Check if the power cable attached to the main Soundbar unit is connected properly or wait about 5 minutes If blinking persists try manually connecting the s...

Страница 20: ...of the main unit s wireless signal is about 32 8 ft 10 m but may vary depending on your operating environment If a steel concrete or metallic wall is between the main unit and the wireless subwoofer t...

Страница 21: ...WITH ETHERNET ConnectingtheTVthatsupportsHDMIARC AudioReturnChannel HDMI IN ARC HDMI TO TV eARC ARC ConnecttotheHDMIIN ARC portofyourTV HDMICable BottomoftheSoundbar ConnecttotheHDMITOTV eARC ARC port...

Страница 22: ...se one whose diameter is less than 0 55 inches 14 mm This function is not available if the HDMI cable does not support ARC When the audio in a broadcast is encoded in Dolby Digital and the Digital Out...

Страница 23: ...hony the Soundbar syncs with a Samsung TV to output sound through two devices for optimum surround effect When the Soundbar is connected the menu TV Soundbar appears under the SoundOutput menu of the...

Страница 24: ...READY if there is a connect record b When BTREADY appears press and hold the MicOn Off button on the top panel of the Soundbar for more than 5 seconds to display BTPAIRING 2 Select Bluetooth mode on t...

Страница 25: ...ndbar Press the PAIR button on the Soundbar remote control or press and hold the MicOn Off button on the top of the Soundbar for more than 5 seconds while the Soundbar is in BT mode NotesonBluetoothco...

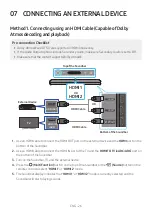
Страница 26: ...undbar ExternalDevice HDMICable HDMICable OR TopoftheSoundbar HDMI1 OR HDMI2 1 Use an HDMI cable to connect the HDMI OUT port on the external device and the HDMI port on the bottom of the Soundbar 2 U...

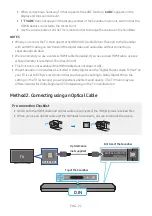
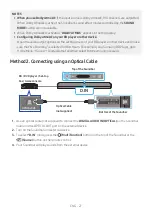
Страница 27: ...ream For example on a Samsung BD Player go to Home Menu Sound Digital Output and then select Bitstream unprocessed Method2 ConnectingusinganOpticalCable DIGITAL AUDIO IN OPTICAL HDMI 1 OPTICAL OUT Bot...

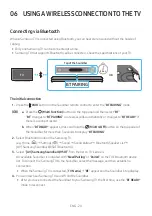
Страница 28: ...and then select BT BT changes to BTPAIRING in a few seconds automatically or changes to BTREADY if there is a connect record b When BTREADY appears press and hold the MicOn Off button on the top panel...

Страница 29: ...e kept away from the Soundbar main unit e g microwaves wireless LAN devices etc The Soundbar supports SBC data 44 1kHz 48kHz Connect only to a Bluetooth device that supports the A2DP AV function You c...

Страница 30: ...hen the Soundbar is disconnected from the Bluetooth device the Soundbar will display BTDISCONNECTED on the top display DisconnectingtheSoundbarfromtheBluetoothdevice Press the MultiFunction button on...

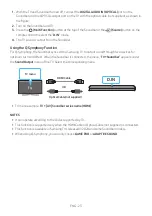
Страница 31: ...1 Install and launch the SmartThings app from your mobile device smartphone or tablet 2 On the app follow the screen instructions to add the Soundbar The automatic pop up the second screenshot below m...

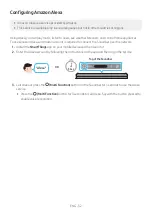
Страница 32: ...mazon account is required to connect the Soundbar over the network 1 Install the SmartThings app on your mobile device and then launch it 2 Enter the Alexa account by following the instructions on the...

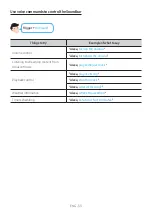
Страница 33: ...ume control Alexa turnupthevolume Alexa turndownthevolume Listening to streaming content from Amazon Music Alexa playsomejazzmusic Playback control Alexa playnextsong Alexa stopthemusic Alexa whatisth...

Страница 34: ...device does not tap a sharp corner of the Soundbar The Soundbar or mobile device may become scratched or damaged It is recommended that the mobile device be covered with a case Lightly tap the wide a...

Страница 35: ...ews according to the type and thickness of the wall you want to mount the Soundbar on Diameter M5 Length 1 3 8 inches 35 mm or longer recommended Connect cables from the unit to external devices befor...

Страница 36: ...ed drill bit drill a hole in the wall at each marking If the markings do not correspond to the positions of studs make sure you insert appropriate anchors or mollies into the holes before you insert t...

Страница 37: ...u can purchase wall mounts separately to install the surround speakers on a wall Wall mounts aren t sold by Samsung Electronics NotesforWallMountingtheSurround Speakers Surround Speaker wall mounts mu...

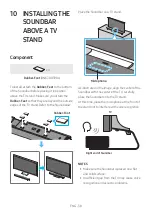
Страница 38: ...tand Refer to the figure below Rubber Foot Place the Soundbar on a TV stand Microphone As illustrated in the image align the center of the Soundbar with the center of the TV carefully place the Soundb...

Страница 39: ...irmware to the SERVICE port of the Soundbar 1 Go to the Samsung Electronics website www samsung com search for the model name from the customer support menu option For more information about update re...

Страница 40: ...oth device mobile device etc is connected adjust the volume of the external device For sound output of the TV select Soundbar Samsung TV Home Settings Sound Sound Output Select Soundbar The cable conn...

Страница 41: ...aker List The automatic TV connection may be disabled While the Soundbar is in BT READY press and hold the p button on the Soundbar remote control for 5 seconds to select ON TVCONNECT If you see OFF T...

Страница 42: ...is disabled First turn off the TV 13 LICENSE Manufactured under license from Dolby Laboratories Dolby Dolby Atmos Dolby Audio Dolby Digital Plus Pro Logic and the double D symbol are trademarks of Dol...

Страница 43: ...An engineer is called out to your home at your request and there is no defect in the product b You bring the unit to a repair center and there is no defect in the product You will be advised of the a...

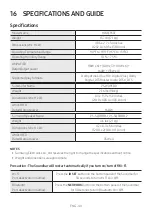
Страница 44: ...210 0 x 403 0 x 403 0 mm AMPLIFIER Rated Output power 160W Surround Speaker Name PS SQ90BB 1 PS SQ90BB 2 Weight 4 6 lbs 2 1 kg Dimensions W x H x D 4 7 x 8 3 x 5 6 inches 120 0 x 210 0 x 141 0 mm AMP...

Страница 45: ...service problems incorrect electrical line voltage fluctuations and surges customer adjustments and failure to follow operating instructions cleaning maintenance and environmental instructions that ar...

Страница 46: ...rights reserved QUESTIONS OR COMMENTS AREA IN THE US 1 800 SAMSUNG 726 7864 www samsung com us support Samsung Electronics America Inc 85 Challenger Road Ridge eld Park NJ 07660 CALL OR VISIT US ONLI...

Отзывы: