background image

FRA - 8

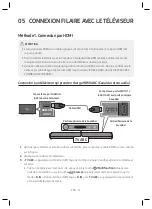
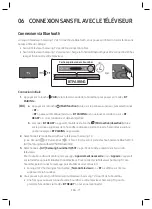
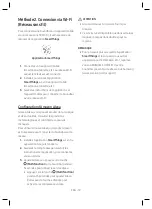
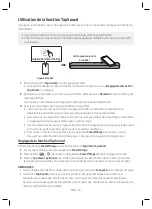
04  CONNEXION DE LA SOUNDBAR

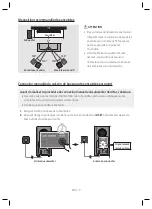
Connexion de l’alimentation et des unités

Utilisez le cordon d’alimentation pour brancher le caisson de basse, les enceintes surround et la Soundbar à 

une prise électrique, dans l’ordre suivant :


• Pour plus d'informations sur l'alimentation électrique requise et la consommation d'énergie, reportez-

vous à l'étiquette collée sur le produit. (Étiquette : située au bas de l'unité principale Soundbar)

REMARQUES


Branchez le caisson de basse et les enceintes surround avant de les connecter à la Soundbar. Le 
caisson de basse et les enceintes surround se connectent automatiquement lorsque vous 
allumez la Soundbar.


Si vous débranchez, puis rebranchez le cordon d'alimentation alors que le produit est allumé, la 
Soundbar s'allume automatiquement.

Bas de l’unité principale 

Soundbar

Arrière du subwoofer

Face inférieure des 

enceintes surround 

gauche et droite

POWER

POWER

POWER

HDMI IN 1

HDMI IN 2

ID SET

(WOOFER, REAR)

POWER

NETWORK

SERVICE

DIGITAL AUDIO IN

(OPTICAL)

HDMI TO TV

(eARC/ARC)

HDMI 1

HDMI 2

ID SET

POWER

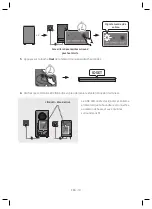
La connexion est terminée.

LINK LED - Bleu si activé

Содержание HW-Q950T

Страница 1: ... access the FULL MANUAL on Samsung s on line customer support centre by scanning the QR code To see the manual on your PC or mobile device download the manual in document format from Samsung s website http www samsung com support ...

Страница 2: ... This symbol indicates that the rated voltage marked with the symbol is AC voltage DC voltage This symbol indicates that the rated voltage marked with the symbol is DC voltage Caution Consult instructions for use This symbol instructs the user to consult the user manual for further safety related information WARNING To reduce the risk of fire or electric shock do not expose this appliance to rain ...

Страница 3: ...temperatures If transporting the unit during the winter wait approximately 2 hours until the unit has reached room temperature before using 5 The battery used with this product contains chemicals that are harmful to the environment Do not dispose of the battery in the general household trash Do not expose the battery to excess heat direct sunlight or fire Do not short circuit disassemble or overhe...

Страница 4: ...ectiontotheTV 12 06 UsingawirelessconnectiontotheTV 15 07 ConnectinganExternalDevice 17 08 ConnectingaMobileDevice 18 09 InstallingtheWallMount 21 10 InstallingtheSoundbaraboveaTVStand 23 11 SoftwareUpdate 24 12 Troubleshooting 25 13 Licence 26 14 OpenSourceLicenceNotice 27 15 ImportantNotesAboutService 27 16 SpecificationsandGuide 28 ...

Страница 5: ... the label attached to the product Label Bottom of the Soundbar Main Unit To purchase additional components or optional cables contact a Samsung Service Centre or Samsung Customer Care For more information about the wallmount or rubber foot see pages 21 23 Design specifications and App screen are subject to change without prior notice InsertingBatteriesbeforeusingtheRemoteControl AAbatteriesX2 Sli...

Страница 6: ...DMI 1 ID SET HDMI IN 1 HDMI IN 2 POWER NETWORK SERVICE DIGITAL AUDIO IN OPTICAL HDMI TO TV eARC ARC HDMI 2 HDMI 1 ID SET WOOFER REAR POWER ID SET NETWORK SERVICE ID SET WOOFER REAR DIGITAL AUDIO IN OPTICAL HDMI TO TV eARC ARC HDMI 2 HDMI 1 MultiFunction Button In standby mode press the Multi Function button to turn on the Soundbar Press the MultiFunction button to change the input source Press the...

Страница 7: ...h the Soundbar to Bluetooth pairing mode Press the button and wait for the BTPAIRING screen to connect to a new Bluetooth device p Play Pause You can also play or pause music by pressing the button Up Down Left Right Press Up Down Left Right on the button to select or set functions SoundControl When pressed the setting items such as TREBLE BASS SYNC CENTERLEVEL SIDELEVEL FRONTTOP LEVEL REARLEVEL R...

Страница 8: ... Subwoofer and Surround Speaker power before connecting to the Soundbar The Subwoofer and Surround Speaker will be automatically connected when turning on the Soundbar If you unplug and reconnect the power cord when the product is turned on the Soundbar turns on automatically BottomoftheSoundbar MainUnit RearofSubwoofer BottomsoftheLeftand RightSurround Speakers POWER POWER POWER HDMI IN 1 HDMI IN...

Страница 9: ...e wireless subwoofer and surround speakers locations are clear of any obstructions ManuallyconnectingtheSubwooferorSurroundSpeakers Beforeperformingthemanualconnectionprocedurebelow Check whether the power cables for the Soundbar and subwoofer or Surround Speakers are connected properly Make sure that the Soundbar is turned off 1 Turn off the Soundbar main 2 Press and hold IDSET on the rear of the...

Страница 10: ...n on the remote control for 5 seconds SOUND MODE PAIR 5 Sec IDSET 4 Check if the LINK LED is solid blue connection complete LINKLED BlueisOn The LINK LED indicator stops blinking and glows a solid blue when a connection is established between the Soundbar and the Wireless Subwoofer surround speakers ...

Страница 11: ...d properly or wait about 5 minutes If blinking persists try manually connecting the subwoofer and Surround Speakers See page 9 Red On Standby with the Soundbar main unit turned off Check if the power cable attached to the main Soundbar unit is connected properly Connection failed Connect again See the instructions for manual connection on page 9 Red and blue Blinking Malfunction See the contact in...

Страница 12: ... WITH ETHERNET ConnectingtheTVthatsupportsHDMIARC AudioReturnChannel HDMI IN ARC HDMI TO TV eARC ARC ConnecttotheHDMIIN ARC portofyourTV HDMICable BottomoftheSoundbar ConnecttotheHDMITOTV eARC ARC portofthe Soundbarmainunit TopoftheSoundbar TVARC 1 With the Soundbar and TV turned off connect the HDMI cable as shown in the figure 2 Turn on the Soundbar and TV 3 TVARC appears in the display window o...

Страница 13: ...cable use one whose diameter is less than 14 mm This function is not available if the HDMI cable does not support ARC When the audio in a broadcast is encoded in Dolby Digital and the Digital Output Audio Format on your TV is set to PCM we recommend that you change the setting to Dolby Digital When the setting on the TV is changed you will experience better sound quality The TV menu may use differ...

Страница 14: ...phony the Soundbar syncs with a Samsung TV to output sound through two devices for optimum surround effect When the Soundbar is connected the menu TV Soundbar appears under the SoundOutput menu of the TV Select the corresponding menu TVmenu OR OpticalCable notsupplied HDMICable D IN TV menu example TV AV Soundbarseriesname HDMI NOTES It can operate according to the Codec supported by TV This funct...

Страница 15: ...TREADY if there is a connect record b When BTREADY appears press and hold the MicOn Off button on the top panel of the Soundbar for more than 5 seconds to display BTPAIRING 2 Select Bluetooth mode on the Samsung TV e g Home Settings Sound Sound Output Bluetooth Speaker List AV Samsung Soundbar Q950T Bluetooth 3 Select AV SamsungSoundbarQ950T from the list on TV s screen An available Soundbar is in...

Страница 16: ...e Soundbar Press the PAIR button on the Soundbar remote control or press and hold the MicOn Off button on the top of the Soundbar for more than 5 seconds while the Soundbar is in BT mode NotesonBluetoothconnection Locate a new device within 1 m to connect via Bluetooth communication If asked for a PIN code when connecting a Bluetooth device enter 0000 The Soundbar automatically turns off after 18 ...

Страница 17: ... the Soundbar External Device and TV MultiFunction Select the HDMI1 or HDMI2 mode Method2 ConnectingusinganOpticalCable DIGITAL AUDIO IN OPTICAL HDMI 1 OPTICAL OUT BottomoftheSoundbar OpticalCable notsupplied BD DVDplayer Set top box Gameconsole TopoftheSoundbar D IN Connect the optical cable Turn on the Soundbar and External Device MultiFunction Select the D IN mode NOTE For more information abou...

Страница 18: ...ltiFunction button on the top panel and then select BT BT changes to BTPAIRING in a few seconds automatically or changes to BTREADY if there is a connect record b When BTREADY appears press and hold the MicOn Off button on the top panel of the Soundbar for more than 5 seconds to display BTPAIRING 2 On your device select AV SamsungSoundbarQ950T from the list that appears When the Soundbar is connec...

Страница 19: ...zon Alexa an Amazon account is required to connect the Soundbar over the network 1 Install the SmartThings app on your mobile device and then launch it 2 Enter the Alexa account by following the instructions on the app and then log in the service 3 Call Alexa or press the MultiFunction button on the Soundbar for 3 seconds to use the Alexa service Press the MultiFunction button for 3 seconds to cal...

Страница 20: ...e device does not tap a sharp corner of the Soundbar The Soundbar or mobile device may become scratched or damaged It is recommended that the mobile device be covered with a case Lightly tap the wide area in the upper portion of the Soundbar without using excessive force To use this function update the SmartThings app to the latest version The function may not be supported depending on the app ver...

Страница 21: ...board iron board wood etc If possible fix the support screws into wall studs Purchase wall mounting screws according to the type and thickness of the wall you want to mount the Soundbar on Diameter M5 Length 35 mm or longer recommended Connect cables from the unit to external devices before you install the Soundbar on the wall Make sure the unit is turned off and unplugged before you install it Ot...

Страница 22: ...l mounts aren t sold by Samsung NotesforWallMountingtheSurround Speakers Surround Speaker wall mounts must be able to support more than 8 0 kg Hole size 1 4 20 UNC threaded insert Check the strength of the wall before you install the Wall Mount Brackets If the strength is insufficient make sure to reinforce the wall before installing the Wall Mount Brackets and the speakers on the wall Samsung is ...

Страница 23: ...Refer to the figure below Rubber Foot Place the Soundbar on a TV stand Microphone As illustrated in the image align the centre of the Soundbar with the centre of the TV carefully place the Soundbar onto the TV stand At this time place the microphone at the front of the stand not to interfere with voice recognition TV RightendofSoundbar NOTES Make sure the Soundbar is placed on a flat and solid sur...

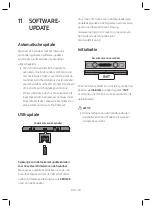
Страница 24: ...I 2 HDMI 1 ID SET WOOFER REAR ID SET WOOFER REAR NETWORK SERVICE ID SET BottomoftheSoundbar SamsungmayofferupdatesfortheSoundbar s systemfirmwareinthefuture When an update is available you can update the Soundbar by connecting the USB drive that contains the update firmware to the SERVICE port of the Soundbar For more information about how to download update files and upgrade the version go to the...

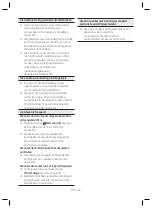
Страница 25: ...utput Select Soundbar Remove the cable from the Soundbar and then reconnect it IncasethesoundoftheSubwooferand SurroundSpeakersisnotoutput Check whether the LED on the rear of the Subwoofer and Surround Speakers lights in blue Reconnect it when the blue LED blinks or the red LED lights See page 9 IncasetheTVisnotconnectedviaHDMITO TV eARC ARC Check whether the HDMI cable is correctly connected to ...

Страница 26: ...router is too weak connection may not be possible Move the router near the Soundbar or adjust the installed position with no obstacles IncaseAlexadoesnotrespond Whenthemicrophoneisturnedofforits receptionispoor Press the MicOn Off button at the top of the Soundbar to enable the microphone Voice recognition may be unavailable due to ambient noise Reduce the noise and try again Whenthenetworkisdisco...

Страница 27: ...ify Software is subject to third party licenses found here www spotify com connect third party licenses For more information about Spotify Connect please visit www spotify com connect 14 OPENSOURCE LICENCENOTICE To send inquiries and requests for questions regarding open sources contact Samsung Open Source http opensource samsung com 15 IMPORTANT NOTESABOUT SERVICE Figures and illustrations in thi...

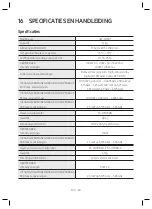
Страница 28: ...00mW at 5 15GHz 5 25GHz 100mW at 5 25GHz 5 35GHz 5 47GHz 5 725GHz WIRELESS DEVICE OUTPUT POWER BT max transmitter power 100mW at 2 4GHz 2 4835GHz WIRELESS DEVICE OUTPUT POWER SRD max transmitter power 25mW at 5 725GHz 5 85GHz Subwoofer Name PS WR95BB Weight 9 8 kg Dimensions W x H x D 210 0 x 403 0 x 403 0 mm AMPLIFIER Rated Output power 160W WIRELESS DEVICE OUTPUT POWER SRD max transmitter power ...

Страница 29: ... to turn Wi Fi On Off Bluetooth Port deactivation method Press the NETWORK button on the bottom panel of the Soundbar for 30 seconds to turn Bluetooth On Off Hereby Samsung declares that this equipment is in compliance with Directive 2014 53 EU The full text of the EU declaration of conformity is available at the following internet address http www samsung com go to Support Search Product Support ...

Страница 30: ...ories or literature indicates that the product and its electronic accessories e g charger headset USB cable should not be disposed of with other household waste at the end of their working life To prevent possible harm to the environment or human health from uncontrolled waste disposal please separate these items from other types of waste and recycle them responsibly to promote the sustainable reu...

Страница 31: ... es sich bei der mit diesem Symbol gekennzeichneten Nennspannung um eine Wechselspannung handelt Gleichspannung Dieses Symbol zeigt an dass es sich bei der mit diesem Symbol gekennzeichneten Nennspannung um eine Gleichspannung handelt Achtung Gebrauchsanweisung beachten Dieses Symbol weist den Benutzer an weitere sicherheitsrelevante Informationen der Gebrauchsanweisung zu entnehmen WARNUNG Setzen...

Страница 32: ...emperaturen transportiert haben warten Sie mit der Inbetriebnahme circa 2 Stunden bis das Gerät Raumtemperatur erreicht hat 5 Die in diesem Produkt verwendeten Batterien enthalten umweltschädliche Chemikalien Entsorgen Sie die Batterien nicht im Hausmüll Entsorgen Sie Batterien niemals in einem Feuer Schließen Sie die Batterien nicht kurz zerlegen und überhitzen Sie sie nicht Bei unsachgemäßem Aus...

Страница 33: ...6 VerwendungeinerdrahtlosenVerbindungmitdem Fernseher 15 07 VerbindeneinesexternenGeräts 17 08 VerbindeneinesMobilgeräts 18 09 InstallierenderWandhalterung 21 10 InstallierenderSoundbarübereinemTV Standfuß 23 11 Software Update 24 12 Fehlerbehebung 25 13 Lizenz 27 14 BekanntmachungzuOpenSourceLizenzen 27 15 WichtigeHinweisezumKundendienst 27 16 SpezifikationenundLeitfaden 28 ...

Страница 34: ... Unterer Teil des Soundbar Hauptgeräts Um zusätzliche Komponenten oder optionale Kabel zu erwerben wenden Sie sich an ein Servicezentrum oder den Kundendienst von Samsung Weitere Informationen über die Wandhalterung oder den Gummifuß finden Sie auf den Seiten 21 23 Design Spezifikationen und App Bildschirm können sich ohne vorherige Ankündigung ändern EinlegenderBatterienvorderVerwendungderFernbed...

Страница 35: ...MI TO TV eARC ARC HDMI 2 HDMI 1 ID SET WOOFER REAR POWER ID SET NETWORK SERVICE ID SET WOOFER REAR DIGITAL AUDIO IN OPTICAL HDMI TO TV eARC ARC HDMI 2 HDMI 1 Multi Funktion Taste Drücken Sie im Standby Modus die Multi Funktion Taste um die Soundbar einzuschalten Drücken Sie die Multi Funktion Taste um die Eingangsquelle zu ändern Drücken Sie die Multi Funktion Taste 3 Sekunden lang um Alexa aufzur...

Страница 36: ...h Kopplungs Modus Drücken Sie die Taste und warten Sie auf den BTPAIRING Bildschirm um ein neues Bluetooth Gerät zu verbinden p Wiedergabe Pause Sie können die Musik auch durch Drücken der Taste wiedergeben oder pausieren Oben Unten Links Rechts Drücken Sie Oben Unten Links Rechts auf der Taste zum Auswählen oder Einstellen von Funktionen Soundsteuerung Wenn Sie diese Taste drücken werden die Eins...

Страница 37: ...tsprecher an den Strom an bevor Sie die Geräte an die Soundbar anschließen Der Subwoofer und die Surround Lautsprecher werden automatisch verbunden wenn die Soundbar eingeschaltet wird Wenn Sie das Stromkabel beim Einschalten des Geräts aus und wieder einstecken schaltet sich die Soundbar automatisch ein UntererTeildesSoundbar Hauptgeräts Rückseitedes Subwoofers Unterseitederlinken undrechtenSurro...

Страница 38: ...rs und die Surround Lautsprecher frei von Hindernissen sind ManuellesAnschließendesSubwoofersoderderSurround Lautsprecher BevorSiedennachfolgendenmanuellenAnschlussvorgangdurchführen Überprüfen Sie ob die Netzkabel für die Soundbar sowie den Subwoofer oder die Surround Lautsprecher korrekt angeschlossen sind Stellen Sie sicher dass die Soundbar ausgeschaltet ist 1 Schalten Sie das Soundbar Hauptge...

Страница 39: ...enung 5 Sekunden lang SOUND MODE PAIR 5 Sec IDSET 4 Prüfen Sie ob die LINK LED dauerhaft blau leuchtet Verbindung abgeschlossen LINK LED Blauistleuchtet Die Anzeige LINK LED hört zu blinken auf und leuchtet konstant blau wenn eine Verbindung zwischen der Soundbar und dem drahtlosen Subwoofer bzw den Surround Lautsprechern hergestellt wurde ...

Страница 40: ...Wenn das Blinken anhält versuchen Sie den Subwoofer und die Surround Lautsprecher manuell zu verbinden Weitere Informationen finden Sie auf Seite 9 Rot Ein Standby bei ausgeschaltetem Hauptgerät der Soundbar Überprüfen Sie ob das an der Soundbar Haupteinheit angeschlossene Stromkabel richtig angeschlossen ist Verbindung fehlgeschlagen Erneut verbinden Anweisungen für einen manuellen Anschluss find...

Страница 41: ...T ETHERNET AnschließendesFernsehgeräts welchesHDMIARC AudioReturnChannel unterstützt HDMI IN ARC HDMI TO TV eARC ARC MitdemHDMIIN ARC AnschlussIhresFernsehgeräts verbinden HDMI Kabel UnterseitederSoundbar VerbindenmitdemHDMITOTV eARC ARC Anschlussam Soundbar Hauptgerät OberseitederSoundbar TVARC 1 Schließen Sie bei ausgeschalteter Soundbar und ausgeschaltetem Fernseher das HDMI Kabel wie in der Ab...

Страница 42: ...nem Durchmesser von weniger als 14 mm Diese Funktion ist nicht verfügbar wenn das HDMI Kabel ARC nicht unterstützt Wenn der Ton einer Sendung in Dolby Digital kodiert ist und das Format des digitalen Audioausgangs an Ihrem Fernsehgerät auf PCM eingestellt ist empfehlen wir Ihnen die Einstellung auf Dolby Digital zu ändern Wenn die Einstellung am Fernseher geändert ist werden Sie eine bessere Tonqu...

Страница 43: ...t synchronisiert um Ton aus zwei Geräten für einen optimalen Surround Effekt zu erzielen Wenn die Soundbar verbunden ist erscheint das Menü TV Soundbar unter dem Tonausgabe Menü des Fernsehgeräts Wählen Sie das entsprechende Menü aus Menüdes Fernsehgeräts ODER OptischesKabel nichtmitgeliefert HDMI Kabel D IN Beispiel für Menü des Fernsehgeräts TV AV SoundbarSerienbezeichnung HDMI HINWEISE Kann ent...

Страница 44: ...erbindung bereits verzeichnet wurde b Sobald BTREADY erscheint halten Sie die MikrofonEin Aus Taste auf dem Bedienfeld auf der Oberseite der Soundbar länger als 5 Sekunden gedrückt um BT PAIRING anzuzeigen 2 Bluetooth Modus am Samsung TV auswählen z B Home Einstellung Ton Tonausgabe Bluetooth Lautsprecherliste AV Samsung Soundbar Q950T Bluetooth 3 Wählen Sie AV SamsungSoundbarQ950T aus der Liste a...

Страница 45: ...e die Taste PAIR auf der Fernbedienung oder halten Sie die Taste MikrofonEin Aus auf der Oberseite der Soundbar für mehr als 5 Sekunden gedrückt während die Soundbar im BT Modus ist HinweisezurBluetooth Verbindung Suchen Sie ein neues Gerät im Umkreis von 1 m um eine Verbindung per Bluetooth Kommunikation herzustellen Wenn Sie bei der Verbindung mit einem Bluetooth Gerät nach einem PIN Code gefrag...

Страница 46: ...t und Fernsehgerät einschalten Multi Funktion Den HDMI1 oder HDMI2 Modus wählen Methode2 VerbindungmiteinemoptischenKabel DIGITAL AUDIO IN OPTICAL HDMI 1 OPTICAL OUT UnterseitederSoundbar OptischesKabel nichtmitgeliefert BD DVD Player Settop Box Spielekonsole OberseitederSoundbar D IN Das optische Kabel verbinden Schalten Sie die Soundbar und das Externe Gerät ein Multi Funktion Den D IN Modus wäh...

Страница 47: ...Bedienfeld der Oberseite und wählen Sie dann BT aus BT wechselt automatisch innerhalb weniger Sekunden zu BTPAIRING oder wechselt zu BTREADY falls eine Verbindung bereits verzeichnet wurde b Sobald BTREADY erscheint halten Sie die MikrofonEin Aus Taste auf dem Bedienfeld auf der Oberseite der Soundbar länger als 5 Sekunden gedrückt um BT PAIRING anzuzeigen 2 Wählen Sie an Ihrem Gerät in der angeze...

Страница 48: ... um über das Netzwerk eine Verbindung mit der Soundbar herzustellen 1 Installieren Sie die SmartThings App auf Ihrem Mobilgerät und starten Sie sie dann 2 Rufen Sie das Alexa Konto auf indem Sie die Anweisungen in der App befolgen und melden Sie sich dann bei dem Dienst an 3 Rufen Sie Alexa auf oder drücken Sie die Multi Funktion Taste an der Soundbar 3 Sekunden lang um den Alexa Dienst zu nutzen ...

Страница 49: ...ar oder das Mobilgerät könnten dadurch zerkratzt oder beschädigt werden Es wird empfohlen das mobile Gerät mit einer Schutzhülle abzudecken Tippen Sie leicht den breiten Bereich auf der Oberseite der Soundbar an ohne dabei übermäßige Kraft anzuwenden Zum Verwenden dieser Funktion aktualisieren Sie die SmartThings Anwendung auf die neueste Funktion Die Funktion wird je nach der Version der App even...

Страница 50: ...latte Eisenplatte Holz etc Wenn möglich befestigen Sie die Stützschrauben an Wandpfosten Kaufen Sie Wandmontageschrauben entsprechend der Art und Dicke der Wand an der Sie die Soundbar befestigen möchten Durchmesser M5 Länge 35 mm oder länger werden empfohlen Schließen Sie die Kabel vom Gerät an die externen Geräte an bevor Sie die Soundbar an der Wand installieren Vergewissern Sie sich dass das G...

Страница 51: ...lich Wandhalterungen werden nicht von Samsung verkauft HinweisezurWandmontageder Surround Lautsprecher Die Wandhalterungen für Surround Lautsprecher müssen mehr als 8 0 kg tragen Lochgröße 1 4 20 UNC mit Gewindeeinsatz Prüfen Sie die Wandstärke bevor Sie die Wandhalterung montieren Wenn die Stärke nicht ausreicht stellen Sie sicher die Wand vor der Installation der Wandhalterung und der Lautsprech...

Страница 52: ...ndbar auf einen TV Ständer Mikrofon Richten Sie wie auf der Abbildung dargestellt die Mitte der Soundbar auf die Mitte des Fernsehers aus und positionieren Sie die Soundbar vorsichtig auf dem Fernsehständer Positionieren Sie das Mikrofon zu diesem Zeitpunkt an der Vorderseite des Standfußes um die Spracherkennung nicht zu beeinträchtigen TV RechtesEndederSoundbar HINWEISE Achten Sie darauf dass di...

Страница 53: ...I 1 ID SET WOOFER REAR ID SET WOOFER REAR NETWORK SERVICE ID SET UnterseitederSoundbar SamsungwirdmöglicherweiseinZukunft UpdatesfürdieSystem FirmwarederSoundbar anbieten Wenn ein Update verfügbar ist können Sie die Soundbar aktualisieren indem Sie das USB Laufwerk das die Update Firmware enthält an den SERVICE Anschluss der Soundbar anschließen Weitere Informationen zum Herunterladen von Update D...

Страница 54: ...ie das Kabel von der Soundbar und schließen Sie es dann wieder an FallsderTondesSubwoofersundder Surround Lautsprechernichtausgegeben wird Überprüfen Sie ob die LED Anzeige auf der Rückseite des Subwoofers und der Surround Lautsprecher blau aufleuchtet Stellen Sie erneut eine Verbindung her wenn die blaue LED blinkt oder die rote LED leuchtet Siehe Seite 9 FallsdasFernsehgerätnichtperHDMITOTV eARC...

Страница 55: ...outer in die Nähe der Soundbar oder passen Sie die Einbauposition so an dass es keine Hindernisse gibt FallsAlexanichtantwortet WenndasMikrofonausgeschaltetistoder seinEmpfangschlechtist Drücken Sie die MikrofonEin Aus Taste an der Oberseite der Soundbar um das Mikrofon zu aktivieren Die Spracherkennung könnte aufgrund der Umgebungsgeräusche nicht verfügbar sein Reduzieren Sie die Geräusche und ve...

Страница 56: ...Sie unter folgender Adresse finden www spotify com connect third party licenses Weitere Informationen über Spotify Connect finden Sie auf www spotify com connect 14 BEKANNTMACHUNG ZUOPENSOURCE LIZENZEN Zum Senden von Anfragen und Anliegen betreffend Open Source kontaktieren Sie Samsung Open Source http opensource samsung com 15 WICHTIGE HINWEISEZUM KUNDENDIENST Die Abbildungen in dieser Anleitung ...

Страница 57: ...Hz 5 25GHz 100mW bei 5 25GHz 5 35GHz 5 47GHz 5 725GHz AUSGANGSLEISTUNG DES DRAHTLOSGERÄTS BT max Transmitterleistung 100mW bei 2 4GHz 2 4835GHz AUSGANGSLEISTUNG DES DRAHTLOSGERÄTS SRD max Transmitterleistung 25mW bei 5 725GHz 5 85GHz Subwoofername PS WR95BB Gewicht 9 8 kg Abmessungen B H T 210 0 x 403 0 x 403 0 mm VERSTÄRKER Nennausgangsleistung 160W AUSGANGSLEISTUNG DES DRAHTLOSGERÄTS SRD max Tra...

Страница 58: ...ckt um das Wi Fi ein auszuschalten Bluetooth Anschlussdeaktivierungsmethode Halten Sie die Taste NETWORK auf der Unterseite der Soundbar 30 Sekunden lang gedrückt um das Bluetooth ein auszuschalten Samsung erklärt hiermit dass dieses Gerät der Richtlinie 2014 53 EU entspricht Der vollständige Text der EU Konformitätserklärung ist unter folgender Internetadresse abrufbar http www samsung com Geben ...

Страница 59: ...er dazugehörigen Dokumentation gibt an dass das Produkt und Zubehörteile z B Ladegerät Kopfhörer USB Kabel nach ihrer Lebensdauer nicht zusammen mit dem normalen Haushaltsmüll entsorgt werden dürfen Entsorgen Sie dieses Gerät und Zubehörteile bitte getrennt von anderen Abfällen um der Umwelt bzw der menschlichen Gesundheit nicht durch unkontrollierte Müllbeseitigung zu schaden Helfen Sie mit das A...

Страница 60: ...Dit symbool geeft aan dat de nominale spanning wisselspanning is Gelijkspanning Dit symbool geeft aan dat de nominale spanning gelijkspanning is Voorzichtig raadpleeg de instructies voor gebruik Dit symbool geeft aan dat de gebruiker de handleiding moet raadplegen voor meer informatie over de veiligheid WAARSCHUWING Om het gevaar voor een elektrische schok te vermijden dient u dit apparaat niet aa...

Страница 61: ...tie optreden Als u het apparaat in de winter verplaatst wacht u ongeveer 2 uur totdat het apparaat weer op kamertemperatuur is voordat u deze gaat gebruiken 5 De batterijen die in dit product worden gebruikt bevatten chemicaliën die schadelijk zijn voor het milieu Gooi batterijen niet met het gewone huisvuil weg Werp de batterijen niet in het vuur De batterijen mogen niet worden kortgesloten gedem...

Страница 62: ...iken 12 06 Eendraadlozeverbindingnaardetvgebruiken 15 07 Eenexternapparaatverbinden 17 08 Eenmobielapparaatverbinden 18 09 Dewandmontageinstalleren 21 10 DeSoundbarinstallerenboveneentv voet 23 11 Software update 24 12 Probleemoplossing 25 13 Licentie 27 14 KennisgevingOpenSource Licentie 27 15 BelangrijkeOpmerkingoverService 27 16 SpecificatiesenHandleiding 28 ...

Страница 63: ...Etiket onderkant van de hoofdeenheid van de Soundbar Om extra componenten of optionele kabels te kopen neemt u contact op met een servicecentrum van Samsung of de klantenservice van Samsung Meer informatie over de wandmontage of rubberen voet vindt u op pagina s 21 23 Afbeeldingen specificaties en het scherm van de app zijn onderhevig aan wijzigingen zonder voorafgaande kennisgeving Batterijenplaa...

Страница 64: ... DIGITAL AUDIO IN OPTICAL HDMI TO TV eARC ARC HDMI 2 HDMI 1 ID SET WOOFER REAR POWER ID SET NETWORK SERVICE ID SET WOOFER REAR DIGITAL AUDIO IN OPTICAL HDMI TO TV eARC ARC HDMI 2 HDMI 1 Knop Multifunctioneel Druk in de standby modus op de knop Multifunctioneel om de Soundbar in te schakelen Druk op de knop Multifunctioneel om de invoerbron te wijzigen Druk gedurende 3 seconden op de knop Multifunc...

Страница 65: ...bar naar de Bluetooth koppelingsmodus Druk op de knop en wacht op het scherm BTPAIRING om een nieuw Bluetooth apparaat te koppelen p Afspelen Onderbreken U kunt muziek ook afspelen of onderbreken door op de knop te drukken Omhoog Omlaag Links Rechts Druk op Omhoog Omlaag Links Rechts op de knop om functies te selecteren of in te stellen Geluidsregeling Wanneer dit is ingedrukt worden instelitems a...

Страница 66: ...prekers voordat de Soundbar wordt aangesloten De subwoofer en de surround luidsprekers worden automatisch verbonden als de Soundbar wordt ingeschakeld Als u de stroomkabel uit het stopcontact haalt en er opnieuw insteekt wanneer het product ingeschakeld is wordt de Soundbar automatisch ingeschakeld Onderkantvande hoofdeenheidvande Soundbar Achterkantvan Subwoofer Onderkantvandelinker enrechtersurr...

Страница 67: ...d luidsprekers voor een optimale geluidsbeleving Handmatigaansluitenvandesubwooferofsurround luidsprekers Voordatuonderstaandeprocedurevoordehandmatigeverbindinguitvoert Controleer of de stroomkabels van de Soundbar en subwoofer of surround luidsprekers op de juiste manier zijn aangesloten Zorg ervoor dat de Soundbar uitgeschakeld is 1 Schakel de hoofdeenheid van de Soundbar uit 2 Druk op IDSET op...

Страница 68: ...p de afstandsbediening 5 seconden ingedrukt SOUND MODE PAIR 5 Sec IDSET 4 Controleer of de LINK LED vast blauw is verbinding voltooid LINK LED Blauwisaan Het LINK LED lampje stopt met knipperen en is continu blauw als de verbinding tussen de Soundbar en de draadloze subwoofer surround luidsprekers tot stand is gekomen ...

Страница 69: ...eer 5 minuten Als het lampje blijft knipperen probeer dan de subwoofer en de surround luidsprekers handmatig aan te sluiten Zie pagina 9 Rood Aan Stand by met de hoofdeenheid van de Soundbar uitgeschakeld Controleer of de stroomkabel aan de hoofdeenheid van de Soundbar goed is aangesloten Verbinding mislukt Maak opnieuw verbinding Raadpleeg de instructies voor handmatig verbinden op pagina 9 Rood ...

Страница 70: ...ERNET DetvverbindendieHDMIARC AudioReturnChannel ondersteunt HDMI IN ARC HDMI TO TV eARC ARC Maakverbindingmetde HDMIIN ARC poortvanuwtv HDMI kabel Onderkantvande Soundbar MaakverbindingmetdeHDMI TOTV eARC ARC poortvande hoofdeenheidvandeSoundbar BovenkantvandeSoundbar TVARC 1 Als de Soundbar en tv uitgeschakeld zijn sluit dan de HDMI kabel aan zoals getoond in de afbeelding 2 Schakel de Soundbar ...

Страница 71: ...dan een met een diameter van minder dan 14 mm Deze functie is niet beschikbaar als de HDMI kabel ARC niet ondersteunt Wanneer de audio in een uitzending gecodeerd is in Dolby Digital en de Formaat van digitale geluidsuitvoer op uw tv op PCM is ingesteld raden we aan om de instelling in Dolby Digital te wijzigen Wanneer de instelling op de tv is gewijzigd zult u genieten van een betere geluidskwali...

Страница 72: ...bar met een Samsung tv om geluid via twee apparaten uit te voeren voor een optimaal surroundeffect Wanneer de Soundbar is aangesloten verschijnt het menu TV Soundbar onder het menu Geluidsuitvoer van de tv Selecteer het overeenstemmende menu Tv menu OF Optischekabel nietmeegeleverd HDMI kabel D IN Voorbeeld tv menu TV AV SoundbarNaamserie HDMI OPMERKINGEN Het kan werken met de codec die wordt onde...

Страница 73: ...Als BTREADY verschijnt houd dan de knop Micaan uit op het bovenpaneel van de Soundbar gedurende meer dan 5 seconden ingedrukt zodat BTPAIRING wordt weergegeven 2 Selecteer Bluetooth modus op de Samsung tv vb Start Instellingen Geluid Geluidsuitvoer Lijst met Bluetooth luidsprekers AV Samsung Soundbar Q950T Bluetooth 3 Selecteer AV SamsungSoundbarQ950T in de lijst op het scherm van de tv Een beschi...

Страница 74: ...ndsbediening van de Soundbar of houd de knop Mic aan uit aan de bovenkant van de Soundbar gedurende meer dan 5 seconden ingedrukt wanneer de Soundbar in BT modus is OpmerkingenovereenBluetooth verbinding Plaats een nieuw apparaat binnen 1 m om een verbinding via Bluetooth communicatie tot stand te brengen Als u bij het verbinden met een Bluetooth apparaat een pincode wordt gevraagd voer dan 0000 i...

Страница 75: ...n apparaat en tv in Multifunctioneel Selecteer de HDMI1 of HDMI2 modus Methode2 Verbindenmeteenoptischekabel DIGITAL AUDIO IN OPTICAL HDMI 1 OPTICAL OUT OnderkantvandeSoundbar Optischekabel nietmeegeleverd BD Dvd speler Settopbox Gameconsole BovenkantvandeSoundbar D IN Sluit de optische kabel aan Schakel de Soundbar en het Externe apparaat in Multifunctioneel Selecteer de D IN modus OPMERKING Raad...

Страница 76: ...nctioneel op het bovenpaneel en selecteer vervolgens BT BT wijzigt na enkele seconden automatisch in BTPAIRING of wijzigt in BTREADY als er een verbindingsrecord is b Als BTREADY verschijnt houd dan de knop Micaan uit op het bovenpaneel van de Soundbar gedurende meer dan 5 seconden ingedrukt zodat BTPAIRING wordt weergegeven 2 Selecteer op uw apparaat AV SamsungSoundbarQ950T in de lijst die versch...

Страница 77: ...een Amazon account nodig om de Soundbar via het netwerk te verbinden 1 Installeer de SmartThings app op uw mobiele apparaat en start de app 2 Voer het Alexa account in door de instructies in de app te volgen en meld u vervolgens aan bij de service 3 Roep Alexa of druk gedurende 3 seconden op de knop Multifunctioneel op de Soundbar om de Alexa service te gebruiken Druk gedurende 3 seconden op de kn...

Страница 78: ...et op een scherpe hoek van de Soundbar De Soundbar of uw mobiele apparaat kan bekrast of beschadigd raken Het wordt aanbevolen om een hoesje te gebruiken voor uw mobiele apparaat Tik zacht op het brede gebied van het bovenste deel van de Soundbar zonder te veel kracht te gebruiken Update de SmartThings app naar de nieuwste versie om deze functie te gebruiken Afhankelijk van het versie van de app w...

Страница 79: ...pe wand gipsplaat ijzeren wand hout enz Bevestig indien mogelijk de ondersteuningsschroeven in muurtapeinden Koop wandmontageschroeven volgens het type en de dikte van de wand waarop u de Soundbar wilt monteren Diameter M5 Lengte 35 mm of langer aanbevolen Sluit kabels van het toestel op externe apparaten aan voordat u de Soundbar aan de wand monteert Zorg ervoor dat het toestel is uitgeschakeld e...

Страница 80: ...geen muurbevestiging Houdrekeningmethetvolgendebijhet bevestigenvandesurround luidsprekersaandemuur De muurbevestigingen voor de surround luidsprekers moeten minimaal 8 0 kg kunnen dragen Afmeting van opening 1 4 20 UNC schroefdraadbevestiging Controleer de draagkracht van de muur voordat u de muurbevestigingsbeugels bevestigt Als er niet voldoende draagkracht is versterk dan de muur voordat u de ...

Страница 81: ...staande afbeelding Rubberenvoet Plaats de Soundbar op een tv voet Microfoon Zoals de afbeelding laat zien moet u het midden van de Soundbar uitlijnen met het midden van de tv en de Soundbar voorzichtig op de tv voet plaatsen Plaats nu de microfoon aan de voorkant van de standaard om spraakherkenning niet te verstoren TV RechteruiteindevandeSoundbar OPMERKINGEN Zorg ervoor dat de Soundbar op een vl...

Страница 82: ... IN OPTICAL HDMI TO TV eARC ARC HDMI 2 HDMI 1 ID SET WOOFER REAR ID SET WOOFER REAR NETWORK SERVICE ID SET OnderkantvandeSoundbar Samsungkanindetoekomstupdatesbieden voordesysteemfirmwarevandeSoundbar Wanneer een update beschikbaar is kunt u de Soundbar bijwerken door de USB schijf die de update firmware aan te sluiten op de SERVICE poort van de Soundbar Voor meer informatie over het downloaden va...

Страница 83: ...t de Soundbar en steek er hem dan weer in Alshetgeluidnietuitdesubwooferen surround luidsprekerskomt Controleer of het led lampje aan de achterkant van de subwoofer en surround luidsprekers blauw is Verbind de Soundbar subwoofer en surround luidsprekers opnieuw als het lampje blauw knippert of rood is Zie pagina 9 AlsdetvnietviaHDMITOTV eARC ARC is verbonden Controleer of de HDMI kabel correct op ...

Страница 84: ...erbinding onmogelijk zijn Verplaats de router dichter bij de Soundbar of pas de geïnstalleerde positie aan zonder obstakels AlsAlexanietreageert Wanneerdemicrofoonisuitgeschakeldofde ontvangstslechtis Druk op de knop Micaan uit bovenop de Soundbar om de microfoon in te schakelen Spraakherkenning is mogelijk niet beschikbaar vanwege omgevingsgeluid Verminder het omgevingsgeluid en probeer het opnie...

Страница 85: ... www spotify com connect third party licenses Ga naar www spotify com connect voor meer informatie over Spotify Connect 14 KENNISGEVING OPENSOURCE LICENTIE Neem contact op met Samsung Open Source http opensource samsung com voor vragen en verzoeken over open source 15 BELANGRIJKE OPMERKING OVERSERVICE De afbeeldingen en illustraties in deze gebruiksaanwijzing dienen slechts te referentie en kunnen...

Страница 86: ...p 5 15 GHz 5 25 GHz 100 mW op 5 25 GHz 5 35 GHz 5 47 GHz 5 725 GHz UITGANGSVERMOGEN DRAADLOOS APPARAAT BT max zendvermogen 100 mW op 2 4 GHz 2 4835 GHz UITGANGSVERMOGEN DRAADLOOS APPARAAT SRD max zendvermogen 25 mW op 5 725 GHz 5 85 GHz Naam van subwoofer PS WR95BB Gewicht 9 8 kg Afmetingen B X H X D 210 0 x 403 0 x 403 0 mm VERSTERKER Uitvoervermogen 160W UITGANGSVERMOGEN DRAADLOOS APPARAAT SRD m...

Страница 87: ...op het onderpaneel van de Soundbar om Wi Fi in uit te schakelen Bluetooth Manier om poort te deactiveren Druk gedurende 30 seconden op de knop NETWORK op het onderpaneel van de Soundbar om Bluetooth in uit te schakelen Samsung verklaart hierbij dat deze apparatuur voldoet aan Richtlijn 2014 53 EU De volledige tekst van de EU Conformiteitsverklaring vindt u op deze website http www samsung com ga n...

Страница 88: ...it merkteken op het product de accessoires of het informatiemateriaal duidt erop dat het product en zijn elektronische accessoires bv lader headset USB kabel niet met ander huishoudelijk afval verwijderd mogen worden aan het einde van hun gebruiksduur Om mogelijke schade aan het milieu of de menselijke gezondheid door ongecontroleerde afvalverwijdering te voorkomen moet u deze artikelen van andere...

Страница 89: ...dique que la tension nominale indiquée par le symbole est une tension CA Tension CC ce symbole indique que la tension nominale indiquée par le symbole est une tension CC Mise en garde Consulter le mode d emploi ce symbole avertit l utilisateur qu il doit consulter le manuel d utilisation pour en savoir plus sur les informations relatives à la sécurité AVERTISSEMENT Afin de diminuer les risques d i...

Страница 90: ...i vous devez transporter l ensemble pendant l hiver attendez environ 2 heures que l appareil ait atteint la température de la pièce avant de l utiliser 5 Les piles utilisées dans ce produit peuvent contenir des produits ch miques dangereux pour l environnement Ne jetez pas les piles dans votre poubelle habituelle Ne vous débarrassez pas des piles en les faisant brûler Ne court circuitez pas ne dés...

Страница 91: ...iseur 12 06 Connexionsansfilavecletéléviseur 15 07 Connexiond unappareilexterne 17 08 Connexiond unappareilmobile 18 09 Installationdelafixationmurale 21 10 InstallationdelaSoundbarau dessusd unsoclede téléviseur 23 11 Miseàjourdulogiciel 24 12 Dépannage 25 13 Licence 27 14 AvisdeLicenceLibre 27 15 RemarqueImportanteàProposduService 27 16 SpécificationsetGuide 28 ...

Страница 92: ... au bas de l unité principale Soundbar Pour acheter des câbles en option ou des composants supplémentaires contactez un Centre de service Samsung ou le Service client de Samsung Pour plus d informations au sujet de la fixation murale ou du pied en caoutchouc consultez les pages 21 à 23 La conception les spécifications et l écran de l application sont sujets à changement sans préavis Insertiondespi...

Страница 93: ...IO IN OPTICAL HDMI TO TV eARC ARC HDMI 2 HDMI 1 ID SET WOOFER REAR POWER ID SET NETWORK SERVICE ID SET WOOFER REAR DIGITAL AUDIO IN OPTICAL HDMI TO TV eARC ARC HDMI 2 HDMI 1 Bouton Multifonction En mode veille appuyez sur la touche Multifonction pour activer la Soundbar Appuyez sur la touche Multifonction pour changer la source d entrée Appuyez sur la touche Multifonction pendant 3 secondes pour a...

Страница 94: ...lage Bluetooth Appuyez sur la touche et attendez que l écran BTPAIRING se connecte à un nouveau dispositif Bluetooth p Lecture Pause Vous pouvez également lire ou mettre en pause la musique en appuyant sur cette touche Haut Bas Gauche Droite Appuyez sur Haut Bas Gauche Droite sur la touche pour sélectionner ou paramétrer les fonctions Réglagesaudio Lorsque vous appuyez sur ce bouton les éléments d...

Страница 95: ...ranchez le caisson de basse et les enceintes surround avant de les connecter à la Soundbar Le caisson de basse et les enceintes surround se connectent automatiquement lorsque vous allumez la Soundbar Si vous débranchez puis rebranchez le cordon d alimentation alors que le produit est allumé la Soundbar s allume automatiquement Basdel unitéprincipale Soundbar Arrièredusubwoofer Faceinférieuredes en...

Страница 96: ...n de basse et des enceintes surround sans fil Connexionmanuelleducaissondebasseoudesenceintessurround Avantderéaliserlaprocéduredeconnexionmanuelledusubwooferdécriteci dessous Assurez vous que les cordons d alimentation de la Soundbar et du caisson de basse ou des enceintes surround sont correctement branchés Vérifiez que la Soundbar est éteinte 1 Éteignez l unité principale de la Soundbar 2 Appuy...

Страница 97: ...e Haut de la télécommande pendant 5 secondes SOUND MODE PAIR 5 Sec IDSET 4 Vérifiez que le témoin LED LINK brille en bleu de manière stable connexion terminée LINKLED Bleusiactivé Le LINK LED arrête de clignoter et s allume en bleu lorsque la Soundbar est connectée au caisson de basse et aux enceintes surround sans fil ...

Страница 98: ...inutes Si le voyant continue de clignoter essayez de connecter manuellement le caisson de basse et les enceintes surround Voir page 9 Rouge Allumé Veille lorsque l unité principale Soundbar est éteinte Vérifiez que le câble d alimentation fixé à l unité principale Soundbar est connecté correctement Échec de la connexion Rétablissez la connexion Consultez les instructions relatives à la connexion m...

Страница 99: ...hargeHDMIARC Canalderetouraudio HDMI IN ARC HDMI TO TV eARC ARC ConnectezauportHDMIIN ARC devotretéléviseur CâbleHDMI Partieinférieuredela Soundbar ConnectezauportHDMITOTV eARC ARC surl unitéprincipale Soundbar PartiesupérieuredelaSoundbar TVARC 1 Vérifiez que le téléviseur et la Soundbar sont éteints plus connectez le câble HDMI comme indiqué sur la figure 2 Allumez la Soundbar et le téléviseur 3...

Страница 100: ...eur à 14 mm Cette fonction n est pas disponible si le câble HDMI ne prend pas en charge ARC Lorsque le son d un canal de diffusion est encodé en Dolby Digital et que le format audio de la sortie numérique Format de sortie audio numérique de votre téléviseur est réglé sur PCM nous vous recommandons d ajuster le réglage sur Dolby Digital Modifier ce réglage sur le téléviseur vous permettra d obtenir...

Страница 101: ...e synchronise avec un téléviseur Samsung pour diffuser le son via deux périphériques pour un effet surround optimal Quand la Soundbar est connectée le menu TV Soundbar apparaît dans le menu Sortieson du téléviseur Sélectionnez le menu correspondant MenuTV OU Câbleoptique nonfourni CâbleHDMI D IN Exemple de menu TV TV AV SoundbarNomdesérie HDMI REMARQUES Il peut fonctionner selon le codec pris en c...

Страница 102: ... la touche Microactivé désactivé située sur le panneau supérieur de la Soundbar enfoncée pendant plus de 5 secondes jusqu à ce que le message BTPAIRING apparaisse 2 Sélectionnez le mode Bluetooth sur le téléviseur Samsung TV p ex Accueil Paramètres Son Sortie son Liste des haut parleurs Bluetooth AV Samsung Soundbar Q950T Bluetooth 3 Sélectionnez AV SamsungSoundbarQ950T à partir de la liste présen...

Страница 103: ...la touche Microactivé désactivé située sur la partie supérieure de la Soundbar enfoncée pendant plus de 5 secondes lorsque la Soundbar est en mode BT RemarquesconcernantlaconnexionBluetooth Placez un nouvel appareil à une distance inférieure à 1 m de la Soundbar pour établir la connexion par le biais de la communication Bluetooth Si un code d identification personnel vous est demandé lors de la co...

Страница 104: ...xterne et le téléviseur Multifonction Sélectionnez le mode HDMI1 ou HDMI2 Méthode2 Connexionàl aided uncâbleoptique DIGITAL AUDIO IN OPTICAL HDMI 1 OPTICAL OUT PartieinférieuredelaSoundbar Câbleoptique nonfourni LecteurBD DVD décodeur consoledejeu PartiesupérieuredelaSoundbar D IN Connectez le câble optique Allumez la Soundbar et l appareil externe Multifonction Sélectionnez le mode D IN REMARQUE ...

Страница 105: ...uée sur le panneau supérieur puis sélectionnez BT BT passe automatiquement sur BTPAIRING en quelques secondes ou sur BT READY si une connexion est déjà enregistrée b Lorsque BTREADY apparaît maintenez la touche Microactivé désactivé située sur le panneau supérieur de la Soundbar enfoncée pendant plus de 5 secondes jusqu à ce que le message BTPAIRING apparaisse 2 Sur votre appareil sélectionnez AV ...

Страница 106: ...mazon Alexa un compte Amazon est nécessaire pour connecter la Soundbar sur le réseau 1 Installez l application SmartThings sur votre appareil mobile puis lancez la 2 Saisissez le compte Alexa en suivant les instructions de l application puis connectez vous au service 3 Appelez Alexa ou appuyez sur la touche Multifonction sur la Soundbar pendant 3 secondes pour utiliser le service Alexa Appuyez sur...

Страница 107: ...ndbar La Soundbar ou l appareil mobile risquerait d être rayé ou endommagé Il est recommandé de recouvrir l appareil mobile d une housse protectrice Appuyez légèrement sur la zone large de la partie supérieure de la Soundbar sans forcer Pour utiliser cette fonction mettez à jour l application SmartThings à la dernière version Il se peut que cette fonction ne soit pas prise en charge selon la versi...

Страница 108: ...âtre en acier en bois etc Si possible fixez les vis du support dans les montants du mur Achetez les vis de montage de fixation murale adaptées au type et à l épaisseur du mur sur lequel vous souhaitez installer la Soundbar Diamètre M5 Longueur 35 mm ou plus selon nos recommandations Connectez des câbles de l unité aux appareils externes avant de procéder à l installation murale de la Soundbar Veil...

Страница 109: ...ne sont pas vendus par Samsung Remarquesconcernantlafixation muraledesenceintessurround Les supports muraux des enceintes surround doivent supporter un poids supérieur à 8 0 kg Taille des trous vis filetées 1 4 20 UNC Vérifiez la solidité du mur avant d installer les supports de fixation murale S il n est pas suffisamment solide veillez à le renforcer avant d installer les supports de fixation mur...

Страница 110: ...ous Piedencaoutchouc Placez la Soundbar sur un socle de téléviseur Microphone Comme indiqué sur l illustration alignez le centre de la Soundbar avec le centre du téléviseur en insérant avec précaution la Soundbar dans le socle du téléviseur À ce moment placez le microphone à l avant du support pour ne pas interférer avec la reconnaissance vocale TV ExtrémitédroitedelaSoundbar REMARQUES Veillez à c...

Страница 111: ...RVICE ID SET PartieinférieuredelaSoundbar Ilestpossiblequ àl avenir Samsungproposedes misesàjourdumicrologicieldusystèmedela Soundbar Lorsqu une mise à jour est disponible vous pouvez mettre à jour la Soundbar en connectant un lecteur USB contenant la mise à jour du micrologiciel au port SERVICE de la Soundbar Pour plus d informations sur la méthode de téléchargement des fichiers de mise à jour et...

Страница 112: ...ble de la Soundbar puis rebranchez le Lecaissondebasseetlesenceintessurround n émettentaucunson Assurez vous que le voyant situé à l arrière du caisson de basse et des enceintes surround est allumé en bleu S il clignote en bleu ou est allumé en rouge effectuez une nouvelle connexion Voir page 9 Siletéléviseurn estpasconnectéviaHDMI TOTV eARC ARC Vérifiez si le câble HDMI est correctement connecté ...

Страница 113: ...z le routeur de la Soundbar ou ajustez la position d installation pour qu il n y ait aucun obstacle entre les deux appareils AucasoùAlexanerépondraitpas Lorsquelemicrophoneestéteintouquela réceptionestmauvaise Appuyez sur la touche Microactivé désactivé située sur le haut de la Soundbar pour activer le microphone La reconnaissance vocale peut ne pas être disponible en raison du bruit ambiant Rédui...

Страница 114: ...nses Pour en savoir plus sur Spotify Connect veuillez consulter le site Web www spotify com connect 14 AVISDELICENCE LIBRE Pour envoyer des questions et des demandes concernant des logiciels libres contactez Samsung Open Source http opensource samsung com 15 REMARQUE IMPORTANTEÀ PROPOSDU SERVICE Les figures et les illustrations du présent Manuel d utilisation sont fournies à titre de référence uni...

Страница 115: ...5 25 GHz 5 35 GHz 5 47 GHz 5 725 GHz PUISSANCE DE SORTIE DE L APPAREIL SANS FIL Puissance de transmission BT max 100 mW à 2 4 GHz 2 4835 GHz PUISSANCE DE SORTIE DE L APPAREIL SANS FIL Puissance de transmission SRD max 25 mW à 5 725 GHz 5 85 GHz Nom du caisson de basse PS WR95BB Poids 9 8 kg Dimensions L x H x P 210 0 x 403 0 x 403 0 mm AMPLIFICATEUR Puissance de sortie nominale 160W PUISSANCE DE S...

Страница 116: ...le Wi Fi Bluetooth Méthode de désactivation du port Appuyez sur la touche NETWORK sur le panneau inférieur de la Soundbar et maintenez la enfoncée pendant 30 secondes pour activer désactiver le Bluetooth Samsung déclare par la présente que cet équipement est conforme à la directive 2014 53 UE Le texte complet de la déclaration de conformité de l UE est disponible à l adresse Internet suivante http...

Страница 117: ...oduit ses accessoires ou sa documentation indique que ni le produit ni ses accessoires électroniques usagés chargeur casque audio câble USB etc ne peuvent être jetés avec les autres déchets ménagers La mise au rebut incontrôlée des déchets présentant des risques environnementaux et de santé publique veuillez séparer vos produits et accessoires usagés des autres déchets Vous favoriserez ainsi le re...

Страница 118: ...pport AUSTRIA 08007267864 0800 SAMSUNG www samsung com at support SWITZERLAND 0800726786 www samsung com ch support German www samsung com ch_fr support French Area Contact Centre Web Site CZECH 800 SAMSUNG 800 726786 www samsung com cz support SLOVAKIA 0800 SAMSUNG 0800 726786 www samsung com sk support CROATIA 072726786 www samsung com hr support BOSNIA 055233999 www samsung com support NORTH MA...

Отзывы: