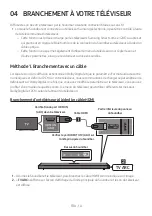
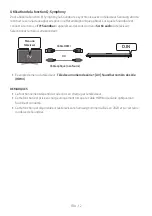
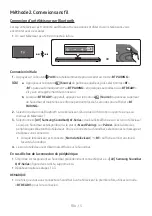
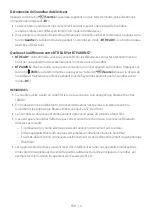
background image

FRA - 24


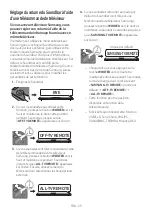
Fonction de limitation du volume


Pour protéger votre audition, la fonction de limitation du volume limite le volume à 20 
si vous allumez le Soundbar alors le volume est réglé sur une valeur supérieure à 20.


– Par défaut, la fonction de limitation du volume est désactivée. Vous devez l’activer 

pour l’utiliser.


– Une fois activée, la fonction de limitation du volume reste active même lorsque 

l’appareil est mis hors tension.


– Pour activer ou désactiver la fonction de limitation du volume, appuyez sur la 

touche 

Bas

 de la télécommande pendant 5 secondes. Lorsque la restriction de 

volume est désactivée, «

V FREE

» apparaît sur l’écran avant. Lorsque la fonction 

est activée, «

V LOCK

» apparaît.

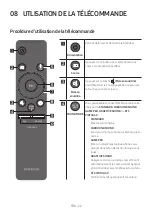
Contrôle du son

VOL

BASS

SOUND

MODE

PAIR

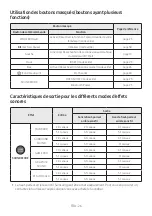
Vous pouvez choisir entre 

TREBLE

BASS

, ou 

AUDIO SYNC

.


Pour contrôler le volume du son des aigus ou des graves, appuyez sur le bouton 

Contrôle du son

 pour sélectionner 

TREBLE

 ou 

BASS

, puis réglez le volume entre -6 et 

+6 en utilisant les boutons 

Haut/Bas

.


Maintenez le bouton 

 (Contrôle du son)

 enfoncé environ 5 secondes pour régler le 

son pour chaque bande de fréquence. Vous pouvez utiliser les boutons 

Gauche/Droite


pour sélectionner les fréquences suivantes : 150 Hz, 300 Hz, 600 Hz, 1,2 kHz, 2,5 kHz, 
5 kHz et 10 kHz. Vous pouvez également définir chaque fréquence sur une valeur allant 

de -6 à +6 à l’aide des touches 

Haut/Bas

.


Si la vidéo du téléviseur et l’audio du Soundbar ne sont pas synchronisés, appuyez sur 
le bouton 

Contrôle du son

 pour sélectionner 

AUDIO SYNC

, puis réglez le retard de 

l’audio entre 0 et 300 millisecondes à l’aide des boutons 

Haut/Bas

. (Non disponible en 

mode «

USB

» ou «

BT

».)


Si des haut-parleurs à effet surround sont connectés, la fonction de haut-parleur 
arrière peut être ACTIVÉE/DÉSACTIVÉE à l’aide des boutons 

Haut/Bas

 afin de régler le 

volume dans une plage de -6 à +6.


L’option 

AUDIO SYNC

 n’est prise en charge que dans certaines fonctions.

VOL

WOOFER

SOUND

MODE

PAIR

WOOFER

SOU

ND

MO

DE

VOL

WOOFE

R

SOUNDB

AR

SOU

ND

MO

DE

VOL

WOOFE

R

SOUNDB

AR

SOU

ND

MO

DE

VOL

WOOFE

R

SOUNDB

AR

SOU

ND

MO

DE

VOL

WOOFE

R

SOUNDB

AR

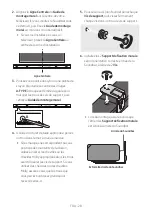
Faites basculer le bouton 

WOOFER

 vers le haut ou vers le bas pour régler le volume du 

caisson des basses sur -12 ou entre -6 à +6. Pour régler le niveau de volume du caisson de 
basses sur 0, appuyez sur la touche.

VOL

BASS

SOUND

MODE

PAIR

VOL

SOU

ND

MO

DE

VOL

WOOFE

R

SOUNDB

AR

SOU

ND

MO

DE

VOL

WOOFE

R

SOUNDB

AR

SOU

ND

MO

DE

VOL

WOOFE

R

SOUNDB

AR

SOU

ND

MO

DE

VOL

WOOFE

R

SOUNDB

AR

Faites basculer le bouton 

VOL

 vers le haut ou vers le bas pour régler le volume.


Mise en sourdine


Appuyez sur le bouton 

VOL

 pour couper le son. Appuyez à nouveau sur le bouton pour 

rétablir le son.

Содержание HW-Q60T

Страница 1: ...HW Q60T FULL MANUAL Imagine the possibilities Thank you for purchasing this Samsung product To receive more complete service please register your product at www samsung com register ...

Страница 2: ...reduce the risk of fire or electric shock do not expose this appliance to rain or moisture To prevent injury this apparatus must be securely attached to the floor wall in accordance with the installation instructions CAUTION Do not expose this apparatus to dripping or splashing Do not put objects filled with liquids such as vases on the apparatus To turn this apparatus off completely you must pull...

Страница 3: ...ug has two blades with one wider than the other A grounding type plug has two blades and a third grounding prong The wide blade or the third prong are provided for your safety If the provided plug does not fit into your outlet consult an electrician for replacement of the obsolete outlet 10 Protect the power cord from being walked on or pinched particularly at plugs convenience receptacles and the...

Страница 4: ...t sunlight or other heat sources This could lead to overheating and cause the unit to malfunction 4 Protect the product from moisture i e vases and excess heat e g a fireplace or equipment creating strong magnetic or electric fields Unplug the power cable from the AC wall socket if the unit malfunctions Your product is not intended for industrial use It is for personal use only Condensation may oc...

Страница 5: ...stallation components connections and product specifications FULLMANUAL You can access the FULL MANUAL on Samsung s on line customer support center by scanning the QR code on the left To see the manual on your PC or mobile device download the manual in document format from Samsung s website http www samsung com support Design and specifications are subject to change without prior notice ...

Страница 6: ...connection between the Subwoofer and the Soundbar 6 Manually connecting the Subwoofer if automatic connection fails 7 Connecting an SWA 8500S Sold Separately to your Soundbar 8 04 ConnectingtoyourTV 10 Method 1 Connecting with a Cable 10 Connecting a TV using an HDMI Cable 10 Connecting using an Optical Cable 11 Method 2 Connecting Wirelessly 13 Connecting a TV via Bluetooth 13 05 ConnectinganExte...

Страница 7: ...h more than one function 26 Output specifications for the different sound effect modes 26 09 InstallingtheWallMount 27 Installation Precautions 27 Wallmount Components 27 10 PlacingtheSoundbaronaTVstand 29 11 SoftwareUpdate 30 Update Procedure 30 If UPDATE is not displayed 31 12 Troubleshooting 32 13 License 33 14 OpenSourceLicenseNotice 33 15 ImportantNotesAboutService 33 16 SpecificationsandGuid...

Страница 8: ...to the label attached to the product Label Bottom of the Soundbar Main Unit To purchase additional components or optional cables contact a Samsung Service Center or Samsung Customer Care The appearance of the accessories may differ slightly from the illustrations above InsertingBatteriesbeforeusingtheRemoteControl AAbatteriesX2 Slide the back cover in the direction of the arrow until it is complet...

Страница 9: ...bar s front display Source Button Selects the source input mode Inputmode Display Optical Digital input D IN ARC HDMI OUT input D IN TV ARC Auto conversion HDMI input HDMI BLUETOOTH mode BT USB mode USB To turn on BTPAIRING mode change the source to BT mode and then press and hold the Source button for more than 5 seconds When you plug in the AC cord the power button will begin working in 4 to 6 s...

Страница 10: ...er adapter HDMI Inputs digital video and audio signals simultaneously using an HDMI cable Connect to the HDMI output of an external device HDMITOTV ARC Connect to the HDMI ARC jack on a TV DIGITALAUDIOIN OPTICAL Connect to the digital optical output of an external device When disconnecting the power cable of the AC DC power adaptor from a wall outlet pull the plug Do not pull the cable Do not conn...

Страница 11: ...e information about the required electrical power and power consumption refer to the label attached to the product Label Bottom of the Soundbar Main Unit POWER RearofSubwoofer PowerCord Connecting ElectricalPower USB 5V0 5A DC 24V DC 24V Bottomofthe SoundbarMainUnit AC DCAdapter PowerCord Connecting ElectricalPower Make sure to rest the AC DC Adapter flat on a table or the floor If you place the A...

Страница 12: ...oofer LED Status Description Resolution Blue On Successfully connected normal operation Blinking Recovering the connection Check if the power cable attached to the main Soundbar unit is connected properly or wait about 5 minutes If blinking persists try manually connecting the subwoofer See page 7 Red On Standby with the Soundbar main unit turned off Check if the power cable attached to the main S...

Страница 13: ...ofer turns off and the blue indicator blinks 5 Sec RearofSubwoofer 2 Press and hold the Upbutton on the remote control for at least 5 seconds The IDSET message appears on the display of the Soundbar for a moment and then it disappears The Soundbar will automatically power on when IDSET is complete SOUND MODE PAIR 5 Sec IDSET SAMSUNGlogoisonthetop 3 Check if the LINK LED is solid blue connection co...

Страница 14: ...If a steel concrete or metallic wall is between the main unit and the wireless subwoofer the system may not operate at all because the wireless signal cannot penetrate metal PRECAUTIONS Wireless receiving antennas are built into the wireless subwoofer Keep the unit away from water and moisture For optimal listening performance make sure that the area around the wireless subwoofer and the Wireless ...

Страница 15: ...inking 5 Sec 3 Press and hold the Upbutton on the remote control for at least 5 seconds The IDSET message appears on the display of the Soundbar for a moment and then it disappears The Soundbar will automatically power on when IDSET is complete SOUND MODE PAIR 5 Sec IDSET SAMSUNGlogoisonthetop CAUTION If your Soundbar was playing music when it connects to the SWA 8500S you may hear some stuttering...

Страница 16: ...n the audio in a broadcast is encoded in Dolby Digital and the Digital Output Audio Format on your TV is set to PCM we recommend that you change the setting to Dolby Digital When the setting on the TV is changed you will experience better sound quality The TV menu may use different words for Dolby Digital and PCM depending on the TV manufacturer ConnectingaTVusinganHDMICable ConnecttotheHDMIIN ARC...

Страница 17: ... audio data with just a single connector If the TV provides an ARC port connect the HDMI cable to the HDMI IN ARC port We recommend you use a coreless HDMI cable if possible If you use a cored HDMI cable use one whose diameter is less than 0 55 inches 14 mm This function is not available if the HDMI cable does not support ARC ConnectingusinganOpticalCable HDMI TO TV ARC DIGITAL AUDIO IN OPTICAL OP...

Страница 18: ...under the SoundOutput menu of the TV Select the corresponding menu TVMenu OR OpticalCable notsupplied HDMICable D IN TV menu example TVseriesname AV Soundbarseriesname HDMI NOTES It can operate according to the Codec supported by TV This function is supported only when the HDMI Cable or Optical Cable not supplied is connected This function is available in Samsung TVs released in 2020 and some Soun...

Страница 19: ...Soundbar for more than 5 seconds to display BTPAIRING 2 Select Bluetooth mode on the TV For more information see the TV s manual 3 Select AV SamsungSoundbarQ6T Series from the list on TV s screen An available Soundbar is indicated with NeedPairing or Paired on the TV s Bluetooth device list To connect the TV to the Soundbar select the message and then establish a connection When the TV is connecte...

Страница 20: ...he remote control or press and hold the Source button on the top of the Soundbar for more than 5 seconds while the Soundbar is in BT mode NOTES If asked for a PIN code when connecting a Bluetooth device enter 0000 In Bluetooth connection mode the Bluetooth connection will be lost if the distance between the Soundbar and the Bluetooth device exceeds 32 8 ft 10 meters The Soundbar automatically turn...

Страница 21: ...e HDMICable BottomoftheSoundbar ExternalDevice TopoftheSoundbar HDMI 1 Connect an HDMI cable from the HDMI jack on the back of the product to the HDMI OUT jack on your digital device 2 Connect an HDMI cable from the HDMITOTV ARC jack on the back of the product to the HDMI IN jack on your TV 3 Press the Source button on the top panel or on the remote control and then select HDMI 4 HDMI mode is disp...

Страница 22: ...lied BottomoftheSoundbar TopoftheSoundbar BD DVDplayer Set topbox Gameconsole D IN 1 Connect DIGITALAUDIOIN OPTICAL on the main unit to the OPTICAL OUT jack of the Source Device using a digital Optical Cable not supplied 2 Select D IN mode by pressing the Source button on the top panel or on the remote control ...

Страница 23: ...er Down if no USB device has been connected for more than 20 minutes FileFormatTypeCompatibilitylist Extension Codec SamplingRate Bitrate mp3 MPEG1 Layer2 32kHz 48kHz 32kbps 320kbps MPEG1 Layer3 32kHz 48kHz 32kbps 320kbps MPEG2 Layer3 16kHz 24kHz 8kbps 160kbps MPEG2 5 Layer3 8kHz 12kHz 8kbps 160kbps wma WMA7 8 9 Audio Only 32kHz 48kHz 32kbps 320kbps ogg Vorbis 32kHz 48kHz 45kbps 500kbps aac m4a mp...

Страница 24: ...TREADY if there is a connect record b When BTREADY appears press and hold the Source button on the top panel of the Soundbar for more than 5 seconds to display BTPAIRING 2 On your device select AV SamsungSoundbarQ6T Series from the list that appears When the Soundbar is connected to the Bluetooth device BluetoothDeviceName BT appears in the front display 3 Play music files from the device connecte...

Страница 25: ... devices may cause radio interference Devices that generate electromagnetic waves must be kept away from the Soundbar main unit e g microwaves wireless LAN devices etc The Soundbar supports SBC data 44 1kHz 48kHz Connect only to a Bluetooth device that supports the A2DP AV function You cannot connect the Soundbar to a Bluetooth device that supports only the HF Hands Free function Once you have pai...

Страница 26: ...etooth Bluetooth is a technology that enables Bluetooth compliant devices to interconnect easily with each other using a short wireless connection A Bluetooth device may cause noise or malfunction depending on usage if A part of your body is in contact with the receiving transmitting system of the Bluetooth device or the Soundbar It is subject to electrical variation from obstructions caused by a ...

Страница 27: ... the device A and then start playing on the device B The device won t switch if playing music from the device B without pausing or stopping the device A first 4 In versions prior to AVRCP V1 4 the switching time of the device playing music may be delayed NOTES If you attempt to connect a 3rd Bluetooth device the A or B devices will disconnect A device that is not currently playing will be disconne...

Страница 28: ... unmute the sound SOUNDMODE VOL WOOFER SOUND MODE PAIR You can select the desired sound effect by choosing STANDARD SURROUNDSOUND GAME PRO ADAPTIVESOUND or DTSVIRTUAL X STANDARD Outputs the original sound SURROUNDSOUND Provides a wider sound field than standard GAMEPRO Provides stereoscopic sound to immerse you in the action while gaming ADAPTIVESOUND Analyzes the content in real time and automati...

Страница 29: ... PAIR Press the PAIR button BTPAIRING appears in the Soundbar s display You can connect the Soundbar to a new Bluetooth device in this mode by selecting the Soundbar from the Bluetooth device s search list Play Pause VOL WOOFER SOUND MODE PAIR Press the p button to pause a music file temporarily When you press the button again the music file plays VOL WOOFER SOUND MODE PAIR Up Down Left Right Pres...

Страница 30: ...e adjusted to a setting between 6 to 6 using the Up Down buttons If the video on the TV and audio from the Soundbar are not synchronized press the SoundControl button to select AUDIOSYNC and then set the audio delay between 0 300milliseconds by using the Up Down buttons Not available in USB or BT mode If Surround Speakers are connected the Rear Speaker function can be turned ON OFF by using the Up...

Страница 31: ... O U N D B A R 5 Sec OFF TVREMOTE 3 If you want to control the Soundbar with your TV s remote push up and hold the WOOFER button for 5seconds repeatedly until ALL TVREMOTE appears in the display Then use your TV s menu to select external speakers S O U N D M O D E V O L W O O F E R S O U N D B A R 5 Sec ALL TVREMOTE 4 If you want to return the Soundbar to the default mode control by a Samsung TV r...

Страница 32: ...ower page 23 Outputspecificationsforthedifferentsoundeffectmodes Effect Input Output WithoutWirelessRear SpeakerKit WithWirelessRear SpeakerKit SOUNDMODE Surround VOL WOOFER SOUND MODE Bluetooth POWER STANDARD 2 0 ch 2 1 ch 4 1 ch 5 1 ch 3 1 ch 5 1 ch SURROUND SOUND 2 0 ch 4 1 ch 6 1 ch 5 1 ch 5 1 ch 7 1 ch GAME PRO 2 0 ch 4 1 ch 6 1 ch 5 1 ch 5 1 ch 7 1 ch ADAPTIVE SOUND 2 0 ch 4 1 ch 6 1 ch 5 1 ...

Страница 33: ...uds Purchase wall mounting screws according to the type and thickness of the wall you want to mount the Soundbar on Diameter M5 Length 1 3 8 inches 35 mm or longer recommended Connect cables from the unit to external devices before you install the Soundbar on the wall Make sure the unit is turned off and unplugged before you install it Otherwise it may cause an electric shock WallmountComponents W...

Страница 34: ...zed drill bit drill a hole in the wall at each marking If the markings do not correspond to the positions of studs make sure you insert appropriate anchors or mollies into the holes before you insert the support screws If you use anchors or mollies make sure the holes you drill are large enough for the anchors or mollies you use 5 Push a screw not supplied through each Holder Screw and then screw ...

Страница 35: ... Wall Mounts and then slide the Bracket Wall Mounts down so that the Bracket Wall Mounts rest securely on the Holder Screws 10 PLACINGTHE SOUNDBARONA TVSTAND Place the Soundbar on a TV stand 1 2inches 3cm ormore As illustrated in the image align the center of the Soundbar with the center of the TV carefully place the Soundbar onto the TV stand For optimal sound quality position the Soundbar at lea...

Страница 36: ...the firmware resets the subwoofer connection too 1 Connect a USB thumb drive to the USB port on your computer Important Make sure there are no music files on the USB thumb drive This may cause the firmware update to fail 2 Go to the Samsung website samsung com select Enter Model Number and enter the model of your Soundbar Select manuals and downloads and download the latest software file 3 Save th...

Страница 37: ...ied The main unit will turn off automatically after completing the firmware update After the update is completed the user setup in the Soundbar is initialized so you can reset your settings We recommend you write down your settings so that you can easily reset them after the update Note that updating firmware resets the subwoofer connection too If the connection to the subwoofer is not re establis...

Страница 38: ...de See the Bluetooth connection sections on pages 13 and 18 Soundisnotproduced IstheMutefunctionon Press the Mute button to cancel the mute function Isthevolumesettominimum Adjust the Volume Theremotecontroldoesnotwork Arethebatteriesdrained Replace with new batteries Isthedistancebetweentheremotecontroland Soundbarmainunittoofar Move the remote control closer to the Soundbar main unit TheredLEDon...

Страница 39: ... X logo are registered trademarks or trademarks of DTS Inc in the United States and or other countries DTS Inc All Rights Reserved The terms HDMI and HDMI High Definition Multimedia Interface and the HDMI Logo are trademarks or registered trademarks of HDMI Licensing LLC in the United States and other countries The Bluetooth word mark and logos are registered trademarks owned by the Bluetooth SIG ...

Страница 40: ...midity Range 10 75 AMPLIFIER Rated Output power 30W x 6 10W x 2 Supported play formats LPCM 2ch Dolby Audio supporting Dolby Digital DTS DTS Virtual X Subwoofer Name PS WR65BB Weight 13 7 Ibs 6 2 kg Dimensions W x H x D 8 1 x 13 9 x 11 9 inches 205 0 x 353 0 x 303 2 mm AMPLIFIER Rated Output power 160W NOTES Samsung Electronics Co Ltd reserves the right to change the specifications without notice ...

Страница 41: ...ipt must be retained by the customer and is the only acceptable proof of purchase It must be presented to the authorized service center at the time service is requested EXCLUSIONS WHATISNOTCOVERED This warranty does not cover damage due to accident fire flood and or other acts of God misuse incorrect line voltage improper installation improper or unauthorized repairs commercial use or damage that ...

Страница 42: ...tomer care Center HEADQUARTERS Samsung Electronics Canada Inc 2050 Derry Road West Mississauga Ontario L5N 0B9 Canada TEL 1 800 SAMSUNG 1 800 726 7864 www samsung com ca support Area Contact Center Web Site North America CANADA 1 800 SAMSUNG 726 7864 www samsung com ca support English www samsung com ca_fr support French U S A 1 800 SAMSUNG 726 7864 www samsung com us support ...

Страница 43: ...HW Q60T MANUEL COMPLET Imaginez les possibilités Merci d avoir choisi un appareil Samsung Pour recevoir une assistance plus complète veuillez enregistrer votre produit sur www samsung com register ...

Страница 44: ...de diminuer les risques d incendie ou de choc électrique n exposez pas cet appareil à la pluie ou à l humidité Pour éviter des blessures cet appareil doit être solidement fixé au plancher au mur conformément aux directives d installation MISEENGARDE Veillez à éviter toute projection sur l appareil Ne placez jamais de récipients contenant un liquide ex vase dessus La prise d alimentation fait offic...

Страница 45: ...arisée Une fiche polarisée comporte deux lames dont l une est plus large que l autre Une fiche de mise à la terre comporte deux lames et une troisième broche de mise à la terre La lame la plus large et la troisième broche sont destinées à assurer votre sécurité Si la fiche fournie ne s insère pas dans la prise utilisée faites appel à un électricien pour faire remplacer celle ci 10 Placez le cordon...

Страница 46: ...aleur Cela pourrait causer une surchauffe du fil et causer un dysfonctionnement de l unité 4 Protégez le produit de l humidité comme les vases et d une chaleur excessive comme une cheminée ou de tout équipement capable de créer des champs magnétiques ou électriques Débranchez le câble d alimentation en cas de dysfonctionnement Votre produit n est pas prévu pour un usage industriel Ce produit ne pe...

Страница 47: ...ations sur l installation du produit les composants les connexions et les caractéristiques du produit MANUELCOMPLET Vous pouvez accéder au MANUEL COMPLET sur le centre d assistance à la clientèle en ligne de Samsung en scannant le code QR sur la gauche Pour visualiser le manuel sur votre ordinateur ou appareil mobile téléchargez le au format document depuis le site Web de Samsung http www samsung ...

Страница 48: ...s et du Soundbar 6 Connexion manuelle du caisson des basses en cas d échec de la connexion automatique 7 Raccordement du module SWA 8500S vendu séparément au Soundbar 8 04 BranchementàvotreTéléviseur 10 Méthode 1 Branchement avec un câble 10 Branchement d un téléviseur à l aide d un câble HDMI 10 Branchement à l aide d un câble optique 11 Méthode 2 Connexion sans fil 13 Connexion d un téléviseur p...

Страница 49: ...ant plusieurs fonctions 26 Caractéristiques de sortie pour les différents modes d effets sonores 26 09 InstallationduSupportMural 27 Précautions d installation 27 Composantes murales 27 10 PlacementduSoundbarsurunsupportde Téléviseur 29 11 MiseàjourLogicielle 30 Procédure de mise à jour 30 Si UPDATE ne s affiche pas 31 12 Dépannage 32 13 Licence 33 14 AvisdeLicencesLibres 33 15 RemarqueImportanteC...

Страница 50: ...e apposée surle produit Étiquette Partie inférieure de l unité principale du Soundbar Pour acheter des composants supplémentaires ou des câbles en option veuillez contacter un centre de service Samsung ou le service clientèle Samsung Les accessoires pourraient légèrement différer de ceux figurant sur la photo ci dessus Insertiondespilesavantd utiliserlatélécommande 2pilesAA Faites glisser le panne...

Страница 51: ...de sélectionner le mode d entrée source Moded entrée Affichage Entrée numérique optique D IN Entrée ARC HDMI OUT D IN TV ARC Conversion automatique Entrée HDMI HDMI Mode BLUETOOTH BT Mode USB USB Pour activer le mode BTPAIRING définissez la source sur le mode BT puis appuyez sur le bouton Source et maintenez le appuyé pendant plus de 5 secondes Lorsque vous branchez le cordon c a la touche de mise...

Страница 52: ...met d entrer simultanément des signaux vidéo et audio numériques à l aide d un câble HDMI Se branche à la sortie HDMI d un périphérique externe HDMITOTV ARC Se branche au raccord HDMI ARC d un téléviseur DIGITALAUDIOIN OPTICAL Se branche à la sortie numérique optique d un périphérique externe Lorsque vous débranchez d une prise murale le câble d alimentation de l adaptateur CC CA tirez sur la fich...

Страница 53: ...tion sur la source d alimentation et la consommation électrique veuillez vous reporter à l étiquette apposée sur le produit Étiquette Partie inférieure de l unité principale du Soundbar POWER Arrièreducaisson desbasses Cordon d alimentation Branchementde l alimentation USB 5V0 5A DC 24V DC 24V Partieinférieuredel unité principaleduSoundbar AdaptateurCA CC Cordon d alimentation Branchementde l alim...

Страница 54: ...escription Résolution Bleu Activé Connexion établie fonctionnement normal Clignotant Récupération de la connexion Vérifiez si le câble d alimentation branché à l unité principale du Soundbar est bien connecté ou patientez 5 minutes Si le clignotement persiste essayez de connecter manuellement le caisson de basses Voir page 7 Rouge Activé Veille unité principale du Soundbar éteinte Vérifiez que le ...

Страница 55: ... du caisson des basses s éteint et le voyant bleu clignote 5 Sec Arrièreducaissondesbasses 2 Appuyez sur la touche Haut de la télécommande et maintenez le enfoncé pendant au moins 5secondes Le message IDSET apparaît sur l écran du Soundbar pendant un moment puis disparaît Le Soundbar est mis sous tension automatiquement lorsque IDSET est terminé SOUND MODE PAIR 5 Sec IDSET LelogoSAMSUNGestsituésur...

Страница 56: ... en béton armé se trouve entre l unité principale et le caisson des basses sans fil il est possible que le système ne fonctionne pas car le signal sans fil ne peut pas traverser le métal PRÉCAUTIONS Les antennes de réception sans fil sont intégrées au caisson des basses sans fil Maintenez les unités à l écart de l eau et de l humidité Pour des performances d écoute optimales assurez vous que la zo...

Страница 57: ...r la touche Haut de la télécommande et maintenez le enfoncé pendant au moins 5secondes Le message IDSET apparaît sur l écran du Soundbar pendant un moment puis disparaît Le Soundbar est mis sous tension automatiquement lorsque IDSET est terminé SOUND MODE PAIR 5 Sec IDSET LelogoSAMSUNGestsituésurle dessus MISEENGARDE Si votre Soundbar est en train de lire de la musique lorsqu il est connecté au mo...

Страница 58: ...fusion est encodé en Dolby Digital et que le paramètre Format audio de sortie numérique est défini sur PCM sur votre téléviseur nous recommandons de changer ce paramètre en le définissant sur Dolby Digital Une fois que vous avez modifié le paramètre sur le téléviseur vous pouvez profiter d une meilleure qualité sonore Le menu du téléviseur peut utiliser différents termes pour Dolby Digital et PCM ...

Страница 59: ...i le téléviseur dispose d un port ARC connectez le câble HDMI au port HDMI IN ARC Nous vous recommandons d utiliser un câble HDMI sans noyau si possible Si vous utilisez un câble HDMI avec noyau utilisez en un dont le diamètre est inférieur à 0 55 po 14 mm Cette fonction n est pas disponible si le câble HDMI ne prend pas en charge l ARC Branchementàl aided uncâbleoptique HDMI TO TV ARC DIGITAL AUD...

Страница 60: ...udio du téléviseur Sélectionnez le menu correspondant Menudu téléviseur OU Câbleoptique nonfourni CâbleHDMI D IN Exemple de menu du téléviseur Téléviseurnumérodesérie AV Soundbarnumérodesérie HDMI REMARQUES Le fonctionnement dépend du codec pris en charge par le téléviseur Cette fonction est prise en charge uniquement lorsque le câble HDMI ou le câble optique non fourni est connecté Cette fonction...

Страница 61: ...ctionnez le mode Bluetooth sur le téléviseur Pour plus d informations reportez vous au manuel du téléviseur 3 Sélectionnez AV SamsungSoundbarQ6T Series dans la liste affichée sur l écran du téléviseur Lorsqu un Soundbar est disponible il a le statut NeedPairing ou Paired dans la liste des périphériques Bluetooth du téléviseur Pour se connecter au Soundbar sélectionnez le message et établissez une ...

Страница 62: ...dessus du Soundbar et maintenez le enfoncé pendant plus de 5 secondes pendant que le Soundbar est en mode BT REMARQUES Si vous êtes invité à saisir un code PIN lors de la connexion à un périphérique Bluetooth entrez 0000 En mode de connexion Bluetooth la connexion Bluetooth est perdue si la distance entre le Soundbar et le périphérique Bluetooth est supérieure à 32 8 pi 10 m Le Soundbar se désacti...

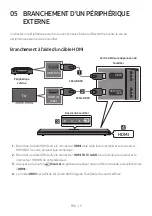
Страница 63: ...Soundbar Périphérique externe DessusduSoundbar HDMI 1 Branchez un câble HDMI entre le connecteur HDMI situé à l arrière du produit et le connecteur HDMI OUT de votre périphérique numérique 2 Branchez un câble HDMI entre le connecteur HDMITOTV ARC situé à l arrière du produit et le connecteur HDMI IN de votre téléviseur 3 Appuyez surle bouton Source du panneau supérieurou de la télécommande puis sé...

Страница 64: ...duSoundbar DessusduSoundbar LecteurBD DVD Décodeur Consoledejeu D IN 1 Branchez le connecteur DIGITALAUDIOIN OPTICAL de l unité principale sur le connecteur OPTICAL OUT du périphérique source à l aide d un câble optique non fourni numérique 2 Sélectionnez le mode D IN en appuyant sur le bouton Source du panneau supérieur ou de la télécommande ...

Страница 65: ... périphérique USB n est connecté depuis plus de 20 minutes Listedecompatibilité Rallonge Codec Tauxd échantillonnage Débitbinaire mp3 MPEG1 Layer2 32 kHz à 48 kHz 32 à 320 kbps MPEG1 Layer3 32 kHz à 48 kHz 32 à 320 kbps MPEG2 Layer3 16 kHz à 24 kHz 8 à 160 kbps MPEG2 5 Layer3 8 kHz à 12 kHz 8 à 160 kbps wma WMA7 8 9 audio seulement 32 kHz à 48 kHz 32 à 320 kbps ogg Vorbis 32 kHz à 48 kHz 45 à 500 ...

Страница 66: ...rsque BTREADY apparaît appuyez sur le bouton Source du panneau supérieur du Soundbar et maintenez le enfoncé pendant plus de 5 secondes pour afficher BT PAIRING 2 Sur votre appareil sélectionnez AV SamsungSoundbarQ6T Series dans la liste qui apparaît Lorsqu un Soundbar est connecté au périphérique Bluetooth NomdupériphériqueBluetooth BT apparaît sur l écran situé à l avant 3 Lisez des morceaux dep...

Страница 67: ...ces radio Les appareils produisant des ondes électromagnétiques doivent être gardés à distance de l unité principale du Soundbar par exemple les micro ondes les appareils de réseau sans fil etc Le Soundbar prend en charge les données SBC 44 1kHz 48kHz La connexion est possible uniquement sur un périphérique Bluetooth compatible avec la fonction A2DP AV Vous ne pouvez pas brancher le Soundbar à un ...

Страница 68: ...l interconnexion d appareils compatibles Bluetooth via une connexion sans fil à faible distance Un appareil Bluetooth peut engendrer des bruits ou un dysfonctionnement selon les conditions d utilisation Si une partie du corps est en contact avec le système de réception transmission du périphérique Bluetooth ou du système Soundbar Variations électriques dues à un brouillage du signal par un mur un ...

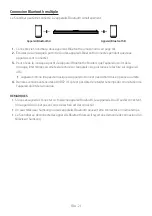
Страница 69: ...cture sur l appareil A puis lancez la lecture sur l appareil B L appareil B ne lira pas de musique si l appareil A n est pas d abord mis en pause ou arrêté 4 Dans les versions antérieures à AVRCP V1 4 il est possible de retarder le temps de commutation de l appareil qui lit de la musique REMARQUES Si vous essayez de connecter un troisième appareil Bluetooth les appareils A ou B se déconnectent Un ...

Страница 70: ... Appuyez de nouveau sur la touche pour activer le son SOUNDMODE VOL BASS SOUND MODE PAIR Vous pouvez sélectionner l effet sonore de votre choix parmi STANDARD SURROUNDSOUND GAMEPRO ADAPTIVESOUND ou DTS VIRTUAL X STANDARD Émet le son d origine SURROUNDSOUND Fournit un champ sonore plus étendu que la norme GAMEPRO Émet un son stéréoscopique afin de vous plonger dans le feu de l action lorsque vous j...

Страница 71: ...e PAIR BTPAIRING apparaît sur l écran du Soundbar Vous pouvez connecter le Soundbar à un nouvel appareil Bluetooth dans ce mode en sélectionnant le Soundbar dans la liste de recherche de l appareil Bluetooth Lecture Pause VOL BASS SOUND MODE PAIR Appuyez sur le bouton p pour mettre temporairement un morceau en pause Si vous appuyez à nouveau sur le bouton le morceau est lu VOL BASS SOUND MODE PAIR...

Страница 72: ...définir chaque fréquence sur une valeur allant de 6 à 6 à l aide des touches Haut Bas Si la vidéo du téléviseur et l audio du Soundbar ne sont pas synchronisés appuyez sur le bouton Contrôleduson pour sélectionner AUDIOSYNC puis réglez le retard de l audio entre 0 et 300 millisecondes à l aide des boutons Haut Bas Non disponible en mode USB ou BT Si des haut parleurs à effet surround sont connecté...

Страница 73: ... E R S O U N D B A R 5 Sec OFF TVREMOTE 3 Si vous souhaitez contrôler le Soundbar à l aide de la télécommande de votre téléviseur Samsung poussez le bouton WOOFER vers le haut et maintenez le pendant 5 secondes jusqu à ce que ALL TVREMOTE apparaisse sur l écran Ensuite utilisez le menu du téléviseur pour sélectionner les haut parleurs externes S O U N D M O D E V O L W O O F E R S O U N D B A R 5 ...

Страница 74: ... Caractéristiquesdesortiepourlesdifférentsmodesd effets sonores Effet Entrée Sortie Sanslehaut parleur arrièresansfil Aveclehaut parleur arrièresansfil SOUNDMODE Surround VOL WOOFER SOUND MODE Bluetooth POWER STANDARD 2 0 canaux 2 1 canaux 4 1 canaux 5 1 canaux 3 1 canaux 5 1 canaux SURROUND SOUND 2 0 canaux 4 1 canaux 6 1 canaux 5 1 canaux 5 1 canaux 7 1 canaux GAME PRO 2 0 canaux 4 1 canaux 6 1 ...

Страница 75: ...Achetez des vis de montage mural en fonction du type et de l épaisseur du mur sur lequel vous souhaitez installer le Soundbar Diamètre M5 Longueur 1 3 8 pouces 35 mm ou plus long Raccordez les câbles de l unité à des périphériques externes avant de fixer le Soundbar au mur Assurez vous que l unité est éteinte et débranchée avant de procéder à l installation Dans le cas contraire des chocs électriq...

Страница 76: ...riée percez un trou dans le mur à chaque marque Si les marques ne correspondent pas aux positions des montants de la cloison veillez à insérer les chevilles ou les chevilles Molly appropriées dans les trous avant d insérer les vis de support Si vous utilisez des chevilles ou des chevilles Molly assurez vous que les trous que vous percez sont assez grands pour recevoir celles ci 5 Poussez une vis n...

Страница 77: ...pportde fixationmurale vers le bas afin que les Supportdefixationmurale reposent fermement sur les Visdesupport 10 PLACEMENTDU SOUNDBARSUR UNSUPPORTDE TÉLÉVISEUR Placez le Soundbar sur un support de téléviseur 1 2pouce 3cm ouplus Comme illustré sur l image alignez le centre du Soundbar avec le centre du téléviseur puis placez soigneusement le Soundbar sur le support du téléviseur Pour une qualité ...

Страница 78: ...éinitialise également la connexion au caisson de basses 1 Connectez une clé USB au port USB de votre ordinateur Important Assurez vous que la clé USB ne contient aucun fichier de musique Dans le cas contraire la mise à jour du micrologiciel est susceptible d échouer 2 Accédez au site Web de Samsung sur samsung com Sélectionnez Saisir le numéro de modèle et saisissez le modèle de votre Soundbar Sél...

Страница 79: ...indra automatiquement après avoir terminé la mise à jour du micrologiciel Une fois la mise à jour terminée la configuration utilisateur du Soundbar est initialisée afin que vous puissiez redéfinir vos paramètres Nous vous conseillons de noter vos paramètres par écrit pour pouvoir facilement les redéfinir après la mise à jour Notez que la mise à jour du micrologiciel réinitialise également la conne...

Страница 80: ...connexion Bluetooth aux pages 13 et 18 Iln yapasdeson LafonctionMiseensourdineest elleactivée Appuyez sur la touche Miseen sourdine pour désactiver la fonction silence Levolumeest ilrégléauminimum Réglez le volume Latélécommandenefonctionnepas Lespilessont ellesdéchargées Remplacez les par de nouvelles piles Ladistanceentrelatélécommandeetl unité principaleduSoundbarest elletropgrande Approchez la...

Страница 81: ... of DTS Inc in the United States and or other countries DTS Inc All Rights Reserved The terms HDMI and HDMI High Definition Multimedia Interface and the HDMI Logo are trademarks or registered trademarks of HDMI Licensing LLC in the United States and other countries The Bluetooth word mark and logos are registered trademarks owned by the Bluetooth SIG Inc and any use of such marks by Samsung Electr...

Страница 82: ...IFICATEUR Puissance de sortie nominale 30W x 6 10W x 2 Formats de lecture pris en charge LPCM 2ch Dolby Audio prise en charge de Dolby Digital DTS DTS Virtual X Nom du caisson de basses PS WR65BB Poids 13 7 Ibs 6 2 kg Dimensions L x H x P 8 1 x 13 9 x 11 9 po 205 0 x 353 0 x 303 2 mm AMPLIFICATEUR Puissance de sortie nominale 160W REMARQUES Samsung Electronics Co Ltd se réserve le droit de modifie...

Страница 83: ...nt doit le présenter au Centre de service agréé au moment où il fait la demande d une réparation sous garantie EXCLUSIONS CEQUIN ESTPASCOUVERT Cette garantie ne couvre pas les dommages causés par un accident un incendie une inondation un cas de force majeure un mauvais usage ou une tension incorrecte La garantie ne couvre pas une mauvaise installation une mauvaise réparation une réparation non aut...

Страница 84: ... Service Consommateurs Samsung SIÈGE SOCIAL Samsung Electronics Canada Inc 2050 Derry Road West Mississauga Ontario L5N 0B9 Canada TEL 1 800 SAMSUNG 1 800 726 7864 www samsung com ca_fr support Area Contact Center Web Site North America CANADA 1 800 SAMSUNG 726 7864 www samsung com ca support English www samsung com ca_fr support French U S A 1 800 SAMSUNG 726 7864 www samsung com us support ...

Отзывы: