background image

ENG - 26

4. 

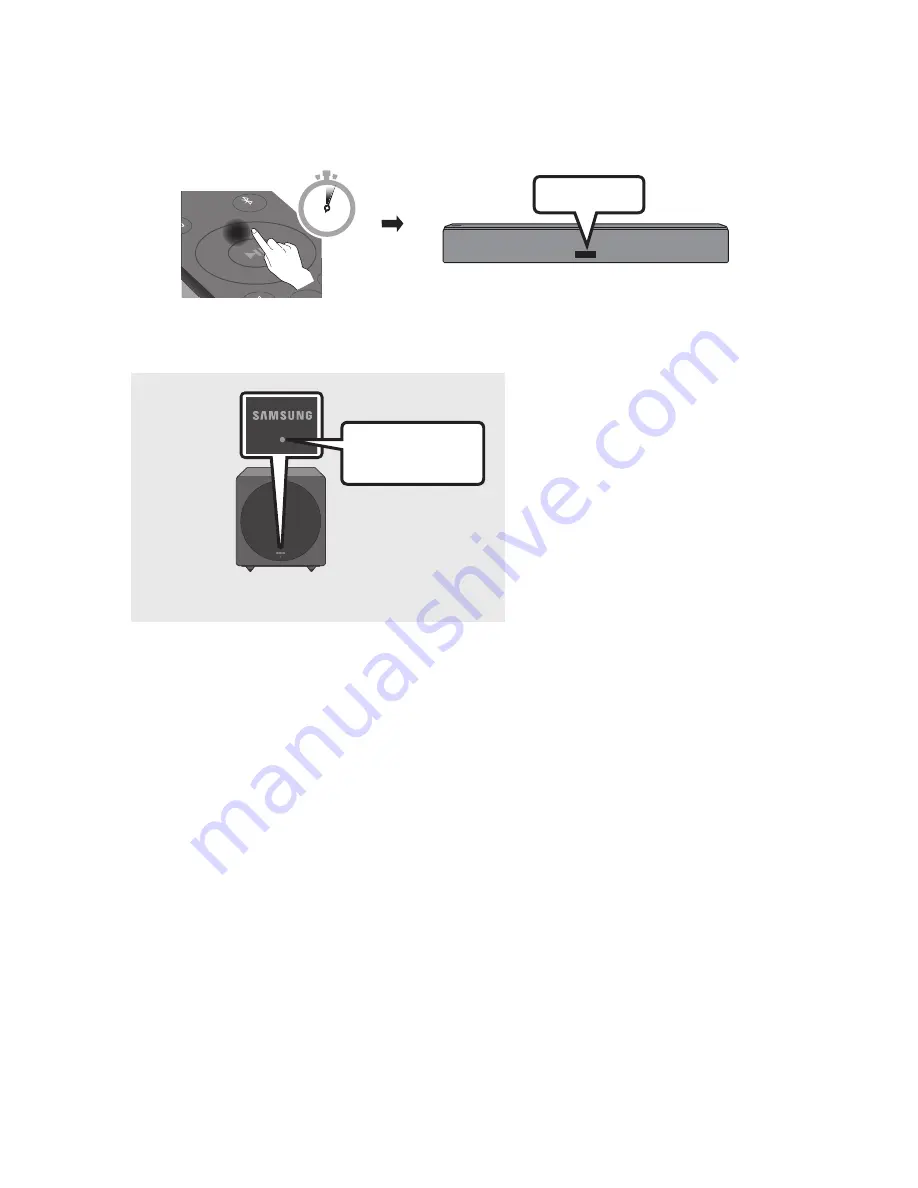
Press and hold the 

Up 

button on the remote control or press the 

ID SET

 button on the bottom 

panel for at least 5 seconds.


The 

ID SET

 message appears on the display of the Soundbar for a moment, and then disappears.


The Soundbar will automatically power on when 

ID SET

 is complete.

ID SET

SOUN

D

MOD

E

PAIR

5 Sec

5. 

Check if the LINK LED is solid blue (connection complete).

Front of the Wireless Subwoofer

Stops blinking. 

Glows blue.

The LINK LED indicator stops blinking 
and glows a solid blue when a 
connection is established between the 
Soundbar and the Wireless Subwoofer.

NOTES


– Do not connect the power cord of this product or your TV to a wall outlet until all connections 

between components are complete.


– Before moving or installing this product, be sure to turn off the power and disconnect the power cord.


– The maximum transmission distance of the wireless signal of the main unit is about 10 meters, but 

may vary depending on your operating environment. If a steel-concrete or metallic wall is between 
the main unit and the wireless subwoofer, the system may not operate at all, because the wireless 
signal cannot penetrate metal.

PRECAUTIONS


– Wireless receiving antennas are built into the wireless subwoofer. Keep the units away from water 

and moisture.


– For optimal listening performance, make sure that the area around the wireless subwoofer and 

Wireless Receiver Module (Sold separately) is clear of any obstructions.

Содержание HW-NW700

Страница 1: ...FULL MANUAL Imagine the possibilities Thank you for purchasing this Samsung product To receive more complete service please register your product at www samsung com register HW NW700...

Страница 2: ...es that the rated voltage marked with the symbol is DC voltage Caution Consult instructions for use This symbol instructs the user to consult the user manual for further safety related information WAR...

Страница 3: ...nit malfunctions Your product is not intended for industrial use It is for personal use only Condensation may occur if your product has been stored in cold temperatures If transporting the unit during...

Страница 4: ...g Electrical Power 9 04 ConnectingtoaTV 10 Connecting using an Optical Cable 10 Connecting Wirelessly 11 Connecting a TV via Bluetooth 11 Connecting via Wi Fi 13 05 ConnectinganExternalDevice 15 Conne...

Страница 5: ...undbar volume with a TV remote control 33 Using the Hidden Buttons Buttons with more than one function 34 Output specifications for the different sound effect modes 34 11 InstallingtheWallMount 35 Ins...

Страница 6: ...To purchase additional components or optional cables contact a Samsung Service Centre or Samsung Customer Care This Soundbar is for wall mounting only Use the Holder DongleScrew to secure the Holder D...

Страница 7: ...rce input mode Inputmode Display Optical Digital input D IN Wi Fi mode WIFI BLUETOOTH mode BT To turn on BTPAIRING mode change the source to BT mode and then press and hold the button on the bottom pa...

Страница 8: ...ot USB compatible The availability of subwoofers differs by area Check the availability at http www samsung com support DC23V PowerSupplyIn Connect the AC DC power adapter NETWORK Press to connect to...

Страница 9: ...about the required electrical power and power consumption refer to the label attached to the product Label Bottom of the Soundbar Main Unit DIGITAL AUDIO IN OPTICAL DC 23V WIRELESS NETWORK DC 23V Rear...

Страница 10: ...calCable When the audio in a broadcast is encoded in Dolby Digital and the Digital Output Audio Format on your TV is set to PCM we recommend that you change the setting to Dolby Digital When the setti...

Страница 11: ...ted at a time SOUND MODE PAIR OR BottomoftheSoundbar Theinitialconnection 1 Press the VOL WOOFER SOUND MODE PAIR button on the remote control to enter the BTPAIRING mode OR a Press the button on the b...

Страница 12: ...bile device to the Soundbar BTPAIRING In this mode you can connect a new device to the Soundbar Press the VOL WOOFER SOUND MODE PAIR button on the remote control or press and hold the button on the bo...

Страница 13: ...eSoundbartoWi Fi 1 Press the button on the bottom of the Soundbar or on the remote control to select WIFI mode When using selected Samsung TVs 2016 2018 Samsung Smart TVs that support Bluetooth If you...

Страница 14: ...TVsreleasedin2017 Home Settings Sound Sound Output AV Samsung Soundbar NWxxx Wi Fi ForTVsreleasedin2016 Home Settings Sound Select Speaker AV Samsung Soundbar NWxxx Wi Fi ForTVsreleasedin2015 Menu Sou...

Страница 15: ...e BottomoftheSoundbar DIGITAL AUDIO IN OPTICAL DC 23V WIRELESS OPTICAL OUT OpticalCable notsupplied RearoftheSoundbar D IN BD DVDplayer Set topbox Gameconsole 1 Connect DIGITALAUDIOIN OPTICAL on the m...

Страница 16: ...here is no Bluetooth device connected to the Soundbar b When BTREADY appears press and hold the button on the bottom panel of the Soundbar for more than 5 seconds to display BTPAIRING 2 On your device...

Страница 17: ...ooth devices are simultaneously paired with the Soundbar If the Bluetooth device is turned off not in place or malfunctions Electronic devices may cause radio interference Devices that generate electr...

Страница 18: ...h Bluetooth is a technology that enables Bluetooth compliant devices to interconnect easily with each other using a short wireless connection A Bluetooth device may cause noise or malfunction dependin...

Страница 19: ...stereo sound mode To connect a Soundbar to a mobile device via a wireless network Wi Fi the SmartThings app is required BottomoftheSoundbar Mobiledevice Theinitialconnection 1 Press the button on the...

Страница 20: ...ete Adddevice from the app menu Your Soundbar is now added to the app Launch App Add speakers Auto pop up NOTE To connect an additional SWA 9000S wireless rear speaker kit not supplied disconnect the...

Страница 21: ...to the Wireless port make sure that the WIRELESS logo is facing up as shown in the illustration below Use the Holder DongleScrew M3 x L10 supplied with the HW NW700 W IR E LE SS W IR E LE SS W IR E LE...

Страница 22: ...the IDSET button on the back of the Wireless Receiver Module with a pen tip for 5 6 seconds until the LINK LED indicator blinks in Blue For more about the LED please refer to the SWA 9000S user manual...

Страница 23: ...all connections between components are complete Before moving or installing this product be sure to turn off the power and disconnect the power cord The maximum transmission distance of the wireless s...

Страница 24: ...at the WIRELESS logo is facing up as shown in the pictures below Use the Holder DongleScrew M3 x L10 supplied with the HW NW700 W IR E LE SS W IR E LE SS W IR E LE SS W IR E LE SS WIRELESS If you purc...

Страница 25: ...inks in Blue For more about the LED please refer to the SWA W700 user manual BottomoftheWirelessSubwoofer FrontoftheWirelessSubwoofer ID SET POWER LINK SERVICE POWER ID SET LINK SERVICE Blue blinking...

Страница 26: ...this product or your TV to a wall outlet until all connections between components are complete Before moving or installing this product be sure to turn off the power and disconnect the power cord The...

Страница 27: ...uct to control your Soundbar and enjoy music services provided by Amazon Echo NOTE Check if the Soundbar is connected to Wi Fi Refer to Connecting via Wi Fi Wireless Network 1 In the SmartThings app c...

Страница 28: ...lls and then select ENABLE Skip this step if you have Skills set up already Select Skills Search Enable AmazonAlexa app 3 In the Alexa app tap SmartHome Devices Discover to complete the connection Sel...

Страница 29: ...o the SmartThings account connected to the AmazonAlexa account AlexaDiscoverdevices TousevoicecommandsfortheSoundbarnamed Livingroom Action VoiceCommand To set the volume level to 5 AlexaSetthevolumet...

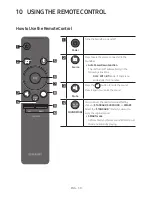
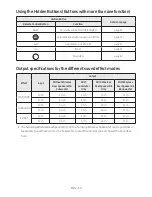
Страница 30: ...ically in the following situations D IN WIFI BTMode If there is no audio signal for 5 minutes Mute VOL WOOFER SOUND MODE PAIR Press the VOL WOOFER SOUND MODE PAIR button to mute the sound Press it aga...

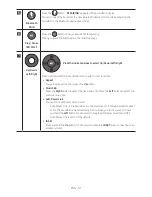
Страница 31: ...ft Right Press Up Down Left Right on the button to select or set functions Repeat To use the Repeat function press the Up button MusicSkip Press the Right button to select the next music file Press th...

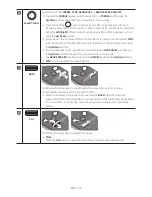
Страница 32: ...ithin a 6 to 6 range The REARSPEAKER function can be turned ON OFF by using the Up Down buttons SYNC is only supported for some functions VOL WOOFER SOUND MODE PAIR BASS S O U N D M O D E V O L B A S...

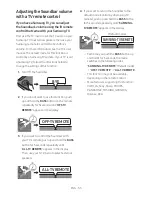
Страница 33: ...S S S O U N D B A R OFF TVREMOTE 5 Sec 3 If you want to control the Soundbar with your TV s remote push up and hold the BASS button for 5seconds repeatedly until ALL TVREMOTE appears in the display T...

Страница 34: ...Input Output WithoutWireless RearSpeakerKit Subwoofer With Subwoofer Only WithWireless RearSpeakerKit Only WithWireless RearSpeakerKit Subwoofer STANDARD 2 0 ch 2 0 ch 2 1 ch 2 0 ch 2 1 ch 5 1 ch 3 0...

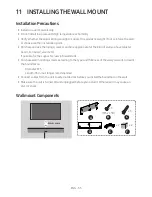
Страница 35: ...ll you have plaster board iron board wood etc If possible fix the support screws into wall studs Purchase wall mounting screws according to the type and thickness of the wall you want to mount the Sou...

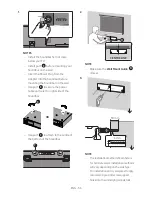
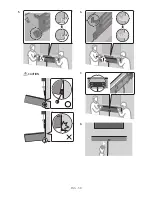
Страница 36: ...re mounting the Soundbar on the wall Use part E F G H to secure the power cable on the left or right side of the Soundbar OR E F G H Use part E F G H to attach to the centre of the bottom of the Sound...

Страница 37: ...ENG 37 A B C D A B C D A B C D 4...

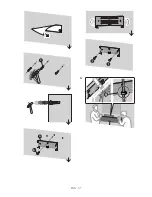
Страница 38: ...ENG 38 5 CAUTION E F G H 6 7 8...

Страница 39: ...off To use the Auto Update function the Soundbar must be connected to the Internet The Wi Fi connection to the Soundbar will be terminated if its power cord is disconnected or the power is cut off If...
Страница 40: ...Ifconnectedviaawirednetwork Check if the cable is connected correctly Check the port name to make sure that the cable is connected to the correct port See the corresponding page regarding each connec...
Страница 41: ...in combination with the Symbol and DTS Digital Surround are registered trademarks or trademarks of DTS Inc in the United States and or other countries DTS Inc All Rights Reserved The Spotify Software...
Страница 42: ...Digital DTS NOTES Samsung Electronics Co Ltd reserves the right to change the specifications without notice Weight and dimensions are approximate ForIndiaOnly This product is RoHS compliant Precautio...

Страница 43: ...89 www samsung com vn support THAILAND 0 2689 3232 1800 29 3232 Tollfree www samsung com th support MYANMAR 95 1 2399 888 www samsung com mm support CAMBODIA 855 23 993232 1800 20 3232 Tollfree www sa...

Отзывы: