background image

ENG - iii

PRECAUTIONS

1. 

Ensure that the AC power supply in your 
house complies with the power 

requirements listed on the identification 

sticker located on the bottom of your 
product. Install your product horizontally, on 
a suitable base (furniture), with enough 
space around it for ventilation (7~10 cm). 
Make sure the ventilation slots are not 

covered. Do not place the unit on amplifiers 

or other equipment which may become hot. 
This unit is designed for continuous use. To 
fully turn off the unit, disconnect the AC plug 
from the wall outlet. Unplug the unit if you 
intend to leave it unused for a long period of 
time.

2. 

During thunderstorms, disconnect the AC 
plug from the wall outlet. Voltage peaks due 
to lightning could damage the unit.

3. 

Do not expose the unit to direct sunlight or 
other heat sources. This could lead to 
overheating and cause the unit to 
malfunction.

4. 

Protect the product from moisture (i.e. 

vases), and excess heat (e.g. a fireplace) or 

equipment creating strong magnetic or 

electric fields. Unplug the power cable from 

the AC wall socket if the unit malfunctions. 
Your product is not intended for industrial 
use. It is for personal use only. Condensation 
may occur if your product has been stored in 
cold temperatures. If transporting the unit 
during the winter, wait approximately  
2 hours until the unit has reached room 
temperature before using.

5. 

The battery used with this product contains 
chemicals that are harmful to the 
environment. Do not dispose of the battery 
in the general household trash. Do not 
expose the battery to excess heat, direct 

sunlight, or fire. Do not short circuit, 

disassemble, or overheat the battery.  
Danger of explosion if the battery is replaced 
incorrectly. Replace only with the same or 
equivalent type.

ABOUT THIS MANUAL

The user manual has two parts: this simple paper 
USER MANUAL and a detailed FULL MANUAL you 
can download.

USER MANUAL

See this manual for safety instructions, 
product installation, components, 

connections, and product specifications.

FULL MANUAL

You can access the FULL MANUAL on 
Samsung’s on-line customer support centre by 
scanning the QR code. To see the manual on 
your PC or mobile device, download the 
manual in document format from Samsung’s 
website. (http://www.samsung.com/support)

Design and specifications are subject to change 

without prior notice.

Содержание HW-N550

Страница 1: ...HW N550 USER MANUAL...

Страница 2: ...tes that the rated voltage marked with the symbol is DC voltage Caution Consult instructions for use This symbol instructs the user to consult the user manual for further safety related information WA...

Страница 3: ...the unit malfunctions Your product is not intended for industrial use It is for personal use only Condensation may occur if your product has been stored in cold temperatures If transporting the unit...

Страница 4: ...en the Subwoofer and the Soundbar 5 Manually connecting the Subwoofer if automatic connection fails 6 Connecting the SWA 8500S to a Soundbar Sold Separately 7 04 ConnectingtoyourTV 9 Method 1 Connecti...

Страница 5: ...e Remote Control 17 Adjusting the Soundbar volume with a TV remote control 20 09 InstallingtheWallMount 21 Installation Precautions 21 Wallmount Components 21 10 Troubleshooting 24 11 Licence 25 12 Op...

Страница 6: ...l Bottom of the Soundbar Main Unit The power components are labelled 1 2 3 For more information about power connections see page 4 For Soundbar wall mounting components see page 21 To purchase additio...

Страница 7: ...rce input mode D IN AUX HDMI BT USB To turn on BTPAIRING mode change the source to BT mode and then press and hold the Source button for more than 5 seconds D IN Connect to the digital optical output...

Страница 8: ...power and power consumption refer to the label attached to the product Label Bottom of the Soundbar Main Unit POWER RearofSubwoofer 1 PowerCord Connecting ElectricalPower HDMI IN HDMI OUT TV ARC USB 5...

Страница 9: ...ofer LED Status Description Resolution Blue On Successfully connected normal operation Blinking Recovering the connection Check if the power cable attached to the main Soundbar unit is connected prope...

Страница 10: ...the subwoofer turns off and the blue indicator blinks 5 Sec RearofSubwoofer 2 Press and hold the Upbutton on the remote control for at least 5 seconds The IDSET message appears on the display of the...

Страница 11: ...status of the Wireless Receiver Module after plugging it into an electrical outlet The LINK LED indicator blue LED on the Wireless Receiver Module blinks If the LED does not blink press the IDSET butt...

Страница 12: ...Sec CAUTION If your Soundbar was playing music when it connects to the SWA 8500S you may hear some stuttering from the woofer as the connection finalises 4 Check if the LINK LED is solid blue connect...

Страница 13: ...on your TV is set to PCM we recommend that you change the setting to Dolby Digital When the setting on the TV is changed you will experience better sound quality The TV menu may differ depending on t...

Страница 14: ...ss the Source button on the right side panel or remote control and then select the D IN mode AutoPowerLink Auto Power Link automatically turns on the Soundbar when the TV is turned on 1 Connect the So...

Страница 15: ...panel of the Soundbar for more than 5 seconds to display BTPAIRING 2 Select Bluetooth mode on the TV For more information see the TV s manual 3 Select AV SamsungSoundbarNxxxN Series from the list on T...

Страница 16: ...utton on the remote control or press and hold the Source button on the right side of the Soundbar for more than 5 seconds while the Soundbar is in BT mode NOTES If asked for a PIN code when connecting...

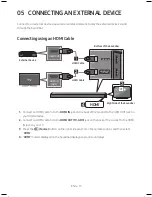
Страница 17: ...tomoftheSoundbar ExternalDevice RightSideoftheSoundbar HDMI 1 Connect an HDMI cable from the HDMIIN jack on the back of the product to the HDMI OUT jack on your digital device 2 Connect an HDMI cable...

Страница 18: ...ble X X Connect DIGITALAUDIOIN OPTICAL on the main unit to the OPTICAL OUT jack of the Source Device using a digital optical cable not supplied Y Y Select D IN mode by pressing the Source button on th...

Страница 19: ...f the adapter cable 3 Press the Source button on the right side panel or on the remote control and then select USB 4 USB appears in the display screen 5 Play music files from the USB storage device th...

Страница 20: ...of the Soundbar for more than 5 seconds to display BTPAIRING 2 On your device select AV SamsungSoundbarNxxxN Series from the list that appears When the Soundbar is connected to the Bluetooth device B...

Страница 21: ...sired sound effect by choosing STANDARD or SURROUND DRC DynamicRangeControl Lets you apply dynamic range control to Dolby Digital tracks Press and hold the SOUNDMODE button while the Soundbar is power...

Страница 22: ...to select the next music file Press the Left button to select the previous music file Anynet AutoPowerLink You can turn Anynet and Auto Power Link on or off Anynet and Auto Power Link are turned on an...

Страница 23: ...s VOL WOOFER SOUND MODE PAIR WOOFER S O U N D M O D E V O L W O O F E R S O U N D B A R S O U N D M O D E V O L W O O F E R S O U N D B A R V O L W O O F E R S O U N D B A R S O U N D M O D E V O L W...

Страница 24: ...remote push up and hold the WOOFER button for 5seconds repeatedly until ALL TVREMOTE appears in the display Then use your TV s menu to select external speakers S O U N D M O D E V O L W O O F E R S O...

Страница 25: ...s into wall studs Purchase wall mounting screws according to the type and thickness of the wall you want to mount the Soundbar on Diameter M5 Length 35 mm or longer recommended Connect cables from the...

Страница 26: ...d drill bit drill a hole in the wall at each marking If the markings do not correspond to the positions of studs make sure you insert appropriate anchors or mollies into the holes before you insert th...

Страница 27: ...r Screws on the wall 8 Slide the Soundbar down as shown below so that the Bracket WallMounts rest securely on the Holder Screws Insert the Holder Screws into the wide bottom part of the Bracket Wall M...

Страница 28: ...n to cancel the function Isthevolumesettominimum Adjust the Volume Theremotecontroldoesnotwork Arethebatteriesdrained Replace with new batteries IsthedistancebetweentheremotecontrolandSoundbarmainunit...

Страница 29: ...demarks of DTS Inc in the United States and or other countries DTS Inc All Rights Reserved The terms HDMI and HDMI High Definition Multimedia Interface and the HDMI Logo are trademarks or registered t...

Страница 30: ...5 AMPLIFIER Rated Output power 30W x 6 Supported play formats LPCM 2ch Dolby Audio supporting Dolby Digital DTS Subwoofer Name PS WN30 Weight 7 0 kg Dimensions W x H x D 215 0 x 384 5 x 304 0 mm AMPLI...

Страница 31: ...com vn support THAILAND 0 2689 3232 1800 29 3232 Tollfree www samsung com th support MYANMAR 95 1 2399 888 www samsung com mm support CAMBODIA 855 23 993232 1800 20 3232 Tollfree www samsung com th su...

Отзывы: