background image

FRA - 11

03  UTILISATION DE LA TÉLÉCOMMANDE

Comment utiliser la télécommande

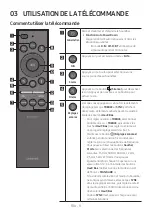
Alimentation

Permet d'allumer et d'éteindre le Soundbar.


Fonction Auto Power Down 

L’appareil s’éteint automatiquement dans les 

situations suivantes :


– En mode 

D.IN

/

Wi-Fi

/

BT

 en l’absence de 

signal audio pendant 18 minutes.

D.IN

Appuyez sur pour accéder au mode « 

D.IN

 ».

Source

Appuyez sur ce bouton pour sélectionner une 
source connectée au Soundbar.

Silence

Appuyez sur le bouton   

(Silence)

 pour désactiver 

le son. Appuyez de nouveau sur ce bouton pour 
activer le son.

Réglages 

sonores

Lorsque vous appuyez sur ce bouton, les éléments 
de réglage tels que 

TREBLE

 et 

SYNC

 s'affichent 

dans l'ordre. L'élément souhaité peut être ajusté à 
l'aide des boutons 

Haut

/

Bas

.


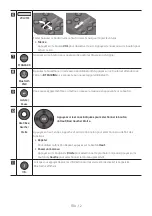
– Pour régler le volume 

TREBLE

, sélectionnez 

Contrôle du son → 

TREBLE

, puis utilisez les 

touches 

Haut

/

Bas

 pour régler le volume sur 

une plage de réglage allant de -6 à +6.


– Maintenez le bouton   

(Réglages sonores)


enfoncé pendant environ 5 secondes pour 
régler le son pour chaque bande de fréquence. 
Vous pouvez utiliser les boutons 

Gauche/

Droite

 pour sélectionner les fréquences 

suivantes : 150 Hz, 300 Hz, 600 Hz, 1,2 kHz, 
2,5 kHz, 5 kHz et 10 kHz. Vous pouvez 
également définir chaque fréquence sur une 

valeur allant de -6 à +6 à l’aide des boutons 

Haut/Bas

. (Veillez à ce que le mode son soit 

défini sur « 

STANDARD

 ».)


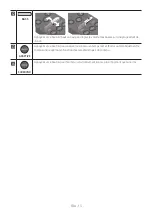
– Si la vidéo de la télévision et l’audio du Soundbar 

ne sont pas synchronisés, sélectionnez 

SYNC


dans les réglages sonores, puis réglez le retard 

de l’audio entre 0 et 300 millisecondes à l’aide 

des boutons 

Haut/Bas

.


– L’option 

SYNC

 n’est prise en charge que pour 

certaines fonctions.

Содержание HW-LST70T/ZC

Страница 1: ...HW LST70T FULL MANUAL Imagine the possibilities Thank you for purchasing this Samsung product To receive more complete service please register your product at www samsung com register ...

Страница 2: ...This symbol instructs the user to consult the user manual for further safety related information WARNING To prevent injury this apparatus must be securely attached to the floor wall in accordance with the installation instructions CAUTION To turn this apparatus off completely you must pull the power plug out of the wall socket Consequently the power plug must be easily and readily accessible at al...

Страница 3: ...d or grounding type plug A polarized plug has two blades with one wider than the other A grounding type plug has two blades and a third grounding prong The wide blade or the third prong are provided for your safety If the provided plug does not fit into your outlet consult an electrician for replacement of the obsolete outlet 9 Protect the power cord from being walked on or pinched particularly at...

Страница 4: ...ds Unplug the power cable from the AC wall socket if the unit malfunctions Your product is not intended for industrial use It is for personal use only Condensation may occur if your product has been stored in cold temperatures If transporting the unit during the winter wait approximately 2 hours until the unit has reached room temperature before using 5 The battery used with this product contains ...

Страница 5: ...tons with more than one function 14 Output specifications for the different sound effect modes 14 Adjusting the Soundbar volume with a TV remote control 15 04 ConnectingtheSoundbar 16 Connecting Electrical Power 16 How to mount the AC DC adapter 16 05 UsingawiredconnectiontotheTV 17 Connecting using an Optical Cable 17 06 UsingawirelessconnectiontotheTV 19 Method 1 Connecting via Bluetooth 19 Meth...

Страница 6: ...ith an Amazon product Amazon Echo 28 Use voice commands to control the Soundbar 28 10 InstallingtheWallMount 29 Installation Precautions 29 Method 1 TV mount 29 Method 2 Wall mount 32 11 SoftwareUpdate 34 Auto Update 34 USB Update 34 Initialization 34 12 Troubleshooting 35 13 License 36 14 OpenSourceLicenseNotice 37 15 ImportantNotesAboutService 37 16 SpecificationsandGuide 38 Specifications 38 ...

Страница 7: ...w For more information about the power supply and power consumption refer to the label attached to the product Label Bottom of the Soundbar Main Unit To purchase additional components or optional cables contact a Samsung Service Center or Samsung Customer Care For Soundbar wall mounting components see pages 29 33 This Soundbar is intended only for TV mount or wall mount Design specifications and A...

Страница 8: ...e the battery cover 3 If there are batteries in the remote to remove the existing batteries 4 Insert two new batteries 1 5V AAA type into the battery compartment making sure that the batteries polarities are oriented correctly 5 Once the batteries have been inserted attach the battery cover and then slide down the body of the remote 6 Turn the remote over press and hold the button on the top rear ...

Страница 9: ...n Adjusts the volume Source Button Selects the source input mode Inputmode Display Optical Digital input D IN Wi Fi mode WIFI BLUETOOTH mode BT When you plug in the AC cord the power button will begin working in 4 to 6 seconds When you turn on this unit there will be a 4 to 5 second delay before it produces sound If you hear sounds from both the TV and Soundbar go to the Settings menu for the TV a...

Страница 10: ...device See page 22 SERVICE Connect a USB storage device to upgrade the product s software DC23V Power Supply In Connect the AC DC power adapter See page 16 When disconnecting the power cable of the AC DC power adaptor from a wall outlet pull the plug Do not pull the cable Do not connect this unit or other components to an AC outlet until all connections between components are complete ...

Страница 11: ...tem can be adjusted using the Up Down buttons To adjust the TREBLE volume select Sound Control TREBLE and then use the Up Down buttons to adjust the volume within a 6 to 6 range Press and hold the SoundControl button for about 5 seconds to adjust the sound for each frequency band 150Hz 300Hz 600Hz 1 2kHz 2 5kHz 5kHz and 10kHz are selectable using the Left Right buttons and each can be adjusted to ...

Страница 12: ...ct to a new Bluetooth device Play Pause You can also play or pause music by pressing the button Up Down Left Right VOL WOOFER SOUND MODE PAIR PresstheindicatedareastoselectUp Down Left Right Press Up Down Left Right on the button to select or set functions Repeat To use the Repeat function press the Up button MusicSkip Press the Right button to select the next music file Press the Left button to s...

Страница 13: ... volume within a 6 to 6 range ADAPTIVE Press this button to analyzes the content in real time and automatically provides the optimal sound field based on the characteristics of the content SURROUND Press this button to provide a wider sound stage than standard ...

Страница 14: ...moteControlButton Function BASS Up TV remote control On Off Standby page 15 Sound Control 7 Band EQ page 11 Outputspecificationsforthedifferentsoundeffectmodes Effect Input Output STANDARD 2 0 ch 2 0 ch 5 1 ch 3 0 ch SURROUND 2 0 ch 3 0 ch 5 1 ch 3 0 ch ADAPTIVE 2 0 ch 2 0 ch 5 1 ch 3 0 ch ...

Страница 15: ...g this function VIZIO LG Sony Sharp PHILIPS PANASONIC TOSHIBA Hisense RCA 1 Turn Off the Soundbar 2 Push up and hold the BASS button for 5 seconds Each time you push the BASS button up and hold it for 5 seconds the mode switches in the following order SAMSUNG TVREMOTE Default mode OFF TVREMOTE ALL TVREMOTE RemoteControlButton Display Status 5 Sec Default mode SAMSUNG TVREMOTE Enable a Samsung TV s...

Страница 16: ...talling the AC DC adapter horizontally place it with the Samsung logo facing upward This product may not operate safely under 4 F 20 C It is recommended to connect the power cable to the outlet and after 1 hour turn on the Soundbar power RearoftheSoundbarMainUnit SERVICE DC 23V DIGITAL AUDIO IN OPTICAL SERVICE DC 23V DIGITAL AUDIO IN OPTICAL AC DCAdapter While the cable is not in use seal it with ...

Страница 17: ...he Soundbar outdoors it is recommended to connect an Optical cable for smooth sound output Be sure to use the optical cable provided with the product To purchase any optical cable separately contact the nearest dealer or Samsung Service Center The optical cable provided with the product is designed to meet the specification 0 16 inches 4 mm for waterproofing When using an optical cable purchased f...

Страница 18: ...Soundbar and the OPTICAL output port on the TV with the optical cable as shown in the figure 2 Turn on the Soundbar and TV 3 Select D IN mode by pressing the Source button on the bottom of the Soundbar or the D IN button on the Soundbar remote control 4 The TV sound is output from the Soundbar ...

Страница 19: ...specifications of your TV BottomoftheSoundbar OR BTPAIRING 5 Sec Theinitialconnection 1 Press the PAIR button on the Soundbar remote control to enter the BTPAIRING mode OR a Press the Source button on the bottom panel and then select BT BT changes to BTPAIRING in a few seconds automatically or changes to BTREADY if there is a connect record b When BTREADY appears press and hold the Source button o...

Страница 20: ...gSoundbarLST70T on the list of speakers on the Samsung TV delete it Then repeat steps 1 through 3 DisconnectingtheSoundbarfromtheSamsungTV Press the Source button on the bottom panel or on the remote control and switch to any mode but BT Disconnecting takes time because the Samsung TV must receive a response from the Soundbar The time required may differ depending on the Samsung TV model Whatisthe...

Страница 21: ...gviaWi Fi Pre connectionChecklist Wi Fi connection is available only on Samsung TV Check whether thewirelessrouter Wi Fi is turned on and the TVisconnectedtotherouter The TV and Soundbar must be connected to the same wireless network Wi Fi If your wireless router Wi Fi uses a DFS channel you will not be able to establish a Wi Fi connection between the TV and Soundbar Contact your Internet service ...

Страница 22: ...onsole BottomoftheSoundbar 1 Use an optical cable to connect the DIGITALAUDIOIN OPTICAL on the Soundbar main and the OPTICAL OUT port on the external device 2 Turn on the Soundbar and external device 3 Select D IN mode by pressing the Source button on the bottom of the Soundbar or the D IN button on the Soundbar remote control 4 Your Soundbar will play sounds from the external device ...

Страница 23: ...ter the BTPAIRING mode OR a Press the Source button on the bottom panel and then select BT BT changes to BTPAIRING in a few seconds automatically or changes to BTREADY if there is a connect record b When BTREADY appears press and hold the Source button on the bottom panel of the Soundbar for more than 5 seconds to display BTPAIRING 2 On your device select AV SamsungSoundbarLST70T from the list tha...

Страница 24: ... Bluetooth search or connection correctly under the following circumstances If there is a strong electrical field around the Soundbar If several Bluetooth devices are simultaneously paired with the Soundbar If the Bluetooth device is turned off not in place or malfunctions Electronic devices may cause radio interference Devices that generate electromagnetic waves must be kept away from the Soundba...

Страница 25: ...s while using the Bluetooth option This wireless device may cause electrical interference during operation DisconnectingtheBluetoothdevicefromaSoundbar You can disconnect a Bluetooth device from the Soundbar For instructions see the Bluetooth device s user manual The Soundbar will be disconnected When the Soundbar is disconnected from the Bluetooth device the Soundbar will display BTDISCONNECTED o...

Страница 26: ... 1 Install and launch the SmartThings app from your mobile device smartphone or tablet 2 On the app follow the screen instructions to add the Soundbar The automatic pop up the second screenshot below may not show on some devices If the pop up window does not appear press on the Home screen The Soundbar is added to the app Launch App Add device Auto pop up SmartThings App ...

Страница 27: ...e device does not tap a sharp corner of the Soundbar The Soundbar or mobile device may become scratched or damaged It is recommended that the mobile device be covered with a case Lightly tap the wide area in the upper portion of the Soundbar without using excessive force To use this function update the SmartThings app to the latest version The function may not be supported depending on the app ver...

Страница 28: ...ia Wi Fi Wireless Network UsevoicecommandstocontroltheSoundbar The Amazon Echo service you can use with your Soundbar is limited to music Other services provided by Amazon Echo such as news and weather can only be accessed through your Amazon Echo product Trigger Command Speakername TousevoicecommandsfortheSoundbarnamed Livingroom Action VoiceCommand To set the volume level to 5 AlexaSetthevolumet...

Страница 29: ...ar keep away from direct sunlight or other heat sources e g a fireplace When leaving the Soundbar outdoors dust or foreign substances may accumulate When not in use be sure to keep it covered with a cloth or cover For more information about TV installation on a wall refer to the TV s wall mounting guide Samsung does not assume the responsibility for the damage caused by improper installation of th...

Страница 30: ...E DC 23V DIGITAL AUDIO IN OPTICAL 1 RearoftheSamsungTV A B C D E F G H 2 A B C D E F G H A B C D E F G H B C D E F G H RearoftheSamsungTV Tighten the TV with it lying down A B C D E F G H 3 A B C D E F G A B C D E F G H RearoftheSoundbar 4 BottomoftheSoundbar A B C D E F G A B C D E F G H 5 Deviation preventing plate ...

Страница 31: ...ed close its cover and then tighten the loosened screws 8 A B C D Before hooking up the Soundbar to A B C D E F G H slightly lift the product and then push it down for assembly NOTES A B C D E F G H Screw When separating the Soundbar frome the TV please loosen te screw on the A B C D E F When removing the Soundbar be careful because the deviation preventing plate may be deformed ...

Страница 32: ... 2 I J K L M N O P x 2 I J K L M N O P C D E F G H I J K L M N O P x 2 A B C D E F G H I J K L M N O P x 2 x 2 M4 x L10 1 2 5cm ormore 15 7 400mm A B C D E F G H CenterLine 2 I J K L M N O P 3 4 I J K L M N O I J K L M N O Recommended torque 10 12 kgf cm 5 ...

Страница 33: ... it with waterproof silicone SERVICE DC 23V DIGITAL AUDIO IN OPTICAL SERVICE DC 23V DIGITAL AUDIO IN OPTICAL After the cable is connected close its cover and then tighten the loosened screws 7 I J K L M N O P A B C D E F G H 8 RearoftheSoundbar ...

Страница 34: ... of the Soundbar 1 Go to the Samsung Electronics website www samsung com search for the model name from the customer support menu option For more information about update refer to Upgrade Guide 2 Download the upgrade file USB type C 3 Unzip the file to create a folder with the file name 4 Store the created folder in a USB and then connect it to the Soundbar 5 Turn on the Soundbar Then the product ...

Страница 35: ...Sound Sound Output Select Soundbar The cable connection to the Soundbar may not be loose Remove the cable and connect again Remove the power cord completely reconnect and turn the power on Initialize the product and try again See page 34 IncaseBluetoothconnectionisnotpossible When connecting a new device switch to BTPAIRING for connection Press the PAIR button on the remote control or press the So...

Страница 36: ...er near the Soundbar or adjust the installed position with no obstacles If your wireless router is new you will need to reconfigure the speaker s network settings IncasetheSoundbarisnotturnedonassoon astheTVisturnedon When you turn off the Soundbar while watching TV power synchronization with the TV is disabled First turn off the TV 13 LICENSE Manufactured under license from Dolby Laboratories Dol...

Страница 37: ... requests for questions regarding open sources contact Samsung Open Source http opensource samsung com 15 IMPORTANT NOTESABOUT SERVICE Figures and illustrations in this User Manual are provided for reference only and may differ from actual product appearance ...

Страница 38: ...ion level against liquid water This Soundbar supports the dust and water resistant level equivalent to IP55 An IP55 rating means that under test conditions the product is protected against quantities of dust that could interfere with the normal operation of the product but is not fully dust tight The product is completely protected against solid objects It is also protected against low pressure wa...

Страница 39: ...ipt must be retained by the customer and is the only acceptable proof of purchase It must be presented to the authorized service center at the time service is requested EXCLUSIONS WHATISNOTCOVERED This warranty does not cover damage due to accident fire flood and or other acts of God misuse incorrect line voltage improper installation improper or unauthorized repairs commercial use or damage that ...

Страница 40: ...tomer care Center HEADQUARTERS Samsung Electronics Canada Inc 2050 Derry Road West Mississauga Ontario L5N 0B9 Canada TEL 1 800 SAMSUNG 1 800 726 7864 www samsung com ca support Area Contact Center Web Site North America CANADA 1 800 SAMSUNG 726 7864 www samsung com ca support English www samsung com ca_fr support French U S A 1 800 SAMSUNG 726 7864 www samsung com us support ...

Страница 41: ...HW LST70T MANUEL COMPLET Imaginez les possibilités Merci d avoir choisi un appareil Samsung Pour recevoir une assistance plus complète veuillez enregistrer votre produit sur www samsung com register ...

Страница 42: ...qu il doit consulter le guide d utilisation pour avoir de l information au sujet de la sécurité AVERTISSEMENT Pour éviter des blessures cet appareil doit être solidement fixé au plancher au mur conformément aux directives d installation MISEENGARDE La prise d alimentation fait office de système de déconnexion Elle doit donc rester disponible en permanence ATTENTION PourleCanada L émetteur récepteu...

Страница 43: ... de mise à la terre ou de la fiche polarisée Une fiche polarisée comporte deux lames dont l une est plus large que l autre Une fiche de mise à la terre comporte deux lames et une troisième broche de mise à la terre La lame la plus large et la troisième broche sont destinées à assurer votre sécurité Si la fiche fournie ne s insère pas dans la prise utilisée faites appel à un électricien pour faire ...

Страница 44: ...champs magnétiques ou électriques Débranchez le câble d alimentation en cas de dysfonctionnement Votre produit n est pas prévu pour un usage industriel Ce produit ne peut être utilisé qu à des fins personnelles Une condensation peut se former si le produit ou un disque a été stocké à basse température Si vous devez transporter l ensemble pendant l hiver attendez environ 2 heures que l appareil ait...

Страница 45: ...ons 14 Caractéristiques de sortie pour les différents modes d effets sonores 14 Réglage du volume du Soundbar avec une télécommande du téléviseur 15 04 ConnexionduSoundbar 16 Connexion de l alimentation électrique 16 Comment monter l adaptateur CA CC 16 05 Utilisationd uneconnexionfilaireavecle téléviseur 17 Connexion à l aide d un câble optique 17 06 Utilisationd uneconnexionsansfilavecle télévis...

Страница 46: ...on Amazon Echo 28 Contrôler votre Soundbar grâce à un périphérique Amazon 28 10 Installationdusupportmural 29 Précautions d installation 29 Méthode 1 Fixation au téléviseur 29 Méthode 2 Support mural 32 11 Miseàjourlogicielle 34 Mise à jour automatique 34 Mise à jour USB 34 Initialisation 34 12 Dépannage 35 13 Licence 36 14 AvisdeLicencesLibres 37 15 RemarqueImportanteConcernantleService 37 16 Car...

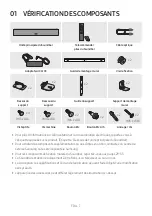
Страница 47: ...ommation électriques reportez vous à l étiquette apposée sur le produit Étiquette Dessous de l unité principale du Soundbar Pour acheter des composants supplémentaires ou des câbles en option contactez un centre de service Samsung ou le service clientèle Samsung Pour les composants de fixation murale du Soundbar reportez vous aux pages 29 33 Ce Soundbar est destiné uniquement à être fixé sur un té...

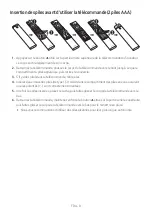
Страница 48: ...S il y a des piles dans la télécommande retirez les 4 Insérez deux nouvelles piles de type 1 5 V AAA dans le compartiment des piles en vous assurant que les polarités sont correctement orientées 5 Une fois les piles insérées placez le cache puis faites glisser le corps de la télécommande vers le bas 6 Retournez la télécommande maintenez enfoncé le bouton situé sur la partie arrière supérieure puis...

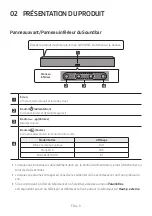
Страница 49: ...sélectionner le mode d entrée source Moded entrée Affichage Entrée numérique optique D IN Mode Wi Fi WIFI Mode BLUETOOTH BT Lorsque vous branchez le câble d alimentation CA le bouton d alimentation se met à fonctionner au bout de 4 à 6 secondes Lorsque vous allumez cet appareil vous devrez patienter 4 à 5 secondes avant qu il ne produise du son Si le son provient à la fois du téléviseur et du Soun...

Страница 50: ...ez un périphérique de stockage USB pour mettre à niveau le logiciel du produit DC23V Entrée de l alimentation Connectez l adaptateur secteur CA CC Voir page 16 Lorsque vous déconnectez le câble d alimentation de l adaptateur CA CC de la prise murale tirez sur la prise Ne tirez pas sur le câble Ne connectez pas cet appareil ou d autres composants à une prise CAtant que toutes les connexions entre l...

Страница 51: ...e des boutons Haut Bas Pour régler le volume TREBLE sélectionnez Contrôle du son TREBLE puis utilisez les touches Haut Bas pour régler le volume sur une plage de réglage allant de 6 à 6 Maintenez le bouton Réglagessonores enfoncé pendant environ 5 secondes pour régler le son pour chaque bande de fréquence Vous pouvez utiliser les boutons Gauche Droite pour sélectionner les fréquences suivantes 150...

Страница 52: ...e Pause Vous pouvez également lire ou mettre en pause la musique en appuyant sur ce bouton Haut Bas Gauche Droite VOL WOOFER SOUND MODE PAIR Appuyezsurleszonesindiquéespoursélectionnerlebouton duHaut Bas Gauche Droite Appuyez en haut en bas à gauche et à droite du bouton pour sélectionner ou définir des fonctions Répéter Pour utiliser la fonction Repeat appuyez sur le bouton Haut Passerunmorceau A...

Страница 53: ...ne plage allant de 6 à 6 ADAPTIVE Appuyez sur ce bouton pour analyser le contenu en temps réel et fournir automatiquement le champ sonore optimal en fonction des caractéristiques du contenu SURROUND Appuyez sur ce bouton pour fournir un environnement sonore plus important que la norme ...

Страница 54: ...activer la fonction Télécommande de votre téléviseur mode veille page 15 Réglages sonores EQ 7 bandes page 11 Caractéristiquesdesortiepourlesdifférentsmodesd effetssonores Effet Entrée Sortie STANDARD 2 0 canaux 2 0 canaux 5 1 canaux 3 0 canaux SURROUND 2 0 canaux 3 0 canaux 5 1 canaux 3 0 canaux ADAPTIVE 2 0 canaux 2 0 canaux 5 1 canaux 3 0 canaux ...

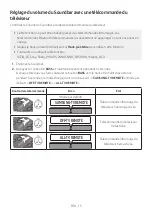
Страница 55: ...ette fonction VIZIO LG Sony Sharp PHILIPS PANASONIC TOSHIBA Hisense RCA 1 Éteignez le Soundbar 2 Appuyez sur le bouton BASS et maintenez le enfoncé pendant 5 secondes À chaque fois que vous faites basculer le bouton BASS vers le haut et le maintenez enfoncé pendant 5 secondes le mode change dans l ordre suivant SAMSUNG TVREMOTE Mode par défaut OFF TVREMOTE ALL TVREMOTE Boutondelatélécommande Écran...

Страница 56: ...horizontale de l adaptateur CA CC le logo Samsung doit être orienté vers le haut La sécurité pourrait être compromise si ce produit est utilisé à moins de 4 F 20 C Il est recommandé de brancher le cordon d alimentation à la prise puis d attendre une heure avant d allumer la Soundbar Arrièredel unitéprincipale duSoundbar SERVICE DC 23V DIGITAL AUDIO IN OPTICAL SERVICE DC 23V DIGITAL AUDIO IN OPTICA...

Страница 57: ...é connexion Lorsque vous utilisez le Soundbar à l extérieur il est recommandé de connecter un câble optique pour une sortie audio adéquate Veillez à utiliser le câble optique fourni avec le produit Pour acheter un câble optique séparément communiquez avec le revendeur ou le centre de service Samsung le plus proche Le câble optique fourni avec le produit est conçu pour répondre à la spécification 0...

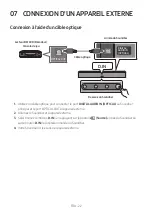
Страница 58: ... port de sortie OPTICAL du téléviseur à l aide du câble optique comme indiqué sur la figure 2 Allumez le Soundbar et le téléviseur 3 Sélectionnez le mode D IN en appuyant sur le bouton Source en bas du Soundbar ou sur le bouton D IN de la télécommande du Soundbar 4 Le son du téléviseur est émis par le Soundbar ...

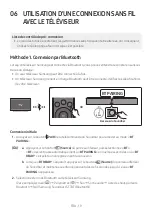
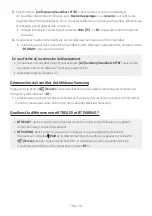
Страница 59: ...spécifications de votre téléviseur DessousduSoundbar OU BTPAIRING 5 Sec Connexioninitiale 1 Appuyez sur le bouton PAIR de la télécommande du Soundbar pour accéder au mode BT PAIRING OU a Appuyez sur le bouton Source du panneau inférieur puis sélectionnez BT BT devient passe automatiquement à BTPAIRING en quelques secondes ou à BT READY s il existe un enregistrement de connexion b Lorsque BTREADY a...

Страница 60: ...V SamsungSoundbarLST70T dans la liste des haut parleurs du téléviseur Samsung supprimez le Répétez ensuite les étapes 1 à 3 DéconnexionduSoundbardutéléviseurSamsung Appuyez sur le bouton Source du panneau inférieur ou de la télécommande puis sélectionnez n importe quel mode sauf BT La déconnexion prend du temps car le téléviseur Samsung doit recevoir une réponse du Soundbar Le temps requis peut va...

Страница 61: ...i Fi Listedecontrôledepré connexion La connexion Wi Fi est disponible uniquement sur les téléviseurs Samsung Vérifiez que lerouteursansfil Wi Fi est activé et que le téléviseurestconnectéaurouteur Le téléviseur et le Soundbar doivent être connectés au même réseau sans fil Wi Fi Si votre routeur sans fil Wi Fi utilise un canal DFS vous ne pourrez pas établir de connexion Wi Fi entre le téléviseur e...

Страница 62: ...dejeu DessousduSoundbar 1 Utilisez un câble optique pour connecter le port DIGITALAUDIOIN OPTICAL au Soundbar principal et le port OPTICAL OUT à l appareil externe 2 Allumez le Soundbar et l appareil externe 3 Sélectionnez le mode D IN en appuyant sur le bouton Source en bas du Soundbar ou sur le bouton D IN de la télécommande du Soundbar 4 Votre Soundbar lit les sons de l appareil externe ...

Страница 63: ... PAIRING OU a Appuyez sur le bouton Source du panneau inférieur puis sélectionnez BT BT devient passe automatiquement à BTPAIRING en quelques secondes ou à BT READY s il existe un enregistrement de connexion b Lorsque BTREADY apparaît appuyez sur le bouton Source du panneau inférieur du Soundbar et maintenez le enfoncé pendant plus de 5 secondes jusqu à ce que BT PAIRING apparaisse 2 Sur votre app...

Страница 64: ... recherche ou la connexion Bluetooth dans les circonstances suivantes S il y a un fort champ électrique autour du Soundbar Si plusieurs appareils Bluetooth sont associés simultanément au Soundbar Si l appareil Bluetooth est éteint pas en place ou fonctionne mal Les appareils électroniques peuvent créer des interférences radio Les appareils produisant des ondes électromagnétiques doivent être gardé...

Страница 65: ...es Bluetooth lorsque vous utilisez l option Bluetooth Cet appareil sans fil peut provoquer des interférences électriques lorsqu il est en marche Déconnexiond unpériphériqueBluetoothd unSoundbar Vous pouvez déconnecter le périphérique Bluetooth à partir du système Soundbar Pour des directives consultez le manuel d utilisation du périphérique Bluetooth Le système Soundbar sera déconnecté Lorsque le ...

Страница 66: ...mobile téléphone intelligent ou tablette 2 Dans l application suivez les instructions à l écran pour ajouter le Soundbar La fenêtre contextuelle automatique deuxième illustration ci dessous peut ne pas s afficher sur certains appareils Si la fenêtre contextuelle ne s affiche pas appuyez sur le bouton sur l écran Home Le Soundbar a été ajouté à l application Lancez l application Ajouter un appareil...

Страница 67: ...oin pointu du Soundbar Cela pourrait rayer ou endommager le Soundbar ou l appareil mobile Il est recommandé de placer l appareil mobile dans un étui Appuyez légèrement sur la zone large de la partie supérieure du Soundbar sans exercer de force excessive Pour utiliser cette fonction mettez à jour l application SmartThings vers la dernière version Cette fonction peut ne pas être prise en charge en f...

Страница 68: ...ar Wi Fi réseau sans fil ContrôlervotreSoundbargrâceàunpériphériqueAmazon Le service Amazon Echo que vous pouvez utiliser avec votre Soundbar est limité à la musique Vous pouvez accéder à d autres services fournis par Amazon Echo comme les informations et la météo grâce à votre produit Amazon Echo Déclencheur Commande Nomduhaut parleur PourutiliserlescommandesvocalespourleSoundbarnommé Salon Actio...

Страница 69: ...ecte du soleil ou d autres sources de chaleur par exemple une cheminée Lorsque vous laissez le Soundbar à l extérieur de la poussière ou des corps étrangers peuvent s accumuler Lorsqu il n est pas utilisé assurez vous de le couvrir d un chiffon ou d une housse Pour plus d informations sur l installation du téléviseur sur un mur reportez vous au guide de montage mural du téléviseur Samsung décline ...

Страница 70: ...AL AUDIO IN OPTICAL 1 ArrièredutéléviseurSamsung A B C D E F G H 2 A B C D E F G H A B C D E F G H B C D E F G H ArrièredutéléviseurSamsung Serrez sur le téléviseur en position couchée A B C D E F G H 3 A B C D E F G A B C D E F G H ArrièreduSoundbar 4 DessousduSoundbar A B C D E F G A B C D E F G H 5 Plaque de prévention des déviations ...

Страница 71: ...nnecté fermez son cache puis serrez les vis desserrées 8 A B C D Avant de raccorder le Soundbar à A B C D E F G H soulevez légèrement le produit puis poussez le vers le bas pour l assemblage REMARQUES A B C D E F G H Vis Pour dissocier la Soundbar du téléviseur desserrez la vis sur le A B C D E F G Lors du retrait de la Soundbar prenez soin de ne pas déformer la plaque de prévention des déviations...

Страница 72: ...0 x 2 I J K L M N O P x 2 I J K L M N O P C D E F G H I J K L M N O P x 2 A B C D E F G H I J K L M N O P x 2 x 2 M4 x L10 1 2 5cm ouplus 15 7 400mm A B C D E F G H Lignecentrale 2 I J K L M N O P 3 4 I J K L M N O I J K L M N O Couple recommandé 10 à 12 kgf cm 5 ...

Страница 73: ...he Veillez à ce que le câble soit déconnecté SERVICE DC 23V DIGITAL AUDIO IN OPTICAL SERVICE DC 23V DIGITAL AUDIO IN OPTICAL Une fois le câble connecté fermez son cache puis serrez les vis desserrées 7 I J K L M N O P A B C D E F G H 8 ArrièreduSoundbar ...

Страница 74: ...ung Electronics www samsung com recherchez le nom du modèle à partir de l option de menu de l assistance à la clientèle Pour plus d informations sur la mise à jour reportez vous au Guide de mise à niveau 2 Téléchargez le fichier de mise à niveau USB type C 3 Décompressez le fichier pour créer un dossier avec le nom du fichier 4 Stockez le dossier créé sur une clé USB puis connectez le au Soundbar ...

Страница 75: ...lâche Débranchez le câble et rebranchez le Retirez complètement le cordon d alimentation rebranchez le et mettez l appareil sous tension Initialisez le produit et réessayez Voir page 34 SilaconnexionBluetooths avèreimpossible Lors de la connexion d un nouvel appareil passez à BTPAIRING pour la connexion Appuyez sur le bouton PAIR de la télécommande ou sur le bouton Source de l unité pendant au moi...

Страница 76: ...ur près du Soundbar ou ajustez la position d installation pour qu il n y ait pas d obstacles Si votre routeur sans fil est nouveau vous devrez reconfigurer les paramètres réseau du haut parleur SileSoundbarn estpasallumédèslamise soustensiondutéléviseur Lorsque vous éteignez le Soundbar tout en regardant la télévision la synchronisation de l alimentation avec le téléviseur est désactivée Éteignez ...

Страница 77: ...vertes communiquez avec Samsung Open Source http opensource samsung com 15 REMARQUE IMPORTANTE CONCERNANTLE SERVICE Les chiffres et les illustrations contenus dans ce Guide d utilisation sont fournis à titre de référence uniquement et pourraient ne pas représenter exactement le produit ...

Страница 78: ...au Cette Soundbarpossède un niveau de résistance à la poussière et à l eau équivalent à IP55 Un indice IP55 signifie que dans des conditions d essai le produit est protégé contre la quantité de poussière qui pourrait nuire au fonctionnement normal du produit mais n est pas complètement étanche à la poussière Le produit est complètement protégé contre les objets solides Il est également protégé con...

Страница 79: ...nt doit le présenter au Centre de service agréé au moment où il fait la demande d une réparation sous garantie EXCLUSIONS CEQUIN ESTPASCOUVERT Cette garantie ne couvre pas les dommages causés par un accident un incendie une inondation un cas de force majeure un mauvais usage ou une tension incorrecte La garantie ne couvre pas une mauvaise installation une mauvaise réparation une réparation non aut...

Страница 80: ... Service Consommateurs Samsung SIÈGE SOCIAL Samsung Electronics Canada Inc 2050 Derry Road West Mississauga Ontario L5N 0B9 Canada TEL 1 800 SAMSUNG 1 800 726 7864 www samsung com ca_fr support Area Contact Center Web Site North America CANADA 1 800 SAMSUNG 726 7864 www samsung com ca support English www samsung com ca_fr support French U S A 1 800 SAMSUNG 726 7864 www samsung com us support ...

Отзывы: