background image

23

ENG

FUNCTIONS

SOFTWARE UPDATE

Samsung may offer updates for the Soundbar's 
system firmware in the future.

If an update is offered, you can update the firmware 
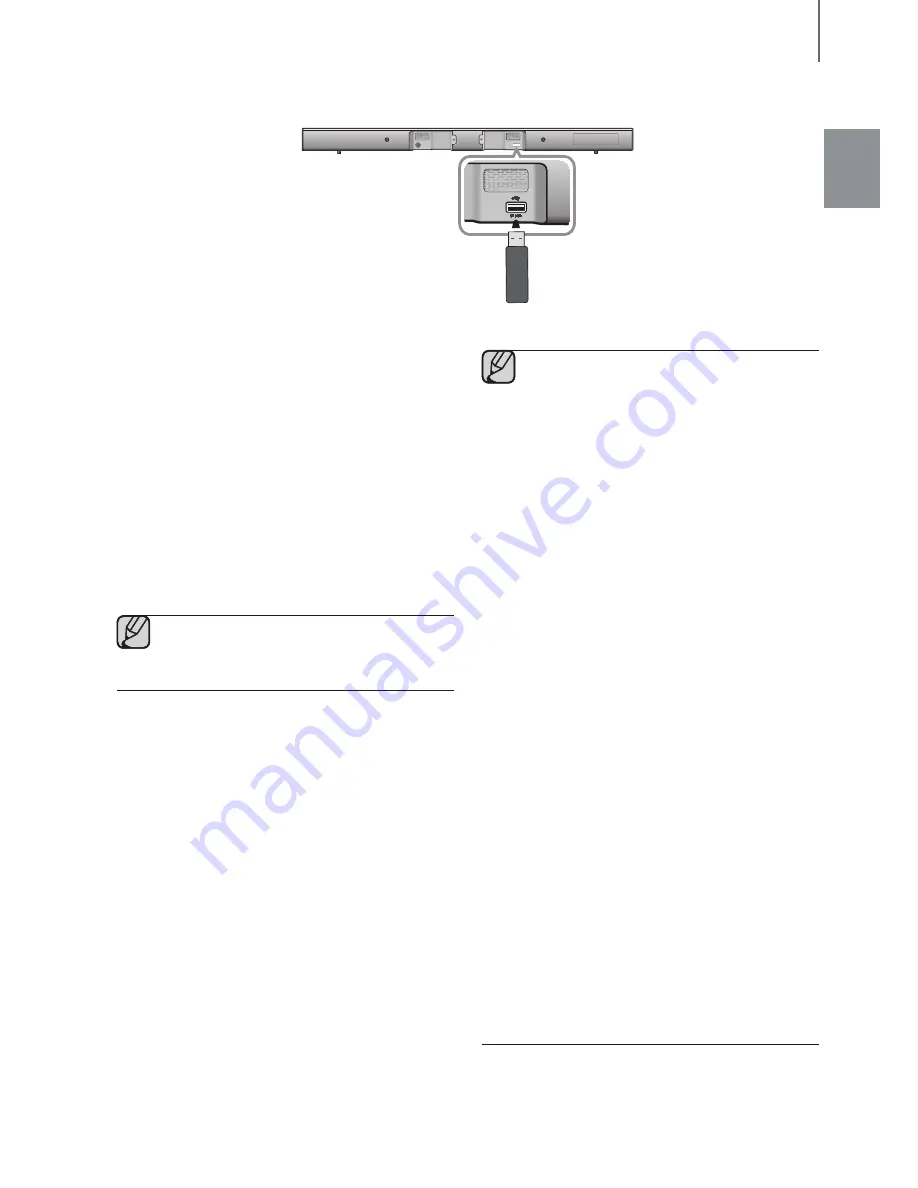
by connecting a USB device with the firmware 
update stored on it to the USB port on your 
Soundbar.

Note that if there are multiple update files, you must 
load them onto the USB device singly and use them 
to update the firmware one file at a time.

Please visit samsung.com or contact the Samsung 
call center to receive more information about 
downloading updates files.


The product has a DUAL BOOT function. 
If the firmware fails to update, you can 
update the firmware again.


Insert a USB device containing the 
firmware update into the USB port on the 
main unit.


Updating firmware may not work properly 
if audio files supported by the Soundbar 
are stored in the USB storage device.


Do not disconnect the power or remove 
the USB device while updates are being 
applied. The main unit will turn off 
automatically after completing the 
firmware update.


After the update, all settings are reset to 
their factory default settings. We 
recommend you write down your settings 
so that you can easily reset them after the 
update. 
Note that updating firmware resets 
subwoofer connection too. If connection 
to the subwoofer is not established 
automatically after resetting,  
refer to page 14. 
If the firmware fails to update, we 
recommend formatting the USB device in 
FAT16 and trying again.


Once the software update is complete, 
turn off the product and then press and 
hold the ( 

&

 ) button on the remote 

control for more than 5 seconds. “

INIT

” 

appears on the display and the unit is 
powered off. The upgrade is complete.


Do not format the USB device in the NTFS 
format. The Soundbar does not support 
the NTFS file system.


Depending on the manufacturer, some 
USB devices may not be supported.

Содержание HW-J550

Страница 1: ...e the possibilities Thank you for purchasing this Samsung product To receive more complete service please register your product at www samsung com register User manual This Nanum Gothic Eco font is provided by NAVER HW J550 HW J551 ...

Страница 2: ...emote Control You can use the supplied remote control to control various operations with the simple press of a button USB Host Support You can connect and play music files from external USB storage devices such as MP3 players USB flash memory etc using the Soundbar s USB HOST function Bluetooth Function You can connect a Bluetooth device to the Soundbar and enjoy music with high quality stereo sou...

Страница 3: ...n the triangle indicates that there are important instructions accompanying the product WARNING To reduce the risk of fire or electric shock do not expose this appliance to rain or moisture To prevent injury this apparatus must be securely attached to the floor wall in accordance with the installation instructions This product contains chemicals known to the State of California to cause cancer and...

Страница 4: ...e or equivalent type During thunderstorms disconnect the AC Do not expose the unit to direct sunlight o PRECAUTIONS Ensure that the AC power supply in your house complies with the power requirements listed on the identification sticker located on the back of your product Install your product horizontally on a suitable base furniture with enough space around it for ventilation 3 4 inches Make sure ...

Страница 5: ...racket without referring to the Wall mount Installation Guide 14 Connecting the Wireless Subwoofer 15 Connecting an External Device using an HDMI cable 16 Connecting an External Device using Audio analog cable or Optical digital cable 17 FUNCTIONS 17 Input mode 17 ARC HDMI OUT 18 Bluetooth 20 Using The Samsung Audio Remote App 21 TV SoundConnect 22 USB 23 Software Update 24 TROUBLESHOOTING 25 APPE...

Страница 6: ...ics Co Ltd All rights reserved no part of this user s manual may be reproduced or copied without the prior written permission of Samsung Electronics Co Ltd WHAT S INCLUDED Check for the supplied accessories shown below The appearance of the accessories may differ slightly from the illustrations above Use the dedicated USB cable to connect external USB devices to the unit Wall Mount L 1EA Wall Moun...

Страница 7: ...ff automatically in the BT READY SEARCH or TV REQUEST modes SOURCE Button Selects the D IN AUX HDMI BT TV USB input While the unit is powered on pressing the button for more than 3 seconds sets the button to act as the MUTE button To cancel MUTE button setup press the button for more than 3 seconds again When you turn on this unit there will be a 4 to 5 second delay before it produces sound If you...

Страница 8: ...simultaneously using an HDMI cable OPTICAL IN Connect to the digital optical output of an external device HDMI IN Inputs digital video and audio signals simultaneously using an HDMI cable Use when connecting a supported external device AUX IN Connect to the Analog output of an external device When disconnecting the power cable of the AC power adaptor from the wall outlet pull the plug Do not pull ...

Страница 9: ...NDOM REPEAT Plays tracks in random order A track that has already been played may be played again MUTE You can turn the volume down to 0 with the push of a button Press again to restore the sound to the previous volume level SOURCE Press to select a source connected to the Soundbar Skip Forward If there is more than one file on the device you are playing and you press the button the next file is s...

Страница 10: ...RD mode if you want to enjoy the original sound Night Mode Night Mode prevents drastic volume level changes when you change a channel or there is a scene transition Play Pause Press the button to pause a file temporarily Press the button again to play the selected file Skip Back If there is more than one file on the device you are playing and you press the button the previous file is selected Inst...

Страница 11: ... sure the unit is turned off and unplugged before you install it Otherwise it may cause an electric shock To install the Soundbar on a wall follow these steps 1 Place the installation guide against the wall surface The installation guide must be level If the TV is mounted on the wall install the Soundbar at least 2 inches 5 cm below the TV 2 Mark the location where the screws will go through on th...

Страница 12: ...ay cause an injury or damage the product When the unit is installed on a wall please make sure that children do not pull any of the connecting cables as it may cause it to fall For the optimal performance of a wall mount installation install the speaker system at least 2 inches 5 cm below the TV if the TV is mounted on the wall For your safety if you do not mount the unit on the wall install it on...

Страница 13: ...in its right end Tighten the screw until it is firmly fixed to the wall 3 Place Wall Mount R on the desired wall surface parallel to the floor and aligned with Wall Mount L as shown above Mark the location of the screw holes on the wall Drill holes for the screws at the places you have marked 4 Match the screw holes on Wall Mount R to the screw holes on the wall and then screw one screw through th...

Страница 14: ...ain unit and start again from Step 2 You can enjoy better sound from the wireless subwoofer by selecting a Sound Effect See page 10 Before moving or installing the product be sure to turn off the power and disconnect the power cord If the main unit is powered off the wireless subwoofer will be in standby mode and the STANDBY LED on the upper side will come on after the Link indicator Blue LED blin...

Страница 15: ...s HDMI IN Connect an HDMI cable not supplied from the HDMI IN jack on the back of the product to the HDMI OUT jack on your digital device and HDMI OUT TV Connect an HDMI cable not supplied from the HDMI OUT TV jack on the back of the product to the HDMI IN jack on your TV HDMI is an interface that enables the digital transmission of video and audio data with just a single connector HDMI OUT ARC Th...

Страница 16: ...er Set top box Game console AUX IN Connect AUX IN Audio on the main unit to the AUDIO OUT jack of the TV or Source Device To use change the function to AUX or OPTICAL IN Connect OPTICAL IN Audio on the main unit to the OPTICAL OUT jack of the TV or Source Device To use change the function to D IN Do not connect the power cord of this product or your TV to the wall outlet until all connections betw...

Страница 17: ...here is no KEY input for 8 hours when the AUX cable is connected To turn the Auto Power Down function ON or OFF press and hold the button for 5 seconds OFF ON AUTO POWER DOWN appears on the display ARC HDMI OUT ARC Audio Return Channel transmits the digital audio signal to the HDMI OUT ARC port HDMI Cable 1 Connect a TV supporting ARC to the Soundbar with an HDMI cable 2 Turn on the TV turn on the...

Страница 18: ...the Soundbar again 5 Play music on the connected device You can listen to the music playing on the connected Bluetooth device over the Soundbar In BT mode the Play Pause Next Prev functions are not available However these functions are available in Bluetooth devices supporting AVRCP If asked for a PIN code when connecting a Bluetooth device enter 0000 Only one Bluetooth device can be paired at a t...

Страница 19: ...r a response from the Soundbar before terminating the connection Disconnection time may differ depending on the Bluetooth device In Bluetooth connection mode the Bluetooth connection will be lost if the distance between the Soundbar and the Bluetooth device exceeds 16 25 ft 5m The Soundbar automatically turns off after 25 minutes in the Ready state More About Bluetooth Bluetooth is a technology th...

Страница 20: ...vice via the Samsung Audio Remote app download the Samsung Audio Remote App by accessing the app through Google Play store Starting the Samsung Audio Remote App After you install the Samsung Audio Remote app follow the instructions in the app The Samsung Audio Remote APP is only supported on phones running Android OS 3 0 or above ...

Страница 21: ...re function before you begin For further information refer to the TV s user manual If your Samsung TV was released before 2014 check the SoundShare setting menu If the distance between the TV and Soundbar exceeds 16 25 ft 5m the connection may not be stable or the audio may stutter If this occurs relocate the TV or Soundbar so that they are within operational range and then re establish the TV Sou...

Страница 22: ...he FAT16 and FAT32 file systems The NTFS file system is not supported Connect USB devices directly to the USB port of the product Otherwise you may encounter a USB compatibility problem Do not connect multiple storage devices to the product via a multi card reader It may not operate properly Digital camera PTP protocols are not supported Do not remove the USB device while it is transferring files ...

Страница 23: ...ored in the USB storage device Do not disconnect the power or remove the USB device while updates are being applied The main unit will turn off automatically after completing the firmware update After the update all settings are reset to their factory default settings We recommend you write down your settings so that you can easily reset them after the update Note that updating firmware resets sub...

Страница 24: ... distance between the remote control and main unit too far Replace with new batteries Move closer to the unit The TV SoundConnect TV pairing failed Does your TV support TV SoundConnect Is your TV firmware the latest version Does an error occur when connecting Reset the TV MODE and connect again TV SoundConnect is supported by some Samsung TVs released from 2012 on Check your TV to see if it suppor...

Страница 25: ... location go to our website www samsung com recyclingdirect or call 877 278 0799 Open Source License Notice For further information on Open Sources used in this product please visit the website http opensource samsung com To send inquiries and requests regarding open sources contact Samsung via Email oss request samsung com Important Note About Service An administration fee may be charged if eithe...

Страница 26: ...sult in service problems incorrect electrical line voltage fluctuations and surges customer adjustments and failure to follow operating instructions cleaning maintenance and environmental instructions that are covered and prescribed in the instruction book product removal or reinstallation reception problems and distortion related to noise echo interference or other signal transmission and deliver...

Страница 27: ...TIONS OR COMMENTS COUNTRY CALL OR VISIT US ONLINE AT WRITE U S A 1 800 SAMSUNG 726 7864 www samsung com us support Samsung Electronics America Inc 85 Challenger Road Ridgefield Park NJ 07660 AH68 02821P 00 ...

Страница 28: ...I ARC HDMI cable not supplied can allows higher sound quality volume control with TV remote and Anynet What is the ARC See video with TV and Soundbar receives only audio by HDMI cable D HDMI Cable not supplied 1 Connect HDMI Cable to HDMI ARC port of TV 2 Connect the HDMI cable to the HDMI OUT TV port on Soundbar 3 Press the button on the top panel of Soundbar or the SOURCE button on remote contro...

Страница 29: ...ity sound Installing the Wall Mount 1 Place the installation guide against the wall surface The installation guide must be level If the TV is mounted on the wall install the Soundbar at least 2 inches 5 em below the TV If the wall is not strong enough to support the unit reinforce the wall or install the unit on a different wall that can support the unit s weight Purchase and use the fixing screws...

Страница 30: ...0 t 302 0mm cene rune Center Line 0 t 0 t ...

Отзывы: