background image

ENG

51

52

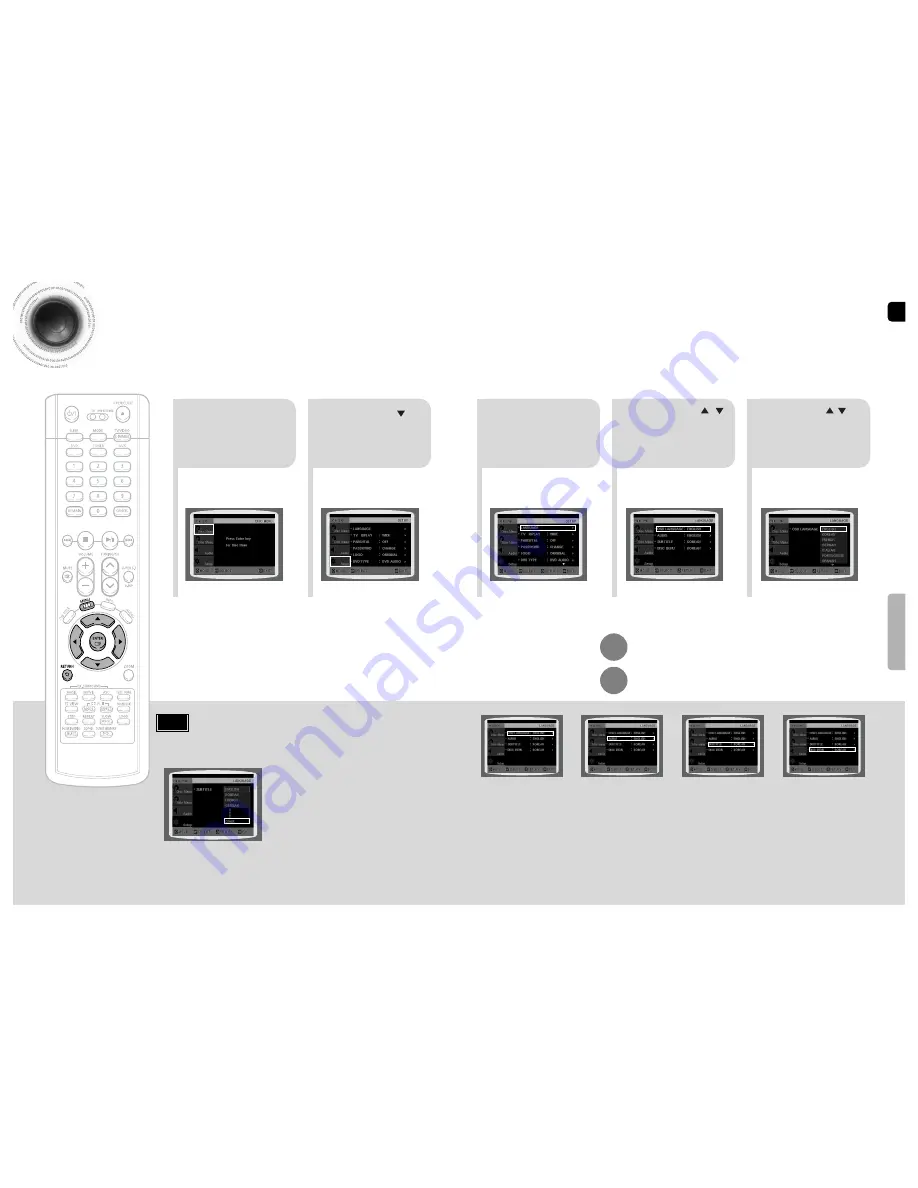
Setting the Language

OSD (On-Screen Display) language is set to English by default.

SETUP

*

If the language you selected is
not recorded on the disc, menu
language will not change even
if you set it to your desired
language.

Selecting the 

OSD Language

Selecting the 

Audio Language

(recorded on the disc)

2

1

In Stop mode,
press 

MENU

button.

Press Cursor
button to move to

Setup

’ and then

press 

ENTER

button.

4

Once the setup is complete, if the language was
set to English, OSD will be displayed in English.

3

Selecting the 

Subtitle Language

(recorded on the disc)

Selecting the Disc Menu

Language (recorded on the disc)

Select ‘

Language

and then press

ENTER

button

5

Press Cursor      ,
button to select ‘

OSD

Language

’ and then

press 

ENTER

button.

Press Cursor       ,
button to select the
desired language and then
press 

ENTER

button.

Press 

RETURN

button to return to the previous level.

Press 

MENU

button to exit the setup screen.

• To select another language, select OTHER and enter the language code of your country. 

(See page 84 for language codes)
AUDIO, SUB TITLE and DISC MENU language can be selected. 

Note

Содержание HT-P1200

Страница 1: ...EM HT P1200 COMPACT DIGITAL VIDEO Instruction Manual AH68 01720R SAMSUNG ELECTRONICS AMERICA INC SERVICE DIVISION 400 Valley Road Suite 201 Mount Arlington NJ 07856 1 800 SAMSUNG 1 800 726 7864 www samsung com COMPACT DIGITAL AUDIO ...

Страница 2: ... the unit Do not expose the unit to direct sunlight or other heat sources This could lead to overheating and malfunction of the unit The batteries used with this product contain chemicals that are harmful to the environment Do not dispose of batteries in the general household trash PREPARATION CLASS 1 LASER PRODUCT This Compact Disc player is classified as a CLASS 1 LASER product Use of controls a...

Страница 3: ...OWER LINES An outside antenna system should not be located in the vicinity of overhead power lines or other electric light or power circuits or where it can fall into such power lines or circuits When installing an outside antenna sys tem extreme care should be taken to keep from touching such power lines or circuits as contact with them might be fatal POLARIZATION This video product is equipped w...

Страница 4: ...2 Safety Instructions 3 Features 5 Notes on Discs 7 Description 9 CONNECTIONS Installing the DVD player 13 Installing Speakers 15 Connecting the Speakers 17 Connecting the Video Out to TV 20 HDMI Function 21 Connecting External Components 23 How to Connect to Anynet 25 Connecting the FM Antenna 26 Before Using Your Home Theater 27 OPERATION Disc Playback 29 SACD Super Audio CD Playback 31 MP3 CD W...

Страница 5: ...d can be fully played If the session is closed but the disc is left open you may not be able to fully play the disc CD R JPEG Discs Only files with the jpeg and JPEG extensions can be played If the disc is not closed it will take longer to start playing and not all of the recorded files may be played Only CD R discs with JPEG files in ISO 9660 or Joliet format can be played JPEG file names should ...

Страница 6: ...button Tuning Up Skip button Disc Tray PRO LOGIC II indicator DTS Disc indicator DVD AUDIO indicator CHAPTER indicator TRACK indicator PROGRAM indicator System Status Display DSP Display RADIO FREQUENCY indicator REPEAT indicator SACD indicator MPEG indicator DOLBY DIGITAL indicator STEREO indicator TUNER indicator GROUP indicator TITLE indicator ASC indicator LINEAR PCM indicator HDMI indicator 9...

Страница 7: ...milar may differ in voltage Always replace both batteries at the same time Do not expose batteries to heat or flame 11 Description Caution PREPARATION Remote Control VOLUME button MUTE button MENU button TV DVD POWER button TV indicator SLEEP button CANCEL button RETURN button MOVIE button Number 0 9 buttons MODE button TV VIDEO DIMMER button OPEN CLOSE button DVD RECEIVER indicator Cursor Enter b...

Страница 8: ... the screws to secure the stand to the DVD player 5 Insert the remaining four screws tighten Round Board Stand Installation Procedure 2 To install as wall mount 14 CONNECTIONS Keep the main unit and speakers out of the reach of children as the equipment could tip over Caution 2 1 Remove the 3 screws from the Stand Remove the Stand Holder from the Stand 3 Fix the removed Holder on DVD player using ...

Страница 9: ...er cable to the connection port of either the front speaker or the front stand Both of the connection ports will work If you have combined the front speaker and the stand connecting the speaker cable to the connection port on the rear side of the front stand is recommended Note To mount the speakers on the wall Tidying Cables Up 1 Push the cables connected to the HDMI OUT Component OUT Video OUT p...

Страница 10: ...he TV stand Selecting the Listening Position The listening position should be located about 2 5 to 3 times the distance of the TV s screen size away from the TV Example For 32 TVs 2 2 4m 6 8 feet For 55 TVs 3 5 4m 11 13 feet Connecting the Speakers Before moving or installing the product be sure to turn off the power and disconnect the power cord R L C SR SL SW 17 Rear of Main unit Rear of Subwoof...

Страница 11: ...ternal Audio Input Connector 4 Crossover Controller 5 Speaker Output Terminals Connecting the Speakers con t Connecting the Video Out to TV Choose one of the three methods for connecting to a TV Connect the supplied video cable from the VIDEO OUT jack on the back panel of the system to the VIDEO IN jack on your TV Composite Video Good Quality METHOD 1 If your television is equipped with Component ...

Страница 12: ...o progressive to prevent flickering and to remove distortion or noise on the edge of screen DCDi Directional Correlational Deinterlacing Function Since this product has an embedded Video Upscaler function with Faroudja DCDi technology it can enhance a 576i 480i DVD resolution output to 480p 720p 1080i You do not have to make separate adjustments since the Home Theater and TV will be automatically ...

Страница 13: ... from the TV in 5 1 channel through the main unit press the Dolby Pro Logic II or the SUPER 5 1 button You can connect Video Output jack on the VCR to the TV and connect Audio Output jack on the VCR to this product Example Analog signal components such as a VCR or TV Connecting an External Analog Component Audio Cable not supplied If the external analog component has only one Audio Out connect eit...

Страница 14: ...Anynet function 3 This function is available only with Samsung Anynet enabled TVs If the Anynet input and output terminals are reversed communication with the TV will fail and you will not be able to use the Anynet function Caution How to Connect to Anynet Using a Samsung Anynet enabled TV you can control the DVD Home Theater System and any other Samsung Anynet enabled AV device For detailed opera...

Страница 15: ...sung TVs See page 79 for more information remote control operation with other manufacturer s TVs 2 3 Press MODE button until the TV indicator lights TV DVDRECEIVER TV DVDRECEIVER Press the POWER button to turn on the TV 5 6 Press the MODE button until the DVD RECEIVER indicator lights Press FUNCTION button on the main unit or DVD on the remote to select DVD CD mode CONNECTIONS 1 Plug the main unit...

Страница 16: ...e applicable to DVD VIDEO DVD AUDIO and DVD R RW discs Where a particular DVD type is mentioned it is indicated separately Depending on the content of the disc the initial screen may appear different DVD Note Groups and tracks DVD AUDIO DVD audio is divided into several large sections called groups and smaller sections called tracks Numbers are allotted to these sections These numbers are called g...

Страница 17: ...ect another album and track repeat Steps 2 and 3 above 3 To change the album use to select another album and then press the ENTER button SACD menu appears and the play begins 2 When the play is stopped select a track using the button and press the ENTER button 1 Open the disk tray by using the OPEN CLOSE button and then insert SACD 3Press the STOP button to stop playback During the play you cannot...

Страница 18: ... Time Each time the REMAIN button is pressed Press the REMAIN button For checking the total and remaining time of a title or chapter being played CHAPTER REMAIN TITLE REMAIN CHAPTER ELAPSED TITLE ELAPSED DVD VIDEO TRACK REMAIN GROUP REMAIN TRACK ELAPSED GROUP ELAPSED DVD AUDIO CD TRACK REMAIN TOTAL ELAPSED TOTAL REMAIN TRACK ELAPSED MP3 TRACK ELAPSED TRACK REMAIN The maximum resolution is 5120 x 3...

Страница 19: ...MV Supported Versions DivX3 11 5 1 V1 V2 V3 V7 DivX Digital internet video eXpress DivX is a video file format developed by Microsoft and is based on MPEG4 compression technology to provide audio and video data over the Internet in real time MPEG4 is used for video encoding and MP3 for audio encoding so that the users can watch a movie at near DVD quality video and audio 1 Supported Formats This p...

Страница 20: ... in playback quality when you connect a USB1 1 device For a USB HDD make sure to connect an auxiliary power cord to the USB HDD for proper operation 6 USB card Reader One slot USB card reader and Multi slot USB card reader Depending on the manufacturer the USB card reader may not be supported If you install multiple memory devices into a multi card reader you may experience problems 7 If you use a...

Страница 21: ...O LOGIC Note What is a Group A section of tracks contained in a DVD AUDIO disc What is a Title A movie contained in a DVD VIDEO disc What is a Chapter Each title on a DVD disc is divided into several smaller sections called chapters What is a Track File A section of video or a music file recorded on a DVD AUDIO CD or MP3 CD appears on the TV screen If this symbol appears on the TV screen while but...

Страница 22: ...playback the repeat playback mode changes as follows CHAPTER Repeatedly plays the selected chapter TITLE Repeatedly plays the selected title GROUP Repeatedly plays the selected group RANDOM Plays tracks in random order A track that has already been played may be played again TRACK Repeatedly plays the selected track DIR Repeatedly plays all tracks in the selected folder DISC Repeatedly plays the e...

Страница 23: ...rsor buttons to select A and then press ENTER button at the beginning of the desired segment To return to normal playback press Cursor buttons to select OFF DVD CD 43 Note OPERATION Angle Function This function allows you to view the same scene in different angles DVD 2 Press Cursor button to move to ANGLE display 1Press INFO button 1 3 Each time the button is pressed the angle changes as follows ...

Страница 24: ...in horizontal to vertical ratio This feature is not supported for DivX discs 45 Note OPERATION EZ VIEW OFF EZ VIEW SELECT ZOOM POSITION Bonus Group Navigating Pages Some DVD Audio discs have an extra bonus group that requires a 4 digit key number to access See the disc packaging for details and the key number Bonus Group When you play a DVD Audio disc that has a bonus group the key number input sc...

Страница 25: ... to time display Moving to a Specific Time Press the numeric buttons You can press on the remote control to move directly to the desired title chapter or track Depending on the disc you may not be able to move to the selected title or time 47 Selecting Audio Subtitle Language Depending on the number of languages on a DVD disc a different audio language ENGLISH SPANISH FRENCH etc is selected each t...

Страница 26: ...ing Disc Menu You can use the menus for the audio language subtitle language profile etc DVD menu contents differ from disc to disc DVD 49 2 When the disc has no menu the This menu is not supported message appears on the screen 1 In Stop mode press MENU button Press Cursor buttons to move to DISC MENU and then press ENTER button 4 Press ENTER button 3 Press Cursor buttons to select the desired ite...

Страница 27: ...the language was set to English OSD will be displayed in English 3 Selecting the Subtitle Language recorded on the disc Selecting the Disc Menu Language recorded on the disc Select Language and then press ENTER button 5 Press Cursor button to select OSD Language and then press ENTER button Press Cursor button to select the desired language and then press ENTER button Press RETURN button to return ...

Страница 28: ...PS option according to personal preference Select 16 9 if you have a widescreen TV Select this to view a 16 9 picture in the full screen mode on your widescreen TV You can enjoy the widescreen aspect Select this to play a 16 9 picture in the letter box mode on a conventional TV Black bars will appear at the top and bottom of the screen Select this to play a 16 9 picture in the pan scan mode on a c...

Страница 29: ...password and then press ENTER button Note 2 1 In Stop mode press MENU button Press Cursor button to move to Setup and then press ENTER button 4 Enter the old password a new password and confirm new password The setting is complete 3 5 Press Cursor button to move to PASSWORD and then press ENTER button Press ENTER button Enter the password and then press ENTER button 2 1 Press MENU button Press Cur...

Страница 30: ... setup screen Press to select the desired USER and then press ENTER Press RETURN button to return to the previous level Press MENU button to exit the setup screen Select this to set the Samsung Logo image as your wallpaper Select this to set the desired image as your wallpaper COPY LOGO DATA will be displayed on the TV screen The selected wallpaper will be displayed You can select up to 3 wallpape...

Страница 31: ...dio mode Please use the Registration code to register this player with the DivX R video on demand format To learn more go to www divx com vod Note Powering off the main unit will automatically switch to the SACD mode Note Set steps 1 4 again if you want to switch to DVD AUDIO Play mode When Selecting DVD Play Mode DVD VIDEO set to play the DVD video contents contained on a DVD audio disc DVD AUDIO...

Страница 32: ...to SMALL Press RETURN button to return to the previous level Press MENU button to exit the setup screen 61 62 SETUP SMALL Select this when using the speakers NONE Select this when no speakers are connected 2 1 In Stop mode press MENU button Press Cursor button to move to Audio and then press ENTER button 3 Press Cursor button to move to TEST TONE and then press ENTER button The test tone will be s...

Страница 33: ...NTER button You can set the delay time for C between 00 and 05mSEC and for SL and SR between 00 and 15mSEC 4 3 5 Press Cursor button to move to DELAY TIME and then press ENTER button Press Cursor buttons to move to the desired speaker and then press ENTER button Press Cursor to set the Delay time 0 ms 3 ms 6 ms 9 ms 12 ms 15 ms Setting REAR SURROUND SPEAKERS If the distance of Df is equal to the d...

Страница 34: ...ouder as you move closer to 6dB and quieter as you get closer to 6dB Method 1 Whenadjustingtheaudioqualityusingthesetupscreen Press RETURN button to return to the previous level Press MENU button to exit the setup screen 66 Note SETUP Press Cursor buttons to select and adjust the desired item Press the buttons to adjust the settings Method 2 When manually adjusting with the SOUND EDIT button 2 1 A...

Страница 35: ...vious level Press MENU button to exit the setup screen Press RETURN button to return to the previous level Press MENU button to exit the setup screen SETUP AV SYNC Setup Audio menu appears 2 1 Setup menu appears AV SYNC screen appears 3 Press Cursor buttons to move to Audio and then press ENTER button Press Cursor buttons to move to AV SYNC and then press ENTER button Press the MENU button 4 You c...

Страница 36: ...connect to only one of the inputs L or R you cannot listen to surround sound Note SETUP CMX MPEG 2 AAC MPEG TA TUNED 1 2 You can select between 0 and 7 This sets the width of the center image The higher the setting the less sound comes from the center speaker You can select between 0 and 6 Incrementally adjusts the sound field DSP from the front or rear 3 4 When playing a DVD disc encoded with two...

Страница 37: ...t 2 minutes to complete 3 Adjust the volume control on the main unit as follows If the distance between the listener and the speaker is over 16 5 feet Set the main unit s volume to over 25 If the distance between the listener and the speaker is 10 to 16 5 feet Set the main unit s volume to 25 If the distance between the listener and the speaker is less than 10 feet Set the main unit s volume to 15...

Страница 38: ...Press MOVIE button Virtual Headphone Function Use headphones not supplied for private listening pleasure You can enjoy dynamic sound effects similar to that of 5 1 channel surround sound using conventional stereo headphones You can purchase headphones from most Electronics stores 1 2 Each time the button is pressed the selection alternates between V H P ON and V H P OFF Plug the headphones into th...

Страница 39: ... to a preset station press on the remote control to select a channel Refer to Step 2 on page 75 to automatically or manually tune in to a station 2 1 PRGM flashes in the display Tune in to a station 3 Example Presetting FM 89 1 in the memory Press TUNING CH to select 89 10 Press the TUNER button and select the FM band Press the TUNER MEMORY button before PRGM disappears from the display PRGM disap...

Страница 40: ...ou can set the time that the DVD player will shut itself off To cancel the sleep timer press SLEEP button until OFF appears on the display MISCELLANEOUS Adjusting Display Brightness You can adjust the brightness of the display on the main unit so it won t interfere with your movie viewing Press DIMMER button MUTE flashes in the display To switch the sound back on at the same volume as before press...

Страница 41: ...and press POWER If the TV turns off or on the setting is complete TV DVDRECEIVER Note MISCELLANEOUS 1 2 3 4 5 6 7 8 9 10 11 12 13 14 15 16 17 18 19 20 21 22 23 24 25 26 27 28 29 SAMSUNG ANAM DAEWOO LG HITACHI JVC SHARP SONY TOSHIBA SANYO MITSUBISHI MATSUSHITA TELEFUNKEN RCA PANASONIC SABA PHILIPS GRUNDIG ZENITH MIVAL NOBLEX EMERSON MAGNAVOX LOEWE THOMSON NORDMENDE LOEWE OPTA BLAUPUNKT SIEMENS TV B...

Страница 42: ...he disc Dolby Digital 5 1 CH Surround Sound is produced only if the disc is recorded with 5 1 channel sound Is the audio language correctly set to DOLBY DIGITAL 5 1 CH in the information display Dolby Digital 5 1 CH Surround Sound is not produced Symptom Check Remedy Is the TV power on Are the video cables connected properly Is the disc dirty or damaged A poorly manufactured disc may not be playab...

Страница 43: ...mese 1203 Gujarati 1352 Mongolian 1512 Serbian 1051 Aymara 1209 Hausa 1353 Moldavian 1513 Siswati 1052 Azerbaijani 1217 Hindi 1356 Marathi 1514 Sesotho 1053 Bashkir 1226 Croatian 1357 Malay 1515 Sundanese 1057 Byelorussian 1229 Hungarian 1358 Maltese 1516 Swedish 1059 Bulgarian 1233 Armenian 1363 Burmese 1517 Swahili 1060 Bihari 1235 Interlingua 1365 Nauru 1521 Tamil 1069 Bislama 1239 Interlingue ...

Страница 44: ...C F828 Sony Digital Camera DSC P73 Sony Digital Camera DSC T1 Sony Digital Camera DSC F88 Sony Digital Camera DSC M1 Sony Digital Camera DSC W1 Sony Digital Camera DSC T3 Sony Digital Camera Sora PDR T30 Toshiba Digital Camera Coolpix 5900 Nikon Digital Camera Coolpix S1 Nikon Digital Camera Coolpix 7600 Nikon Digital Camera DMC FX7 Panasonic Digital Camera DMC LS1 Panasonic Digital Camera DMC LZ2...

Страница 45: ...ms SAMSUNG does not warrant uninterrupted or error free operation of the product THERE ARE NO EXPRESS WARRANTIES OTHER THAN THOSE LISTED AND DESCRIBED ABOVE AND NO WARRANTIES WHETHER EXPRESS OR IMPLIED INCLUDING BUT NOT LIMITED TO ANY IMPLIED WARRANTIES OF MERCHANTABILITY OR FITNESS FOR A PARTICULAR PURPOSE SHALL APPLY AFTER THE EXPRESS WARRANTY PERIODS STATED ABOVE AND NO OTHER EXPRESS WARRANTY O...

Отзывы: